Identifying Child Item Types and Syncing Entities
This section discusses how to use the Item Type Matrix to identify child item types. It also discusses the processes that you must run each time that you create a new academic item type or make changes to an existing item type.
|
Page Name |
Definition Name |
Navigation |
Usage |
|---|---|---|---|
|
Item Type Matrix |
SSR_CHILD_ITEM_TYP |
|
Identify child item types and sync entities. |
Access the Item Type Matrix page ().
Image: Item Type Matrix page (1 of 3)
This example illustrates the fields and controls on the Item Type Matrix page (1 of 3). You can find definitions for the fields and controls later on this page.
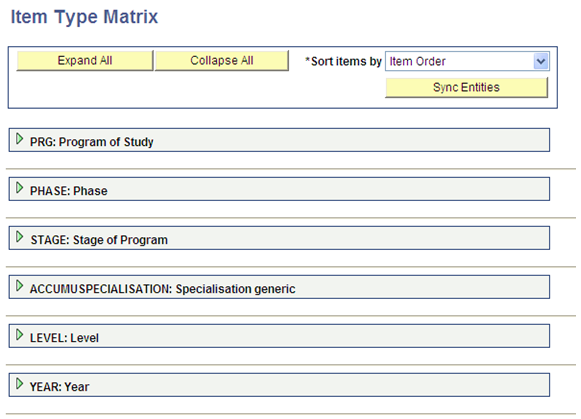
Image: Item Type Matrix page (2 of 3)
This example illustrates the fields and controls on the Item Type Matrix page (2 of 3). You can find definitions for the fields and controls later on this page.

Image: Item Type Matrix page (3 of 3)
This example illustrates the fields and controls on the Item Type Matrix page (3 of 3). You can find definitions for the fields and controls later on this page.
Identifying Child Item Types
As explained earlier in the “Setting Up Academic Item Types” section, the Item Order value of an academic item (defined on the Academic Item Type page) indicates which items are potential child items for that academic item.
After you create your academic item types, use the Item Type Matrix component to determine which item types (those with a higher item order than the item itself) can be defined as child item types for each academic item.
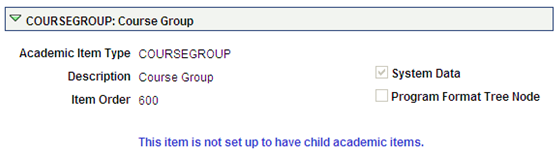
When the Child Academic Items check box is cleared on the Attributes page for an academic item type, a message appears in the Item Type Matrix for that item type: This item is not set up to have child academic items.
The Valid Child Item Types grid is refreshed whenever the component is opened. For each item type, the system retrieves all other academic item types with an item order (SSR_ITEM_TYPE.SSR_ITEM_LVL) that is greater than its own item order.
|
Field or Control |
Definition |
|---|---|
| Select |
Select this check box to identify the item as a valid child for the academic item type. Note: Only item types for which this check box is selected will be listed as potential child items in any prompt for this item. This applies in: Program Format definition. Academic Item Registry: adding child elements Academic Progress Tracker: adding child items and substituting items. See Setting Up Program Formats |
|
Field or Control |
Definition |
|---|---|
| Sort items by |
Sort by Item Order, Item Type, or Item Description. The default value is Item Order. |
Syncing Entities
If you implemented Program Enrollment before Bundle 29 / Additional Features April 2013, you must run the processes listed here after you apply Bundle 29.
Each time that you create a new academic item type, make changes to an existing academic item type, or set or make changes to the child item matrix for an academic item type, you must run the following processes:
Item Type Matrix Sync Entities
Here on the Item Type Matrix page (SACR, Product Related, Student Records, Program Enrollment, Item Type Matrix):
Click the Sync Entities button. This initiates the SSR_PE_SYNC process.
Check the Process Monitor to ensure that the process completes successfully.
This process can be scheduled using the process scheduler
Note: If you make changes on the Item Matrix page, be sure to save those changes before you launch the Sync Entities Process.
Entity Property Sync
Go to the Entity Property Sync page (SACR, System Administration, Entity, Entity Property Sync) and:
Click the Sync All Entities button.
Check the Process Monitor to ensure that the process completes successfully.
Wipe Entity Cache
Remain on the Entity Property Sync page and:
After the Sync All Entity Properties process has completed successfully, click the Wipe Entity Cache button.
Check the Process Monitor to ensure that the process completes successfully.
See Setting Up Entity Registry
Note: You must also run these processes when you add common attributes for the AIR (SSR_AIR_HDR, SSR_AIR_ELEM) and APT (SSR_APT_HDR) record contexts.
See Using Item Attributes to Extend AIR Data Elements
See Using Item Attributes to Extend APT Instance Header Data Elements