Setting Up an Activity Management Framework
This section discusses how to:
Define content categories.
Define content devices.
Define exam types.
Define forms of identification.
Define a result scale.
Define content messages.
Define academic periods.
Define extenuating circumstances.
Define inclusion types.
Review date sources.
Define date settings.
Define action dates.
Define result dates.
Understanding Activity and Result Dates for Self Service
The Date Sources, Date Settings, Action Dates, and Result Dates components comprise a structure that allows schools to establish self-service controls for students and instructional staff (faculty and exam staff). This feature is designed to be a one-time setup using delivered date sources, negating the need to set up these controls on a term-by-term basis.
You must select a date source to control when to begin and end specific access for actions and results. Similar to the dynamic date feature, you have the ability to indicate how many days before or after this date the controls should begin or end.
For students, you must define when optional activities can be selected. For example, students may have a choice of submitting either a written report or presenting an oral report. You must define the range of dates, using the delivered date sources, that a student has to make that choice. For instance, your institution may want students to begin their selection of an optional assessment item on the session start date, but complete this selection five days before the assessment item due date. Define these dates on the Action Dates component. These can be defined down to the academic program level. If your institution does not allow optional selections of activities, you do not need to set up Action Dates.
You must also define when students can view their course activities results. Set this up on the Result Dates component using the Student Self Service View Release Type. Again, you can define these down to the academic program level, but you can also restrict the view of results to specific result statuses.
For instructional staff, you must define when to display the result rosters in the Activity Management WorkCenter and whether they can manually enter results (grades) and calculate results. Using the Result Dates component with the Faculty Self Service Update Release Type, your institution can define dates for specific academic organizations and which result access – calculate or grade – can be performed.
See the following sections for more details about defining activity and result dates for self service:
Reviewing date sources.
Defining date settings.
Defining action dates.
Defining result dates.
|
Page Name |
Definition Name |
Navigation |
Usage |
|---|---|---|---|
|
Content Categories |
SSR_AC_TYPE_TBL |
|
Set up content categories used in activity management. |
|
Content Devices |
SSR_AC_DEVICES_TBL |
|
Set up content devices used in activity management. |
|
Exam Types |
SSR_AC_EXAMTYP_TBL |
|
Set up exam types used in activity management. |
|
Forms of Identification |
SSR_AC_ID_REQ_TBL |
|
Set up forms of ID accepted by your institution as part of activity management. |
|
Result Scale Table |
SSR_GRADE_MAP_TBL |
|
Define a result scale that will be attached to the various content types of a course. |
|
Content Messages |
SSR_AC_MESSAGES |
|
Set up messaging that will be used in activity management. |
|
Academic Period Table |
SSR_PERIOD_TBL |
|
Set up academic periods used as part of activity management. |
|
Activity Extenuating Circumstances |
SSR_AC_ITEMTYPE |
|
Define reason codes specific to an activity or a result. |
|
Inclusion Types |
SSR_AC_INCLTYPE |
|
Activate inclusion types to be used in the Activity Definition. |
|
Date Sources |
SSR_ADC_SETUP |
|
Indicates the available records when setting activity dates. |
|
Date Settings |
SSR_ADC_MAPPNG |
|
Set date sources for actions and results. |
|
Action Dates |
SSR_ADC_ACTN_CTRL |
|
Set parameters for when students can select optional activities. |
|
Result Dates |
SSR_ADC_RSLT_CTRL |
|
Set parameters for when instructional staff can grade activities. |
Access the Content Categories page ().
Image: Content Categories page
This example illustrates the fields and controls on the Content Categories page. You can find definitions for the fields and controls later on this page.
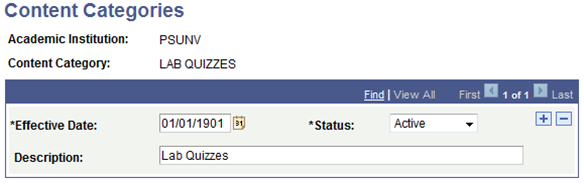
You should define content categories if categories will be utilized as a content type in your activity content tree. Content categories are used to group individual content items into a category that has meaning to your institution. This setup is optional, but provides the ability to set calculation rules against a given category, if necessary, the ability to group assignments for display purposes, or both. Categories are child items to courses and components in the content tree structure. They can also be children to conditions. Additional examples of categories include reading assignments, quizzes, in-class tests, research, and homework.
Access the Content Devices page ().
Image: Content Devices page
This example illustrates the fields and controls on the Content Devices page. You can find definitions for the fields and controls later on this page.
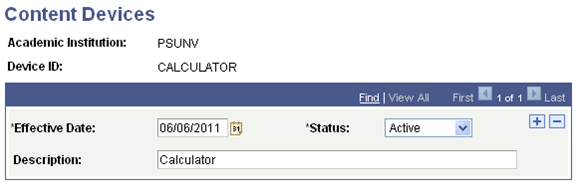
A content device is any item that a student is allowed to utilize during an examination or required for a course or to complete a piece of coursework. Devices are associated with specific content items in the activity registry. Content devices are optional. Additional examples of content devices include dictionary, thesaurus, textbook, digital camera, and paint brushes.
Access the Exam Types page ().
Image: Exam Types page
This example illustrates the fields and controls on the Exam Types page. You can find definitions for the fields and controls later on this page.
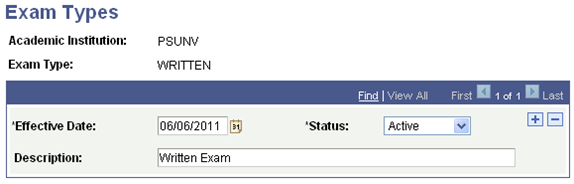
Exam types are required for course-level examinations and are a means to further define the nature of an exam; they are associated with an exam content item on the activity registry. Additional examples of exam types include open-book, closed-book, oral, and final.
Access the Forms of Identification page ().
Image: Forms of Identification page
This example illustrates the fields and controls on the Forms of Identification page. You can find definitions for the fields and controls later on this page.
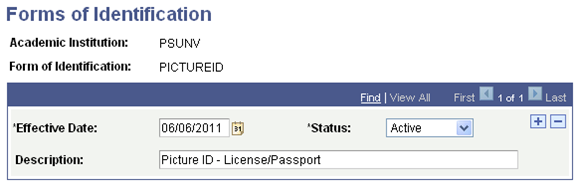
Forms of identification are any items that a student may be required to provide prior to entrance into an examination at your institution. This setup is optional. Forms of identification are associated with a specific exam content item in the activity registry. Additional examples of forms of identification include examination entry form, campus ID, and waiver form. Forms of Identification can be established at the Academic Institution, Career, or Organization level and can be applied automatically to course activity registries.
Access the Result Scale Table page ().
Image: Result Scale Table page (1 of 2)
This example illustrates the fields and controls on the Result Scale Table page (1 of 2). You can find definitions for the fields and controls later on this page.
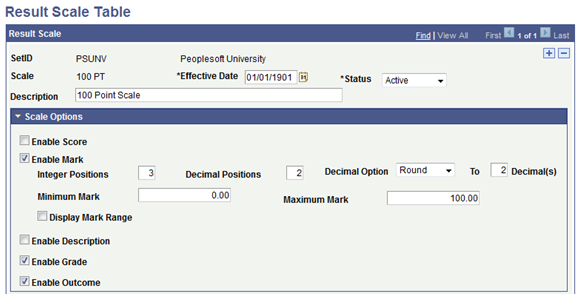
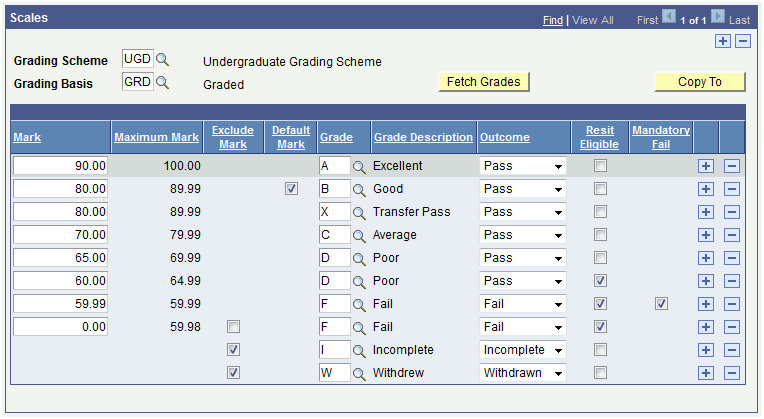
Image: Result Scale Table page (2 of 2)
This example illustrates the fields and controls on the Result Scale Table page (2 of 2). You can find definitions for the fields and controls later on this page.
On this page you will establish how scores and marks map to grades and outcomes. If using program enrollment, users will define which of these fields, calculated at the activity level, they want to update to a student's Academic Progress Tracker (APT). The Grade In/Official value can also populate the Student Enroll record (STDNT_ENRL), in much the same way as the system currently does in the Student Records core grading process. A Result Scale can be established at the Academic Institution, Career, or Organization level and can be applied automatically to course activity registries.
Scale Options
The options you select in this group box determine the appearance of the Scales group box below.
|
Field or Control |
Definition |
|---|---|
| Enable Score |
Select this check box to display the Score column below, and define the field as either Character or Numeric. If you enable the Score column, users can enter a value that can be translated to a Mark. This check box is cleared by default. The score is an optional result field that can be used to map a value that is not used in calculation to a mark that will be used in calculation. |
| Score Value Field Type |
This field appears when you select the Enable Score check box. Specify whether the free-form Score will be entered as a Character or Numeric value. |
| Integer Positions, Decimal Positions |
These fields appear when the Score Value Field Type is Numeric. Specify to what position the integer and decimal fields will use. |
| Enable Mark |
Select this check box to display the Mark column below. Marks are required for those scales where result values require calculation. This check box is selected by default. |
| Integer Positions, Decimal Positions |
These fields appear when the Enable Mark check box is selected. Specify to what position the integer and decimal fields will use. The default value is 0; you must define the position values. |
| Decimal Option, To __ Decimals |
Indicate how to round or truncate the decimal position for an entered or calculated mark on a student's record. |
| Minimum Mark, Maximum Mark |
These fields appear when the Enable Mark check box is selected. Together, they indicate the numerical range of the scale; that range is used to validate entered marks against a student's record. During the grading process if an entered mark falls outside the range of these minimum and maximum values, the user receives an error. |
| Display Mark Range |
This field appears when the Enable Mark check box is selected. Select the check box to allow users to view the upper end of the range for each mark entered. The upper end of the range appears in the Maximum Mark column of the Scale grid below. This check box is cleared by default. |
| Enable Description |
Select this check box to display the Score/Mark Description column below. This check box is cleared by default. |
| Enable Grade |
Select this check box to display the Grade and Grade Description columns below. If you select this check box, the Grading Scheme and Grading Basis fields also appear. This check box is selected by default. Note: Currently, to enter results on the Individual Activity Manager (IAM) a result scale must possess a student's enrollment grading scheme/grade basis. |
| Enable Outcome |
Select this check box to display the Outcome column below, where you can define the outcome of a score/mark/grade combination. This check box is selected by default. |
Scales
|
Field or Control |
Definition |
|---|---|
| Grading Scheme |
Identify the grading scheme from which the grade basis and grade will be mapped. A result scale can have multiple grading schemes and grade bases, but the course to which the result ID is associated must have one of the grading scheme and grade bases combinations defined here. |
| Grading Basis |
Identify the grade basis from which the grade will be mapped. |
| Fetch Grades |
You can click this button after a grading scheme and basis have been entered. The system displays all grades defined on the grade table for the given grading scheme and grading basis. The system then displays a message when grades are fetched and displays them here. Note that you can delete any grade from the scale after the fetch process is complete. |
| Copy From |
You can click this button if the Enable Grade check box is selected. To use Copy From, a previously saved scale within this result scale must exist. To execute the copy, insert a new row; enter the Grading Scheme and Grading Basis, then select Copy From. |
| Copy To |
You can click this button if the Enable Grade check box is selected and a previously saved scale exists. |
| Score |
This column appears if the Enable Score check box is selected above. Use this field if the initial result provided to the student differs from the corresponding mark or grade field. The value entered here maps to the specific mark value. If you use this column, the Display Mark Range and Maximum Mark fields are disabled. |
| Mark |
This column appears if the Enable Mark check box is selected above. The system maps marks in one of two ways:
Use this field, in combination with the Maximum Mark field, to indicate the range of each row. |
| Maximum Mark |
This column appears if the Display Mark Range check box is selected above. Use this field, in combination with the Mark field, to show the full range of a specific row. The value that appears here is derived from the actual values entered in the Mark column. |
| Exclude Mark |
This check box appears when the Mark value of a row is zero (0.00). Select this check box when a mark should not be used in a calculation. Rows containing grade outcomes such as Incomplete and Withdrawn are the most likely candidates to be excluded. |
| Default Mark |
This check box appears when there is duplication in the Mark column. When duplication occurs, select which mark the system should use for calculation purposes. In the above example, a student who earns a mark between 60.00 and 69.99 will receive a grade of D / Poor by default; faculty and administrative users have the ability to override and change the grade to P / Pass or X / Transfer Pass where necessary for individual students. |
| Grade |
The values in this column are retrieved from the Grade Table when you select the Fetch button; you can also enter them manually. You can delete any fetched grade values. |
| Outcome |
Select Passed, Failed, Withdrawn, Audit, or Incomplete. The Outcome (SSR_RESULTS_STATUS ) is populated based on the following logic when the grade field is populated:
Note: Any values added to SSR_RESULTS_STATUS must also be set up on SSR_IAM_OUTCOME. |
| Resit Eligible |
Indicate which mark, grade, and outcome combinations are eligible for reassessment. This field works in conjunction with the Resit Inclusion defined on the Activity Registry page and maintained on the Activity Manager page. |
| Mandatory Fail |
This feature is used with the Mandatory Pass feature set up in the Activity Registry or the Activity Manager. It allows schools to indicate that if a particular activity of a course is failed, then the student will fail the overall course. If an activity is noted as a Mandatory Pass and the student fails it, the system will populate the mark indicated here as the Mandatory Fail result on the course result. In the example above—a student who fails an activity required as Mandatory Pass—the system inserts a course result row with a mark of 59.99, the grade of F, and the outcome of Fail. Any mark/grade/outcome combination can be set as the Mandatory Fail row. Another common setting for this the result row may be 0.00 / F / Fail. |
Access the Content Messages page ().
Image: Content Messages page
This example illustrates the fields and controls on the Content Messages page. You can find definitions for the fields and controls later on this page.
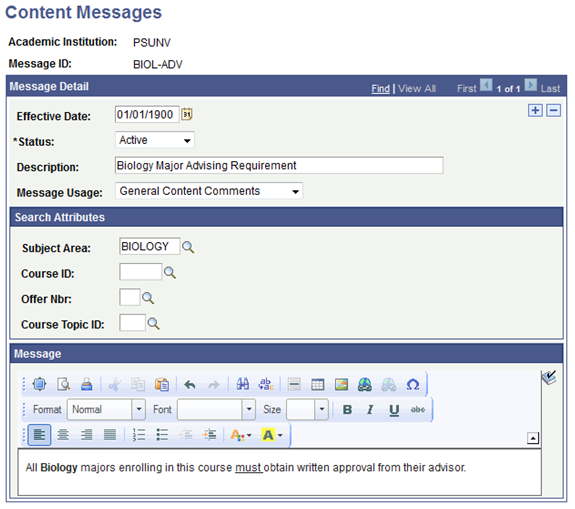
Content messages that you create here can be used within the activity registry. You can also enter free-form messages directly into the activity registry. Content messages are created as either General Content Comments or Staff Instructions. General content comments are directives for students and staff and are associated with content types in the activity. Staff instructions are associated with examination staff in the activity registry. Staff instructions are only visible to staff members assigned to a given exam.
|
Field or Control |
Definition |
|---|---|
| Message Usage |
Select either General Content Comments or Staff Instructions. General content comments are prompted as content notes in the activity registry for each content type. Staff instructions are prompted as administrative instructions in the Staffing Requirements section in the activity registry for exam content types. |
| Subject Area, Course ID, Offer Nbr (number), Course Topic ID |
These fields serve as search filters in the activity registry and activity manager for content notes and administrative instructions. Add subject, course ID, offering number, or course topic to aid in searching on the activity registry or activity manager. |
| Message |
Enter text here to populate the Message ID prompt in content notes or administrative instructions (based on message usage) in the activity registry. |
Access the Academic Period Table page ().
Image: Academic Period table page
This example illustrates the fields and controls on the Academic Period table page. You can find definitions for the fields and controls later on this page.
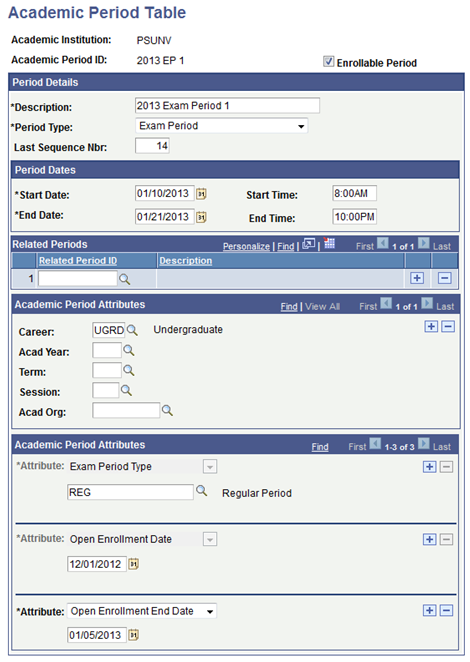
Academic periods are institutionally defined time periods that can be created to support exams in Activity Management. The Period Type of Exam Period is delivered for this purpose. Exam periods will be associated with exams in the Activity Generator, Activity Manager, and the Section Manager. The Program Enrollment feature also utilizes Academic Periods but with a different Period Type.
|
Field or Control |
Definition |
|---|---|
| Period Type |
Select Exam Period for Activity Management. Additional period types are delivered for Program Enrollment. This field indicates the type of academic period. When the Period Type is Exam Period, the Academic Period Attributes section becomes available. |
| Last Section Number |
This field indicates the most recent section number associated with an exam section in the Section Manager. |
| Start Date |
The beginning date of the academic period being defined. |
| Start Time |
The beginning time of the academic period being defined. |
| End Date |
The final date of the academic period being defined. |
| End Time |
The final time of the academic period being defined. |
| Related Period ID |
For future use. |
| Career |
Enter the career(s) for which this academic period will be applicable. When associating an exam period with a course exam, the career entered here must match the career associated with the course. |
| Academic Year |
For future use. This attribute will be used at a later date to associate an academic period with an academic year. |
| Term |
Enter a term to associate it with the academic period. This association is used as follows:
|
| Session |
Enter a session to associate it with the academic period. This association is used as follows: it controls which academic periods are available to students who are enrolled in a particular term/session combination. |
| Acad Org |
For future use. This attribute will be used at a later date to restrict processing. |
| Academic Period Attributes Section |
This section appears when the Period Type is Exam Period and allows users to define values for delivered common attributes. The record context used for the Academic Period Table is the Period Table Attributes (SSR_PERIOD_TBL) record. The entity names used for the Activity Registry are prefixed by 'SSR'. The delivered attributes are Exam Period Type, Enrollment Start Date, Enrollment End Date, Fully Graded Date, Late Enrollment Date, and Service Indicator. Of these, Exam Period Type is required. |
| Exam Period Type |
Select Regular or Resit. When the period type is exam period, indicate if the period is designed to be a regular exam period or an exam period designated for resits only. The period type will be analyzed during the reassessment evaluation process (see Resit Period Limit Assignment). |
| Enrollment Start Date |
Use this field to indicate the first date that students are able to select an exam activity during this academic period. |
| Enrollment End Date |
Use this field to indicate the last date that students are able to select an exam activity during this academic period. |
| Fully Graded Date |
Use this field to identify the date for an exam period where activities would be considered completely graded. |
| Late Enrollment Date |
Use this field to indicate the first date that begins the late enrollment period to select an exam activity during this academic period. |
| Service Impact |
Use this field to enter the service impact that would prohibit a student from selecting an exam activity in this academic period. |
Access Activity Extenuating Circumstances page
Image: Activity Extenuating Circumstances page
This example illustrates the fields and controls on the Activity Extenuating Circumstances page. You can find definitions for the fields and controls later on this page.

This component allows administrative users to define reason codes specific to an activity, a result, or both. The extenuating circumstance is stored and can be used to drive further processing. For instance, if a student is sick on the day of the exam, users can record this against the exam activity. With future processing the system will know to defer the student’s attempt to a later exam period (Rules Engine would be incorporated into this processing).
|
Field or Control |
Definition |
|---|---|
| Content Definition |
Indicate to which Activity Definition the extenuating circumstance is applicable. Currently for Activity Management the only value is Coursework. |
| Extenuating Circumstance |
User-defined code to identify the extenuating circumstance. |
| Long Description |
Long description field to explain the extenuating circumstance. In the future, this information can be provided to students and faculty in self service. |
| Show in Faculty Self Service |
Select this check box to display the extenuating circumstances prompt in faculty self service. |
| Show in Student Self Service |
Select this check box to display the chosen extenuating circumstance to students in student self service. |
| Valid for Activity Status |
Indicates whether the extenuating circumstance is applicable to student’s activity status. For example, if the student missed an assignment due to illness this extenuating circumstance can be recorded against the student's assignment activity on the IAM component. |
| Valid for Result Status |
Indicates whether the extenuating circumstance is applicable to student’s result status. For example, if a student sat for an exam but was ill, this extenuating circumstance can be recorded against the exam result to explain a poor result. This would be recorded on the Result Roster component or the IAM Result for an individual student. |
| Applicable Contents |
Indicates to which content types the extenuating circumstance is applicable. |
Access the Inclusion Types page ().
Image: Inclusion Types page
This example illustrates the fields and controls on the Inclusion Types page. You can find definitions for the fields and controls later on this page.
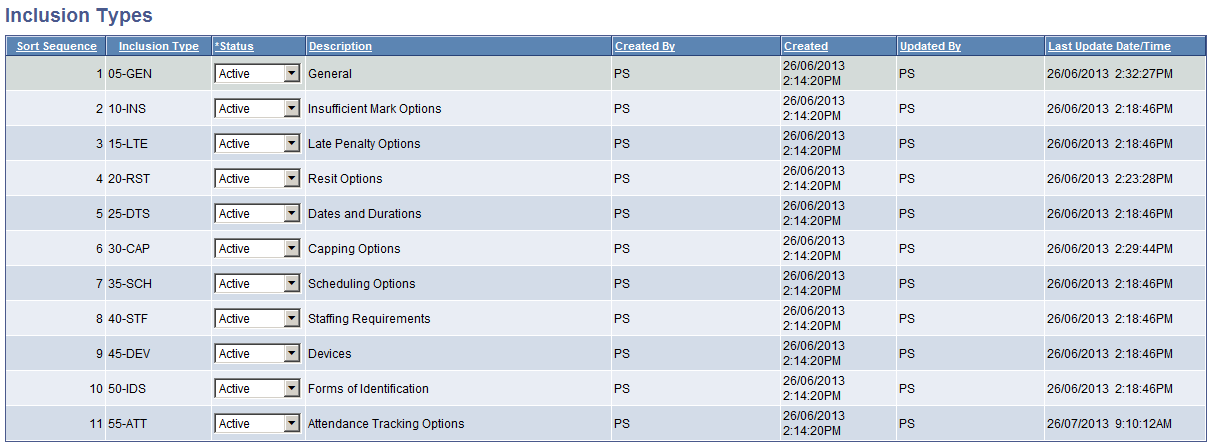
This page lists the delivered inclusion records available for use in the Activity Management feature. The statuses are delivered with an Active Status. Deactivate any inclusion types that your institution will not use in creating activity management coursework structures.
Access the Date Sources page ().
Image: Date Sources page
This example illustrates the fields and controls on the Date Sources page. You can find definitions for the fields and controls later on this page.
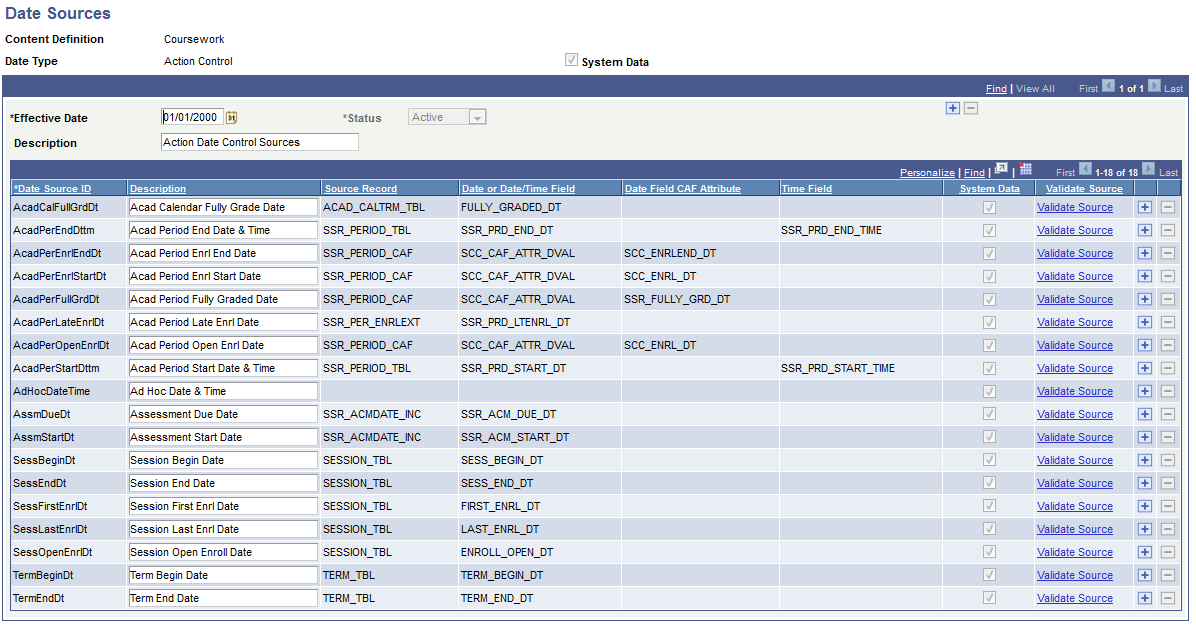
This component defines which dates in the system can be used as landmarks to control when students are allowed to select optional activities and review results in self service. Users also select from these dates when the result roster becomes available to instructional staff in the Activity Management WorkCenter and which actions can be performed. Eighteen date sources are delivered as system data and can be used when setting date controls for actions (students) and results (students and instructional staff). In most cases, no action is required on this page.
An Ad Hoc date source is provided that allows users to enter a specific date and time for activity actions and results. Keep in mind that unlike the other delivered date sources, an ad hoc date would need to be updated on a regular basis.
Users can also add new date sources if needed, but depending on the record keys this could require modifications to the SSR_ACTIVITY:UTIL app package.
|
Field or Control |
Definition |
|---|---|
| Content Definition |
The delivered content definition value for Activity Management is Coursework. |
| Date Type |
This indicates if the dates listed are for actions or results. Two date types are delivered: Action Control and Result Control. Action controls are specific to students being able to select optional activities in self service. Result controls are used to display results to students and to open the result roster to instructional staff for grading purposes. |
| System Data |
An indicator showing that system data exists on this page. |
| Date Source ID |
A unique identifier that stores the details of the date and time for each date source. |
| Date Field CAF Attribute |
The Common Attribute Framework date field referenced. |
| System Data |
Indicates whether the data is delivered as system data. |
| Validate Sources |
Select to review any restrictions for the specific Date Source on the Date Source Validation secondary page. |
Access the Date Settings page ().
Image: Date Settings page
This example illustrates the fields and controls on the Date Settings page. You can find definitions for the fields and controls later on this page.
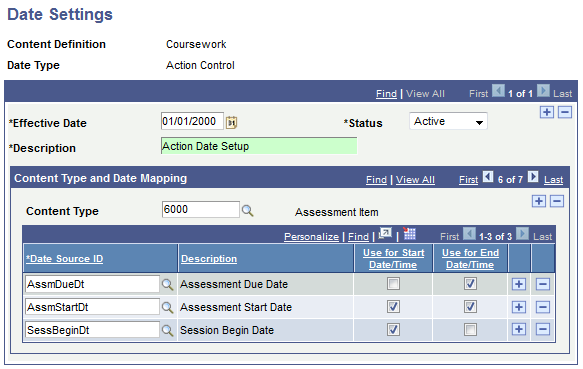
This page is used to define what date sources will be used for each content type of the activity management structure. Date sources are specified as either Action Control or Result Control. Only establish date settings for action control if your school utilizes optional activities. If activities are always defined as mandatory, it is not necessary to define a date setting structure for the action control date type.
Regardless of the date type selected, you will define for each available content type all the applicable start and end date sources that will be used. In the above example, one start date and two end dates are identified for the action control for the course content type. When creating Action Date IDs on the Action Date page, the Session Start Date is available for selection as the start date and the Assessment Start Date and Assessment Due Date are available for selection as the end date.
Note: For the date type Action Control, the content type Component is not available for selection. Component selection is based on enrollment and is not available in the activity management structure as an optional activity. However, Course is listed to support Exam Only Course selection, although that feature is not yet functional.
|
Field or Control |
Definition |
|---|---|
| Content Definition |
The delivered content definition value for Activity Management is Coursework. |
| Date Type |
This indicates if the dates listed are for activity actions or activity results. Two date types are delivered: Action Control and Result Control. Action controls are specific to students being able to select optional activities in self service. Result controls are used to display results to students and to open the result roster to instructional staff for grading purposes. |
| Content Type |
Enter a row for each content type for which you will enter an action date or an result date. |
| Date Source ID |
Enter the date source ID you will use as either a start or end date for the given content type. |
| Use for Start Date/Time |
Select to indicate if the date source will be used as a start date source. |
| Use for End Date/Time |
Select to indicate if the date source will be used as an end date source. |
Access the Action Dates page ().
Image: Action Dates page
This example illustrates the fields and controls on the Action Dates page. You can find definitions for the fields and controls later on this page.
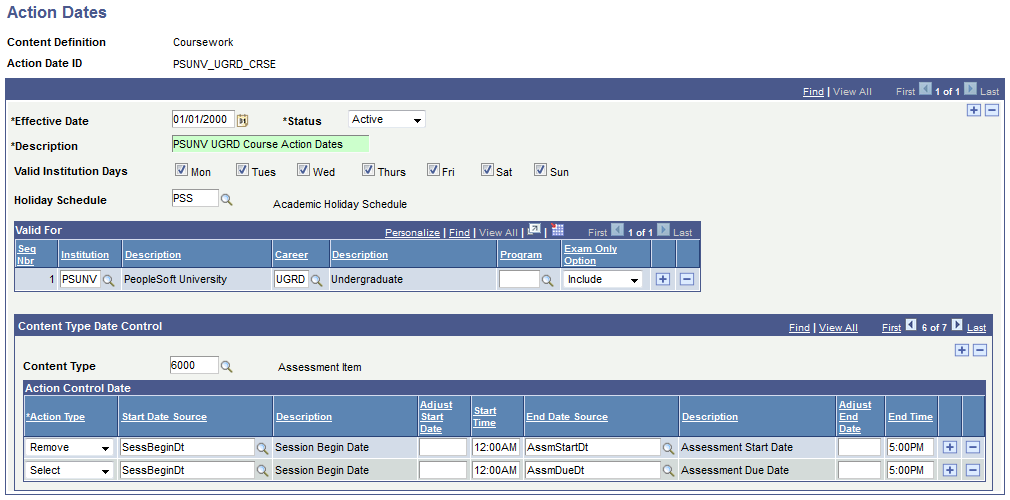
This component controls when students can perform certain actions for optional content types in self service.
|
Field or Control |
Definition |
|---|---|
| Content Definition |
The delivered content definition value for Activity Management is Coursework. |
| Activity Action ID |
Add a unique identifier when adding a new Action Date ID. |
| Valid Institution Days |
Indicate the valid days of the week to count when using the Adjust Start Date and Adjust End Date fields below. |
| Holiday Schedule |
Indicate which holiday schedule to use when using the Adjust Start Date and Adjust End Date fields below. |
| Institution |
Enter the academic institution to which the Action Date ID applies. A blank value will apply to all academic institutions. |
| Career |
Enter the academic career to which the Action Date ID applies. A blank value will apply to all academic careers of the institution. |
| Program |
Enter the academic program to which the Action Date ID applies. A blank value will apply to all academic programs of the career. |
| Exam Only Option |
(for future use) Three options are available: Include to have the Action Date ID apply to Exam Only Courses, as well as regular courses; Exclude to not have the Action Date ID apply to exam only courses, or Exam Only to have the Action Date ID only apply to exam only courses. If different action dates will exist for exam only and non-exam only courses, create different Action Date IDs. |
| Content Type |
Enter a row for each content type for which the Action Date ID applies. You are not able to enter Component as this is not an optional content type. |
| Action Type |
Select all applicable action types for the content type. Select and Remove are applicable actions for all content types. The exam section also has actions of Confirm and Unconfirm. The exam also includes Resit Selection and Resit Remove options. |
| Start Date Source |
Select the appropriate date source. You will only see those sources defined for the specific content type that were defined on the Date Setting component as a action control start date source. |
| Adjust Start Date |
Enter the number of days before or after the source date for which the action should be allowed. For instance, if selections can be performed starting three days after the session start date, enter 3. |
| Use Time from Start Source |
Select to automatically use the start time associated with this source date. This field is only visible when the date source is AcadPerStartDttm or AcadPerEndDttm. Set up the academic period start time on the Academic Period Table. |
| Start Time |
Enter a specific time the action should be allowed to start. A blank value will default the action to begin at 12:00AM. |
| End Date Source |
Select the appropriate date source. You will only see those sources defined for the specific content type that were defined on the Date Setting component as an action control end date source. |
| Adjust End Date |
Enter the number of days before or after the source date for which the action should be ended. For instance, if selections should end one day prior to the assessment start date, enter -1. |
| Use Time from End Source |
Select to automatically use the end time associated with this source date. This field is only visible when the date source is AcadPerStartDttm or AcadPerEndDttm. Set up the academic period end time on the Academic Period Table. |
| End Time |
Enter a specific time the action should end. A blank value will default the action to end at 11:59PM. |
Access the Result Dates page ().
Image: Result Dates page — Student View
This example illustrates the fields and controls on the Result Dates page — Student View. You can find definitions for the fields and controls later on this page.
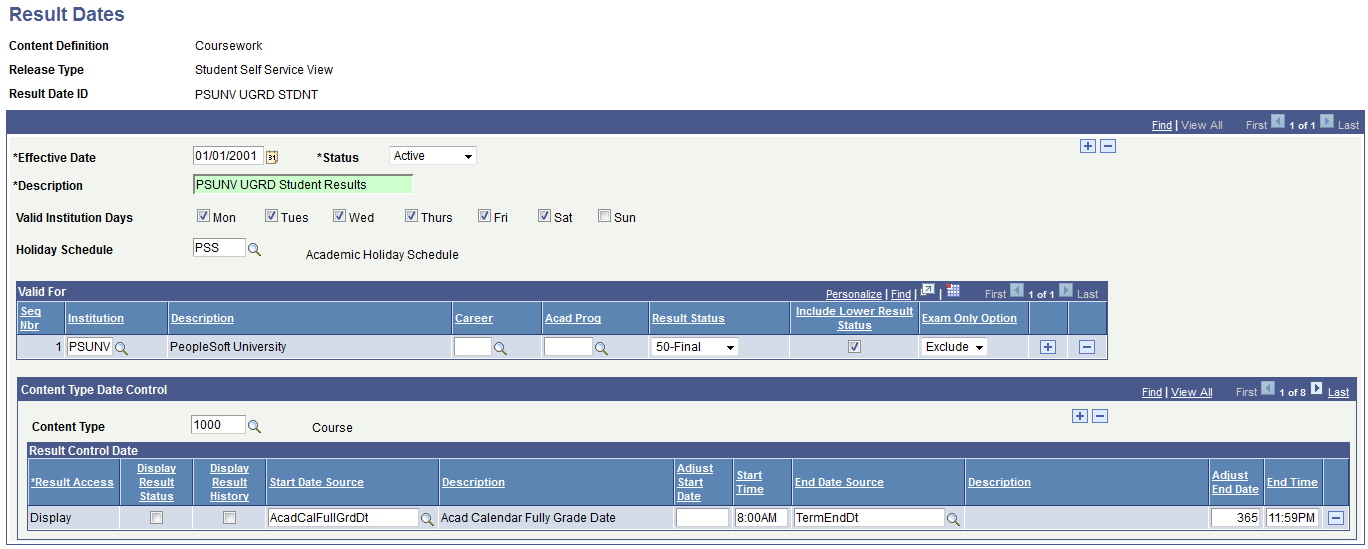
Image: Result Dates page — Faculty View
This example illustrates the fields and controls on the Result Dates page — Faculty View. You can find definitions for the fields and controls later on this page.
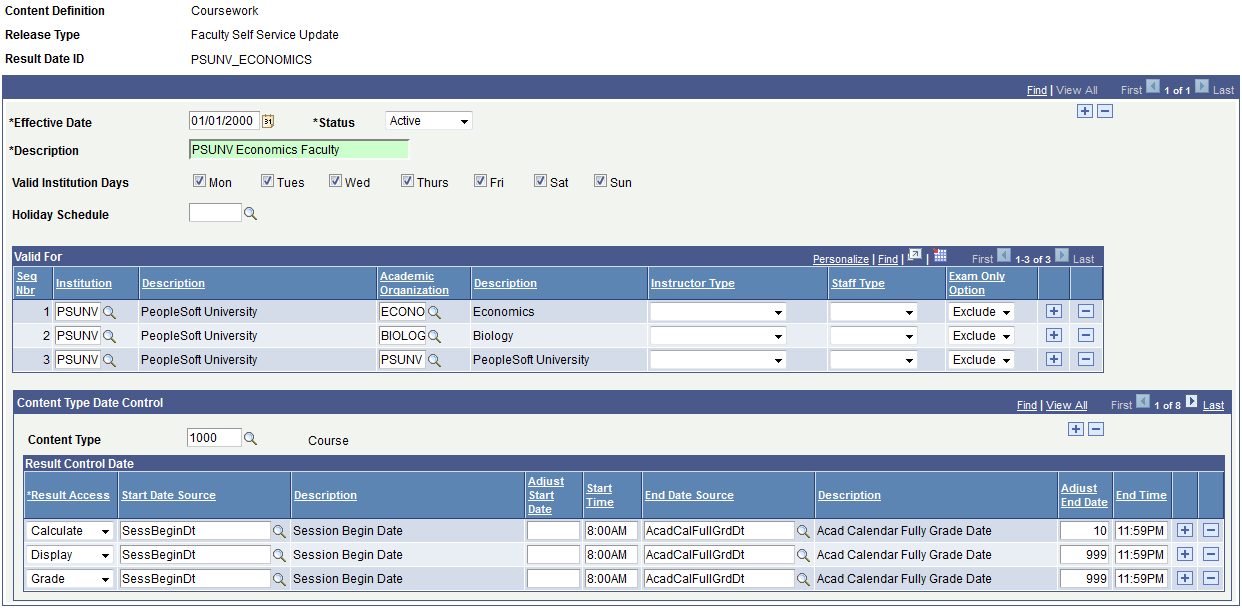
This component controls release of results to students and roster access for instructional staff. Student result dates should be created using the Release Type Student Self Service View, while staff result dates should use the Release Type Faculty Self Service Update.
|
Field or Control |
Definition |
|---|---|
| Content Definition |
The delivered content definition value for Activity Management is Coursework. |
| Release Type |
Two release types are delivered: Student Self Service Update which is designed to only display results, and Faculty Self Service Update which is designed with calculate, grade and display options. |
| Result Release ID |
This is a unique identifier you create when adding a new Result Date ID. |
| Valid Days |
Indicate the valid days of the week to count when using the Adjust Start Date and Adjust End Date fields below. |
| Holiday Schedule |
Indicate which holiday schedule to use when using the Adjust Start Date and Adjust End Date fields below. |
The following fields are valid for the Student Self Service View:
|
Field or Control |
Definition |
|---|---|
| Institution |
Enter the academic institution to which the Result Date ID applies. A blank value will apply to all academic institutions. |
| Career |
Enter the academic career to which the Result Date ID applies. A blank value will apply to all academic careers of the institution. |
| Program |
Enter the academic program to which the Result Date ID applies. A blank value will apply to all academic programs of the career. |
| Result Status |
Enter the result status to display for the Result Date ID. A blank value will display all applicable result statuses. |
| Include Lower Result Status |
Select to display the indicated result status and all other result statuses with a lower number. For example, if you select Result Status 10-Calculated and then select this check box, the 07-Imported, 05-Manual, and 00-Undetermined statuses will also be displayed. |
| Exam Only Option |
Three options are available: Include to have the Result Date ID apply to Exam Only Courses, as well as regular courses; Exclude to not have the Result Date ID apply to Exam Only Courses, or Exam Only to have the Result Date ID only apply to Exam Only Courses. If different result dates will exist for exam only and non-exam only courses, create different Result Date IDs. |
The following fields are valid for the Faculty Self Service Update:
|
Field or Control |
Definition |
|---|---|
| Institution |
Enter the academic institution to which the Result Date ID applies. A blank value will apply to all academic institutions. |
| Organization |
Enter the academic organization to which the Result Date ID applies. A blank value will apply to all academic organizations of the institution. |
| Instructor Type |
Enter the instructor type to which the Result Date ID applies. The instructor type is associated to instructors on the Meetings tab of the Class Schedule. A blank value will apply to all instructor types associated to the class. |
| Staff Type |
Enter the staff type to which the Result Date ID applies. The staff type is associated with exam staff in the Section Manager. A blank value will apply to all staff types associated to the exam section. |
| Exam Only Option |
Three options are available: Include to have the Result Date ID apply to exam only courses, as well as regular courses; Exclude to not have the Result Date ID apply to exam only courses, or Exam Only to have the Result Date ID only apply to exam only courses. If different result dates will exist for exam only and non-exam only courses, create different Result Date IDs. |
| Content Type |
Enter a row for each content type for which the Result Date ID applies. The following additional system settings must also be in place for results to display: the specified Result Type must be selected to Show in Student Self-Service (Result Type Table) and the activity must be identified as Accessible (Activity Manager). |
| Result Access |
This value defaults to Display when the release type is Student Self Service View. When using the Faculty Self Service Update release type the values are:
|
| Start Date Source |
Select the appropriate date source. You will only see those sources defined for the specific content type that were defined on the Date Setting component as a result control start date source. |
| Adjust Start Date |
Enter the number of days before or after the source date for which the result action should be allowed. For instance, if results can be viewed starting two days after the assessment item due date, enter 2. |
| Use Time from Start Source |
Select to automatically use the start time associated with this source date. This field is only visible when the date source is AcadPerStartDttm or AcadPerEndDttm. Set up the academic period start time on the Academic Period Table. |
| Start Time |
Enter a specific time the action should be allowed to start. A blank value will default the action to begin at 12:00AM. |
| End Date Source |
Select the appropriate date source. You will only see those sources defined for the specific content type that were defined on the Date Setting component as a result control end date source. |
| Adjust End Date |
Enter the number of days before or after the source date for which the action should be ended. For instance, if results can be viewed forever, enter 999. |
| Use Time from End Source |
Select to automatically use the end time associated with this source date. This field is only visible when the date source is AcadPerStartDttm or AcadPerEndDttm. The setup of the academic period end time is done on the Academic Period Table. |
| End Time |
Enter a specific time the action should end. A blank value will default the action to end at 11:59PM. |