Deleting Planning Nodes
The Delete Planning Node process allows you to delete planning node(s) that may have been created in error. Alternatively, planning nodes might need to be deleted if program requirements were changed after APT instances had been built or updated for a group of students. Whatever the reason, the APT Delete process is intended for use on an exceptional basis and it is expected that a very limited group of users would have access to run the process. As a safeguard against accidental deletes, the process never deletes a planning node if there has been any activity or update performed on it.
The process does not delete (that is, the selected student/planning node is skipped) if any of the following conditions are true:
The APT Attempt Status of the Planning Node is a status other than activated or null.
The Satisfied check box is selected for an APT Item (for the planning node or child items).
The APT Item outcome is not null.
Results exist for the Planning node or one of its child items.
The APT Item Attempt (for the planning node) approval value is anything other than Not Required.
The Planning Node item/attempt or one of its child items/attempt is locked.
Child Course Academic Item(s) have a progress level other than planned.
No Enrollment or Transfer Credit data exists for the planning node.
No Items within the planning node are substitutes/replacements for other items in the instance.
This section discusses how to run the Delete Planning Nodes process.
|
Page Name |
Definition Name |
Navigation |
Usage |
|---|---|---|---|
|
Delete Planning Node(s) |
SSR_APT_DEL_RUNCNT |
|
Delete planning nodes. |
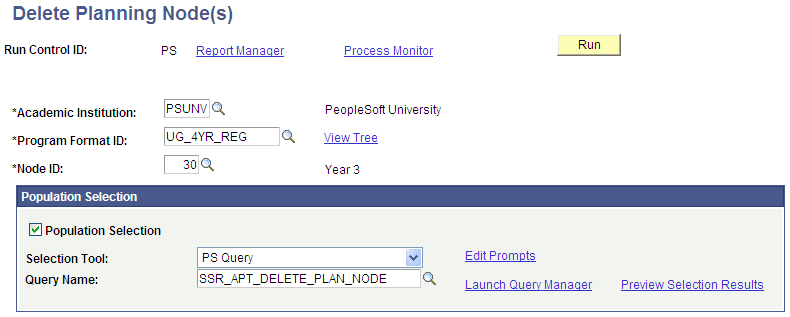
Access the Delete Planning Node(s) page ().
Image: Delete Planning Node(s) page
This example illustrates the fields and controls on the Delete Planning Node(s) page. You can find definitions for the fields and controls later on this page.
|
Field or Control |
Definition |
|---|---|
| Program Format ID |
Prompts against the Program Format Table for the selected institution. Use the View Tree link to view the Program Format definition. The value selected here serves as a high level control for the run control. Only students (whether identified by population selection or entered manually) in programs with a matching program format ID are processed. |
| Node ID |
Select a planning node from the list. The prompt lists all planning nodes for the selected Program Format ID. |
Population Selection
The Population Selection group box is a standard group box that appears on run control pages when the Population Selection process is available or required for the transaction. Selection tools are available based on the selection tools that your institution selected in the setup of the Population Selection process for the application process and on your user security. Fields in the group box appear based on the selection tool that you select. The fields behave the same way from within the group box on all run control pages and application processes. If your institution uses a specific delivered selection tool to identify IDs for a specific transaction, you must use it.
|
Field or Control |
Definition |
|---|---|
| Selection Tool |
Select External File or PS Query. |
| Query Name |
The following queries are delivered as samples:
When you create you own queries, you must use the bind record SSR_APT_HDR. |
Manual Selection
The Manual Selection grid is available if you do not select the Population Selection check box. Use the grid to enter a list of students for processing:
Image: Delete Planning Nodes page Manual Selection grid
This example illustrates the fields and controls on the Delete Planning Nodes page Manual Selection grid. You can find definitions for the fields and controls later on this page.

|
Field or Control |
Definition |
|---|---|
| ID |
Enter a student ID (EMPLID). The prompt includes only those students in programs with the program format ID equal to the Run Control value. |
| APT Instance |
Select an APT Instance for the student. |