Setting Up LMS Values and Default Options
Now that you have considered the extract file type that you plan to use, you can set up values and options for PeopleSoft interoperability LMS batch extract and LMS authentication.
To set up LMS values and options:
If you plan to use the XML V1.1 extract file type, you must set up LMS datasource codes and descriptions, LMS target codes and descriptions, and LMS type codes and descriptions.
You must create a data source code and a description for every possible extract source (for example, Undergraduate School of Business Administration, or PeopleSoft University). You must consider how you want to name your extract source information, and whether you typically extract from one small department or school at a time or extract a large group of data for a term at a time.
You must create target codes and descriptions for all of your targets (for example, the PSUNV/LMS shared server, or the School of Law server). Also, you need to create codes and descriptions for all of the different types of extract processes that you may run. These naming conventions are used as part of each XML V1.1 extract and are useful tracking tools.
If you plan to use PeopleSoft LMS self-service user authentication, you must set up LMS authentication profiles.
Currently, WebCT is the only LMS that uses LMS authentication. If you plan to use the LMS single sign on authentication, you must assign the LMS extract file type of XML for the LMS classes on the Schedule of Classes - LMS Data page.
See Configuring Your Learning Management System Third-Party Vendors for PeopleSoft Campus Solutions, which is posted to My Oracle Support.
If you plan to use PeopleSoft LMS self-service user authentication, you must set up LMS providers.
LMS providers are assigned to classes on the Schedule of Classes - LMS Data page and the Schedule New Course - LMS Data page in the Providers for Authentication field. LMS providers can also be assigned as default values on the Academic Institution 3 page and the Course Catalog - Components page.
(Optional) If you want to automatically include all newly scheduled classes in a particular LMS extract file type, you can specify the desired LMS extract file type on the Academic Institution 3 page.
If you are using LMS authentication, you can also assign a default LMS provider for authentication on the Academic Institution 3 page.
Every time that you schedule a new class, the system uses the values on the Academic Institution 3 page as default values on the Schedule of Classes - LMS Data page.
(Optional) If you want to automatically include only some of your newly scheduled classes in the LMS extract file type, you can specify the desired LMS extract file type, and if required, the LMS provider for authentication, on each course's respective Course Catalog - Components pages.
When you schedule classes, the system uses the values that you specify on the Course Catalog - Components page as default values on the Schedule of Classes - LMS Data page instead of using the values from the Academic Institution 3 page.
Note: You can set up default values at the institution level or at the catalog level to populate the schedule of classes. However, the extract uses only the values that are set at the class level.
You can add or modify LMS options on the Schedule of Classes - LMS Data page or on the Schedule New Course - LMS Data page.
The LMS extract file type that is specified on the LMS Data page autogenerates an LMS extract group ID. The batch extract uses these LMS values, as does the self-service authentication process, when linking a student or instructor from a self-service page to the academic content for the class on the LMS website.
For each class that does not require authentication to use an LMS or other website, enter the target URL on the Schedule of Classes - LMS Data page. The URL address must be complete (for example, include "http://").
Note: Do not enter URLs for classes that require authentication. The system autogenerates the required URLs from the Student Center, My Class Schedule, Faculty Center - My Teaching Schedule, and Learning Management Systems self-service pages.
|
Page Name |
Definition Name |
Navigation |
Usage |
|---|---|---|---|
|
LMS Datasource |
LMS_DATASOURCE |
|
Set up codes and descriptions for potential XML batch extract sources. |
|
LMS Target |
LMS_TARGET |
|
Set up codes and descriptions for potential XML batch extract targets. |
|
LMS Type |
LMS_TYPE |
|
Set up codes and descriptions for potential XML batch extract types. |
|
Learning Management System Authentication Profile |
ESA_PROFILE_PG |
|
Set up authentication profiles to communicate with your external LMS websites and to synchronize keys between your PeopleSoft site and the LMS site. |
|
LMS Provider |
LMS_INT_SETUP |
|
Set up codes, descriptions, and LMS authentication profiles to enable authentication for students and instructors to access their LMS home page and LMS academic content pages. Using this page, define all LMS providers to be used with LMS authentication at your institution. |
|
Academic Institution 3 |
INSTITUTION_TABLE3 |
|
Define a default provider for authentication and the LMS extract file type to use when scheduling new classes. Define remaining LMS options for the LMS batch extract to use. |
|
Components |
CRSE_CATALOG_CMPNT |
|
Enter default provider for authentication and LMS extract file type values on a course-by-course basis to use when scheduling new classes. |
|
LMS Data |
CLASS_LMS_SETUP |
|
Enter or modify LMS values to use when generating the LMS batch extract and when clicking a class's LMS link on the self-service pages. |
Access the LMS Datasource page ().
Image: LMS Datasource page
This example illustrates the fields and controls on the LMS Datasource page. You can find definitions for the fields and controls later on this page.
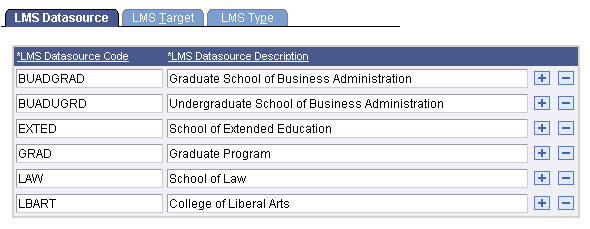
LMS datasource codes and descriptions are required on the LMS Batch Extract page as part of your run control parameters if you run the batch extract process with an LMS batch extract file type of XML V1.1. If you run the batch extract process with an LMS extract file type of Blackboard CourseInfo 4 or API Input format, this setup is not required.
|
Field or Control |
Definition |
|---|---|
| LMS Datasource Code and LMS Datasource Description |
Enter an LMS datasource code and corresponding LMS datasource description for all valid data sources. The data source is an identifier for the site generating the XML file and is used in the properties object (header record). For XML file types, the LMS datasource code must be entered at runtime on the LMS Batch Extract - Setup page. |
Access the LMS Target page ().
Image: LMS Target page
This example illustrates the fields and controls on the LMS Target page. You can find definitions for the fields and controls later on this page.
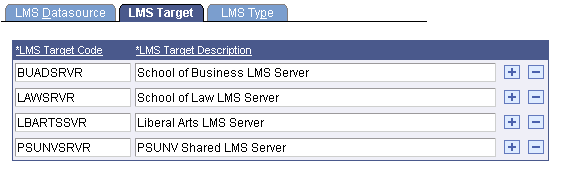
LMS target code and description information is required on the LMS Batch Extract - Setup page as part of your run control parameters if you run the batch extract process with an LMS type of XML V1.1. If you run the batch extract process with an LMS extract file type of Blackboard CourseInfo 4 or API Input format, this setup is not required.
|
Field or Control |
Definition |
|---|---|
| LMS Target Code and LMS Target Description |
Enter an LMS target code and corresponding LMS target description for all valid recipients of the XML files. The target code is an identifier for the site receiving the XML file and is used in the properties object (header record). For XML file types, the LMS target code is entered at runtime on the LMS Batch Extract - Setup page. |
Access the LMS Type page ().
Image: LMS Type page
This example illustrates the fields and controls on the LMS Type page. You can find definitions for the fields and controls later on this page.
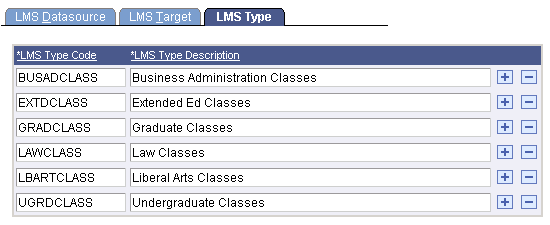
LMS type and description information is required on the LMS Batch Extract - Setup page as part of your run control parameters if you run the batch extract process with an LMS type of XML V1.1. If you run the batch extract process with an LMS extract file type of Blackboard CourseInfo 4 or API Input format, this setup is not required.
|
Field or Control |
Definition |
|---|---|
| LMS Type Code and LMS Type Description |
Enter an LMS type code and a corresponding LMS type description to specify the nature of any extract that you may perform with this type. The type code is used in the properties object (header record). For XML types, the LMS type code is entered at runtime on the LMS Extract - Setup page. |
If you plan to use PeopleSoft LMS authentication, you must configure your system to communicate with external LMS sites by creating an LMS authentication profile and synchronizing the keys between your PeopleSoft site and the external LMS site. Keys enable the two sites to recognize the requests that are passed between them and to authenticate your self-service users to the LMS site.
Using LMS authentication, end-users sign on one time to enter the PeopleSoft Campus Self Service.
When using the self-service Learning Management Systems page, users can click an LMS provider link, which will take them to their home page within the LMS system such as WebCT. For classes, you can assign LMS providers for authentication at the Academic Institution and Course Catalog Component level. The system then uses the provider as a default value when adding a class to the schedule of classes. You can also assign or update providers at the class level.
If an LMS provider is assigned to a class, the system displays an LMS button next to the class within the self-service Student Center, My Class Schedule page, and Faculty Center - My Teaching Schedule page. When students or instructors click the button, the system quickly performs the authentication and moves the user to the academic class content on the LMS website. The authentication happens without users explicitly signing on to the other site, without their having any sense of moving out of the PeopleSoft application, and without having to add another user ID or password to their ever-growing list of IDs and passwords.
You can also assign LMS providers without using LMS authentication for use on the Learning Management Systems self-service page. In this case, you assign a target URL, such as an institution or division website that has links to instructor web pages.
You can also use the LMS provider as a run control parameter within the LMS batch extract process.
See the following document which is available on My Oracle Support: “Configuring Self-Service User Authentication for Your Learning Management System Website”
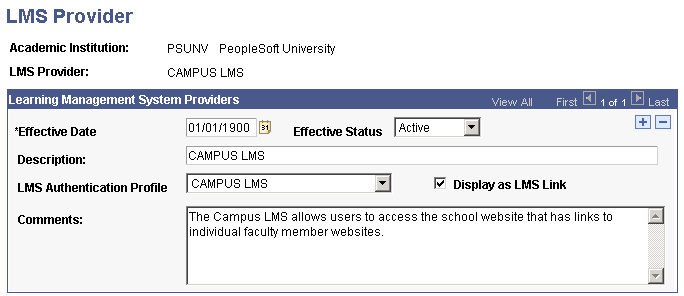
Access the LMS Provider page ().
Image: LMS Provider page
This example illustrates the fields and controls on the LMS Provider page. You can find definitions for the fields and controls later on this page.
|
Field or Control |
Definition |
|---|---|
| Effective Date |
Enter the date when the status of this LMS provider becomes effective. Use a new effective date each time that you make a change to a provider. Insert new rows as needed, and modify the record. |
| Description |
Enter the description to display to students and instructors from the self-service Learning Management System page. |
| LMS Authentication Profile |
If the provider uses the LMS authentication feature, select the LMS authentication profile to use for that provider. |
| Default URL |
The system hides and clears the Default URL field when you enter an LMS authentication profile. If you do not enter an LMS authentication profile, the Default URL field is available so that you can specify the default URL to use for a provider who does not use LMS authentication. You might want to use the URL that takes the user to an institution or division website from the Learning Management Systems page. Be sure to enter the complete URL (including http://). |
| Display as LMS Link |
Select this check box to display the LMS provider as a link on the self-service Learning Management System page. The link enables users to access their LMS site homepage by way of PeopleSoft LMS authentication. |
| Comments |
Enter comments to further describe or identify the LMS provider. |
Use the LMS Options group box on the Academic Institution Table 3 page to specify the LMS extract file type default values if all your classes need to be available to extract to a learning management system. If you plan to use PeopleSoft LMS authentication, you must also specify the provider for authentication.
The system uses the values that are defined on the Academic Institution Table 3 page as default values when adding a class to the schedule of classes.
The LMS batch extract uses the personal data extract parameters of phone type and address usage. The user ID extract option identifies whether the extract should use the student or instructor's employee ID or user ID. User IDs are created on the User Profile page.
Note: The user ID value is of particular importance for LMS authentication. For the user's authentication to work properly, the selected user ID extract option must be the same as the LMS authentication profile - authentication user ID value. If you set the user ID extract option to user ID on the Academic Institution Table 3 page, then authentication user ID must also be set to user ID on the LMS Authentication Profile page.
See the following document which is available on My Oracle Support: “Configuring Self-Service User Authentication for Your Learning Management System Website”
Use the Course Catalog - Components page to enter LMS values on a course-by-course basis if you have not specified a default LMS extract file type and a default provider for authentication (if you plan to use PeopleSoft LMS authentication) on the Academic Institution 3 page. When you enter LMS values on the Course Catalog - Components page, the system overrides the values that are set on the Academic Institution 3 page and uses the Course Catalog - Components page values as defaults.
If you have not specified, on either the Academic Institution 3 page or the Course Catalog - Components page, a default LMS extract file type and a default provider for authentication (if you plan to use PeopleSoft LMS authentication), you must enter your LMS values on the Schedule of Classes - LMS Data page.
All LMS classes must have an LMS extract file type and an LMS extract group ID defined on the Schedule of Classes - LMS data page. You can also modify the LMS that comes in from the Academic Institution 3 page or the Course Catalog - Components page.
Note: You must assign an extract file type to use. To use PeopleSoft LMS authentication, you must use the XML LMS extract file type and you must identify a provider for authentication.
The LMS authentication is designed to work with the IMS enterprise system specifications that are used to create the batch XML V1.1 extract file. When the XML V1.1 LMS extract file type is designated within the Schedule of Classes, the system autogenerates the LMS extract group ID. During the extract process and LMS authentication from self-service pages, the system creates a unique class identifier by supplementing the LMS group ID with a term code and the class number.
If you do not want to use LMS authentication, but want to link students who are enrolled in a class to a designated URL such as an instructor's website, you can specify the website in the LMS URL field. The website URL must be preceded by the http:// designation.
Note: Do not specify URLs for classes that require authentication to the LMS site. When using PeopleSoft LMS authentication, the system autogenerates the required URLs from the Student Center, My Class Schedule, and Faculty Center - My Teaching Schedule self-service pages.