Creating Course Offerings
This section provides an overview of course offerings, lists prerequisites, and discusses how to:
Define course catalog data.
Define course offerings.
Define course components.
(NZL) Set up government reporting data.
Link milestones to course data.
Interface course offerings with the general ledger.
The Course Catalog component contains several pages that enable you to enter all information for a course offering: the course title, units, workload hours, components, description, topics, requisites, and so on. We review each of the pages in the order in which you use them to set up a new course offering. In our design, a course offering includes all components of a course, such as lecture, laboratory, and discussion.
You complete these steps to create a course:
Define the course title, description, units, grade bases, repeat rules, equivalent course groups, topics, and course attributes on the Catalog Data page.
Define the course offering number, catalog number, subject area, academic organization, Classification of Instructional Programs (CIP) and Higher Education General Information Survey (HEGIS) codes, and attach requirement designations on the Offerings page.
Define the course components and the final exam and room characteristics on the Components page.
Map courses as course item types to specific general ledger accounts on the GL Interface page.
After you set up your institution codes, academic groups, subject areas, campuses, academic organizations, and academic careers, you can set up the basics of your course catalog. At this point, you should have set up room characteristics, requirement designations, enrollment requisites, and course attributes also.
|
Page Name |
Definition Name |
Navigation |
Usage |
|---|---|---|---|
|
Catalog Data |
CRSE_CATALOG |
|
Define course titles, course units, grade bases, topics, and repeat rules. |
|
Offerings |
CRSE_CATALOG_OFFER |
|
Define course numbers, link academic organizations to course offerings, and so on. |
|
Components |
CRSE_CATALOG_CMPNT |
|
Define components, such as lecture, laboratory, and discussion, as well as instructor workload hours, room characteristics, additional fees, and final exams. |
|
Crse Catalog NZL (course catalog New Zealand) |
SSR_CRS_CAT_NZL |
|
Set up SDR and EFTS data for a course. Note: The fields on this page are available only if you select the New Zealand Catalog, SDR, EFTS, StudyLink check box on the Academic Institution 6 page. You should also select the New Zealand NSI and SDR Personal Data, SDR Degree check box on the SA Features page in the Student Administration Installation component. |
|
Course/Milestone Link |
SSR_CRS_MILESTN |
|
Link milestones to courses and (NZL) establish links between a course and unit standard milestones. |
|
GL Interface (general ledger interface) |
CRSE_OFFER_GL |
|
Map course fees as item types to their proper general ledger accounts. The system generates charges to the student's account based on the course code you define on this page and offsets these charges based on the general ledger you define on this page. Your office should coordinate the information on this page with your controller's office. |
Access the Catalog Data page ().
Image: Catalog Data page (1 of 2)
This example illustrates the fields and controls on the Catalog Data page (1 of 2). You can find definitions for the fields and controls later on this page.
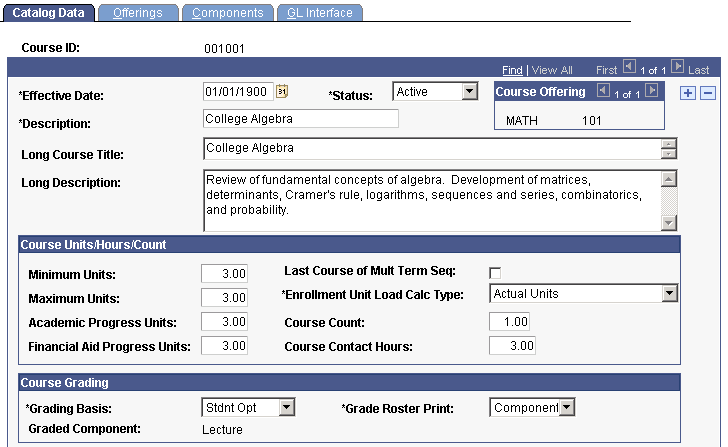
Image: Catalog Data page (2 of 2)
This example illustrates the fields and controls on the Catalog Data page (2 of 2). You can find definitions for the fields and controls later on this page.
The system generates a unique course ID when you add a new course, as long as you do not enter a course ID yourself. You should let the system generate the course ID.
|
Field or Control |
Definition |
|---|---|
| Effective Date |
Enter an effective date for this course. The effective date defines when the status you enter is valid. Use a new effective date each time you make a change to a course offering. Insert new rows as needed, and modify the record. Effective dates enable you to track historical course changes. |
| Status |
Enter a status for this course. Enter Active when the course is valid for your institution. You can keep all courses in the database for historical research purposes by inserting a new effective-dated row and setting the status to Inactive for courses that you no longer offer. Note: When you schedule a class for a term, the system prompts against the Catalog Data page using the start date of the term as the effective date to find the appropriate row in the catalog. Therefore, you do not need to create a new catalog entry for every term. Instead, insert a new effective-dated row for your revisions. |
| Short Course Title and Long Course Title |
The short title appears on items such as transcripts, advisement reports, study lists, and the schedule of classes. The long course title appears on the Browse Course Catalog page and the course catalog report. |
| Long Description |
The long description can appear in the course catalog report if specified. |
Course Units/Hours/Count
You can attach four unit types to a course in the course catalog:
Minimum units
Maximum units
Academic progress units
Financial aid progress units
These values appear by default on the Schedule of Classes - Class Associations page, where you can override course unit values for a class. When a student enrolls in a class, corresponding fields on the enrollment page populate with the values on the Class Associations page. After a student enrolls, the system uses each unit type to determine the student's academic and financial aid load, academic level, and grade point average. In general, the minimum, maximum, academic progress, and financial aid progress units are always the same. The exception is multi-term courses, remedial courses, and variable unit courses.
Note: For courses that use the same minimum and maximum units, the Minimum Units field populates the Units Taken field on administrative enrollment pages and the Units field on self-service enrollment pages.
|
Field or Control |
Definition |
|---|---|
| Minimum Units and Maximum Units |
Enter the minimum units and maximum units that the course is worth. The minimum and maximum units are the same, except for a variable unit class. For a variable unit class, the minimum and maximum units would constitute a range, and the student or administrator would be able to select from within that range how many units the class is worth. For example, the minimum units could be set at 2, and the maximum units could be set at 3. After you schedule the class, you can enroll the student and enter the number of units the student chooses to take for the class in the Units Taken field on the enrollment page. |
| Academic Progress Units |
The system uses academic progress units in conjunction with the billing factor to calculate billing units and, subsequently, per unit fees. The system also uses academic progress units to calculate academic load. Academic progress units are usually equal to the minimum/maximum units, except for a multi-term class. A multi-term class is when all credit for a sequence of classes (HIST 101a + 101b) is granted after a student completes the last course in the sequence. To prevent the student from earning units taken, which are used to calculate GPA, or units earned, which are used by the Academic Advisement application, you could enter 0 in the Minimum Units field and the Maximum Units field. Then, you could enter 3 (or another unit value) in the Academic Progress Units field. The system would calculate the billing units and academic load using 3 (or another unit value) academic progress units, but the student would earn no credit. |
| Financial Aid Progress Units |
Enter the number of units for the course that the system counts towards tracking a student's financial aid load for a term. |
Note: When minimum units and maximum units are not equal, the Academic Progress Units field and the Financial Aid Progress Units field on the Catalog Data page become unavailable, and Progress Units and FA Progress Units on the enrollment page appear by default from the student's Units Taken field value.
|
Field or Control |
Definition |
|---|---|
| Last Course of Multi-Term Sequence |
Select this check box so that academic progress units can be less than the minimum units for this course. The academic progress units for the last course in a multi-term course is less than the minimum units because the minimum units have been accumulating over the entire sequence, and they are only granted after the student completes the last course. The academic progress units, however, are still granted for each course in the sequence, so they are less than the minimum units at the end of the sequence. See the Multi-Term Course example in the next section. |
| Enrollment Unit Load Calc Type (enrollment unit load calculation type) |
The value you enter determines how the enrollment engine calculates the student's academic load. Values for this field are delivered with your system as translate values. Do not modify these values in any way. Any modifications to these values requires a substantial programming effort. Values are: Actual Units: The system populates the Enrollment Unit Load Calc Type field with Actual Units by default. Enter this option for any course that has identical values for the Minimum Units, Maximum Units, and Academic Progress Units fields. The exception to this rule is when you are creating a variable unit course; even though the minimum and maximum units are different, use Actual Units. The enrollment engine calculates the number of units the student can take in the term by looking at the Units Taken field on the Enrollment Request 1 or Student Enrollment 1 page (see the Variable Unit Course example that follows). You can also enter this option for a remedial course, as an example, if you do not want the course to count toward the student's academic load. Academic Units: Enter this option for any course that does not have identical minimum units, maximum units, and academic progress units, such as remedial courses and multi-term sequence courses. Entering this option requires the system to look at the academic progress units when it calculates academic load. For example, the minimum units and maximum units might be 0 because you do not want academic level and GPA to be affected by this course. The academic progress units might be 3 so that the course would be used to calculate academic load and billing units (see the Multi-Term Course example that follows). Furthermore, you could use this option for a remedial course, as an example, if you wanted the course to be used in calculating load but not in calculating GPA. |
| Course Count |
If you count courses (in addition to units) toward academic advising requirements or limits, enter a course count value in this field. The system populates this field by default from the course catalog. The course count indicates the worth, or count, of the course towards an advising requirement. Some institutions count courses, as well as units, towards degree requirements. |
| Course Contact Hours |
The system populates this field by default from the Schedule of Classes - Instructor Contact Hours page, where the value is used to calculate total contact hours. Each component of the course can have different contact hours on the Components page. |
| Grading Basis |
Enter a grading basis for the course. Grading basis values are defined on the Grading Scheme Table page. You can override the grading basis for individual class offerings when you create the schedule of classes. |
| Graded Component |
The system displays the graded component based on the Grade Roster Print field value on this page and the Graded Component field value on the Components page. |
| Grade Roster Print |
Enter the type of grade roster that you want to print for this course offering, as processed through the Grade Roster Print page. Values for this field are delivered with your system as translate values. Do not modify these values in any way. Any modifications to these values requires a substantial programming effort. Values are: By Student: Enter to print grade rosters for each student. Each student has a distinct grade roster, separated by a page break. Component: Enter to print grade rosters for the graded component of the course. The graded component is specified on the Components page. Instructor: Enter to print grade rosters for the graded component of the course. The graded component is specified on the Components page. A copy of the grade roster prints for each instructor, primary or otherwise. The number of copies that prints is equal to the number of instructors for the course, primary or otherwise. None: Enter to not print a grade roster for the course. |
| Repeat for Credit |
Select this check box to indicate that the class can be repeated for additional credit, as opposed to repeating for grade improvement only. If you do not select the check box, the class is subject to the repeat rules set up in the Repeat Rule Table component. |
| Allow Multiple Enroll in Term (allow multiple enrollments in term) |
Select this check box to permit a student to enroll in this course multiple times within the same term. An example would be an independent study course. |
| Total Units Allowed |
The system populates this field by default with the maximum units for the course (by default, one full course completion is always permissible). However, if you select the Repeat for Credit check box, you may edit and increase this value. This value must be equal to or greater than the maximum units for the course. The system enforces the lower of the two limits, units or completions, that you define. |
| Total Completions Allowed |
The system populates this field with 1 by default (by default, one full course completion is always allowed). However, if you select the Repeat for Credit check box, you may edit and increase this value. This value must be equal to or greater than 1. The system enforces the lower of the two limits, units or completions, that you define. |
| Instructor Edit |
Enter a value to indicate how you want the system to prompt for instructor IDs during class enrollment. This option determines the availability of and the prompt values for the instructor ID field on the Enrollment Request, Quick Enroll, Enrollment, and self-service enrollment pages. The system populates the value for the Instructor Edit field by default to the Class Associations page, where you can override the value. Values for this field are delivered with your system as translate values. Do not modify these values in any way. Any modifications to these values requires a substantial programming effort. Values are: No Choice: Enter if you want the system to make the Instructor ID field on the Enrollment Request page unavailable and to automatically assign the instructor who is scheduled to teach the class, as indicated on the Assignment tab of the Schedule of Classes - Meetings page: Thus, the student has no choice of instructor. Class Instructor Edit: Enter this option if you want the system to make the Instructor ID field on the Enrollment Request, Quick Enroll, Enrollment, and Self Service Enrollment pages available and to prompt the user with only the Primary Instructors for the class, as defined on the Meetings page. Select this option for independent study courses or the like, for which the student can select one of several Primary instructors. Instructor/Advisor Edit: If you enter this option, the Instructor ID field appears on the Enrollment Request, Quick Enroll, Enrollment and Self Service Enrollment pages. The system prompts the user with only the instructors available to teach this course, as defined on the Instructor/Advisor Table page. Note: To activate the instructor/advisor edit your institution must first select, on the Academic Organization Table page, to edit instructors against instructor/advisor for the academic organization to which this class belongs. The Instructor/Advisor Edit option should be used only for courses that belong to academic organizations for which the Instructor Advisor option is selected (on the Academic Organization Table page). This ensures that instructor selection is controlled by the academic organization settings. |
| Add Consent and Drop Consent |
The No Consent value appears by default. Values for these fields are delivered with your system as translate values. Do not modify these values in any way. Any modifications to these values requires a substantial programming effort. Values are: No Consent: Enter if no special consent is required for a student to add or drop a class. Instructor or Department: Enter if consent is required. Consent can be granted by using class permission numbers or student specific permissions. The consent requirement can be overridden in the enrollment process by setting an override permission option. |
| Requirement Designation |
Enter a requirement designation for the course. A requirement designation can be additional work that is needed for a course, such as Design Credit, or a requirement designation can specify a special variety of a course to use in a course list for the Academic Advisement application. Requirement designation values are defined on the Requirement Designation Table page. Example requirement designation values are Design Credit, Thesis Choice, and so on. Requirement designations are provided to the Academic Advisement application. |
| Equivalent Course Group |
You can enter an equivalent course group for the course. Equivalent course groups are defined on the Course Equivalencies page. Here, you are adding the course to a group of equivalent courses for requisite checking and degree progress requirement purposes. If two courses have the same Equivalent Course Group number, then they are equivalent to each other and can fulfill the same requirement. |
| Course Attribute and Course Attribute Value |
Enter the general characteristics that describe the course offering in the Course Attribute and Course Attribute Value fields. Course attributes are defined on the Course Attribute Table page. Course attributes are not provided to the Academic Advisement application. They are primarily used for institutional research purposes, and for printing repetitive text in the catalog and schedule of classes. Example course attribute and course attribute values are Degree Seeking Only - Open to Students in Any Plan and Fall - Offered in Fall Only. |
| Override Topic Link ID |
Select to manually update topic link IDs. When you select this check box, the Topic Link ID field becomes available for edit. Use this functionality to link course topics across effective-dated rows by giving them the same topic link ID. |
Description Tab
See the previous exhibit for a view of this tab.
Use the Description tab to define course topics associated with a course. You attach topics to specific classes on the Schedule of Classes - Basic Data page.
|
Field or Control |
Definition |
|---|---|
| Course Topic ID |
The system assigns a unique course topic ID number to identify the topic record. Insert rows to add topics. |
| Course Topic Title, Short Description, and Formal Description |
Enter the course topic title, short description, and formal description. |
| Topic Link ID |
The system assigns a unique topic link ID number for each topic. The repeat checking process uses this number when determining if the topic was already taken. If you create a new effective-dated row for this course, the system carries over the topic link ID to the new effective-dated row. If the Override Topic Link ID check box was selected, the Topic Link ID field becomes available for edit. This selection enables you to link course topics within a course across effective-dated rows by giving them the same topic link ID. Because the repeat checking process uses the topic link ID, the process views similar topics that have the same topic link ID as being identical. |
Repeat For Credit Tab
Select the Repeat For Credit tab.
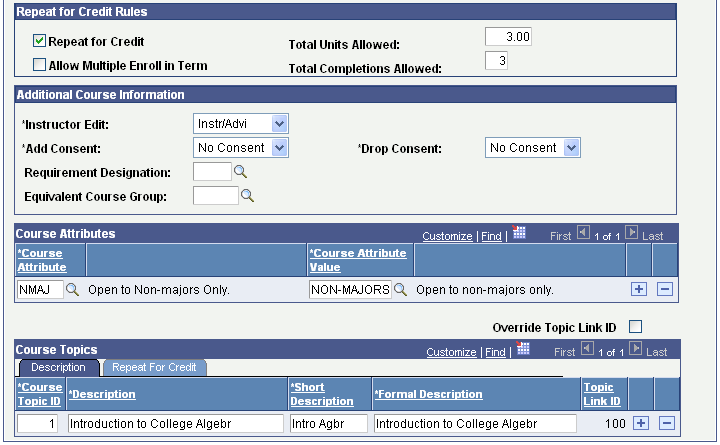
Image: Course Catalog - Catalog Data page: Repeat For Credit tab
This example illustrates the fields and controls on the Course Catalog - Catalog Data page: Repeat For Credit tab. You can find definitions for the fields and controls later on this page.

|
Field or Control |
Definition |
|---|---|
| Repeat for Credit |
Select to allow students to repeat the topic for credit. If you do not select this check box, additional enrollment in the same topic is subject to the repeat rules set up in the Repeat Rule Table component. |
| Total Units Allowed and Total Completions Allowed |
If you select the Repeat for Credit check box, the Total Units Allowed and Total Completions Allowed fields become available for entry. Enter the maximum number of units and course completions allowed for credit within the topic. If you enter a value in both fields, the system enforces the lower of the two limits. |
Example of Multi-Term Course
At PSUNV, when a student takes History 101a for the fall term and History 101b for the spring term, the student's credit for both courses is contingent upon the successful completion of the entire course sequence. To define this multi-term course in the course catalog, we purposefully place the minimum units, maximum units, and academic progress units out of synchronization so that the enrollment engine correctly calculates the student's academic load and GPA. The course catalog might look similar to this:
|
Course |
Term of Student Enrollment |
Minimum Units |
Maximum Units |
Academic Progress Units |
Last Course of Multi-Term Sequence |
Enrollment Unit Load Calculation Type |
|---|---|---|---|---|---|---|
|
History 101a |
Fall 1999 |
0 |
0 |
3 |
No |
Academic Units |
|
History 101b |
Spring 2000 |
6 |
6 |
3 |
Yes |
Academic Units |
Because the minimum and maximum units are set to 0, History 101a will not be calculated in the student's GPA or Academic Level (if academic level increments by units, that is). But, when the student completes History 101b, he or she will receive credit for both classes because the minimum and maximum units are set to 6. Academic load and billing units will be counted for both classes because academic progress units are set to 3, and the Enrollment Unit Load Calculation type is set to Academic Units.
Example of Variable Unit Course
At PSUNV, students can select how many units they earn for ENGL 1a. They can select from the range of 2 and 3 units. Because ENGL 1a is an elective course, they can take it for only 2 units, in which case they are not required to complete a final project. Students who complete the project earn 3 units. In this case, the course catalog might look similar to this:
|
Course |
Minimum Units |
Maximum Units |
Academic Progress Units |
Financial Aid Units |
Enrollment Unit Load Type |
|---|---|---|---|---|---|
|
ENGL 1a |
2 |
3 |
Unavailable |
Unavailable |
Actual |
When students enroll in ENGL 1a, they have to select how many units to take. If they enroll online or through an interactive voice response system, they can select the number of units they want to take when they add the class. If they enroll in person, the Registrar's Office most likely creates an enrollment request. If the minimum and maximum unit fields on the Course Catalog Data page vary, the Units Taken field on the Enrollment Request page becomes available, and the Registrar's Office can enter the number of units the student chooses to take. The possible enrollments would look like this:
|
Student |
Units Taken |
Units Earned |
Academic Progress Units |
Financial Aid Units |
Billing Units |
|---|---|---|---|---|---|
|
Student 1 |
2 |
2 |
2 |
2 |
2 |
|
Student 2 |
3 |
3 |
3 |
3 |
3 |
As shown, the student chooses the number of units to take and the system determines the units earned, academic progress units, and financial aid units based on the units you enter in the Units Taken field when the student enrolls in the class.
Access the Offerings page ().
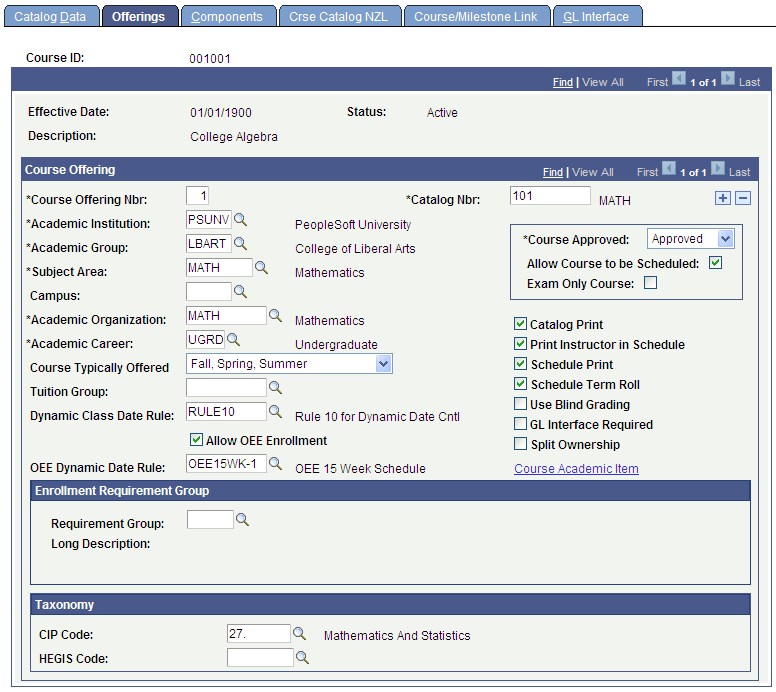
Image: Offerings page
This example illustrates the fields and controls on the Offerings page. You can find definitions for the fields and controls later on this page.
|
Field or Control |
Definition |
|---|---|
| Course Offering Number |
The system generates the course offering number and uses it for sequencing. The system also uses the course offering number to distinguish cross-offered courses for which the course ID is the same, as are the requisites, but the course itself is listed in different subject areas, academic groups, and so on. |
| Catalog Number |
Within an academic group, catalog number ranges are linked to academic careers on the Academic Group Table page. If you have already specified an academic group for this course offering, the system automatically displays the appropriate academic career when you enter a catalog number. This field is 10 digits. The system reserves the four left digits exclusively for numeric characters, and the right six digits for both alpha and numeric characters. A field edit enforces this programming. |
The system automatically reformats the catalog number you enter to fit the defined system format, as this table illustrates:
|
Catalog Number |
N |
N |
N |
N |
A/N |
A/N |
A/N |
A/N |
A/N |
A/N |
|---|---|---|---|---|---|---|---|---|---|---|
|
12 |
1 |
2 |
||||||||
|
120 |
1 |
2 |
0 |
|||||||
|
1A |
1 |
A |
||||||||
|
12B |
1 |
2 |
B |
|||||||
|
120AB |
1 |
2 |
0 |
A |
B |
|||||
|
B12 |
B |
1 |
2 |
|||||||
|
AB1200 |
A |
B |
1 |
2 |
0 |
0 |
||||
|
10001A |
1 |
0 |
0 |
0 |
1 |
A |
||||
|
1B12 |
1 |
B |
1 |
2 |
N = numeric character
A/N = alpha or numeric character
|
Field or Control |
Definition |
|---|---|
| Academic Institution |
The system displays the academic institution by default. Multiple institutions can offer the same course by way of multiple course offerings. |
| Academic Group |
Enter the academic group to which this course offering belongs. You can define global notes by academic group, which can appear on the Schedule of Classes report. In addition, academic group controls the valid meeting pattern values and their corresponding normal class duration values. Academic group values are defined on the Academic Group Table page. |
| Subject Area |
Enter the subject area of the course offering. Subject area values are defined on the Academic Subject Table page. |
| Campus |
Enter the campus at which your institution offers the course. If the course is offered at one campus, you should place a value in this field. If the course can be offered at multiple campuses, leave this field blank. |
| Academic Organization |
The system populates this field by default from the academic organization linked to the subject on the Academic Subject Table page. You can override the value. |
| Academic Career |
Enter the academic career to which this course offering belongs. The system automatically displays the default values of the Dynamic Class Data Rule, Allow OEE Enrollment, and OEE Dynamic Date Rule fields according to your settings for these fields in the Academic Career Table component. The default values of these fields vary depending on the academic career that you enter and the effective date of the course. Academic career is important because it specifies which students can enroll in the class (in accordance with the Academic Career Pointers page specifications), as well as which grading bases are available. |
| Tuition Group |
Regardless of the tuition group that you enter on this page, the system charges all students tuition based on their own tuition group. Use this field to designate a specific group of students that you want to charge additional course fees for the course. |
| Dynamic Class Date Rule |
If you have specified a dynamic class data rule for the academic career to which you assign this course offering, the system displays that rule by default in this field. You can override the default value. Select a dynamic class date rule to have the system assign that rule by default to all dynamic class sections of this course offering that you schedule (excluding open entry and open exit sections). Attaching your rule to the course offering rather than to the class section ensures consistency and eases maintenance because you only have to attach the rule to a course one time (to apply to all class sections), rather than having to attach a rule to each course offering that you schedule. The system requires dynamic date calculation for each class section that you schedule for this course offering. After you schedule the class sections, you can run the Dynamic Class Dates process to calculate landmark dates for each class section. The process automatically uses the rule that you specify here for all dynamic date class sections. You can override this default rule on a section-by-section basis through the Dynamic Class Date page. This field prompts you with only the dynamic class data rules that have not been designated for OEE enrollment on the Dynamic Class Dates page. If you leave this field blank and schedule the course within a dynamic date session, you receive a warning message indicating that a rule has not been defined. You need to define a rule on the Dynamic Class Dates page. |
| Allow OEE Enrollment (allow open entry/exit enrollment) |
The system assigns the value of this check box by default based on the Allow OEE Enrollment check box on the Academic Career Table page for the academic career with which you have associated this course offering. You can override this default on an offering-by-offering basis. Select this check box to attach a dynamic date rule to the offering, thus enabling students to enroll in OEE class sections of this course offering. The OEE Dynamic Date Rule field becomes available for edit. If you do not select the check box, you can always define the rule on the Dynamic Class Dates page. |
| OEE Dynamic Date Rule (open entry/exit dynamic date rule) |
The system assigns the value of this field by default based on the OEE Dynamic Date Rule field on the Academic Career Table 2 page for the academic career with which you associate this course offering. An open entry/exit (OEE) dynamic date rule is a dynamic class date rule that has been designated for OEE enrollment. The enrollment engine uses the OEE dynamic date rule to calculate significant class dates for a student whenever a student enrolls in an open entry/exit class. This field is available for edit only if you select the Allow OEE Enrollment check box for this course offering. Select an OEE dynamic date rule to have the system assign that rule by default to all OEE class sections of this course offering that you schedule. Attaching your rule to the course offering rather than the class section ensures consistency and eases maintenance because you only have to attach the rule to a course one time (to apply to all class sections), rather than having to attach a rule to each course offering that you schedule. The system thus automatically requires dynamic date calculation for each OEE class section that you schedule for this course offering. After you schedule the class sections, you can run the Dynamic Class Dates process to calculate landmark dates for each class section. The process automatically uses the rule that you specify here for all OEE class sections. You can override this default rule on a section-by-section basis through the Dynamic Class Data page. The system prompts you with only the dynamic class data rules that have been designated for OEE enrollment on the Dynamic Class Dates page. If this field is blank and you schedule the course within an OEE session, you receive a warning message that indicates a rule has not been defined. You can then save the page and define the rule on the Dynamic Class Dates page. |
| Course Approved |
Enter the course approved status. Values for this field are delivered with your system as translate values. Do not modify these values in any way. Any modifications to these values requires a substantial programming effort. Enter Pending or Denied to prevent anyone from scheduling the class—the system does not list the course in the class scheduling function. Enter Approved and select the Allow Course to be Scheduled check box to enable scheduling of the course offering. |
| Allow Course to be Scheduled |
Select this check box so that the course can be scheduled for a term. A course can only be scheduled for a term if you select this check box and set the Course Approved field to Approved. |
| Exam Only Course |
Select this check box when a course will have no class sections scheduled and the only requirement for the course is that students must complete an examination. When the check box is selected, the Allow Course to be Scheduled field is disabled and the field defaults to the Activity Registry when this course is entered as the Course Control Record. |
Note: For courses that are set up solely as transfer articulation courses, set the Course Approved field to Approved but clear the Allow Course to be Scheduled check box. This setting ensures that you never accidentally schedule the course.
|
Field or Control |
Definition |
|---|---|
| Catalog Print |
Select to display the course offering in the course catalog report. |
| Print Instructor in Schedule |
Select to display the names of all the assigned instructors in the schedule of classes report. |
| Schedule Print |
Select to display the course offering in the schedule of classes. The system selects this check box by default. |
| Schedule Term Roll |
Select to enable the prior term copy function for this course offering. |
| Use Blind Grading |
Select to enable grade rosters for blind grading. The system populates this field by default from the Academic Subject Table page. When you generate grade rosters for a course that invokes blind grading, instead of student names on the roster, the system generates random numbers. |
| GL Interface Required |
Select to include this class in the GL Interface process. If you select this check box, the system requires you to enter the necessary data into the GL Interface page of this component. |
| Split Ownership |
Select if multiple academic organizations own the course. If you select this check box, the Owner group box becomes available for entry. |
| Course Academic Item |
Click to access the Course Academic Item page. |
Enrollment Requirement Group
|
Field or Control |
Definition |
|---|---|
| Requirement Group |
Enter the requirement group that will link the appropriate requisites to this course. Enrollment requirement group values are defined on the Course Requisite page and can consist of a variety of elements: courses, units, GPA, and so on. |
| Long Description |
The system enters the long description of the enrollment requirement group from the Course Requisites page. |
Taxonomy
|
Field or Control |
Definition |
|---|---|
| CIP Code (Classification of Instructional Programs code) |
Enter the CIP code for the course. CIP codes provide a taxonomic scheme that support the accurate tracking, assessment, and reporting of fields of study and program completions activity. The system prompts you from the CIP Code Table page. |
| HEGIS Code (Higher Education General Information Survey code) |
Enter the HEGIS code for the course. HEGIS codes provide a taxonomic scheme that support the accurate tracking, assessment, and reporting of fields of study and program completions activity. The system prompts you from the HEGIS Code Table page. |
| (AUS) Field of Education Code |
The system enters the Australia Department of Education, Science and Training (DEST) field of education code that you entered on the Subject Taxonomy page for this course. Note: This field is available only when you select the DEST, HECS, Centrelink, TAC check box on the Academic Institution 6 page. |
| (AUS) HECS Band ID (higher education contribution scheme band ID) |
The system enters the Australia DEST HECS band ID for the field of education code. Note: This field is available only when you select the DEST, HECS, Centrelink, TAC check box on the Academic Institution 6 page. |
| (AUS) Work Experience Indicator |
Select the work experience indicator for this course. This value is used to confirm whether the course is considered wholly or partially work experience in industry for Australian DEST reporting purposes. Note: This field is available only when you select the DEST, HECS, Centrelink, TAC check box on the Academic Institution 6 page. |
| (AUS) Use Discipline Group From Plan |
Select to disable the discipline group field. The system uses the discipline group from a student's plan when a student enrolls in this course. Note: This field is available only when you select the DEST, HECS, Centrelink, TAC check box on the Academic Institution 6 page. |
| (AUS) Discipline Group Code |
The system enters the discipline group from the Subject Taxonomy page. Note: This field is available only when you select the DEST, HECS, Centrelink, TAC check box on the Academic Institution 6 page. |
Ownership
Use this group box to link course offerings to multiple academic organizations.
The system assumes a course offering has a single academic organization owner, unless you indicate split ownership on this page. Course ownership data is tracked for reporting and analysis purposes at the course offering level.
Important! The Ownership group box is only available if you select the Split Ownership check box.
|
Field or Control |
Definition |
|---|---|
| Academic Organization |
Enter the academic organization owners of the course offering. The system prompts you from the Academic Organization Table page. |
| Percent Owned |
Enter the percentage of ownership. The total percentage must equal 100. |
Examples of Equivalent and Cross-Offered Courses
Equivalent courses, unlike cross-listed courses, can have different requisites, requirements, and so on. Each equivalent course has a unique course ID number. Use the Course Equivalency component to create Equivalent Course Groups.
Define cross-offered courses on the Course Catalog - Offerings page. Cross-offered courses have the same course ID number; therefore, they possess the same Catalog Data page information. When classes are scheduled, each class is associated with a single offering.
Note: Repeat checking and multiple enrollment rules apply across all offerings of the course because the same course is offered in every case.
Image: Offerings page example 1
The following examples show the defined course ID number 003302, Literature and Philosophy. It is a cross-offered course in both the English and Philosophy departments. In all ways, the two course offerings are exactly the same. They possess the same description, equivalencies, and so on. On the Offerings page, the course offering number distinguishes the two offerings.
In course offering number 1, we indicate that Literature and Philosophy is listed under the English Literature subject area, catalog number 270.
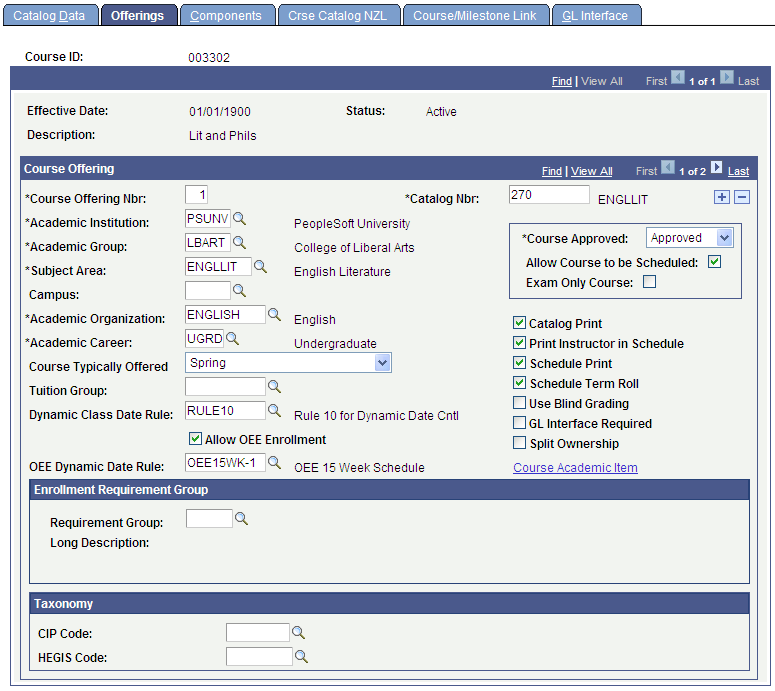
Image: Offerings page example 2
Add another row for course offering number 2. The second offering of Literature and Philosophy is listed under the Philosophy subject area, catalog number 170.
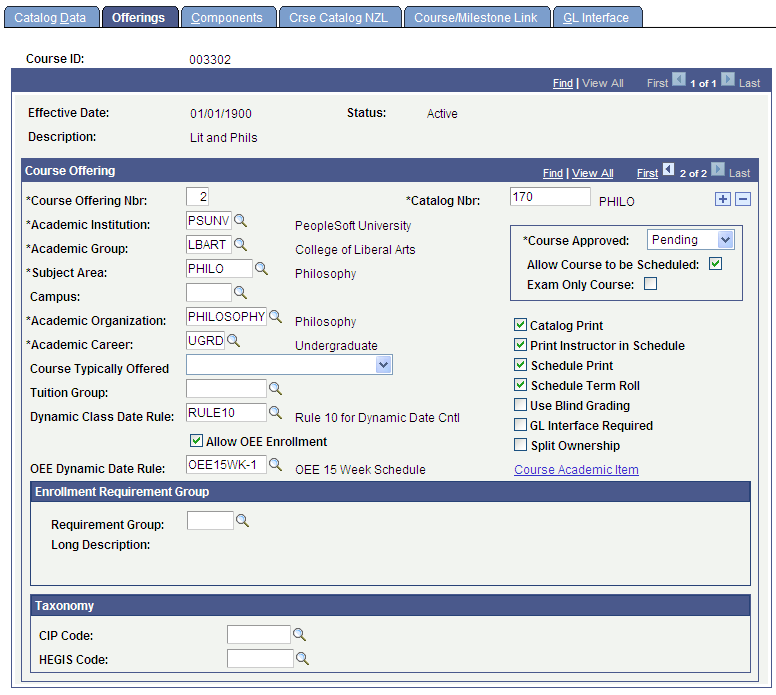
Select the Catalog Print and Schedule Print check boxes to enable printing of both course offerings in the catalog and schedule.
Access the Components page ().
Image: Course Catalog - Components page (1 of 2)
This example illustrates the fields and controls on the Course Catalog - Components page (1 of 2). You can find definitions for the fields and controls later on this page.
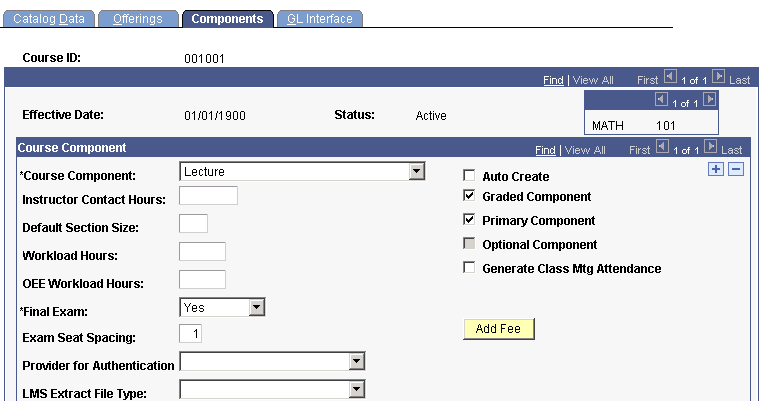
Image: Course Catalog - Components page (2 of 2)
This example illustrates the fields and controls on the Course Catalog - Components page (2 of 2). You can find definitions for the fields and controls later on this page.
Course Component
|
Field or Control |
Definition |
|---|---|
| Course Component |
Enter a course component for the offering. Values for this field are delivered with your system as translate values. You can modify these values. The course component indicates the parts of the course offering, for example, lecture, laboratory, seminar, and so on. One course offering can have multiple components. |
| Instructor Contact Hours |
Enter the contact hours you want to record for the instructors teaching this component of the course. You can also assign specific instructors and corresponding contact hours when scheduling classes on the Schedule of Classes - Meetings page. Use this field only if you want to report contact hours manually. The Instructor Workload feature does not reference this free-form field. |
| Default Section Size |
Enter the default section size. You can override section sizes in the schedule of classes. The system uses the value in this field to populate the Requested Room Capacity field and the Enrollment Capacity field. |
| Workload Hours |
If you want to track instructor workload based on course component workload hours, enter a workload hours value for the course component. The system uses the value that you specify here to populate the same fields on the Class Associations - Class Components page when you schedule a new course. Therefore, if you set the lecture workload hours to 3 on the Course Catalog - Components page, then whenever someone schedules a lecture for this course, the lecture component, 3 workload hours, appears by default on the Class Components page. Similarly, if you set the laboratory component to 1 workload hour on the Components page, then whenever someone schedules a laboratory for this course, the laboratory component, 1 workload hour, appears by default on the Class Components page. The user can modify the component values on the Class Components page if necessary. This field is optional. |
| OEE Workload Hours (open entry/open exit workload hours) |
If you want to track instructor workload based on course component OEE workload hours, enter an OEE workload hours value for the course component. The value you specify here represents the number of workload hours for the entire course, unlike regular workload hours, which represent weekly hours for the course. The system populates the value in this field by default to the same components on the Class Associations - Class Components page when you schedule a new course. In other words, if you set the lecture OEE workload hours to 45 on the Components page, then whenever someone schedules a lecture for this course, the lecture component, 45 OEE workload hours, appears by default on the Class Components page. Similarly, if you set the laboratory component to 15 OEE workload hours on the Components page, then whenever someone schedules a laboratory for this course, the laboratory component, 15 OEE workload hours, appears by default on the Class Components page. You can modify the component values on the Class Components page if necessary. This field is optional. |
| Final Exam |
Enter a value to indicate whether a final exam is given in the course. The value you enter here defaults to the Schedule of Classes. Final exam values are delivered with your system as translate values. Add as many values to the translate table for the final exam as needed. The only value that you must not remove from the translate table is Yes, which has coding attached to it. Values are: Yes: The Yes value enables block final exam scheduling. This value cannot be modified without programming effort. No: Indicates that this component has no final exam. Entering No eliminates this component from the block exam scheduling process. Last Class: Indicates that a final exam is taken in the last regularly scheduled class (as opposed to during final examination week). Entering Last Class eliminates this component from the block exam scheduling process. |
| Exam Seat Spacing |
If you enter Yes in the Final Exam field, the Exam Seat Spacing field becomes available for entry. Enter the number of spaces between student's seats during the exam. For example, enter 2 to have two empty seats between each student taking the exam. This value has no programming tied to it. Use this field for your information or for third-party interface. |
| Provider for Authentication |
If this course is a learning management system (LMS) course requiring self-service user authentication, and the Provider for Authentication is not set on the Academic Institution 3 page, then enter the provider here. The value entered here appears by default on the schedule of classes when you schedule a class, but you can override it. If this field is left blank, any time you schedule a class for this course the system uses the LMS file type from the Academic Institution 3 page. |
| LMS File Type |
If your institution uses the LMS interoperability feature, enter the LMS file type for the interface. The value entered here appears by default in the schedule of classes when you schedule a class, but you can override it. If this field is blank, any time you schedule a class for this course, the LMS file type is provided by default from the setting on the Academic Institution 3 page. Values are XML V1.01, Blackboard CourseInfo 4, and API Input. WebCT Campus Edition and WebCT Vista both support XML V1.1 and user authentication. |
| Auto Create |
Select for each component to have the system automatically create that component of the course in the schedule of classes. This saves you data entry and ensures that the system schedules at least one section for each required component. |
| Graded Component |
Select to enable grading of this component. Only one component can have a final grade. The value you select for this course offering appears by default on the (Schedule New Course, Schedule of Classes) Basic Data page when you schedule a class section for this course offering. |
| Primary Component |
Select whether this is the primary component of the course. If you are using the Dynamic Class Dates feature, it is mandatory that you select a primary component for the course, even if you only have one component. The Dynamic Class Dates process always uses the scheduled class section of the primary component to calculate the landmark dates on a dynamic academic calendar. The process uses the primary component value on the Class Associations - Class Components page. |
| Optional Component |
If available for entry, select so that the system does not require that students enroll in this component. If you clear the check box, the system requires students to enroll in the component. |
| Include in Dynamic Date Calc (include in dynamic date calculation) |
Select to include this component of the course offering, in addition to the primary component, in the Dynamic Class Dates process. The system automatically selects and makes unavailable for edit this check box for the primary component of a course because the Dynamic Class Dates process always uses the scheduled class section of the primary component to calculate the landmark dates on a dynamic academic calendar. This check box is optional for other components. The value here appears by default on the corresponding field for all class sections of the component that you schedule on the Basic Data page. For non-primary components, you can override the default value on a section-by-section basis. |
| Generate Class Mtg Attendance (generate class meeting attendance) |
Select to indicate that you want the system to always generate attendance rosters for all classes your institution schedules for this course component. This value defaults to the Schedule of Classes where you can override this setting. Selecting this check box marks the class so that when you generate attendance rosters through the Attendance Roster Generator page you have the option to limit processing to only the classes that have this check box selected and that meet your processing criteria. If you clear this check box on the Attendance Roster Generator page, the generator creates attendance rosters for all classes that meet your processing criteria, regardless of the check box setting. When you generate attendance rosters through the Class Attendance page and this check box is selected for a scheduled class, the setting has no effect on processing. |
| Add Fee |
Click to add an additional fee for the course component and to access the Course Fees Modal page. The additional fee is attached to the course component that you specify. |
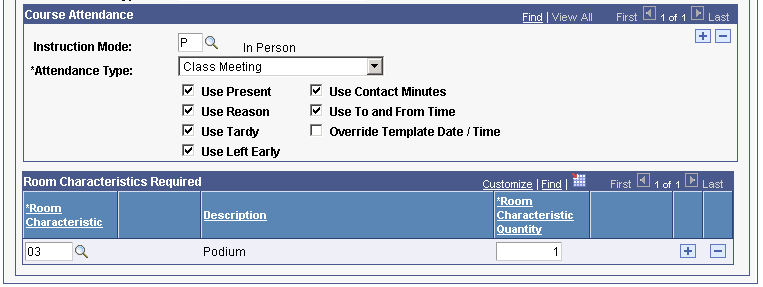
Course Attendance
|
Field or Control |
Definition |
|---|---|
| Instruction Mode |
The instruction mode indicates whether the course component is taught In Person or using Interactive TV, World Wide Web, Correspondence, and so on. The instruction mode relates to the attendance type. You can indicate an instruction mode, then select attendance type values for the course component that relate only to this instruction mode. For example, by selecting the In Person instructor mode, you can select an attendance type that applies only to the In Person instruction mode. If you leave the Instruction Mode field blank, the attendance types that you define for the course component applies to all instruction modes. When you create and update attendance rosters, only the attendance type values that relate to the instruction mode for the class are available for you to use. Instruction modes for classes are set on the Schedule of Classes - Basic Data page. Instruction mode values are defined on the Instruction Mode page. |
| Attendance Type |
Select each attendance type that your institution might use for the course component. The attendance type indicates the type of class meeting attendance roster you want to generate, such as Class Meeting, Conference, Field Trip, Instructor Consultation, or Study Group. Add rows for additional attendance types. When you track attendance, the system prompts you only with the attendance type values that your institution defines for the course component. Values for this field are delivered with your system as translate values. You can modify these values. Note: At the least, you should specify the attendance type value that your institution has selected on the Academic Institution Table 3 page to use whenever you generate attendance rosters, as well as the fields you want the system to use for this component's attendance type. Although you can generate attendance rosters for a course component without defining attendance type values and their associated fields, the system only creates a default attendance roster that includes the Template Number for the class meeting attendance roster; the Attendance Type and its description; the Attendance Date; and each student's ID, name, and career. You must return to the Components page and define these values for your institution to be able to track student attendance. For each attendance type of the course component, select the fields you want the system to use when generating class attendance rosters. You can set up the system to generate attendance rosters with as few or as many fields as you want to appear for each class section. When you generate attendance rosters, the available fields that appear on the attendance rosters for each attendance type depend on the options you select for each attendance type of the course component. Values for any given course component's attendance type are: |
| Use Present |
Select in order for the attendance rosters to have a Present check box on them. |
| Use Reason |
Select in order for the attendance rosters to have a Reason field on them. You can use the reason field to describe a reason for why a student is present, tardy, leaves early, or any other reason your institution wants to track. |
| Use Tardy |
Select in order for the attendance rosters to have a Tardy check box on them. |
| Use Left Early |
Select in order for the Attendance rosters to have a Left Early check box on them. |
| Use Contact Minutes |
Select in order for the attendance rosters to have a Contact Minutes field on them. The system populates the contact minutes time with the total minutes of the class meeting. The system determines this value based on the Class Meeting pattern that your institution has set up for the class in the Schedule of Classes. |
| Use To and From Time |
Select in order for the attendance rosters to have a to and from time field to designate the start and end time of a class meeting. The system determines this value based on the class meeting pattern that your institution has set up for the class in the Schedule of Classes. |
| Override Template Date/Time |
Select for the attendance rosters to have an attendance date field on them. Also, you can override the attendance date, from time, and to time values that appear on the attendance rosters. Otherwise, the corresponding fields that appear on an attendance roster template control the attendance date, from time and to time values that appear for each student on the attendance rosters. A template only identifies an attendance roster as unique. |
Room Characteristics Required
|
Field or Control |
Definition |
|---|---|
| Room Characteristic |
Enter the room characteristics that you require for the course component. Room characteristic values are defined on the Room Characteristic Table page. Characteristics you enter here default to the schedule of classes. Insert rows to add additional characteristics. This field is used for interfacing to the Universal Algorithm's product, Schedule 25. The maximum number of room characteristics for Schedule 25 is 96. Therefore, be sure you select values between 01 and 96 if you use Schedule 25. |
| Room Characteristic Quantity |
Enter the quantity of each room characteristic that you require. |
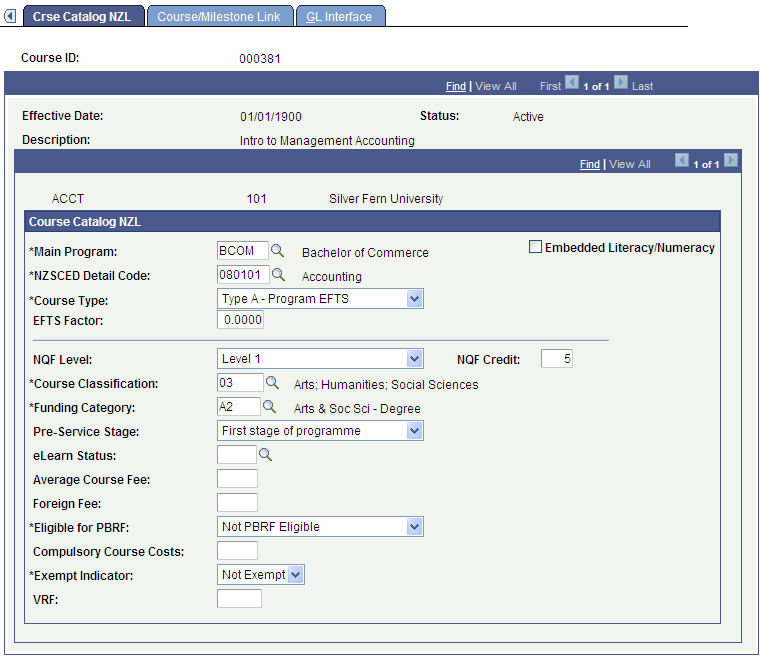
Access the Crse Catalog NZL (course catalog New Zealand) page ().
Image: Crse Catalog NZL page
This example illustrates the fields and controls on the Crse Catalog NZL page. You can find definitions for the fields and controls later on this page.
|
Field or Control |
Definition |
|---|---|
| Main Program |
Enter the main program for this course. When you generate the SDR course register file, the prospectus code from the program you select here is reported as a qualification code. |
| NZSCED Detail Code |
Enter the NZSCED field of study code for this course. Set up NZSCED field of study codes on the NZSCED Field of Study NZL page. |
| Course Type |
Enter the course type for this course. Values are:
If you enter Type B, the system displays the Hours field, in which you can enter the total hours for the course. The system calculates the EFTS factor based on the new value. If you enter Type A, the system recalculates the EFTS factor whenever the values change for the UNITS_ACAD_PROG, UNITS_MINIMUM, and UNIT_MAXIMUM fields in the CRSE_CATALOG record. The system calculates the EFTS factor for type A courses by multiplying the academic progress units for the course by the EFTS Translation A value defined for the institution. |
| EFTS Factor |
The system automatically calculates the EFTS factor for the course whenever you add a new course or whenever you change the course type or hours for the course. The system calculates the EFTS factor by multiplying the course hours by the EFTS Transaction B value defined for the institution. |
| NQF Level |
Enter the New Zealand Register of Quality Assured Qualifications level for the credits in this course. |
| NQF Credit |
Specify the number of New Zealand Register of Quality Assured Qualifications credits contained in this course. |
| Course Classification |
Enter the course classification code for this course. Define course classifications on the Course Classification NZL (SSR_CRS_CLSF_FNDC ) page. Only Course Classifications that have an effective date less than or equal to the current date and a status of Active are available for selection in the Course Classification field. |
| Funding Category |
Enter the funding category for this course. Define funding categories on the Funding Category NZL (SSR_FUND_CAT_NZL ) page. |
| Pre-Service Stage |
For courses that are part of a teacher training program, enter the pre-service stage code for the course. |
| eLearn Status |
Enter the eLearn status to indicate whether or not this course is offered through the internet. |
| Average Course Fee |
Enter the average fee for the students enrolled in this course for the reporting period. |
| Foreign Fee |
Enter the tuition fee paid by foreign, fee paying students. |
| Eligible for PBRF (eligible for Performance Based Research Fund) |
Use this field to indicate if a course is eligible for the Performance Based Research Fund. |
| Compulsory Course Costs |
Enter a dollar amount for the total compulsory fees for this course. |
| Exempt Indicator |
Indicate if a course was granted an exemption from FCCM (Fees/Course Costs Maxima). |
| VRF (Volume of Research Factor) |
Use this field to capture Volume of Research Factor data. This field is for informational purposes only. |
| Embedded Literacy/Numeracy |
Select this check box to indicate that the course has an embedded literacy or numeracy component. The check box is cleared by default. |
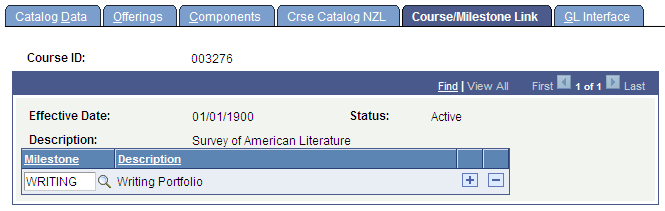
Access the Course/Milestone Link page ().
Image: Course/Milestone Link page
This example illustrates the fields and controls on the Course/Milestone Link page. You can find definitions for the fields and controls later on this page.
|
Field or Control |
Definition |
|---|---|
| Milestone |
Link a milestone to a course. If the Writing milestone for example is selected for a course, when a student enrolls in a section of that course, the Writing milestone is assigned to the student. A row is inserted in the Student Milestones page. The Enroll into Course Milestones check box must be selected on the Academic Institution 2 page and the Academic Career Table 2 page. (NZL) Enter the unit standards to link to this course. Link unit standards to milestones in the NQF Detail group box on the Milestone Table page. |
Access the GL Interface page ().
Copy and paste icons appear on this page, next to the Jrnl Set field. Use the copy icon to copy the setup for the row, which can then be pasted to the new, or any proceeding, row.
|
Field or Control |
Definition |
|---|---|
| Receivables From Item Type |
Select if you do not want to track revenue by course. The system allocates revenue based on the credit entry defined for the tuition item type. In this case, do not enter ChartField information. The system automatically tracks receivables for a course based on the debit entry defined for the tuition item type (on the Item Types - GL Interface page). If you want to track revenue by course, you must select the GL Interface Required check box on the Catalog Data page and then enter a credit entry for the class by completing the ChartFields on this page. |