Setting Up Item Types and Item Type Groups
To set up item types and item type groups, use the Item Types component (ITEM_TYPE_PANEL) and the Item Type Groups component (ITEM_GROUPINGS).
This section provides an overview of item types and item type groups and discusses:
Item types are the basic work unit of the Student Financials application. Each item type defines and describes a unique action. During the setup of your item types, you differentiate between charges and credits and define how and where each can be applied. You also group them by classification and determine how your system uses them to transfer student account information to your general ledger.
Many functions in the Student Financials application also use item type trees. You need to understand how item type trees are organized and used.
Note: Virtually everything you do within Student Financials involves item types (the exception being certain transactions in cashiering). Because of this, planning your item type setup is very important. Make sure that you create enough item types to represent every unique transaction. Also, establish a numbering scheme that enables you to group similar charges and credits. This helps you later when you define item type security and facilitates creating groups of item types for other setup procedures such as defining waivers, charge priority lists, and payment plans. Use the sample data that is provided with the system as an example.
See the product documentation for PeopleTools: Tree Manager.
Item Type Groups
Use item type groups to combine ranges of item types using multiple item type tree nodes. Item type groups limit the application of credits to desired charge items only. For example, if you have a waiver attached to a tuition group, you can use an item grouping to limit the application of the waiver to only tuition and housing, rather than to all fees.
Note: Do not define both a parent and child node.
|
Page Name |
Definition Name |
Navigation |
Usage |
|---|---|---|---|
|
Initial Setup |
ITEM_TYPE_TBL |
|
Define basic item type attributes. |
|
Amount Edits |
ITEM_TYPE_TBL4 |
|
Define transaction amount and tax form parameters for item types. |
|
Miscellaneous |
ITEM_TYPE_TBL2 |
|
Define miscellaneous parameters for item types. |
|
External Awards |
SSF_EAITMTYPE_TBL |
|
Define the financial aid external award type, source, and program code attributes for SF payments to be considered as external awards. |
|
Posting Restrictions |
ITEM_TYPE_TBL3 |
|
Define item type posting restrictions. |
|
Account Types |
ITEM_ACCT_TYPE |
|
Link account types to an item type. |
|
GL Interface |
GL_INTERFACE |
|
Map item types to general ledger accounts. |
|
AP ChartFields |
SSF_CF_WRKGRID_SEC |
Click the Jrnl Set ChartFields link on the GL Interface page. |
Define item type GL interface parameters for AP distribution. |
|
Write-off ChartFields |
SSF_CF_WRKGRID_SEC |
Click the Write-off ChartFields link on the Item Interface page. |
Define item type GL interface parameters for write-offs. |
|
Journal Set ChartFields |
SSF_CF_WRKGRID_SEC |
Click the Jrnl Set ChartFields link on the GL Interface page. |
Define item type GL interface parameters for a journal set. |
|
Deferred ChartFields |
SSF_CF_WRKGRID_SEC |
Click the Deferred ChartFields link on the GL Interface page. |
Define item type GL interface parameters for a deferred revenue account. |
|
Item Type Groups |
ITEM_GROUP_TBL |
|
Define item type groups. |
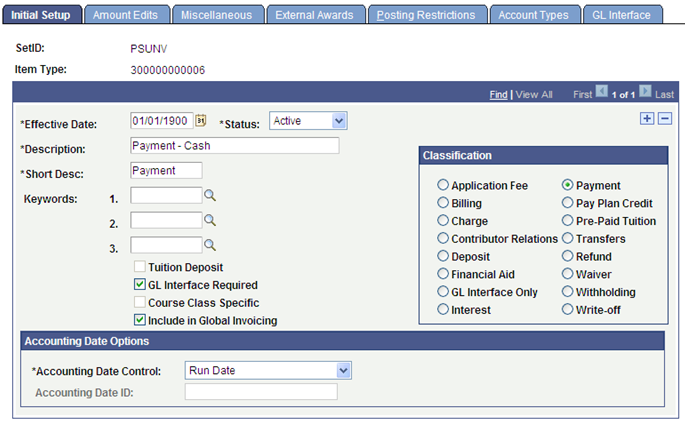
Access the Initial Setup page ().
Image: Initial Setup page
This example illustrates the fields and controls on the Initial Setup page. You can find definitions for the fields and controls later on this page.
|
Field or Control |
Definition |
|---|---|
| Keywords |
Select up to three keywords that you want to link to the item type. |
| Tuition Deposit |
Select if the item type is for a tuition deposit. This check box is active only when the Deposit item type classification is selected. |
| GL Interface Required |
If you select this check box, you must complete the GL Interface page of this component to save the item type. You must define both a debit and credit side for the item type, the GL Pct (general ledger percent) must add up to 100 percent for all accounts on each side, and all of the required fields on the GL Interface page must be populated. If you select this check box, the Course Class Specific check box and Accounting Date Options group box also become available. |
| Course Class Specific |
Select if you want to override the GL Interface defined for this item type and use one that is defined specifically for certain courses or classes. When you select this check box, the GL Interface defined for the item type is overridden if you define an interface at the course or class level only and select the Track Class Pricing check box on the related term fee setup. For example, if you want tuition revenue from certain math classes credited to a special account rather than the normal tuition account, set up a unique item type using the Course Class Specific option. Note: GL Interfaces specific to a course or class are defined on the Student Records GL Interface page in either the Course Catalog component or the Class Schedule component. |
| Include in Global Invoicing |
This check box is available only if Global Invoicing is enabled—the Apply Payments by Invoice option is selected on the SF Installation 2 page. The Global Invoicing process currently selects only charges, waivers and app fees—use this check box to include additional item types. Select the check box if you want the item type to be included in the invoice — for example, if you want to see an item type on the printed invoice/bill. See: |
Accounting Date Options
The Accounting Date Options group box is available only when the GL Interface Required check box is selected.
|
Field or Control |
Definition |
|---|---|
| Accounting Date Control |
Select the accounting date of the item type. Transactions in Accounting Line (SF_ACCTG_LN) are stamped with the accounting date. Values are: Accounting Date: Select this value to use the accounting date that is set up on the Accounting Dates page. When you select Accounting Date here, you must then select a value in the Accounting Date ID field, to associate it with the item type. The date that is used in Accounting Line transactions is the date that is set up for the term or a combination of term and session for that ID on the Accounting Dates page. Item Effective Date: Select to use the effective date of the transaction (item) as the accounting date. Maximum (Accounting Dt, Run Dt): Select this value to use the date that is the greater of these two dates—the accounting date (see the definition of the Accounting Date value) and the run date, which is the GL Interface process date. Maximum (Term Start Dt, Run Dt): Select to make the system use the more recent of term start date or run date as the accounting date. This option is useful to prevent complications resulting from accounting periods that have already been closed. Run Date: Select to use the GL Interface process date as the accounting date. This is the default value for this field. Term Start Date: Select to use the beginning of the term as the accounting date. For example, suppose students at your institution register for fall term courses in the spring, but you want the system to put the tuition income from those registrations into a fall accounting period. By selecting term start date as your accounting date control and specifying the fall term on your tuition transaction, the system posts the charges to the fall period. Warning! Selecting Term Start Date in the Accounting Date Control field could cause transactions to be backdated into an already closed accounting period. Select this option with caution. |
| Accounting Date ID |
This field is available and required only when the value in the Accounting Date Control field is Accounting Date or Maximum (Accounting Dt, Run Dt). All IDs that are set up on the Accounting Dates page and have an active status are available values in this field. Use this field to assign an accounting date ID to an item type to designate the specific date to be used for Accounting Line transactions. |
Classification
Select the appropriate classification for this item type. Your choice determines the fields that are available to you on the Miscellaneous Edits page, and indicates to the system whether the item type is a charge or credit entry.
|
Field or Control |
Definition |
|---|---|
| Application Fee |
Select if you are defining an item type used for an application fee. Application Fee transactions result in a charge on the student's account. |
| Billing |
Reserved for future use. |
| Charge |
Select if you are defining a charge item type. Charge transactions result in a charge on the student's account and, depending on your GL setup, may create a receivable. |
| Contributor Relations |
Select if you are defining a contributor relations item type. Typically, the Contributor Relations staff define contributor relations item types. |
| Deposit |
Select if you are defining a deposit item type. If the deposit classification is selected, a Tuition Deposit check box is also activated. If this item type is used for a tuition deposit, both the Deposit classification and the Tuition Deposit check box must be selected. Deposit and Tuition Deposit transactions result in a credit on the student's account. |
| Financial Aid |
Select if you are defining a financial aid item type. Financial Aid transactions result in a credit (payment) on the student's account. Note: Financial Aid item types also require definition in the Financial Aid application. |
| GL Interface Only |
Reserved for future use. |
| Interest |
Select if you are defining an item type for interest charges for payment plans. Interest transactions result in a charge on the student's account. |
| Payment |
Select if you are defining a payment item type. Payment transactions result in a credit (payment) on the student's account. |
| Pay Plan Credit |
Reserved for future use. |
| Pre-Paid Tuition |
Reserved for future use. |
| Transfers |
Reserved for future use. |
| Refund |
Select if you are defining an item type used for an overpayment refund. Refund transactions result in a charge on the student's account. |
| Waiver |
Select if you are defining an item type used for waivers. Waiver transactions result in a credit (payment) on the student's account. |
| Withholding |
Select if you are defining an item type for tax withholding. Withholding transactions result in a charge on the student's account. |
| Write-off |
Select if you are defining an item type used for bad debt write-off. Write-off transactions result in a credit on the student's account. |
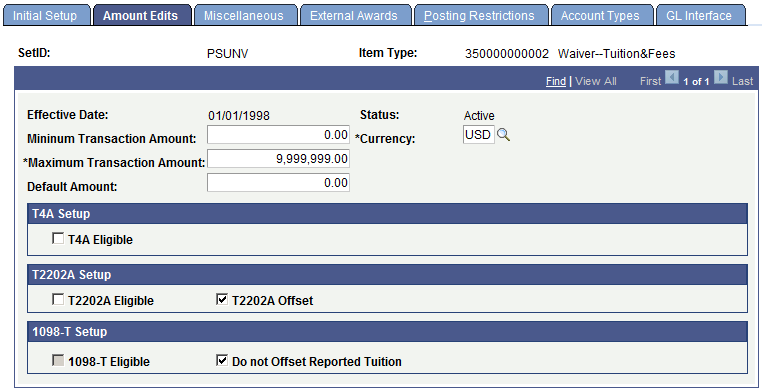
Access the Amount Edits page ().
Image: Amount Edits page
This example illustrates the fields and controls on the Amount Edits page. You can find definitions for the fields and controls later on this page.
|
Field or Control |
Definition |
|---|---|
| Min Transaction Amount (minimum transaction amount) and Max Transaction Amount (maximum transaction amount) |
Select the optional minimum and maximum amounts for each transaction using this item type. The system uses these amounts as edits for group posting. |
| Base Currency |
The base currency selected by your institution is supplied automatically to the Base Currency field. You can override this field. |
| Default Amount |
You can enter a default amount for your item types to streamline data entry. This is particularly useful when you are entering a charge or payment for something with a fixed cost (for example, a parking permit). You can override this default amount whenever necessary. The default amount must be greater than or equal to the minimum transaction amount. |
T4 Setup
This group box pertains to the form that is required by the Canadian government to report certain scholarships and other financial aid that must be counted as income.
T4 processing in Student Financials is a payroll interface. You can use Student Financials or Financial Aid to process income scholarships and have the scholarship income reported to the federal government through the standard payroll T4 process.
Note: If your institution does not use PeopleSoft Payroll for North America, you can run the SF Generate T4 Data process (SFGENT4) and use the output from the file generated by this process to create an interface with your payroll system.
|
Field or Control |
Definition |
|---|---|
| T4A Eligible |
Select the T4A Income check box and enter a corresponding wage loss plan on the CDN/ANZ Taxes page (in the SF business unit component) to indicate that this item type is considered income per the T4 definition (and, therefore, needs to be reported as income). A process in tax reporting generates the payroll interface that is necessary to generate a T4 transaction as an interface to the payroll system. Note: Wage loss plans are set up in |
T2202A Setup
This group box pertains to the form that is required by the Canadian government to report eligible educational expenses for Canadian students.
|
Field or Control |
Definition |
|---|---|
| T2202A Eligible |
Select if this item is an eligible educational expense. |
| T22202A Offset |
Select if this item is to be used to offset eligible educational expenses. For example, waivers may reduce the total fees paid by the student and would, therefore, be considered an offset. |
1098-T Setup
This group box pertains to the form that is required by the U.S. government to report eligible educational expenses for U.S. students.
|
Field or Control |
Definition |
|---|---|
| 1098-T Eligible |
Select if this item is an eligible educational expense. |
| Do not Offset Reported Tuition |
This check box is available only for Waiver item types, and disabled for other item type classification. By default, this check box is not selected. If you select this check box, for the:
Whether or not you select this check box, if the item type exists in the tree node that is used in the Item Type Group that is attached to the TIN setup table, the item type is included as financial aid in Box 5. |
Access the Miscellaneous page ().
Image: Miscellaneous page
This example illustrates the fields and controls on the Miscellaneous page. You can find definitions for the fields and controls later on this page.
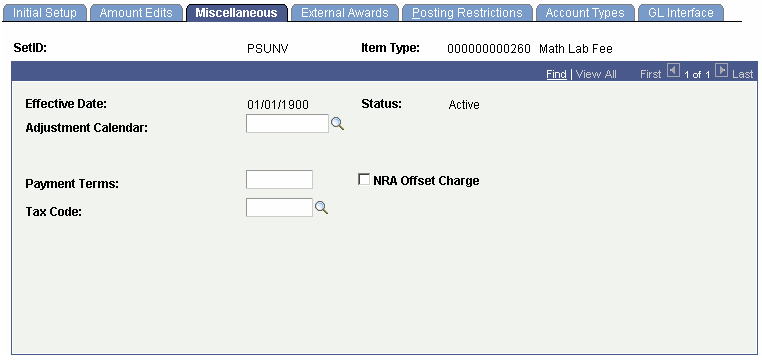
Note: Not all fields shown in the example are available for all item type classifications. And other fields may be available that are not shown. The following list defines all fields that are used with all item type classifications.
|
Field or Control |
Definition |
|---|---|
| Charge Priority List |
Select the charge priority list that you want to use to control which charges are eligible for payment with this item type. If you are selecting a charge priority list for an ePayment item type, the value that you select here affects the charges that are eligible for self-service payment on the Payment Information, Charge Information, and Payment Allocation pages. This field is used with Deposit, Financial Aid, Payment, Pre-Paid Tuition, and Waiver item type classifications. Note: You can leave this field blank if you want charge priority lists to be ignored for this item type. If you do so, excess payments appear as unapplied payments, potentially available for refund to the student. For example, if this item type is a Financial Aid stipend that a student uses to pay for living expenses, but not available for tuition and mandatory fees, you could leave this field blank. Any stipend is then reflected as an excess payment and may be given to the student as a refund for living expenses. Warning! Do not change this setting after transactions have been posted. Create a new item type with a new charge priority list. |
| Payment Overall Priority |
Select the payment overall priority definition that you want to use to control the order in which payments are applied to eligible charges using this item type. This field is used with Deposit, Financial Aid, Payment, Pre-Paid Tuition, and Waiver item type classifications. Warning! Do not change this setting after transactions have been posted. Create a new item type with a new payment overall priority. |
| Adjustment Calendar |
Reserved for future use. |
| Days to Encumber |
If you want to encumber payments for a period of time before making them available for a refund, enter the number of days in this field. The number that you enter in this field establishes how many business days must pass before a refund can be made. For example, if you entered the number 10 in this field, ten working days would have to pass before a customer could receive a payment refund (the student could receive a refund on the eleventh day). This field is used with Payment item type classifications. |
| Payment Terms |
Reserved for future use. |
| NRA Taxable Credit (nonresident alien taxable credit) and Earnings Code non-resident aliens (NRAs)item type setup |
Select if this item type is considered taxable income for nonresident aliens. When you select this option, the Earnings Code field becomes active and you can identify the item type with its corresponding payroll earnings code. This field is used with Financial Aid, Payment, and Waiver item type classifications. |
| NRA Offset Charge (nonresident alien offset charge) and Earnings Code |
Select if this item type can offset (reduce) tax liability for nonresident aliens. When you select this option, the Earnings Code field becomes active and you can identify the item type with its corresponding payroll earnings code. This field is not shown on the sample page. This field is used with Application Fee, Billing, Charge, GL Interface Only, Interest, and Withholding item type classifications. |
| Tax Code |
Select a tax code for charges that are taxable. For example, purchases that are made at a campus bookstore might be subject to state taxes, local sales taxes, or both. This field is not shown on the sample page. This field is used with Charge, GL Interface Only, Refund and Withholding item type classifications. |
| Earnings Code Non Taxable |
Enter an earnings code to be used with nontaxable payments. This field is used with Deposit, Financial Aid, Payment, Pre-Paid Tuition, Refund, and Waiver item type classifications. |
| Earnings Code |
If you process refunds through payroll, choose the appropriate earnings code. This field is used with all item type classifications except Write-off. |
| Tender Specific |
Select if you want to specify the form of tender to use with this item type. For example, if you set up an item type to be used for credit card payments, you should select this check box and specify the desired tender form in the Tender Category field. The Tender Category field appears when you select this option. This field is used with Deposit and Payment item type classifications. |
| Tender Category |
Select the tender category that you want to use with a tender specific charge. |
| Refundable Indicator |
Select if you want payments against the charge to be eligible for refunding. This field is used with Deposit, Financial Aid, Payment, and Pre-Paid Tuition item type classifications. |
| Taxable |
If you use PeopleSoft Payroll for North America, the system automatically selects and uses this option. Clear the check box if the item type is not taxable under any circumstance, or your institution does not use Payroll for North America. This field is used with Deposit, Financial Aid, Payment, and Pre-Paid Tuition item type classifications. |
| Payment Priority Flag |
Select to assign a priority ranking to this payment. When you select this check box, the Priority field is activated. If you do not select this option, the system ignores values in the Priority field and the payment has the lowest priority ranking (999). This field is used with Deposit, Financial Aid, Payment, and Waiver item type classifications. Warning! Do not change this setting after transactions have been posted. Create a new item type with the Payment Priority Flag check box cleared. |
| Priority |
Enter a priority value. Payment priority is used to cause payment swapping whereby payments with a higher priority can actually displace lower-priority payments. For example, you might want financial aid payments to be applied to tuition charges whenever possible, leaving the student with less out-of-pocket expenses. And rules that are associated with certain types of financial aid might require that institutional waivers be applied ahead of the aid. In this case, the institutional waivers should have a higher priority value (1 being the highest priority value and 999 being the lowest) than the financial aid, and the financial aid should have a higher priority value than a cash payment. With payment swapping, waivers and financial aid payments (in the previous example) can be applied after a cash payment has been made and the cash payment is swapped out, or displaced by the higher priority payments. Assuming that the total payments exceed the amount of the charge resulting in an overpayment, the cash payment would then be eligible for refund to the student. This field is used with Deposit, Financial Aid, Payment, and Waiver item type classifications. |
| Pick Up Receivable from Charge |
Select to credit receivables based on the specific charge being paid by the payment. This selection is used in GL processing. This field is used with Deposit, Financial Aid, Payment, and Waiver item type classifications. |
| Match Charge Write-Offs |
Select to match write-off entries to the original charges. You must also complete the Write-Off page for each charge item type and term for which you want to match charges to write-offs on the GL Interface. This field is not shown on the sample page. If this check box is cleared, write-offs will be routed to the generic receivables account that is set up in the write-off item type. This field is used only with the Write-off item type classification. |
Access the External Awards page ().
Image: External Awards page
This example illustrates the fields and controls on the External Awards page. You can find definitions for the fields and controls later on this page.
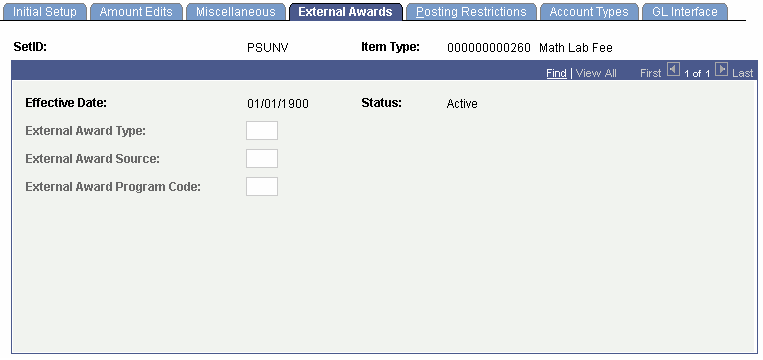
Use this page to define the financial aid external award type, source, and program code.
To define an external award, complete the financial aid setup that defines the general external award attributes, then set the way your institution mapping strategy will represent a student's financial payment will be represented on a Financial Aid Award package. After this is completed, complete the External Award Cross Reference setup in Financial Aid which will maps the award attributes to a financial aid item type. Finally, complete the External Award page on the Student Financials item type setup to complete the mapping of payments to a Financial Aid award.
The Student Financials External Awards process uses the cross-reference mapping and external award attributes mapped on the Student Financials item type setup to determine which Student Financials payments to process and report as external award transactions.
Access the Posting Restrictions page ().
Image: Posting Restrictions page
This example illustrates the fields and controls on the Posting Restrictions page. You can find definitions for the fields and controls later on this page.
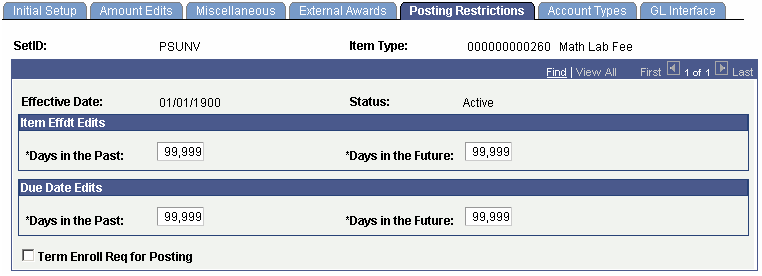
Item Effdt Edits (item effective date edits)
|
Field or Control |
Definition |
|---|---|
| Days in the Past and Days in the Future |
Enter the number of days in the past and the number of days in the future that an item can be effective-dated. |
Due Date Edits
|
Field or Control |
Definition |
|---|---|
| Days in the Past and Days in the Future |
Enter the number of days in the past and the number of days in the future that a due date can be set. |
| Appropriate Term Enroll Req for Posting (appropriate term enroll required for posting) |
Select if you want the system to make sure the student is enrolled in the appropriate term before posting the charge. If the student is not enrolled, the charge is left with the status unposted. Use this feature to avoid posting charges that have a high probability of being canceled. |
Access the Account Types page ().
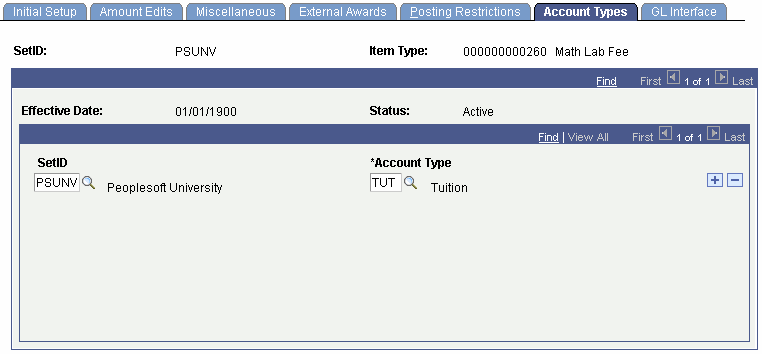
Image: Item Types – Account Types page
This example illustrates the fields and controls on the Item Types – Account Types page. You can find definitions for the fields and controls later on this page.
|
Field or Control |
Definition |
|---|---|
| SetID |
Enter the setID that includes both the account type and the item type. Warning! You can have item types and account types duplicated in more than one setID, but this is not recommended. Exercise caution that you do not specify a setID that is incorrect for the item type that you are defining. |
| Account Type |
Enter an account type that you want to associate with the item type. Account types provide information for prompting when you are performing data entry. |
Access the GL Interface page ().
Image: GL Interface page
This example illustrates the fields and controls on the GL Interface page. You can find definitions for the fields and controls later on this page.
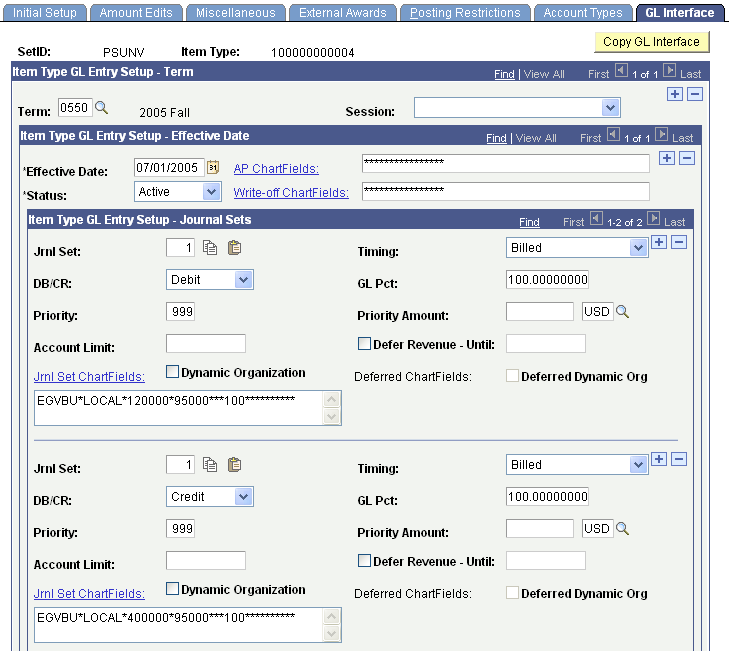
Note: If you select the GL Interface Required check box on the Initial Setup page, you must complete this page to save the item type.
|
Field or Control |
Definition |
|---|---|
| Copy GL Interface |
Click to copy a GL Interface setup from a previous term. Note: Although the GL Interface definition is designated for a specific term, it is also effective-dated. Therefore, you need not perform the copy function if no changes are made to your setup. |
Item Type GL Entry Setup - Term
|
Field or Control |
Definition |
|---|---|
| Term |
Select a term if you have a term-specific general ledger. If you do not enter a term, you must enter 0000 as a placeholder. |
| Session |
Select a session if you want to limit the GL Interface definition to a specific academic session. |
Item Type GL Entry Setup - Effective Date
|
Field or Control |
Definition |
|---|---|
| Effective Date and Status |
Enter the effective date and the status for the interface. |
| AP ChartFields |
Click to access the AP ChartFields page, where you can enter chart of accounts information to define a liability account—typically a holding account. The link is not available if this is a Contributor Relations item type. Use this link if you use the PeopleSoft Accounts Payable interface to create refund checks for students, external organizations, or both. Select a predefined SpeedType definition to populate the ChartFields. Click the Copy button to copy ChartField values into a temporary variable. Click the Paste button to paste the copied ChartField values from the temporary variable into another ChartField page. Note that if one of the check boxes in the ChartField Edit Options group box on the SF Installation page is selected, then a check mark button appears next to the Copy and Paste buttons. Click the check mark to validate the ChartField combination. This button does not start journal set edits. |
| Writeoff ChartFields |
Click to access the Writeoff ChartFields page, where you can enter chart of accounts information to define an account for write-offs. You must define a unique account for each charge that you want the system to match. Select a predefined SpeedType definition to populate the ChartFields. Click the Copy button to copy ChartField values into a temporary variable. Click the Paste button to paste the copied ChartField values from the temporary variable into another ChartField page. Note that one of the check boxes in the ChartField Edit Options group box on the SF Installation page is selected, then a check mark button appears next to the Copy and Paste buttons. Click the check mark to validate the ChartField combination. This button does not start journal set edits. |
Item Type GL Entry Setup - Journal Sets
Each GL Interface definition requires at least one debit and one credit entry. Each debit entry and each credit entry can be split into multiple entries for distribution to your general ledger, but you must make sure that each side (debit and credit) totals 100 percent.
|
Field or Control |
Definition |
|---|---|
| Jrnl Set (journal set) |
Enter the journal set that is used by your institution. You can use multiple journal sets. This enables you to generate a set of balanced entries into your journals. Using multiple journal sets also enables you to set journals for multiple ledgers, for example, budget or actuals. Use the copy icon to copy the setup for the row, which can then be pasted to the new or any proceeding row. |
| Timing |
Select the appropriate timing for sending the charge to the general ledger. You can select either Assessment, which sends the charge when it is incurred, Satisfaction, which sends the charge when the offset is posted, or Billed, which sends the charge or waiver when it has been billed. |
| DB/CR (debit/credit) |
Select either Debit or Credit for the DB/CR field. You must set up one debit and one credit for each item type. Note: For charge classifications, the debit side represents accounts receivable and the credit side represents revenue. |
Next to the Jrnl Set field, there are copy and paste icons. Use the copy icon to copy the setup for the row, which can then be pasted to the new, or any proceeding row.
To input all areas for the ChartFields, abbreviated display fields have been added. The number of delimiters displayed is based on the number of ChartFields. The abbreviated display fields are used to view the ChartField set up as a string, add or update the ChartField string. All ChartField edits set up on the SF Installation page are adhered to within the display field.
Splitting a Transaction Between Multiple GL Accounts
The General Ledger Percent (GL Pct), Priority, Priority Amount, and Account Limit fields are used to split a debit or credit across multiple GL accounts.
|
Field or Control |
Definition |
|---|---|
| GL Pct (general ledger percent) |
Enter an optional percentage of the transaction that you want posted to the GL account. |
| Priority |
Enter the posting priority for either the GL percent or priority amount. The lower the number, the higher the priority. |
| Priority Amt (priority amount) |
Enter an optional priority amount that you want distributed to a GL account. If you specify a priority amount, the amount specified will be distributed to the GL account definition with the highest priority. The remaining balance will be distributed to the remaining GL accounts as defined. |
| Account Limit |
Enter a maximum monetary amount that you want to distribute to the specified GL account. For example, if you set the GL Pct field to 25 percent and the Account Limit field to 100 USD, 25 percent of a debit or credit up to a maximum of 100 USD will be distributed to the specified GL account. |
| Defer Revenue - Until and Deferred Date |
Select the Defer Revenue - Until check box on the revenue (credit) side of your ChartField setup and specify a date. Then click the Deferred ChartFields link to access the Deferred GL Interface page, where you can define GL Interface parameters for a deferred revenue account. If you indicate that a particular item type needs to defer revenue, the system prompts you for liability account information and the deferred date. The system uses the liability account until the date that you have indicated for that item type. The system does not automatically generate the entry for moving the deferred revenue from the liability account to the realized revenue. When this date passes, you must move the revenue into the general ledger. Select a predefined SpeedType definition to populate the ChartFields. Click the Copy button to copy ChartField values into a temporary variable. Click the Paste button to paste the copied ChartField values from the temporary variable into another ChartField page. Note that if one of the check boxes in the ChartField Edit Options group box on the SF Installation page is selected, then a check mark button appears next to the Copy and Paste buttons. Click the check mark to validate the ChartField combination. This button does not start journal set edits. |
| Deferred ChartFields |
This link becomes available only if you check the Defer Revenue - Until check box above. Click this link to access the Deferred GL Interface page, where you can define GL Interface parameters for a deferred revenue account. Select a predefined SpeedType definition to populate the ChartFields. Click the Copy button to copy ChartField values into a temporary variable. Click the Paste button to paste the copied ChartField values from the temporary variable into another ChartField page. Note that if one of the check boxes in the ChartField Edit Options group box on the SF Installation page is selected, then a check mark button appears next to the Copy and Paste buttons. Click the check mark to validate the ChartField combination. This button does not start journal set edits. |
| Journal Set ChartFields |
Click this link to access the Journal Set ChartFields page, where you can define the parameters for the journal set. |
| Dynamic Organization |
If you select this optional check box, the system allocates the appropriate revenue based on the subject area of the classes in which a student is enrolled. In the PeopleSoft Student Records system, subject areas map to academic organizations, and academic organizations map to financial organizations. Consequently, the system enables you to map subject areas to financial organizations. By using these constructs with the dynamic organization capabilities, you can distribute revenue based on a student's course load using the organizational ChartField. Note: The dynamic organization feature uses billing units. When making adjustments, the system reallocates based on the number of billing units. It does not use the adjustment calendar to determine how much remains allocated to the organization. It reallocates 100 percent of the funds. |
| Deferred Dynamic Org |
Select to have the system defer the appropriate revenue based on the subject area of the classes in which a student is enrolled. This capability enables you to defer revenue based on a student's course load using the organizational ChartField. |
Journal Set ChartFields Page
Access the Journal Set ChartFields page (Click the Jrnl Set ChartFields link on the GL Interface page).
Image: Journal Set ChartFields page
This example illustrates the fields and controls on the Journal Set ChartFields page. You can find definitions for the fields and controls later on this page.
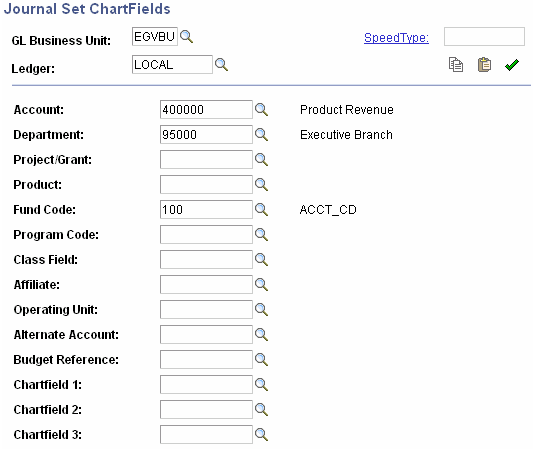
Note: You must run the Sync Chartfield Values process before you use this page.
See Synchronizing ChartField Values.
Use this page to define the parameters for the journal set.
Select a predefined SpeedType definition to populate the ChartFields.
Click the Copy button to copy ChartField values into a temporary variable.
Click the Paste button to paste the copied ChartField values from the temporary variable into another ChartField page.
If one of the check boxes in the ChartField Edit Options group box on the SF Installation page is selected, a Validate check mark icon appears next to the Copy and Paste buttons. Click the Validate icon to validate the ChartField combination. This icon does not start journal set edits. If you do not click the Validate icon, validation is still performed when you save the Item Types component.
For Oracle Financials, the Real-Time Validation Edit option should be selected on the SF Installation page. Click the icon to perform real time validation of the entered combination with Oracle GL. If you do not click the Validate icon, real time validation is still performed when you save the Item Types component.
Integration with Oracle Financials
The Journal Set ChartFields page appears and functions differently if Oracle Financials is selected in the Financial System group box on the SF Installation page:
If you select a GL business unit that has not been mapped on the Chartfield Mapping page, you receive an error message.
The Ledger field does not appear.
The 2 Affiliate Intra (Intra Unit), Project/Grant, and Affiliate chartfields are not supported and these should be made inactive on the HRMS Standard Chartfield Configuration page.
The prompt table associated with the chartfields displays valid segment values based on the mapping on the ChartFields Mapping page.
See:
Mapping General Ledger Business Units to Oracle General Ledger
CS90 to EBS GL Integration Developer's Reference Guide. The guide is posted to My Oracle Support.
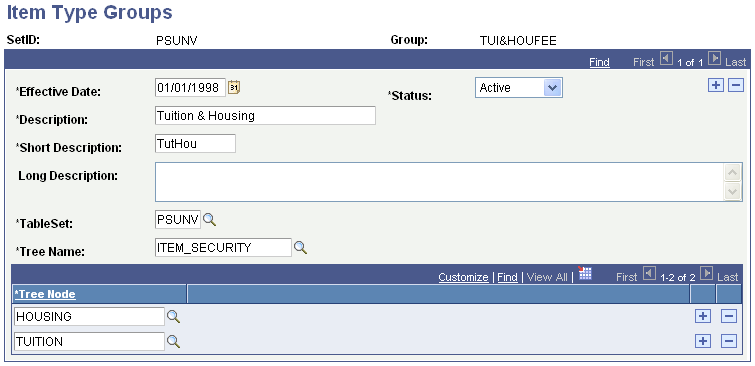
Access the Item Type Groups page ().
Image: Item Type Groups page
This example illustrates the fields and controls on the Item Type Groups page. You can find definitions for the fields and controls later on this page.
|
Field or Control |
Definition |
|---|---|
| TableSet |
Select the setID that includes the item type tree that you want to use. |
| Tree Name |
Select the tree name of an item type tree that includes all of the tree nodes that you want to include in your item type group. |
| Tree Node |
Select a tree node that you want to include in your item type group. Note: Do not define both a parent and child node. |