Setting Up Installation Parameters and Keywords
To set up installation parameters and keywords, use the Student Fin Installation component (INSTALLATION_SF) and the Keywords component (KEYWORDS).
This section provides overviews of installation parameters and key words and global invoicing and discusses:
Installation parameters define how Student Financials looks and performs. You specify how the system:
Numbers certain elements.
Displays results for various functions.
Determines the frequency for committing work to the database.
You can change most of these settings at any time without any negative impact. In fact, you should experiment with your settings to strike the proper performance balance. PeopleSoft software provides default settings for many of these parameters, but review them to make sure that they work well for your institution.
Keywords
Key words enable you to quickly locate item types within a long list of possibilities. For example, you might have dozens of payment item types, but only a handful that are related to scholarships. By defining Scholarship as one of your key words and associating it with the select few item types, it will be much easier to locate just the item type you need. You can define up to three keywords per item type. Key words are associated with edit tables, and you must select the appropriate edit table to use for each key word.
Note: Because Student Financials, Financial Aid, and Contributor Relations all use keywords, we recommend Student Financials, Financial Aid, and Contributor Relations staff work together to define a keyword standard for your institution.
Many institutions, especially those outside the United States, are required to bill and collect payments from students using an invoice model rather than the standard statements typically used in the United States. Campus Solutions enables such global institutions to invoice for student receivables.
Global invoicing enables institutions to:
Link charges to a specific invoice with a unique invoice number. Subsequent invoices include only new activity and do not include any prior balance.
Send a reminder letter rather than include unpaid charges in another invoice if a student does not pay an invoice.
Allow students to make a payment against a specific invoice rather than against the overall account. Any charge or payment priorities are applied only within the context of the specific invoice.
Create a specific credit invoice that references the original invoice if charges are reversed after being invoiced.
Refund excess payments or a credit balance from an invoice to the student unless the student authorizes the institution to apply that credit to a different invoice.
Pass charges to the General Ledger only after they have been invoiced.
Campus Solutions offers institutions the flexibility to use its global invoicing functionality or to use billing statements.
An option in the Student Financials installation setup enables the global invoicing functionality. Institutions can also define banking information for inclusion on the invoice as necessary.
|
Page Name |
Definition Name |
Navigation |
Usage |
|---|---|---|---|
|
SF Installation |
INSTALLATION_SF |
|
Define number sequence start points, maximum row settings, ChartField edit options, financial system setup, AP refunding option, and notification options for direct deposit refunding. |
|
Populate Items by Invoice |
SSF_RUNCTL_EURO_BI |
|
Define payment by invoice. |
|
SF Installation 2 |
INSTALLATION_SF2 |
|
Define keyword edit tables, invoice/payment processing, a null due date, and enable tuition installments. |
|
SF Installation 3 |
INSTALLATION_SF3 |
|
Define commit levels. |
|
Keywords |
KEYWORD_TBL |
|
Define keywords. |
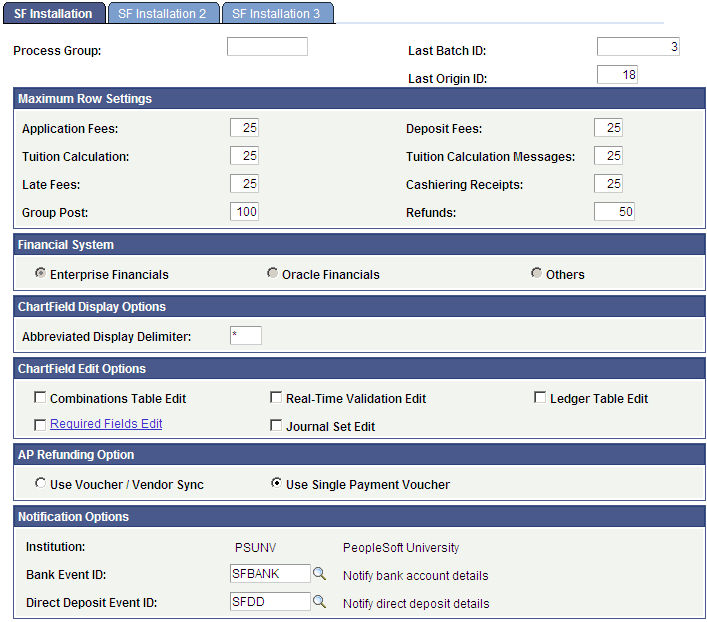
Access the SF Installation page ().
Image: SF Installation page
This example illustrates the fields and controls on the SF Installation page. You can find definitions for the fields and controls later on this page.
|
Field or Control |
Definition |
|---|---|
| Process Group |
Enter a value for the process group. The system uses the process group in conjunction with GL Combination processes. |
| Last Batch ID |
Each batch transaction is assigned an ID number. This field displays the last ID number assigned to a batch. To start your numbering sequence at a particular point, enter a number here. Otherwise, the system continues to increment subsequent batch transactions from the number shown. |
| Last Origin ID |
Use origin IDs to track the source of batch transactions (for example, receipts from the housing or parking offices). This field displays the last ID number that was assigned to an origin definition. To start your numbering sequence at a particular point, enter a number here. Otherwise, the system continues to increment subsequent origin definitions from the number shown. |
Maximum Row Settings Group Box
For each field in this group box, enter the maximum rows of results that you want to display on a page at one time.
Financial System
Use this group box to select the financial system that you want to use: Enterprise Financials, Oracle Financials, or Others.
The selection and functioning of the options in this group box depends on the General Ledger check box selection on the HRMS Installation Table (Setup HRMS, Install, Installation Table).
If the General Ledger check box is selected in HRMS:
The Enterprise Financials option is selected by default and is read-only.
The Oracle Financials and Others options are not available for selection.
If the General Ledger check box is cleared in HRMS:
The Enterprise Financials option is selected by default and is available for selection.
The Oracle Financials option is available for selection.
The Others option is available for selection.
ChartField Display Options
|
Field or Control |
Definition |
|---|---|
| Abbreviated Display Delimiter |
This field is used to distinguish individual ChartFields to be added, updated or viewed as a string on setup pages. Select a delimiter that is not a letter, number or special character used to define any of the ChartField values. For example, if the character '-' is used within the ChartField value 23-1103, do not use the '-' character as the delimiter. If 'A' is used within the ChartField value such as TRAINING, do not use 'A' as the delimiter. |
| Display External Chartfield |
This field is available only if the General Ledger check box is cleared in HRMS and the Others option is selected in the Financial System group box. |
ChartField Edit Options
ChartFields represent organizational or reporting structures and are used to facilitate the journaling of accounting entries. You can use dynamic ChartFields to customize certain display characteristics (such as order, visibility, labels) of the standard set of ChartFields. Selecting one of the first four options ensures that the Student Financials Departmental Receipt is created with a required ChartField.
|
Field or Control |
Definition |
|---|---|
| Combinations Table Edit |
Evaluates the ChartField combination to determine whether it exists in the PS_VALID_COMBO_TBL. If you select the Combinations Table Edit check box, you cannot select the Real-Time Validation Edit check box. If you select Oracle Financials in the Financial System group box, this check box is cleared by default. Note: The Combinations Table Edit option is not supported for Oracle Financials. |
| Real-Time Validation Edit |
Evaluates the ChartField combination using the Synchronous Message COMBO_CF_EDIT_REQUEST with Student Financials. If you select the Real-Time Validation Edit check box, you cannot select the Combinations Table Edit check box. If you select Oracle Financials in the Financial System group box, this check box is selected by default. Note: The Real-Time Validation Edit option is supported for Oracle Financials and you should select this option if you select Oracle Financials as the financial system. When you set up chartfield combinations, a web service performs real time validation of the chartfield combinations against the Oracle GL combinations. |
| Ledger Table Edit |
The LED_FLDS_SF_TBL is used to store required ChartFields for a specified ledger. Required ChartFields are examined for values, and edit errors occur when required values do not exist in the specified ChartFields. If you select Oracle Financials in the Financial System group box, this check box is cleared by default. Note: The Ledger Table Edit option is not supported for Oracle Financials. |
| Required Fields Edit |
Checks for values in all fields defined in the Required Fields secondary page. |
| Journal Set Edit |
Evaluates individual sets of ChartFields (journal sets) to make sure that percent totals equal 100 and that ledger values remain the same for ChartFields of the same journal set. Selecting this check box also ensures that debit and credit journal set entries are properly balanced. |
| Use External ChartFields |
This check box appears only if you clear the General Ledger check box in HRMS, select Others as the Financial System on the SF Installation page, and restart the application server. |
See CS90 to EBS GL Integration Developer's Reference Guide. The guide is posted to My Oracle Support for Feature Pack 2, November 2009.
AP Refunding Option
This group box is available only if the Financial System is
Select an option to indicate how vouchers and vendors are created and sent to Accounts Payable (AP).
If you change the option, you receive a warning message: Changing AP Refunding Option might affect proper functioning of the system. Changing AP Refunding might make the system unstable. Some refunding functionality might not work as desired.
Note: Before you select an AP refunding option, refer to the Addendum: Direct Deposit Through AP Refunding document for additional setup information. This document is posted to My Oracle Support for Additional Features January 2011 as part of the AP Direct Deposit Refunds Documentation Package.
|
Field or Control |
Definition |
|---|---|
| Use Voucher/Vendor Sync |
This option is selected by default. Select this option to be able to run the Create Vendors and Vouchers process using VOUCHER_BUILD VERSION_1. A Vendor ID is generated for each student or organization. |
| Use Single Payment Voucher |
If you select this option, you can distribute refunds by direct deposit. Select this option to be able to run the Create Refund Voucher process using VOUCHER_BUILD VERSION_2. Note: A single payment voucher is created in AP, using a single payment vendor that is already set up—the same Vendor ID is reused across students or organizations. This reduces your vendor maintenance. Refunds are transferred to AP along with bank details and direct deposit distributions. |
Notification Options
Use this group box to define a bank event ID or direct deposit event ID to trigger email notifications when bank accounts are created or edited. The academic institution value defaults from the Student Admin Installation setup and is used along with the event ID for generating required communication.
To use the notification feature, you must first complete 3C setup in Campus Community.
The Bank Event ID, Direct Deposit Event ID, and Institution values are used to insert details into the 3C trigger table when a new bank account is added or existing details are modified by students in Self Service or by administrative staff. The 3C Engine and ComGen features use these values to generate the email notifications which are sent to students.
Note: The default academic institution and administrative function of GEN control which values are available in the Bank Event ID and Direct Deposit ID fields.
Email notifications can also be generated when a direct deposit refund is initiated—you complete setup for refund notifications on the SF Business Unit - Refund Setup page.
See:
Setting Up and Managing Direct Deposit Distributions for AP Refunding
Addendum: Direct Deposit Through AP Refunding. This document is posted to My Oracle Support for Additional Features January 2011 as part of the AP Direct Deposit Refunds Documentation Package.
Product documentation for PeopleSoft HRMS Application Fundamentals, Setting Up and Working with ChartFields and ChartField Combinations, Populating HRMS with Valid ChartField Combinations
Note: UPK for setting up AP Direct Deposit is also available. Click to access the Campus Solutions 9.0 Additional Features, January 2011, AP Direct Deposit Setups UPK.
Access the Populate Items by Invoice page ().
Image: Populate Items by Invoice page
This example illustrates the fields and controls on the Populate Items by Invoice page. You can find definitions for the fields and controls later on this page.
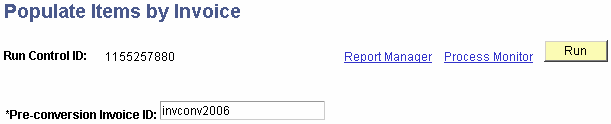
You can define your business requirements based on country requirements and business model needs.
This enables you to associate charges to individual invoices, create credit invoices, and produce reminder letters. On the payment side, you can run online posting, Cashiering, and batch processes to apply payments to specific invoices.
Run the Populate Item Invoice process to initialize the apply payments by invoice functionality.
This process creates rows in SSF_ITEM_INV that are required to apply payments by invoice. Before running this process, run billing for any transaction that has not yet been billed.
After the process is run, the installation Apply Payments by Invoice check box is selected on the SF Installation 2 page. If you decide at a later time to not apply payments by invoice, the user can clear the check box.
|
Field or Control |
Definition |
|---|---|
| *Pre-conversion Invoice ID |
The pre-conversion invoice ID can be any value and does not need to be defined in the Billing Invoice setup, for example, invconv2006. |
| Run |
Click to initiate the process. |
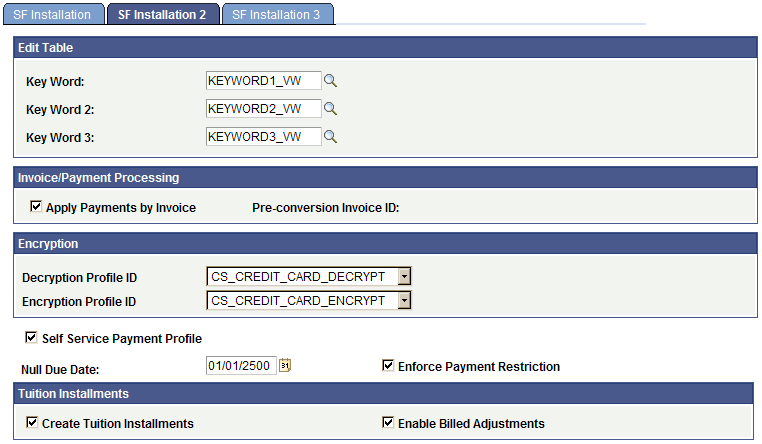
Access the SF Installation 2 page ().
Image: SF Installation 2 page
This example illustrates the fields and controls on the SF Installation 2 page. You can find definitions for the fields and controls later on this page.
Applying Payment by Invoice
Global institutions may have the requirement to assign payments to a specific invoice and not to individual charges.
Campus Solutions allows institutions to select whether to associate payments with a specific invoice or with individual charges. Global Invoicing will associate charges with individual invoices. When payments are received, they are paid against an invoice number and the payment is applied to the charges associated with that invoice. If an overpayment of an invoice number exists, a refund can be generated. A student can make a prepayment prior to any charges invoiced in order to hold his or her place in class. Such a prepayment is not part of the invoice. When tuition calculation is run and charges are incurred, and a bill is generated with the unique invoice number, the prepayment is applied to that invoice. Future bills show only the unpaid amount of the invoice, not an accumulation of charges and payments. If a waiver exists for a student's payment, the waiver appears on the invoice.
Applying payments by invoice involves:
Invoicing
Generate an invoice with unique invoice numbers for charges.
Associate invoice numbers with items on the invoice.
Create a credit invoice for overpayments.
Create a credit invoice for credit balances based on charge reversals while referencing the original invoice.
Create invoices in batch as well as on line.
View and reprint any individual invoice using original invoice data.
Store student bank information (similar to payment profile information but accessible administratively) for student or the legally responsible party.
Invoices with a payment voucher which include scan line (OCR-B font) that can incorporate the institution's bank information as well as the student's bank information, invoice number, and amount due.
Payment Processing
Payments applied against a specific invoice. If a credit balance remains from a specific invoice, it can manually be applied to another invoice or the student can request a refund.
Payments are accepted and applied using payment files from banks or clearinghouses.
Prepayments are applied when an invoice is generated.
Reminders and Collections
Reminders can be generated for open invoices after a due date has passed using the Campus Community Comm Gen process. Reminder letters include original invoice amount, any payments, remaining unpaid balance, and the number of days passed due.
Institutions define a minimum balance as selection criteria when sending reminder letters.
All reminders are tracked at the student level for each invoice.
Edit Table
|
Field or Control |
Definition |
|---|---|
| Key Word |
Select an edit table to use for your first level Key Word values. |
| Key Word 2 |
Select an edit table to use for your Key Word 2 values. |
| Key Word 3 |
Select an edit table to use for your Key Word 3 values. |
Invoice Payment Processing
You cannot set the Apply Payments by Invoice check box. You must instead run the Populate Item Invoice process.
After the process is run, the installation check box, Apply Payments by Invoice, is selected.
If you decide at a later time to not apply payments by invoice, you can clear the check box.
Encryption
Set default profile IDs.
PeopleTools Pluggable Cryptography framework provides the delivered profiles of TRIPLE DES ENC B64 and TRIPLE DES DEC B64.
PeopleSoft Campus Solutions has enhanced the PeopleTools profiles specifically for Campus Solutions re-encryption.
Profiles specify multiple user-defined steps applying various algorithms and keys to the data in a specified order and supporting various encryption standards and third-party encryption libraries.
The decrypt profile must be the same profile and have the same keys that are used to encrypt the data as it is. The encryption profile must contain the new keys and algorithm to which you are converting. Therefore, when using the delivered Campus Solutions profiles, you must change the key value on the Algorithm Keyset page for the encrypt profile and associated algorithm before running the conversion process. After running the conversion, you must modify the decrypt profile to include the new key.
|
Field or Control |
Definition |
|---|---|
| Decryption Profile ID |
The predefined, enhanced profile that is delivered for Campus Solution is CS_CREDIT_CARD_DECRYPT. |
| Encryption Profile ID |
The predefined, enhanced profile that is delivered for Campus Solution is CS_CREDIT_CARD_ENCRYPT. This encryption profile is used in the storage of credit card, bank account numbers, Security Code data, and Security Key. The profile is used by both Student Financials and Contributor Relations. See: |
Self Service Payment Profile
|
Field or Control |
Definition |
|---|---|
| Self Service Payment Profile |
The check box is selected by default. When the check box is selected, existing self-service payment profiles are retained and students can create and save new profiles. Clear the check box to prevent students from creating and saving new payment profiles and from using existing profiles in Self Service. Note: Clearing the check box does not automatically delete existing payment profiles. The check box is therefore not cleared by default, because you might have existing profiles in your system. Note also that clearing the check box does not automatically prevent students from creating and maintaining profiles. Use the following instructions to delete existing profiles and ensure that students cannot create and maintain payment profiles. After you clear the check box, you must:
If you clear the check box and take these steps, the default behavior in Self Service will be to not create or save payment profiles. If you forget to remove security for the Payment Profile component and the Self Service Payment Profile check box is cleared, students will still be able to create new and maintain existing payment profiles. This information appears in a warning message when you clear the Self Service Payment Profile check box and click Save. |
Null Due Date
Enter a date that you want the system to use when no other form of due date is specified. Charges with a null due date appear as future charges. You should select a date well into the future. This date appears on the Total Due Charges page of the self-service portion of Student Financials.
Enforce Payment Restriction
Select this check box to impose the restriction of payments or waivers, and to ensure that proportional waivers are applied to the designated installment.
When you select the Enforce Payment Restriction check box and Select Charges to Pay is used to allocate the payment, SSF_PMTCH_ALLOC is used to record the restriction of the payment. Additionally, when this check box is selected, the payment is reallocated through the Reallocate Restricted Payment component. Waivers that are posted using the Tuition Calculation process are also restricted to the designated charges.
When you deselect this check box, Select Charges to Pay will not update SSF_PMTCH_ALLOC and the payment is reallocated through the Payment Applier process. Waivers that are posted using the Tuition Calculation process will initially target specific charges, but these charges may be reallocated in subsequent processing.
See:
Tuition Installments
Use this grid box to enable the ITEM_SF tuition installment functionality.
|
Field or Control |
Definition |
|---|---|
| Create Tuition Installments |
Select to enable the Installment Controls tab for ITEM_SF installments in the Tuition Calculation Controls component. By default, this check box is deselected. This check box controls whether the Assess Past Installments and Adjust Billed Installments check boxes appear in the Tuition Group setup. This check box also enables or disables the Enabled Billed Adjustments check box. |
| Enable Billed Adjustments |
Select to enable or disable the Adjust Billed Installments check box in Tuition Group. By default, this check box is deselected. |
Access the SF Installation 3 page ().
Image: SF Installation 3 page
This example illustrates the fields and controls on the SF Installation 3 page. You can find definitions for the fields and controls later on this page.

Application Fee, Deposit Fee, Late Fee, and 1098–T Data Commit Level Group Boxes
The selections that you make in the following fields control how often the system commits batched application, deposit, 1098–T, and late fee transactions to the database.
|
Field or Control |
Definition |
|---|---|
| Commit After Each Item |
Select to commit each transaction when it is processed. The advantage to this selection is that the commitment process does not affect access to your database. |
| Commit At The End |
Select this option to commit all the transactions contained in the batch being processed at the conclusion of that batch's process. The advantage to this selection is that processing itself is more efficient. The disadvantage is that when transactions are being committed, other processing involving that database may be affected until commitment is complete. |
| Use Commit Level |
Select to commit a specified number of transactions during processing. For example, if you enter 50 in the Use Commit Level field, when the transactions are saved the system commits blocks of fifty transactions until the batch is complete. At the end of a batch process, the system commits all remaining transactions even if the number of transactions is less than the number in the Commit Level field. |
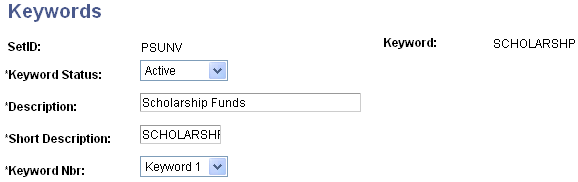
Access the Keywords page ().
Image: Keywords page
This example illustrates the fields and controls on the Keywords page. You can find definitions for the fields and controls later on this page.
|
Field or Control |
Definition |
|---|---|
| Keyword Nbr (keyword number) |
Select the keyword number for this keyword. Each keyword is associated with an edit table that is set up in SF Installation. |