Processing Cashiering Transactions
This section provides and overview of cashiering transactions, lists common elements, and discusses:
Using the Cashiering feature of Student Financials, you can process six types of cashiering transactions.
|
Type of Transaction |
Description |
|---|---|
|
Student Payment |
A payment tendered by a student. Typically, the system posts a student payment to the student's account. However, a student payment can also represent the purchase of an item (such as books or supplies). In this case, the system may not necessarily post the payment to the student's account. |
|
Corporate Payment |
A payment tendered by an external organization. The system posts a corporate payment to the organization's account. |
|
Department Receipt |
A transfer of funds through the cashiering office to a department's general ledger account. Institutions often have offices or departments (such as the housing office, the bookstore, and the athletics office) that take in money on a daily basis or only at certain times of the year. These departments often deposit their funds through the cashiering office to record their accounting information in the institution's general ledger. |
|
Cash Check |
An exchange of cash for a check tendered by a customer. |
|
Interim Deposit |
A withdrawal of funds from the cashier's drawer to be deposited in the bank during the business day, while the cashier is still open. Most cashiering offices set limits on how much money they want their cashiers' drawers to have in them. The Cashiering feature enables you to set this limit on a tender-specific basis on the Tender Key page. When one of your cashiers' drawers reaches the set limit, you must take tender out of the drawer so that you can deposit it in the bank. |
|
Cash Replenishment |
An addition of funds to a cashier's drawer during the business day, while the cashier is still open, so that the drawer does not run out of money. |
Every time that you process one of these transactions, the Cashiering feature creates a receipt in the system. These receipts enable you to track and organize your cashiering transactions.
Note: Both Student Payments and Corporate Payments support hosted payment transactions.
See:
Electronic Payment Integration Developer's Reference Guide in My Oracle Support.
|
Page Name |
Definition Name |
Navigation |
Usage |
|---|---|---|---|
|
Student Payments |
CSH_OFF_PMNT |
|
Accept student payments in hosted and non-hosted payment modes. |
|
Select Charges To Pay |
CSH_O_SPLITPAY_SEC |
Click the Select Charges to Pay link on the Student Payments page or the Corporate Payments page. |
Allocate student payments to specific charges. |
|
Corporate Payments |
CSH_OFF_ORG_PMNT |
|
Accept corporate payments in hosted and non-hosted modes. |
|
Select Students to Pay |
QUICK_CSH_EMP_SEC |
Click the Select Students to Pay link on the Corporate Payments page. |
Allocate corporate payments to sponsored charges. |
|
Third Party Info (third-party information) |
ORG_CSH_3PARTYINF |
Click the Third Party Info link on the Corporate Payments page. |
Restrict payments to a Contract EmplID and/or a Contract. |
|
Department Receipts |
CSH_OFF_DEPT |
|
Create department receipts. |
|
Cash Checks |
CSH_OFF_CASH_CHECK |
|
Cash checks. |
|
Interim Deposits |
CSH_OFF_DEPOSIT |
|
Process interim deposits. |
|
Cash Replenishment |
CSH_OFF_REPLENISH |
|
Create a cash replenishment when adding funds to a cashiering drawer. |
|
Currency Conversion |
QUICK_POST_CURR_SP |
Click the Currency Detail link on the Student Payments page, the Corporate Payments page, the Department Receipts page, or the Cash Checks page. |
Select exchange rates for cashiering transactions processed with foreign currency. |
|
Check Information |
CSH_OFF_CHK_PMT_SP |
Click the Tender Details link on the Student Payments page, the Corporate Payments page, the Department Receipts page, or the Cash Checks page. This link accesses the Check Information page only if you select a check tender in the Tender field. |
Enter check information for cashiering transactions. Some of these details appear on the receipt for tracking and auditing purposes. |
|
Credit Card Information |
CSH_OFF_CC_PMT_SEC |
Click the Tender Details link on the Student Payments page, the Corporate Payments page, or the Department Receipts page. This link accesses the Credit Card Information page only if you select a credit card tender in the Tender field of the respective page and only for non-hosted payments. |
Enter credit card information for cashiering transactions for non-hosted payments using Business Interlink or Integration Broker, but not for hosted payments. Some of these details appear on the receipt for tracking and auditing purposes. For the Department Receipt, the credit card information is only stored. It is not processed by the third party vendor. The credit card authorization for the Department Receipt must be done outside of Campus Solutions. |
Access the Student Payments page ().
Image: Student Payments page
This example illustrates the fields and controls on the Student Payments page. You can find definitions for the fields and controls later on this page.
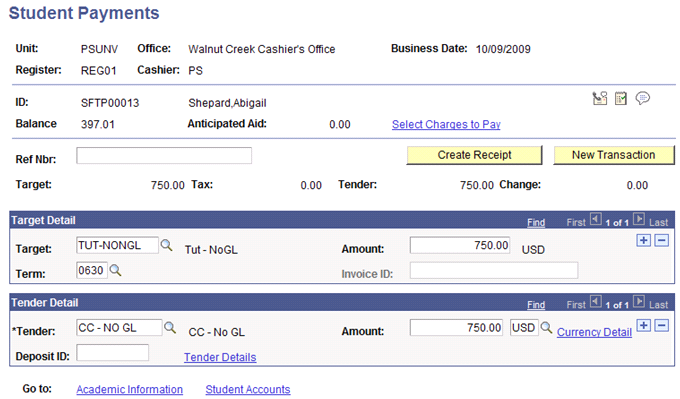
You can process credit card payments on the Student Payments page using hosted payment or non-hosted payment mode, depending on your setup.
The following information about the Student Payments page is based on non-hosted payment mode. For information about hosted payment mode, see the Hosted Payment subsection later within this section of documentation.
|
Field or Control |
Definition |
|---|---|
| Select Charges to Pay |
Click to access the Select Charges to Pay page, where you can specify to which charges to apply the payment to. You can pay only charges that are associated with the target key that you select in the Target Detail group box. If you select more than one target key in the Target Detail group box, the Select Charges to Pay page is not available. If you select Apply Payments by Invoice on the SF Installation 2 page, the Select Charges to Pay link cannot be used. Note: For information about using the Select Charges to Pay page, see “Allocating Student Payments to Specific Charges.” |
Note: The Target,Tax, Tender, and Change fields display the correct totals only after you click the Refresh button. If you make a change to any of the fields in the Target Detail group box or the Tender Detail group box, you must click the Refresh button for those changes to register in the display fields.
See Allocating Student Payments to Specific Charges.
Target Detail
|
Field or Control |
Definition |
|---|---|
| Target |
Enter a target key for the student payment. You define target keys using the Target Keys component (TARGET_KEYS). If the target key that you select is associated with a tax authority, the system automatically inserts an additional target key for the tax. This is the secondary target key that you designated for the tax authority when you assigned the tax authority to the primary target key during target key setup. Note: Restrict payment by invoice If your institution specifies that it will apply payments by invoice, you can restrict payments to an invoice. When the target key is associated with an invoice cash or check payment, the cashier can restrict or select an invoice for which the payment is applied. The Restricted by Invoice label appears if Apply Payments by Invoice is selected on the SF Installation 2 page, the Cashier Target key is defined as Post on the Target Keys - Definition page and the Apply Payments by Invoice check box is selected in the Posting Parameters group box on the Target Keys - Definition page. |
| Amount |
Enter the target amount. The system populates this field automatically if you specify a default amount when you define the selected target key. If necessary, you can override the target amount to match the amount that the student tenders for payment. If the system automatically inserts a tax target key, it supplies the appropriate target amount. |
| Term |
Enter the term to be associated with this payment. This defines the current term to be used in the payment allocation rules. If this field is left blank, the term will be derived from the option selected on the SF Business Unit>Posting Setup>Default Term Control field. |
Tender Detail
You can create student payments with both cash and check tenders, but credit card tender payments must be processed separately from other tenders. For example, a student has charges for tuition, books, and housing in the amount of 1,465 USD. The student pays 1,000 USD by credit card, 400 USD by check, and 65 USD by cash. Using two tender types, you can combine the check and cash payments into a single student payment for 465 USD, but you must create a separate student payment for the 1,000 USD credit card payment. This is necessary because when the system applies a student payment made with a credit card, it associates the payment with a payment reference number that it uses for processing. This reference number is particularly important when you are issuing refunds for credit card payments.
See:
|
Field or Control |
Definition |
|---|---|
| Tender |
This information applies if you use non-hosted payment mode. Select a value to identify the method of payment that the student is using. If you enter check or credit card, the Check Information page or Credit Card Information page appear automatically. You can also access these pages by clicking the Tender Details link. Note: For information about the hosted payment process, refer to the Hosted Payment section. |
| Amount |
Enter the amount tendered. If you selected a target key with a default amount, the system automatically supplies that default tender amount. In addition, if you click the Refresh button or the Create Receipt button without entering a tender amount, the system automatically populates this field with the amount that you specified for the target. If the currency tendered is not the base currency that you selected during the setup of your cashiering office, select the correct currency in the field to the right of the Amount field. |
| Currency Detail |
If the student tenders foreign currency for the payment, click this link to access the Currency Conversion page, where you select the method that the system uses to convert the currency. |
| Deposit ID |
If you assigned a deposit ID to the selected tender key when you opened the cashiering office, it appears in this field. |
| Tender Details |
This information applies if you use non-hosted mode. If you select a check tender as the tender key, click this link to access the Check Information page, where you enter specific information about the check tendered. If you select a credit card tender as the tender key, click this link to access the Credit Card Information page, where you enter specific information about the credit card used. For information about these pages refer to the Entering Credit Card Information for Cashiering Transactions and Entering Credit Card Information for Cashiering Transactions in this section. Some of the tender details that you enter appear on your receipts for tracking and auditing purposes. Note: For information about the hosted payment process, refer to the Hosted Payment section. |
| Message |
When you create a receipt for a credit card payment and you authorize the payment in real time, the Message field displays the status of the transaction. |
Using the Go to Links
|
Field or Control |
Definition |
|---|---|
| Academic Information |
Click to access the Academic Information page, where you can view a student's personal and academic information. |
| Student Account |
Click to access the Customer Accounts page, where you can view a student's account information. |
| View Anticipated Aid |
Click to access the Anticipated Aid Details page, where you can view details about the financial aid that the student is anticipated to receive. This link appears on the page only if the student has anticipated financial aid. |
Using the Student Payment Buttons
|
Field or Control |
Definition |
|---|---|
| Calculate Tuition |
Click to calculate tuition for the student making the payment. This button is available only if you select the Auto Calculate Tuition check box on the Tuition Calculation Controls page. |
| Create Receipt, Print Receipt, and Create and Print Receipt authorization, credit card printingstudent payment receipts |
Note: For information about the hosted payment process, refer to the Hosted Payment section. The label and functionality of this button changes according to the automatic receipt printing setup of your valid cashiers and valid registers. If you are not printing automatically, the label of this button is Create Receipt. Click it to create a receipt for the student payment. If you set up your cashiering office for no posting delay, the system posts the payment. Depending on the setup of the SF merchant ID assigned to your cashiering office, this button may also trigger the authorization and capture of any student payments that are made with a credit card. When you click the Create Receipt button, the label changes to Print Receipt. Click it to print the receipt using Forms Engine or BI Publisher. Forms Engine or BI Publisher generates the receipt and sends it to the appropriate printer as specified on the Valid Registers page. If you are printing automatically, the label of this button is Create and Print Receipt. Click the Create and Print Receipt button to simultaneously create the receipt and print it using Forms Engine or BI Publisher. Note: If your institution specifies that it will apply payments by invoice, the Receipt Detail page will indicate an invoice number. Note: If you select Delay posting or Group Post in the Posting field during the setup of your cashiering office, the system does not post the student payment when you click the Create Receipt button. You must post your payments using the Post Receipts page if you selected Delay posting or the Group Posting page if you selected Group Post. Note: If the Cashiering Offices are not defined to print using either BI Publisher or Forms engine, you must navigate to Report Manager to view and print the receipt. |
| New Transaction |
After you create a receipt, click to return to the Student Payments dialog page to process another student payment. |
Declined Credit Card
In non-hosted payment mode, if a credit card is declined, the Create Receipt button label becomes the Re-create Receipt button. You cannot make changes to the tender type—in the Tender Detail group box, the Tender field is not available for edit and the Add and Delete row buttons are not available. You have 2 options:
Click the New Transaction button to create a new receipt.
Change the credit card details by selecting the Tender Details link, and then clicking the Re-create Receipt button from the receipt page.
For information about hosted payment mode, refer to the Hosted Payment section.
Hosted Payment
|
Field or Control |
Definition |
|---|---|
| Tender |
For hosted payments, when you select credit card as the tender, the Credit Card Information page does not appear. Instead, you should ensure that the receipt is complete and then click on the Tender Details link to access the third party hosted site and enter credit card details. Clicking the Tender Details link causes the receipt details to be validated and invokes the ePayment API using the SF_PMT_REF_NBR as the merchant reference. The API retrieves the Cashier payment details using Cashiering application classes, and transfers control to the third party host. Alternatively, you can click the Create Receipt button to start the same processing. |
Input credit card details on the third party hosted site page.
Fields that appear on the third party page might be configurable, depending on the level of customization that the third party allows.
If you click Cancel, you are taken back to the Receipt page on which a message appears advising that the payment has been cancelled. The receipt cannot be used and you must start a new transaction.
If you click Continue you return to the Student Payments page where you can authorize payment. Click the Authorize and Print button to change the SF_PAYMENT status to Submitted and invoke the ePayment API to authorize the payment. The authorization results, credit card type, and last 4 digits of the credit card are saved in the SF_PAYMENT record and the Receipt record.
Image: Student Payments page — Authorize Transactions
This example illustrates the fields and controls on the Student Payments page — Authorize Transactions. You can find definitions for the fields and controls later on this page.
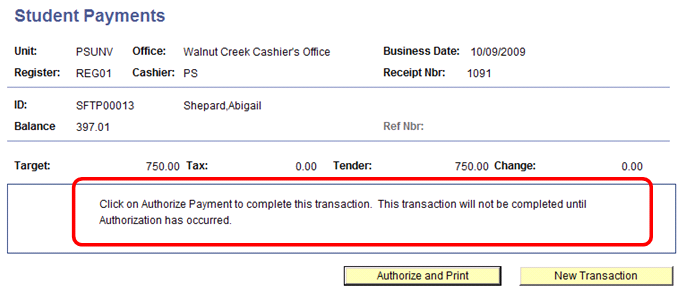
If the authorization is successful, the Receipt page appears:
Image: Student Payments page — Receipt
This example illustrates the fields and controls on the Student Payments page — Receipt. You can find definitions for the fields and controls later on this page.
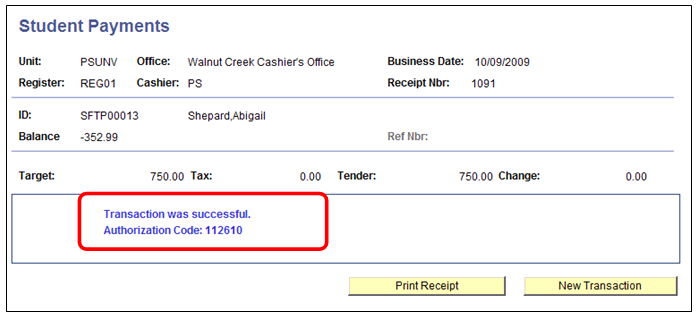
If the credit card is declined, the Student Payments page appears with a message: Transaction was declined.
|
Field or Control |
Definition |
|---|---|
| New Transaction |
If you click this button, you are taken to the Student Post search page, with the assumption that a new receipt will be created. A new SF_PAYMENT record is created with the receipt number and an Initiated status. |
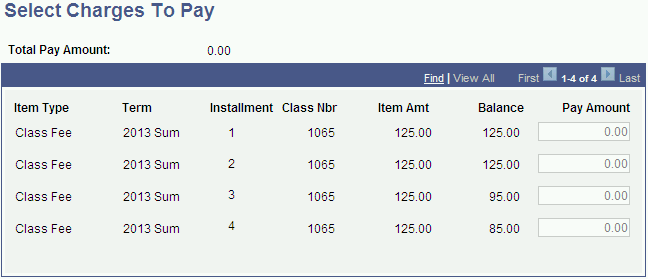
Access the Select Charges To Pay page (click the Select Charges to Pay link on the Student Payments page or the Corporate Payments page).
Image: Select Charges To Pay page
This example illustrates the fields and controls on the Select Charges To Pay page. You can find definitions for the fields and controls later on this page.
|
Field or Control |
Definition |
|---|---|
| Pay Amount |
Enter the amount that you want to pay toward the item on the student's account. Remember that you can select only charges associated with the target key that you select in the Target Detail group box on the Student Payments page or the Corporate Payments page. This field is unavailable for all other items on a student's account. |
After you select your charges to pay and click the OK button, the fields in the Target Details group box on the Student Payment page become unavailable.
If you select the Enforce Payment Restriction check box on the SF Installation 2 page, restricted credits (payments and waivers) will not follow the charge priority associated to the credit item type but by the account type associated to the credit item type. Charge priority and payment overall priority are excluded in the processing of a restricted credit. To reapply restricted credits, you must use the Reallocate Restricted Payment component. If another credit with a higher priority supersedes the payment, the payment will sit on the student's account as an unapplied credit balance.
Only charge transactions with amounts greater than zero ($0.00) are identified. Non-eligible charges are displayed, but greyed out.
PAYMENT_TBL will have a Y/N flag, SSF_PMT_CHG_ALLOC, to indicate that the credit is restricted. Additionally, SSF_PMTCH_ALLOC, a child record of PAYMENT_TBL, will hold the restricted payment allocation.
Note: Self Service ePayment transactions will not be restricted to the charges that the student may have identified.
See:
Access the Corporate Payments page ().
Image: Corporate Payments page.
This example illustrates the fields and controls on the Corporate Payments page.. You can find definitions for the fields and controls later on this page.
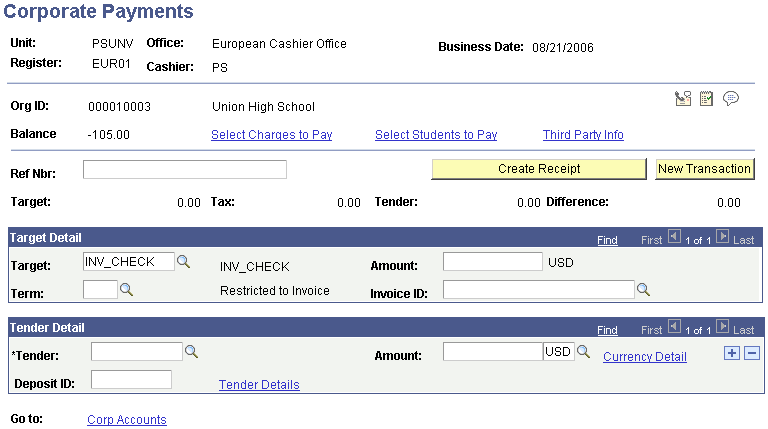
You can process credit card payments on the Corporate Payments page using hosted payment or non-hosted payment mode, depending on your setup.
See:
The following information about the Corporate Payments page is based on non-hosted payment mode. For information about hosted payment mode, see the Hosted Payment section in the Student Payments page documentation.
With the exception of the following three links, this page is identical to the Student Payments page.
Note: The following links cannot be used if the institution uses Apply Payments by Invoice.
|
Field or Control |
Definition |
|---|---|
| Select Students to Pay |
Click to access the Select Students to Pay page, where you can specify the sponsored charges to which the system applies the corporate payment. |
| Third Party Info (third-party information) |
Click to access the Third Party Info page where you can restrict payment to a Contract Empl ID and/or a Contract. See Restricting Corporate Payments to a Contract Number and/or Contract ID. |
| Corp Account (corporate account) |
Click to access the Corporate Accounts page, where you can view the account information of a corporation. |
Note: Restrict payment by invoice.
If your institution specifies that it will apply payments by invoice, you can restrict payments to an invoice. When the target key is associated with an invoice cash or check payment, the cashier can restrict or select an invoice for which the payment is applied. The Restricted by Invoice label appears if Apply Payments by Invoice is selected on the SF Installation 2 page, the Cashier Target key is defined as Post on the Target Keys - Definition page and the Apply Payments by Invoice check box is selected in the Posting Parameters group box on the Target Keys - Definition page.
Access the Select Students to Pay page (click the Select Students to Pay link on the Corporate Payments page).
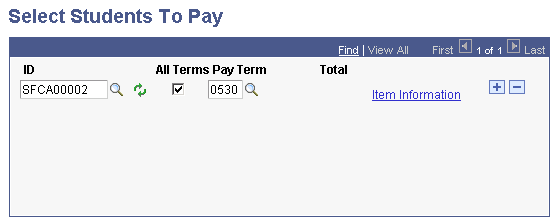
Image: Select Students to Pay page
This example illustrates the fields and controls on the Select Students to Pay page. You can find definitions for the fields and controls later on this page.
|
Field or Control |
Definition |
|---|---|
| ID |
Enter the ID of the student whose charges the organization wants to pay. Only students included in the organization's third-party contract are available in the pick list. |
| All Terms |
Select to apply the corporate payment to every term in which the sponsored student has a charge. If you select this check box, you cannot select a specific pay term. |
| Pay Term |
If you do not select the All Terms check box, use this field to apply the corporate payment to sponsored student charges that are associated with only one specific term. |
| Total |
This field displays the total amount of the sponsored student's charges to which the system can apply the corporate payment. |
| EmplID Org Detail (employee ID organization detail) |
Click to access the Item Information page, where you can view the specific sponsored charges of the selected student. |
Access the Third Party Info page (click the Third Party Info link on the Corporate Payments page).
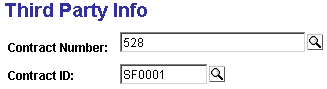
Image: Third Party Info page
This example illustrates the fields and controls on the Third Party Info page. You can find definitions for the fields and controls later on this page.
|
Field or Control |
Definition |
|---|---|
| Contract Number |
Enter the number of the third-party contract that you want to associate with this corporate payment. |
| Contract ID |
Enter the student ID of the third-party contract member that you want to associate with the corporate payment. |
Posting the payment using the Third Party Info link populates the Contract Number and the Contract EmplID in the PAYMENT_TBL and ITEM_SF. Using one or both of these options will restrict the payment to the Contract Number and/or Contract ID specified.
Note: The Third Party Information page provides better processing performance than Select Charges to Pay when restricting corporate payments to specified charges. Use Select Charges to Pay to restrict payments only when there are few charges to select.
If you use this page to restrict a corporate payment and the payment has a credit balance, you cannot retrieve the payment through the Reallocate Corp Payment page.
Access the Department Receipts page ().
Image: Department Receipts page
This example illustrates the fields and controls on the Department Receipts page. You can find definitions for the fields and controls later on this page.
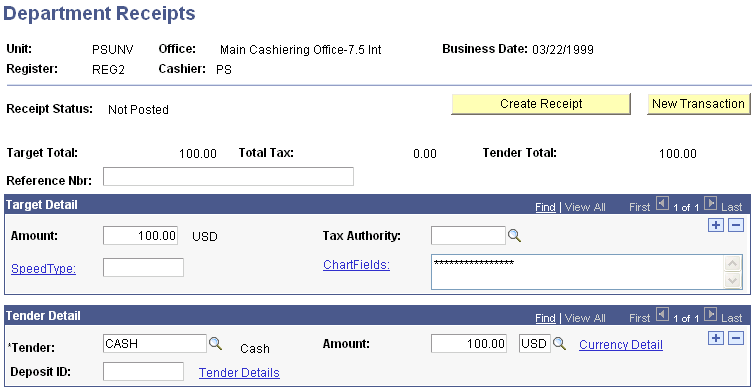
Note: If your institution does not use PeopleSoft General Ledger or Oracle General Ledger, the Ext GL Chartfield (external general ledger ChartField) field appears in the Target Detail group box instead of the standard ChartFields.
|
Field or Control |
Definition |
|---|---|
| Receipt Status |
The system displays the status of the department receipt in this field. Before you click the Create Receipt button, this field displays the Not Posted value. After you click the Create Receipt button, the value changes to Processed if approval of the department receipt is not required. If approval is required, the value changes to Pending when you click the Create Receipt button. |
| ChartFields |
Click this link to select the chart of accounts to which your department receipt posts or enter the ChartField values in the display field. |
Target Detail
Instead of specifying a target key as you do for student and corporate payments, you must select the chart of accounts to which your department receipt posts. In addition, if tax is associated with the department receipt, you must manually add a target row for the tax and specify its tax authority. For example, if you were processing a department receipt for 550 USD, of which 50 USD were tax, you would enter two target rows. The first nontax target row would be for 500 USD. The second tax target row would be for 50 USD.
|
Field or Control |
Definition |
|---|---|
| Tax Authority |
Enter the tax authority that is associated with the amount of tax that you are including in the department receipt. You select a tax authority for the tax target row only. |
| Amount |
Enter the monetary amount for the target. |
| ChartFields |
Click to select the chart of accounts to which your department receipt posts. Click the SpeedType field to enter a SpeedType, which is a predefined set of ChartFields for a department your cashiering office works with regularly. After you enter the SpeedType, the system automatically populates the appropriate general ledger fields. |
Tender Detail
|
Field or Control |
Definition |
|---|---|
| Tender |
Enter the type of tender being used for the department receipt. |
| Amount |
Enter the amount of tender for the department receipt. |
| Currency Detail |
If the department receipt involves foreign currency, click this link to access the Currency Conversion page, where you select the method that the system uses to convert the currency. |
| Deposit ID |
If you assigned a deposit ID to the selected tender key when you opened the cashiering office, it appears in this field. |
| Tender Details |
If you enter a check tender as the tender key, click this link to access the Check Information page where you enter specific information about the check tendered. If you select a credit card tender as the tender key, click this link to access the Credit Card Information page, where you enter specific information about the credit card used. For the Department Receipt, the credit card information is only stored. It is not processed by the third party vendor. The credit card authorization for the Department Receipt must be done outside of Campus Solutions. |
Using the Department Receipt Buttons
|
Field or Control |
Definition |
|---|---|
| Create Receipt, Print Receipt and Create and Print Receipt printingdepartment receipts |
The label and functionality of this button changes according to the automatic receipt printing setup of your valid cashiers and valid registers. If you are not printing automatically, the label of this button is Create Receipt. Click it to create a department receipt. When you click the Create Receipt button, the label changes to Print Receipt. Click it to print the receipt using Forms Engine or BI Publisher. Forms Engine or BI Publisher generates the receipt and sends it to the appropriate printer as specified on the Valid Registers page. If you are printing automatically, the label of this button is Create and Print Receipt. Click it to simultaneously create the receipt and print it using Forms Engine or BI Publisher. Note: If the Cashiering Offices are not defined to print using either BI Publisher or Forms engine, you must navigate to Report Manager to view and print the receipt. |
| New Transaction |
After you create a receipt, click this button to return to the Department Receipts dialog page so that you can process another department receipt. |
Access the Cash Checks page ().
Image: Cash Checks page
This example illustrates the fields and controls on the Cash Checks page. You can find definitions for the fields and controls later on this page.
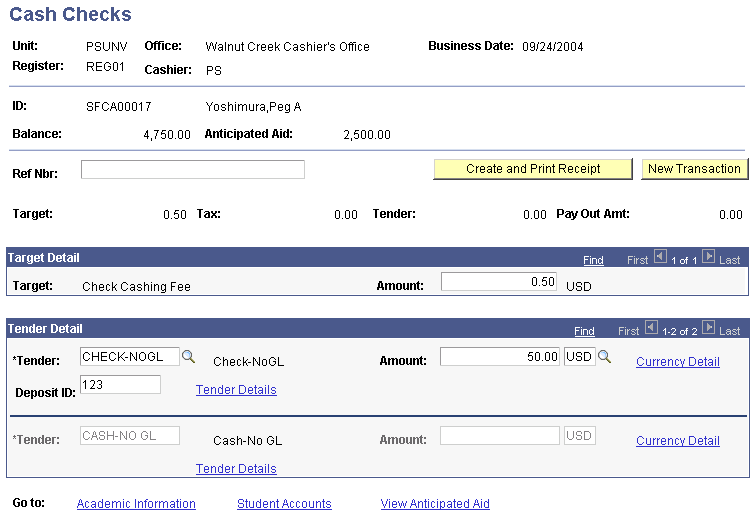
Note: The Target, Tax, Tender, and Pay Out Amt fields display the correct totals only after you click the Refresh button. If you make a change to any of the fields in the Target Detail group box or the Tender Detail group box, you must click the Refresh button for those changes to register in the display fields.
Target Detail
|
Field or Control |
Definition |
|---|---|
| Target |
The system automatically selects the Check Cashing Fee target key. If you set up your check-cashing target key to tax the check-cashing fee, the system automatically inserts an additional target key for the tax. |
| Amount |
The system populates this field automatically with the check-cashing fee that you specified for the cashiering office. The cashier can override the default check-cashing fee. If the system automatically inserts a tax target key, it supplies the appropriate target amount. |
Tender Detail
|
Field or Control |
Definition |
|---|---|
| Tender |
Enter a check tender. If you press Tab to move out of this field, the system accesses the Check Information page. |
| Amount |
Enter the amount of the check being cashed. If the currency tendered is not the base currency that you selected during the setup of your cashiering office, select the correct currency in the field to the right of the Amt field. |
| Currency Detail |
If the student tenders foreign currency for the payment, click this link to access the Currency Conversion page, where you select the method that the system uses to convert the currency. |
| Deposit ID |
If you assigned a deposit ID to the check tender key when you opened the cashiering office, it appears in this field. |
| Tender Details |
Click to access the Check Information page, where you enter specific information about the check tendered. |
Using the Go to Links
|
Field or Control |
Definition |
|---|---|
| Student Accounts |
Click to access the Student Accounts page, where you can view a student's account information. |
| Academic Information |
Click to access the Student Personal Information page, where you can view a student's personal and academic information. |
| View Anticipated Aid |
Click to access the Anticipated Aid Details page, where you can view details about the financial aid the student is anticipated to receive. This link appears on the page only if the student has anticipated financial aid. |
Using the Cash Check Buttons
|
Field or Control |
Definition |
|---|---|
| Create Receipt, Print Receipt and Create and Print Receipt printingcheck cashing receipts |
The label and functionality of this button changes according to the automatic receipt printing setup of your valid cashiers and valid registers. If you are not printing automatically, the label of this button is Create Receipt. Click it to create a receipt for the cashed check. When you click the Create Receipt button, the label changes to Print Receipt. Click it to print the receipt using Forms Engine or BI Publisher. Forms Engine or BI Publisher generates the receipt to the appropriate printer as specified on the Valid Registers page. If you are printing automatically, the label of this button is Create and Print Receipt. Click it to simultaneously create the receipt and print it using Forms Engine or BI Publisher. Note: If the Cashiering Offices are not defined to print using either BI Publisher or Forms engine, you must navigate to Report Manager to view and print the receipt. |
| New Transaction |
After you create a receipt, click to return to the Cash Checks dialog page to cash another check. |
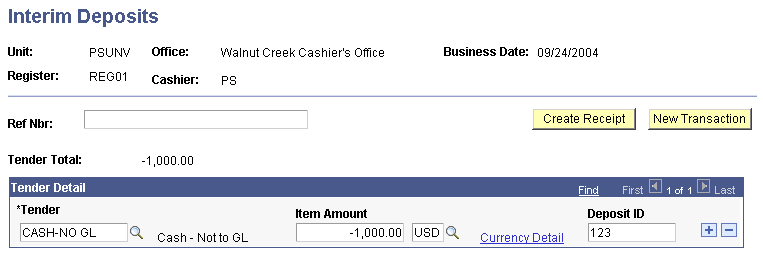
Access the Interim Deposits page ().
Image: Interim Deposits page
This example illustrates the fields and controls on the Interim Deposits page. You can find definitions for the fields and controls later on this page.
Tender Detail
|
Field or Control |
Definition |
|---|---|
| Tender |
Enter the type of tender that you are removing from the drawer. |
| Item Amount |
Enter the amount of tender that you are removing from the drawer. Remember that because you are removing tender from the drawer, you must enter a negative value in this field. |
| Currency Detail |
If you are removing foreign currency from the drawer, click this link to access the Currency Conversion page, where you select the method that the system uses to convert the currency. |
| Deposit ID |
If you assigned a deposit ID to the selected tender key when you opened the cashiering office, it appears in this field. |
Using the Interim Deposit Buttons
|
Field or Control |
Definition |
|---|---|
| Create Receipt |
Click to create a receipt for the interim deposit. When you click the Create Receipt button, it becomes unavailable and the Print Receipt button appears. |
| Print Receipt |
Click to create a report of the receipt that you just created. This button appears only after you click the Create Receipt button. Note: You must use the Report Manager to view the report created when you click the Print Receipt button. |
| New Transaction |
After you have created a receipt, click this button to return to the Interim Deposits dialog page so that you can process another interim deposit. |
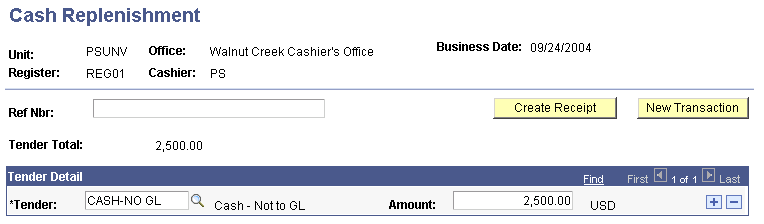
Access the Cash Replenishment page ().
Image: Cash Replenishment page
This example illustrates the fields and controls on the Cash Replenishment page. You can find definitions for the fields and controls later on this page.
Tender Detail
|
Field or Control |
Definition |
|---|---|
| Tender |
Enter the tender key that you have set up for cash payments. |
| Amount |
Enter the amount of cash that you are adding to the drawer. |
Using the Cash Replenishment Buttons
|
Field or Control |
Definition |
|---|---|
| Create Receipt |
Click to create a receipt for the cash replenishment. When you click the Create Receipt button, it becomes unavailable and the Print Receipt button appears. |
| Print Receipt |
Click to create a report of the receipt that you just created. This button appears only after you click the Create Receipt button. Note: You must use the Report Manager to view the report created when you click the Print Receipt button. |
| New Transaction |
After you create a receipt, click to return to the Cash Replenishment dialog page so that you can process another cash replenishment. |
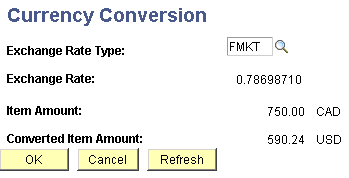
Access the Currency Conversion page (click the Currency Detail link on the Student Payments page, the Corporate Payments page, the Department Receipts page, or the Cash Checks page).
Image: Currency Conversion page
This example illustrates the fields and controls on the Currency Conversion page. You can find definitions for the fields and controls later on this page.
|
Field or Control |
Definition |
|---|---|
| Exchange Rate Type |
Enter the type of exchange rate that you want the system to use to convert the foreign currency. |
| Item Amount |
This field displays the amount of foreign currency that is tendered to the cashier. |
| Converted Item Amount |
This field displays the amount after the system converts the foreign currency to your base currency. |
Access the Check Information page (click the Tender Details link on the Student Payments page, the Corporate Payments page, the Department Receipts page, or the Cash Checks page).
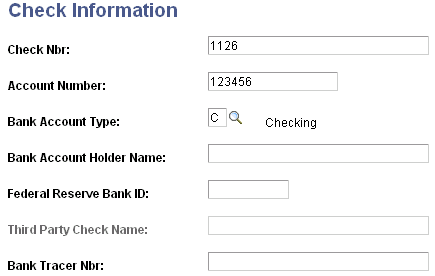
Image: Check Information page
This example illustrates the fields and controls on the Check Information page. You can find definitions for the fields and controls later on this page.
|
Field or Control |
Definition |
|---|---|
| Check Nbr (check number) |
Enter the check number as printed on the check. |
| Account Number |
Enter the customer's bank account number. |
| Bank Account Type |
Enter the type of account, C (checking) or S (savings). |
| Bank Account Holder Name |
Enter the name of the person on the account. |
| Federal Reserve Bank ID |
If you know the Federal Reserve Bank ID of the bank issuing the check, enter it here. |
| Third Party Check Name |
This field is available only if the tender category of the tender that you select on the Student Payments page is Third Party Check. Use this field to enter the name of the third party making the payment on the student's behalf. |
| Bank Tracer Nbr (bank tracer number) |
Enter any information in this optional field to track or characterize the transaction. |
Note: All of the fields on the Check Information page are optional and enable you to more easily track your check information. Some of the field values appear on your printed receipts.
This section applies only if you use non-hosted payment mode.
Access the Credit Card Information page (click the Tender Details link on the Student Payments page, the Corporate Payments page, or the Department Receipts page).
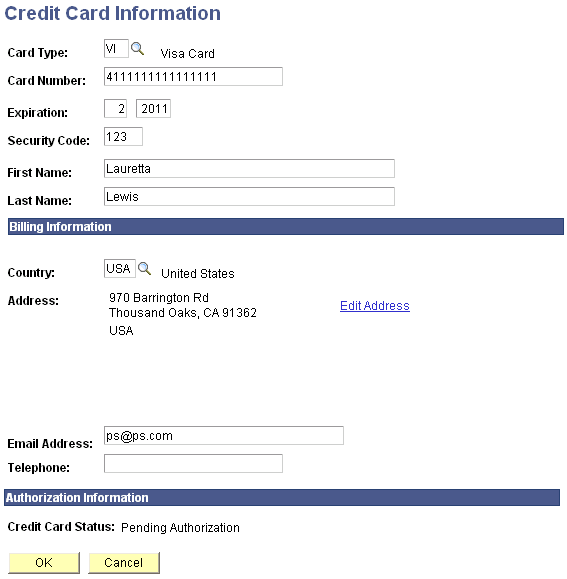
Image: Credit Card Information page
This example illustrates the fields and controls on the Credit Card Information page. You can find definitions for the fields and controls later on this page.
|
Field or Control |
Definition |
|---|---|
| Card Type |
Enter the type of credit card used for the transaction. This field is required. |
| Card Number |
Enter the credit card number as it appears on the credit card. This field is required. Note: Credit card numbers do not appear on the printed receipts. |
| Expiration |
Enter the expiration date of the credit card. This field is required. |
| Security Code |
Enter the Security Code that is located on the credit card. The Security Code is a security feature for "card not present" transactions such as Internet transactions. The Security Code field is available if the Security Code Required check box is selected on the SF Merchants page. Note: Security Code is supported for hosted payment mode and Integration Broker. It is not supported through Business Interlink. |
| First Name |
Enter the first name of the credit card holder as it appears on the credit card. If you accessed the Credit Card Information page from the Student Payment page, the default value for this field is the first name of the student making the payment. This field is required. |
| Last Name |
Enter the last name of the credit card holder as it appears on the credit card. If you accessed the Credit Card Information page from the Student Payment page, the default value for this field is the first name of the student making the payment. This field is required. |
| Bank Tracer Nbr (bank tracer number) |
Enter any information in this optional field to track or characterize the transaction. |
Billing Information
Enter the billing information of the student or organization making the payment.
Note: If you use the third-party vendor business interlink for credit card processing of student payments, you must enter an email address and telephone number. Also, if the SF merchant ID associated with your cashiering office requires address verification, the billing address that you enter here must match the billing address recorded for the credit card; otherwise, the transaction will be denied.
Authorization Information
This group box displays the authorization details received from the third-party credit card processing vendor. Prior to a user authorizing the payment, the only field appearing in this group box is the Credit Card Status (credit card authorization status) field. After you authorize the transaction, the system displays the Reference Nbr (reference number), Authorization Reply, Auth Code (authorization code), Auth DTTM (authorization datetime), and Request ID fields.