Creating Online Refunds
This section discusses:
|
Page Name |
Definition Name |
Navigation |
Usage |
|---|---|---|---|
|
Student Refund |
REFUND_SF |
|
Create an online refund for a student. |
|
Academic Information |
SF_STUDENT_SP |
Click the Academic Information link on the Student Refund page. |
View enrollment and personal information for a given student. |
|
Student Accounts |
ACCOUNT_SF_SP |
Click the Student Accounts link on the Student Refund page. |
View account activity information for a given student. |
|
Corporate Refund |
REFUND_ORG_SF |
|
Create an online refund for an organization. You can use this page in conjunction with the A/P refund method only. |
|
Corp Accounts |
ACCOUNT_ORG_SF_SP |
Click the Get Account link on the Corporate Refund page. |
View account activity for a given corporation. |
|
Refund with Extra Amount |
REFUND_SF |
|
Create a refund for an amount greater than the refundable balance. |
|
Extra Refund Amount |
EXTRA_REFUND_AMT |
Click the Extra Amount Info link on the Refund with Extra Amount page |
Specify account and term information associated with the extra amount refunded. |
|
Sponsor Refund |
REFUND_SF_OLD |
|
Create a refund for a designated sponsor. |
|
Corporate Sponsor Refund |
SSF_REFUND_ORG_OTH |
|
Create a refund for a designated corporate sponsor. |
Access the Student Refund page ().
Image: Student Refund page
This example illustrates the fields and controls on the Student Refund page. You can find definitions for the fields and controls later on this page.
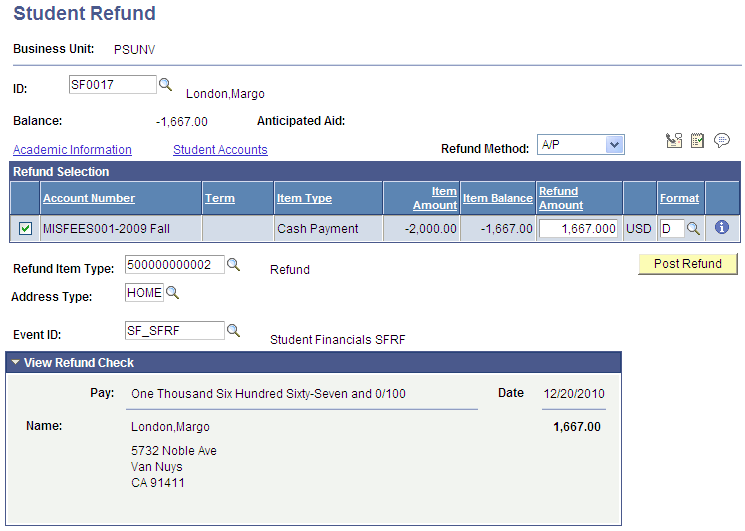
Depending on the type of refund method that you select, the fields described below will differ.
|
Field or Control |
Definition |
|---|---|
| ID |
Enter the ID of the student for whom you want to create a refund. |
| Balance and Anticipated Aid |
Displays the account balance and any anticipated aid of the selected student. |
| Academic Information |
Click to access the Academic Information page. |
| Student Accounts |
Click to access the Student Accounts page. |
| Refund Method |
Select the refund method that you want to use to create this refund. The possible values for this field are Payroll, A/P, and Other. The value in the Refund Method field on the Refund Setup page (SF Business Unit component) appears here by default. If you select the Allow Changes in Refund Method check box on the Refund Setup page, you can change the value in the Refund Method field here. |
Refund Selection
Select the check box next to each credit line item to include in the refund. This group box displays the account type, academic term, item type description, original monetary amount, and balance of each line item.
Note: If you pay multiple targets by the same transaction, each target appears as a separate line item on the Student Refund page. When you refund multiple targets from the same transaction, however, the system combines the targets into a single refund. For example, if you are refunding a student 750.00 USD for tuition and 125.00 USD for housing, and both targets were part of the same credit card payment, the system combines the target refunds into a single credit card refund of 875.00 USD. It does not issue two separate refunds to the same credit card.
See Accepting Student Payments.
|
Field or Control |
Definition |
|---|---|
| Refund Amount |
The system automatically enters the total amount of the line item in this field. To include only a portion of the line item in the refund, decrease the amount. |
| Format |
Select the format to distribute the refund. Values are:
Note: For ePayment transactions, you can change a default format of C or E to A or P. If you do this, the system processes the refund so that you can generate a paper check instead of directly crediting the student's credit card or eCheck account. If you change the format to A or P for more than one ePayment transaction, the system combines the transactions into one lump refund so that you issue only one check to the student. You cannot change a default format of A or P to C or E. For the Accounts Payable and Payroll refund methods, you can change the format from D to A or P. You cannot change a format of A or P to D if no direct deposit distribution exists. |
| Address Type |
Select the type of address that you want printed on the check. Only address types for which an active address exists are available for selection. You must select a value in this field. |
| Event ID |
This field is available only if:
By default, the value that appears in this field is based on the Event ID value on the Refund Setup page in the SF Business Unit component. The 3C engine uses Event ID when it generates email notifications. |
See Understanding Refunding Setup.
Note: You can only refund one ePayment at a time using the Student Refund page. Even if there are multiple ePayments on a student's account, you can select only one at a time. In addition, the system does not allow you to post a refund for eCheck payments that have not been debited or credit card payments that have not been settled. If you click the Post Refund button after selecting a refund for an ePayment that has not been debited/settled, you receive an error message.
Student Refund Buttons and Links
|
Field or Control |
Definition |
|---|---|
| Post Refund |
Click to post the refund to the student's account. If you selected Payroll in the Refund Method field, the Produce Check link becomes available when you click this button. If you set up your business unit to require refund approval, the system alerts you to the approval requirement when you click Post Refund. |
| Produce Check |
If you are creating the refund using the payroll refund method, click to create the payroll interface for the refund. This link opens the Produce Student Refund Check page (SSF_REF_STU_CNTRL). Note: For refunds using the payroll method, the Create Student Job Data step must be completed before moving onto the Produce Student Refund Check. (You need to run the Create Student Job Data process if a student has never had a refund before and there is no "employee" data.) The Produce Check is the first process for interfacing to payroll. Once there, you enter the pay period end date and click Process Check. That step creates the paysheet data. A paysheet serves as a repository for the data required for Payroll for North America to calculate a refund. After creating the paysheet, (click Process Check) the system populates the paysheet data. The Print Check button appears, enabling you to print a check (or direct deposit advice) on your printer. |
| Calculate Tuition |
Click to calculate tuition for the selected student. This button is available only if you selected the Auto Calculate Tuition check box on the Tuition Calculation Controls page, there is a term listed for any of the refunds listed, and tuition is required. |
View Refund Check
Expand this group box to view a simulation of a refund check for the amount that you are refunding.
Access the Corporate Refund page ().
Image: Corporate Refund page
This example illustrates the fields and controls on the Corporate Refund page. You can find definitions for the fields and controls later on this page.
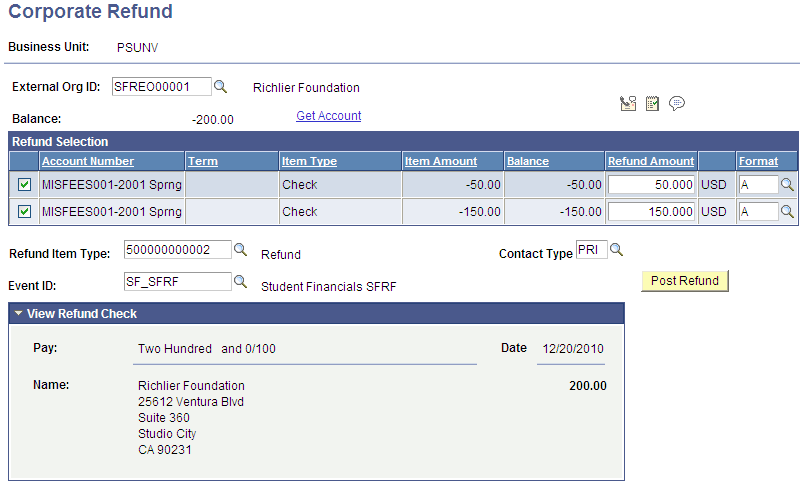
Note: Except for the fields documented here, the fields on this page are identical to their counterparts on the Student Refund page.
|
Field or Control |
Definition |
|---|---|
| External Org ID (external organization ID) |
Enter the ID of the organization for which you want to create a refund. |
| Get Account |
Click to access the Corp Accounts secondary page. |
| Contact Type |
Enter the organization's contact type to determine the address to print on the check. The address associated with the contact type appears at the bottom of the page, to the right of any image that you have inserted. The value in the Contact Type field appears by default from the Refund Setup on the SF Business Unit, but can be changed. |
View Refund Check
Expand this group box to view a simulation of a refund check for the amount that you are refunding.
The address that appears here is the address that is set up for the Contact on the Organization Table.
Access the Refund with Extra Amount page ().
Image: Refund with Extra Amount page
This example illustrates the fields and controls on the Refund with Extra Amount page. You can find definitions for the fields and controls later on this page.

Note: You cannot use the Refund with Extra Amount page to create a refund for an organization.
Use this page to create a refund for more than the refundable balance or in the absence of a refundable balance. For example, you can disburse anticipated aid to a student before the actual receipt of funds. The refund becomes a charge on the student's account that is later credited when your institution actually receives the financial aid.
Note: By default, the value in the Format field for Extra Amount is the same as the value in the Format field for Refund Selection.
If you enter values that do not match, you receive an error message when you click the Post Refund button.
If at least one direct deposit distribution exists, a value of D appears in the Format field by default.
Note: Except for the fields documented here, the fields on this page are identical to their counterparts on the Student Refund page.
|
Field or Control |
Definition |
|---|---|
| Method |
Enter the format to distribute any extra amount added to the refund. |
| Extra Amount |
Enter the extra amount that you are adding to the refund. |
| Extra Refund Info |
Click to access the Refund with Extra Amount Information page. |
Note: You can create a refund for more than the refundable balance only if you select the Refund Debit Balances check box on the Refund Setup page. If you do not select this check box, you can create a refund for an extra amount, but not for an extra amount and a credit at the same time.
Access the Extra Refund Amount page (click the Extra Amount Info link on the Refund with Extra Amount page).
|
Field or Control |
Definition |
|---|---|
| Extra Account Nbr (extra account number) |
Specify the account to charge the extra refund amount to. |
| Extra Account Term |
If the account that you select in the Extra Account Nbr field is set up by term, select a term. |
| Extra Item Term |
Enter the academic term to assign to the extra refunded amount. |
Access the Sponsor Refund page ().
Image: Sponsor Refund page
This example illustrates the fields and controls on the Sponsor Refund page. You can find definitions for the fields and controls later on this page.
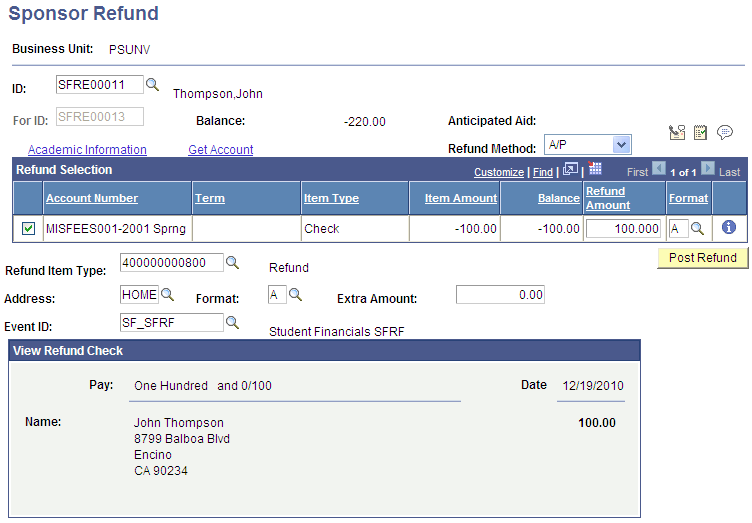
If you have designated an individual as a sponsor for credits on a student's account, use the Sponsor Refund page to create refunds for those credits, to be distributed to the sponsor.
Note: You can create a refund for a sponsor only if you have associated the sponsor with a student using the Designate Individual Sponsor page.
Note: Except for the fields documented here, the fields on this page are identical to their counterparts on the Student Refund page.
|
Field or Control |
Definition |
|---|---|
| ID |
Enter the ID of the sponsor for whom you are creating a refund. If the sponsor that you select sponsors only one student, the ID of that student appears in the For ID field. |
| For ID |
If the sponsor that you select in the ID field sponsors more than one student, select the student whose refund you are creating. |
Note: By default, the value in the Format field for Extra Amount is the same as the value in the Format field for Refund Selection.
If you enter values that do not match, you receive an error message when you click the Post Refund button.
If at least one direct deposit distribution exists, a value of D appears in the Format field by default.
Access the Corporate Sponsor Refund page ().
Image: Corporate Sponsor Refund page
This example illustrates the fields and controls on the Corporate Sponsor Refund page. You can find definitions for the fields and controls later on this page.
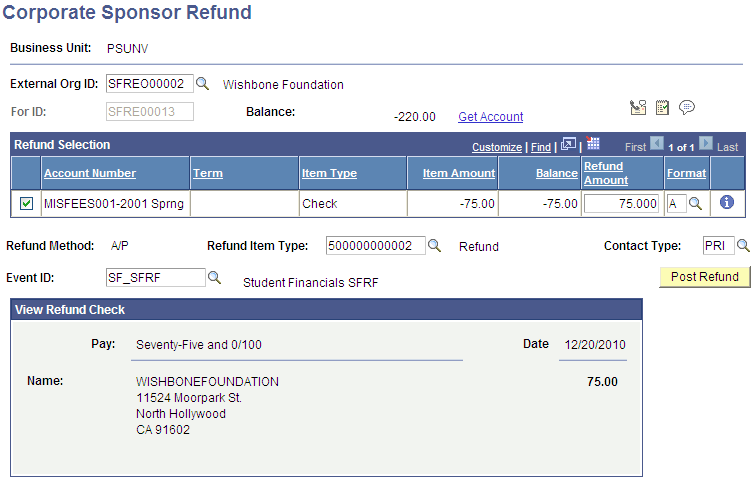
Refer to the documentation for the Corporate Refund page and the Sponsor Refund page.