Defining a Cashiering Office
To set up a cashiering office, use the Cashiering Offices component (CASHIERING_OFFICES).
Before you can run your cashiering process, you must first define the characteristics of your cashiering office. Your institution may have multiple cashiering offices, located on or off campus. Different cashiering offices often serve different roles in your institution. The Cashiering feature provides the flexibility to define different cashiering offices, each with its own set of cashiering rules and requirements.
This section discusses how to:
|
Page Name |
Definition Name |
Navigation |
Usage |
|---|---|---|---|
|
Cashiering Offices |
CSH_OFF_TABLE |
|
Define the basic parameters of the cashiering office. |
|
Transaction Setup |
CSH_OFF_TABLE2 |
|
Define the way in which your cashiering office handles and posts transactions. |
|
Over GL Entry |
CSH_OFF_TBL_OVER |
|
Define the general ledger chart of accounts to which you record any cash overages for your cashiering office. The chart of accounts that you define on this page provides the credit side of the GL entry. |
|
Short GL Entry |
CSH_OFF_TBL_SHORT |
|
Define the general ledger chart of accounts to which you record any cash shortages for your cashiering office. The chart of accounts that you define on this page provides the debit side of the GL entry. |
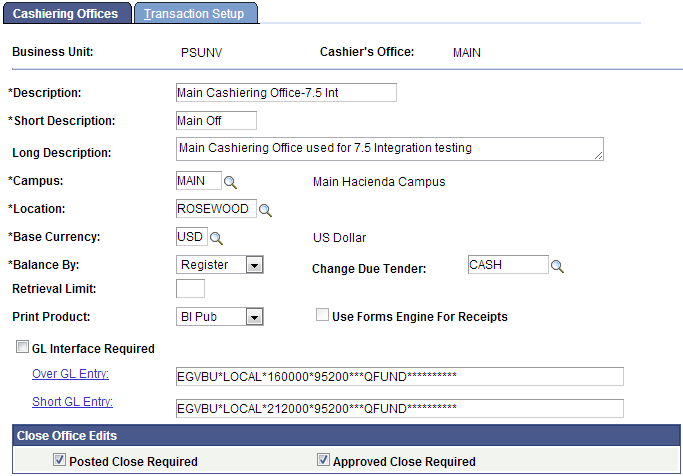
Access the Cashiering Offices page ().
Image: Cashiering Offices page
This example illustrates the fields and controls on the Cashiering Offices page. You can find definitions for the fields and controls later on this page.
|
Field or Control |
Definition |
|---|---|
| Campus |
Enter the campus on which the cashiering office is located. |
| Location |
Enter the specific location of the cashiering office. |
| Base Currency |
Enter the base currency that the cashiering office uses when processing transactions. All transactions in the office are set to this currency by default. The default value for this field is the default currency of your business unit. |
| Balance By |
Select the method to use to balance the cashiering office. Select from the following values: Cashier: Select this value to balance receipts of each cashier against the cash drawer. With this method, a cashier can use any open register, but no one else can use his individual cash drawer. Therefore, balancing by cashier is the more secure option. It enables you to track errors and outages to specific cashiers. Register: Select this value to balance the receipts of each register against the cash drawer. With this method, any number of valid cashiers can use the cash drawer in a register during a given business day. |
| Change Due Tender |
Enter the tender key that you want to designate for change due. This is the type of tender that the office uses to give change to customers. You define the tender keys available in this field using the Tender Keys component. |
| Retrieval Limit |
Enter the number of business days the system retrieves when you open, reopen, or close the cashiering office. This is an optional field. Use it to enhance system performance. Note: If you do not enter a value, the system displays all past business days when opening, closing, or reopening a cashiering office. This slows system performance significantly. |
| Print Product |
If you want to print receipts automatically using the Create Receipt button on the six receipt generation pages, you must select a print product, either BI Publisher or Forms Engine receipts. To print receipts, select any one of the following:
|
| Use Forms Engine for Receipts |
This check box is available when you select Crystal in the Print Product field. Select to use Forms Engine for printing student payment, corporate payment, department, and check cashing receipts. When you select this check box, it is necessary to specify printers for your valid registers before you can print receipts using Forms Engine. |
| Over GL Entry (over general ledger entry) |
Click this link to access the Over GL Entry page or enter the ChartField values in the display field . Select the ChartField values that correspond to the general ledger account into which you record your cashiering overages. |
| Short GL Entry (short general ledger entry) |
Click this link to access the Short GL Entry page or enter the ChartField values in the display field. Select the ChartField values that correspond to the general ledger account into which you record your cashiering shortages. |
| GL Interface Required (general ledger interface required) |
If you select this check box, the system requires you to run the Cashiering GL Interface process before closing the cashiering office. |
Close Office Edits
Use the Close Office Edits group box to specify the requirements that your office must meet before you can close it.
|
Field or Control |
Definition |
|---|---|
| Posted Close Required |
If you select this check box, the system requires you to post all receipts before closing the cashiering office. This requirement takes effect only if you select the Delay posting or Group Post options in the Posting field of the Transaction Setup page. |
| Approved Close Required |
If you select this check box, the system requires you to approve all pending department receipts before closing the cashiering office. This requirement takes effect only if you select the Dept Receipt Approval Required check box on the Transaction Setup page. |
Access the Transaction Setup page ().
Image: Transaction Setup
This example illustrates the fields and controls on the Transaction Setup. You can find definitions for the fields and controls later on this page.
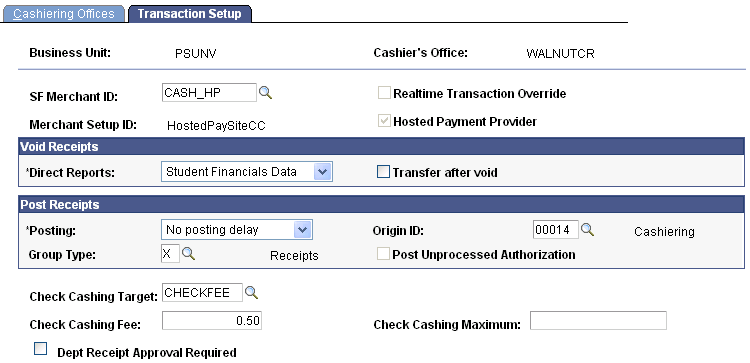
Note: If you select the Realtime Transaction Override check box, you must authorize and capture your cashiering credit card transactions using the batch process.
The value in Merchant Setup ID field and the selection of the Hosted Payment Provider check box are based on the setup of those fields on the Payment Merchant page.
See Setting Up Payment Merchants.
See Electronic Payment Integration Developer's Reference Guide. The guide is posted to My Oracle Support.
If the payment merchant is set up for hosted payment transactions, the Realtime Transaction Override and Post Unprocessed Authorization check boxes are cleared and not available for edit.
The Realtime Transaction Override check box applies to Business Interlink and Integration Broker transactions. It allows the cashier office to override the Real-Time Authorization selection on the SF Merchant page in case the Cashier Office is experiencing multiple timeouts. The transactions are then not authorized online but in batch.
For information about the Post Unprocessed Authorization check box, see the Post Receipts section of documentation.
Void Receipts
Use this group box to define how the system voids receipts.
|
Field or Control |
Definition |
|---|---|
| Direct Reports |
Enter the appropriate value for your institution to determine the rules the system uses to establish supervisory relationships for the process of voiding receipts. Student Financials Data: Select this value to establish supervisory relationships of cashiers on the Valid Cashiers page. Human Resources Data: Select this value to have Student Financials use the employment data for each cashier defined in PeopleSoft Human Resources to determine supervisory relationships. |
| Transfer after void |
Select this check box if, upon voiding a receipt, you want the system to transfer you automatically to the page where the receipt was created. For example, after voiding a student payment, the system automatically takes you to the Student Payment page if you selected this option. |
Post Receipts
Use this group box to define how the system posts student payments and corporate payments.
|
Field or Control |
Definition |
|---|---|
| Posting |
Use this field to select when the system posts student and corporate payment receipts. Valid values are: No posting delay: If you select this value, the system posts receipts immediately to student and corporate accounts from the Student Payment and Corporate Payment pages when you click the Create Receipt button. The advantage of this method is that the system updates account balances as you create payment receipts. Delay posting: If you select this value, the system does not post receipts to student or corporate accounts when you click the Create Receipt button on the Student Payment and Corporate Payment pages. Instead, you post delayed student and corporate payment receipts using the Post Receipts page. By delaying posting, you can enhance system performance during receipt creation, especially if you have a large number of cashiers using the system. Using the Post Receipts page, you can post receipts at any time during the day, when it puts less demand on the system. Group Post: If you select this value, the system does not post receipts when you click the Create Receipt button on the Student Payment and Corporate Payment pages. Instead, the system places each receipt that you create into a single posting group for the business day. To post receipts for a group, use the Posting Groups page in the Maintain Receivables feature. Like the Delay posting method, the Group Post method enables you to enhance system performance during peak demand. However, using the Group Post method, you post all receipts at the end of the day by running one batch process. Therefore, the system does not update your student or corporate accounts as often. |
| Origin ID and Group Type |
If you selected Group Post in the Posting field, enter the origin ID and group type of the posting group in which your cashiering office places student and corporate payment receipts. |
| Post Unprocessed Authorizations |
Note: If the payment merchant is set up for hosted payment transactions, this check box is cleared and not available for edit. If you select this check box, the system posts credit card transactions even if it has not processed the authorizations of those transactions. If you clear this check box, the system posts only transactions for which you have processed authorizations. This option is useful when intermittent timeouts of the authorization process occur. This enables the system to save or post the transactions normally regardless of the timeout. However, if this situation occurs, you must remember to authorize your credit card transactions using the batch process in the Maintain Receivables feature. |
Note: You should define a group type and origin ID in Maintain Receivables specifically for cashiering receipts so that you can more readily identify and isolate these posting groups.
Setting Check Cashing Rules
|
Field or Control |
Definition |
|---|---|
| Check Cashing Target |
Enter the target key associated with the check-cashing fee item type. Define the check cashing fee target key using the Target Keys component. Define the amount of the check-cashing fee in the Check Cashing Fee field. This is not a required field. |
| Check Cashing Fee |
Enter the amount that you want to charge customers when they use this cashiering office to cash checks. |
| Check Cashing Maximum |
Enter the maximum check amount that you want to allow customers to cash at your cashiering office. |
Setting Department Receipt Approval
|
Field or Control |
Definition |
|---|---|
| Dept Receipt Approval Required (department receipt approval required) |
Select this check box to implement the workflow approval process for all department receipts generated by this cashiering office. When you select this check box, the Cashier Approval Rolefield becomes available. |
| Cashier Approval Role |
Enter the role of the person who approves department receipts generated by your cashiering office. A person with the cashier approval role must approve all department receipts before you post them to the general ledger. If you select the Approved Close Required check box on the Cashiering Offices page, the person with the cashier approval role must approve all department receipts before you close the cashiering office. |