Using Account Services
This section discusses how to:
Set up and manage bank accounts.
Enroll in direct deposit.
Enroll in a payment plan.
View the 1098-T form.
Receive the 1098-T form online.
Complete the 1098-T consent agreement.
Receive the 1098-T consent confirmation.
View student permissions.
Select the permission form.
Grant permission using the form agreement.
Confirm student permission.
View student permission agreement.
|
Page Name |
Definition Name |
Navigation |
Usage |
|---|---|---|---|
|
My Bank Accounts |
SSF_SS_BANK_VW |
|
View existing bank account details and access pages for adding and editing bank account details. |
|
Manage My Bank Accounts - Bank Location and Currency |
SSF_SS_BANK_CNTRY |
Click the Add Account button on the My Bank Accounts page. |
Specify the country and currency of the bank account. |
|
Manage My Bank Accounts - Add Bank Account Details |
SSF_SS_BANK_DET |
Click the Add Account button on the My Bank Accounts page. Click the Add Another Bank Account button on the My Direct Deposits - Bank Account Summary page. |
Set up and edit bank accounts for direct deposit refunds. |
|
Manage My Bank Accounts - Agreement |
SSF_SS_BANK_SUB |
Click the Next button on the Manage My Bank Accounts - Add Bank Account Details page. |
Review the bank agreement. |
|
Manage My Bank Accounts - Result |
SSF_SS_BANK_RES |
Click the Submit button on the Manage My Bank Accounts - Agreement page. |
Confirm bank account details. |
|
Manage My Bank Accounts - Delete Enroll in Direct Deposit - Delete |
SSF_SS_DELETE_BANK |
Click the Delete icon on the My Bank Accounts - Bank Account Summary page. Click the Delete icon on the Enroll in Direct Deposit - Modify Direct Deposit page. |
Delete bank accounts and direct deposits. |
|
Manage My Bank Accounts - Cancel Enroll in Direct Deposit - Cancel |
SSF_SS_CONFIRM |
Click the Cancel button during the Manage my Bank Accounts or Enroll in Direct Deposit process. |
Cancel an action during the Manage my Bank Accounts or Enroll in Direct Deposit process. |
|
My Direct Deposits |
SSF_SS_DIRDEP_VW |
Select Enroll in Direct Deposit from Student Center. Click the Enroll in Direct Deposit link on the Manage My Bank Accounts - Result page. |
Access the first step in the enroll in direct deposit process or access the pages to edit existing distributions. |
|
My Direct Deposits - Bank Account Summary |
SSF_SS_DIRDEP_CONF |
Click the Enroll in Direct Deposit button on the My Direct Deposits page. |
Review the bank accounts that are set up for direct deposit refund distributions and continue to the next step of the enroll in direct deposit process. |
|
Enroll in Direct Deposit - Add Direct Deposit |
SSF_SS_DIRDEP_BNK |
Click the Proceed to Enroll in Direct Deposit button on the My Direct Deposits - Bank Account Summary page. |
Set up direct deposit distribution details. |
|
Enroll in Direct Deposit - Agreement |
SSF_SS_DIRDEP_SUB |
Click the Next button on the Enroll in Direct Deposit - Add Direct Deposit page. |
Review the direct deposit agreement. |
|
Enroll in Direct Deposit - Result |
SSF_SS_DIRDEP_RES |
Click the Submit button on the Enroll in Direct Deposit - Agreement page. |
Confirm direct deposit details. |
|
Account Services - Enroll in Payment Plan - Select Payment Plan |
SSF_SS_PPL_SEL |
|
Select a payment plan. |
|
Account Services - Enroll in Payment Plan - Review Installments |
SSF_SS_PPL_CALC |
|
Change the installment amount, number of installments, or both. |
|
Account Services - Enroll in Payment Plan - Agreement |
SSF_SS_PPL_SUBMIT |
|
Review the terms of the payment plan before enrolling in the plan. |
|
Account Services - Enroll in Payment Plan - Agreement |
SSF_SS_PPL_RESULT |
|
Review the terms of the payment plan before enrolling in the plan. |
|
Account Services - 1098T Tax Form |
SSF_SS_1098_SEL |
|
Indicate which tax year to view. |
|
1098-T Consent Agreement |
SSF_SS_1098_RESULT |
|
Capture 1098-T consent confirmation. |
|
Account Services - Student Permissions |
SSF_SS_PERM_VIEW |
|
View student permissions. |
|
Student Permissions - Select Permission Form |
SSF_SS_PERM_SEL |
|
Select the desired permissions form. |
|
Student Permissions - Permission Form Agreement |
SSF_SS_PERM_SUBMIT |
|
Read and agree to the selected permissions form. |
|
Student Permissions - Student Permission Confirmation |
SSF_SS_PERM_RESULT |
|
Receive student permission confirmation. |
|
Student Permission Agreement |
SSF_SS_PERM_VW_SEC |
|
Review the student permission agreement. |
Students use the My Bank Accounts pages to set up and manage bank accounts.
See Setting Up Installation Parameters and Keywords.
See Setting Up Institution Sets.
See Setting Up Your Business Unit to Refund Customers.
Understanding the My Bank Accounts Page
Whether a student is setting up a bank account for the first time or has previously set up an account and wants to edit that account or add another account, the My Bank Accounts page is always the first page that a student sees. This page is known as the landing page for student bank accounts.
After a student adds at least one account, the page is called the My Bank Accounts - Bank Account Summary page.
Image: My Bank Accounts (Bank Account Summary) example page
This example illustrates the fields and controls on the My Bank Accounts (Bank Account Summary) example page. You can find definitions for the fields and controls later on this page.
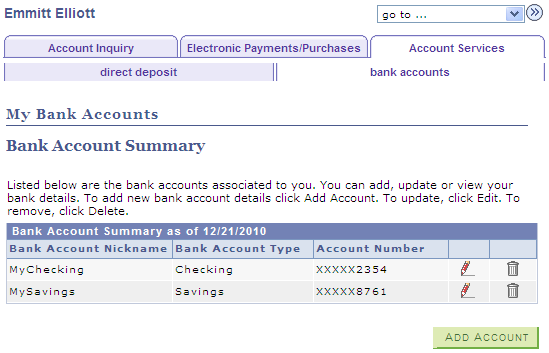
Only active bank accounts are displayed on this page. Students can view, edit, and delete bank account details from this landing page.
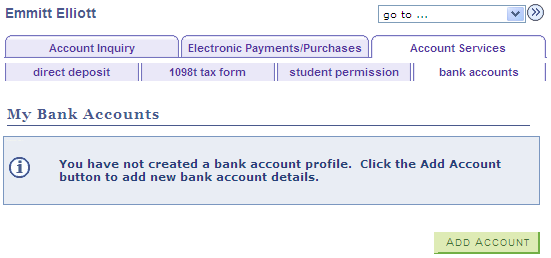
Before a student sets up a bank account, this is how the page appears:
Image: My Bank Accounts example page
This example illustrates the fields and controls on the My Bank Accounts example page. You can find definitions for the fields and controls later on this page.
Adding a Bank Account
Access the Manage My Bank Accounts - Add Bank Account Details page (click the Add Account button on the My Bank Accounts page).
Image: Bank Location and Currency page
This example illustrates the fields and controls on the Bank Location and Currency page. You can find definitions for the fields and controls later on this page.
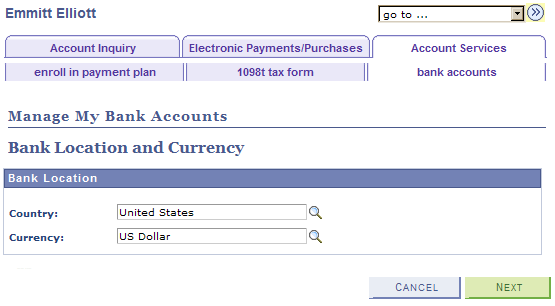
Students access this page from the My Bank Accounts (landing) page. This page appears only if the Allow Change in Country check box is selected on the SF Institution – General Options page.
|
Field or Control |
Definition |
|---|---|
| Country |
If a country is not selected, the default value from the HRMS installation setup is retrieved. |
| Currency |
If a currency is not selected, the default value from the HRMS installation setup is retrieved. |
| Next |
Click to access the Add Bank Account Details page. |
Image: Manage My Bank Accounts - Add Bank Account Details page
This example illustrates the fields and controls on the Manage My Bank Accounts - Add Bank Account Details page. You can find definitions for the fields and controls later on this page.
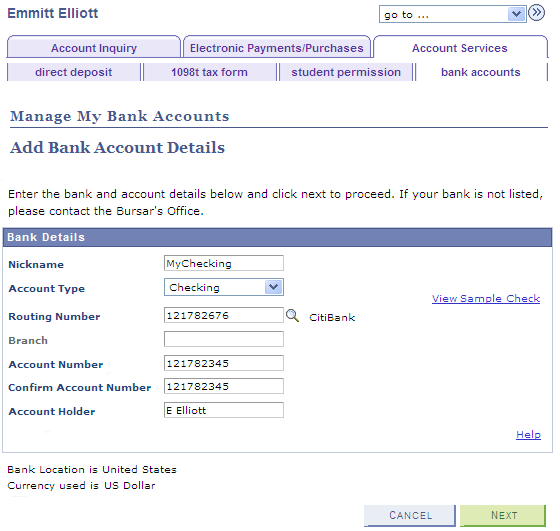
If the Bank Location and Currency page is not enabled, students access this page from the My Bank Accounts (landing) page. Students also access this page if they set up direct deposit distributions (using Enroll in Direct Deposit) but have not yet set up a bank account.
When students set up or modify a bank account, data is inserted in the 3C trigger table with the Bank Event ID and institution to facilitate communication using 3C and the Comm Gen process. The Bank Event ID and institution are derived from the SF Installation setup only if the Bank Event ID is populated. Also, when students modify a bank account, only the Nickname field can be edited. The other fields are view-only.
The bank details on this page are validated according to the validation procedures in HRMS. To prevent duplicate bank accounts, the system checks that the combination of EmplID, Routing Number, Branch, and Account Number is unique.
If students are able to set the country and currency for their bank, the fields that appear here are based on the country they select.
|
Field or Control |
Definition |
|---|---|
| Nickname |
Enter an alias for the bank account. The nickname appears instead of the bank account name when the student enrolls in direct deposit. |
| Account Type |
By default, Checking is selected. |
| Routing Number |
Select a routing number. The available values are based on the bank details record in HRMS. |
| Branch |
The values for this field depend on the routing number, and are based on the bank details record in HRMS. |
| Account Number |
Enter an account number. For security reasons, only the last four digits of the account number appears after the student saves the page. The account number is also encrypted and stored in the database. |
| Confirm Account Number |
The value in this field must match the value in the Account Number field. Also, if the account number is modified, this field is enabled and the same account number must be provided. This field does not appear when a value is entered in the IBAN field. |
| Account Holder |
Enter the account holder name as it appears on the bank account. |
| Check Digit |
Enter the two-digit number after the first two-letter country code of the IBAN. This field appears based on the country code. |
| IBAN and BIC Code |
If the IBAN is provided, then the BIC Code must also be provided. Student Financials uses the information in the HRMS IBAN Country Setup page to perform the required validation and prompt for values in the lookups.
For security reasons, only the last four digits of the IBAN appear after the page is saved. See PeopleSoft HRMS Application Fundamentals,Setting Up Banks and Bank Branches. |
| View Sample Check |
Click to view a sample image of a check in a new window. This link appears only for the United States (USA) and Canada (CAN). |
| Help |
Click to open a Help page in a new window. The URL that is selected in the Help URL field in the Manage Bank Options group box on the SF Institution Set - General Options page is used here. If that setup is not done, the link does not appear here. |
|
Field or Control |
Definition |
|---|---|
| Next |
Click to go to the Agreement or Confirmation page. The Agreement page appears if the first bank account is being created, otherwise the Confirmation page appears if there are no validation errors. |
Note: For further information about this page, refer to the documentation about the related administrative component.
Reviewing the Bank Agreement
Access the Manage My Bank Accounts - Agreement page (click the Next button on the Manage My Bank Accounts - Add Bank Account Details page).
Image: Manage My Bank Accounts - Agreement page
This example illustrates the fields and controls on the Manage My Bank Accounts - Agreement page. You can find definitions for the fields and controls later on this page.
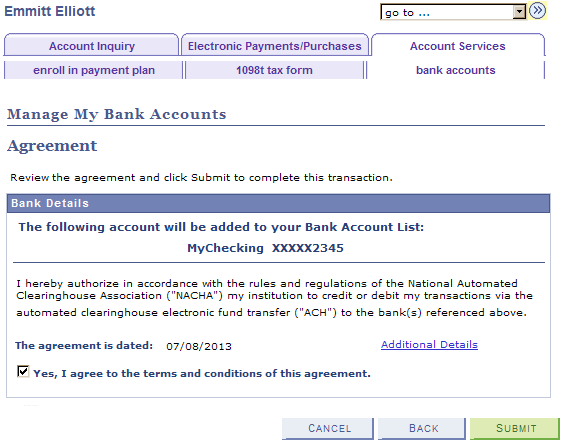
This page appears only:
if the Display Agreement check box is selected in the Manage Bank Options group box on the SF Institution - General Options page.
once, when the first bank account is created.
|
Field or Control |
Definition |
|---|---|
| Yes, I agree to the terms and conditions of this agreement. |
Select to be able to save bank details. |
| Submit |
Click to save bank details and go to the Manage My Bank Accounts – Result page. An agreement type of Bank Account is inserted into the Agreement table. |
| Additional Details |
Opens a page in another window. The page that appears is derived from the URL that is specified in the Additional details URL field in the Manage Bank Options group box on the SF Institution Set - General Options page is used here. If the setup is not done, the link does not appear here. |
Note: The bank agreement cannot be revoked either by administrative staff or by students. The agreement remains in the table even if all bank account details are deleted or made inactive.
Confirming Bank Account Details
Access the Manage My Bank Accounts - Result page (click the Submit button on the Manage My Bank Accounts - Agreement page).
Image: Manage My Bank Accounts - Result page
This example illustrates the fields and controls on the Manage My Bank Accounts - Result page. You can find definitions for the fields and controls later on this page.
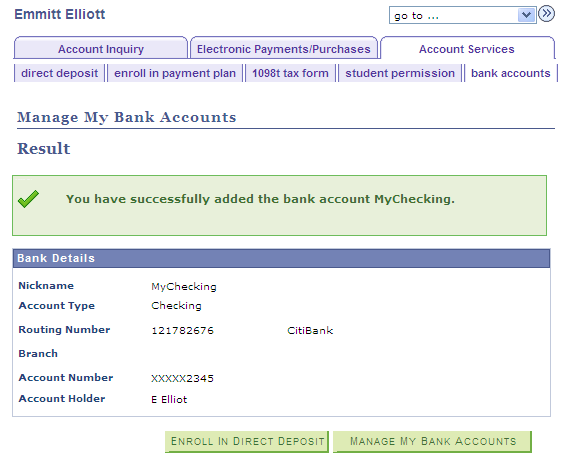
|
Field or Control |
Definition |
|---|---|
| Enroll in Direct Deposit |
Click to access the My Direct Deposit pages and set up distributions for direct deposit refunds. This button appears only if AP Refunding Option is set to Use Single Payment Voucher on the SF Installation page. |
| Manage My Bank Accounts |
Click to access the landing page (My Bank Accounts - Bank Account Summary page) from which additional bank accounts can be added, or existing bank accounts can be edited or deleted. |
When students create a bank account or edit bank account details, they receive an email notification based on the Event ID set up on the SF Installation page.
Modifying a Bank Account
Click the Edit icon on the My Bank Accounts – Bank Account Summary page.
Image: Edit Bank Account Details page
This example illustrates the fields and controls on the Edit Bank Account Details page. You can find definitions for the fields and controls later on this page.
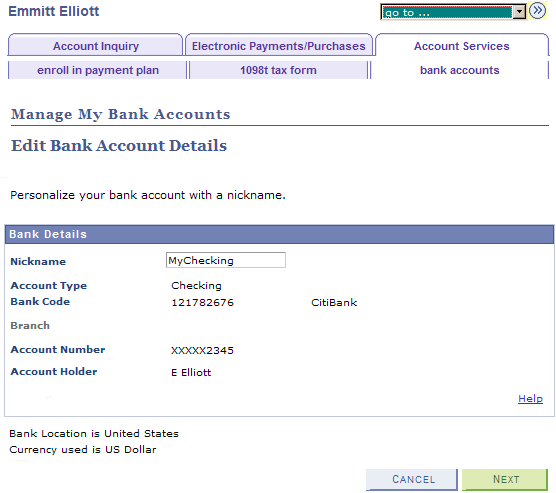
The Nickname field is the only field that can be edited. The other fields are view-only.
When students modify a bank account, data is inserted in the 3C trigger table with the Bank Event ID and institution to facilitate communication using 3C and the Comm Gen process. The Bank Event ID and institution are derived from the SF Installation setup only if the Bank Event ID is populated.
|
Field or Control |
Definition |
|---|---|
| Next |
Click to go to the Manage My Bank Accounts - Result page. |
Deleting a Bank Account
Click the Delete icon on the My Bank Accounts – Bank Account Summary page.
When a student deletes a bank account, the bank account status is set to Inactive. To delete a bank account for which a direct deposit distribution is set up, students must first deactivate the direct deposit distribution.
When students delete a bank account, data is inserted in the 3C trigger table with the Bank Event ID and institution to facilitate communication using 3C and the Comm Gen process. The Bank Event ID and institution are derived from the SF Installation setup only if the Bank Event ID is populated.
Students use the My Direct Deposit pages to specify how direct deposit refunds are distributed across their bank accounts.
Students can access the Direct Deposit feature in Self Service only if:
Use Single Payment Voucher is selected as the AP Refunding Option on the SF Installation page.
The Direct Deposit Enrollment check box is selected on the SF institution Set - General Options page.
A/P is selected in the Refund Method field on the Refund Setup component of the SF Business Unit.
The student does not have a negative service impact for Disable Manage My Banks on the SF Institution Set - Business Units page.
See Setting Up Installation Parameters and Keywords.
See Setting Up Institution Sets.
See Setting Up Your Business Unit to Refund Customers.
See: Addendum: Direct Deposit Through AP Refunding.pdf which is posted to My Oracle Support as part of Additional Features January 2011
Understanding the My Direct Deposits Page
Whether a student is enrolling in direct deposit for the first time or has previously set up direct deposit distributions and wants to edit them, the My Direct Deposits page is always the first page that a student sees. This page is known as the landing page for direct deposits.
After a student enrolls in direct deposit, the page is called the My Direct Deposits - Direct Deposit Summary page. Here is an example of the page:
Image: My Direct Deposits - Direct Deposit Summary example page
This example illustrates the fields and controls on the My Direct Deposits - Direct Deposit Summary example page. You can find definitions for the fields and controls later on this page.
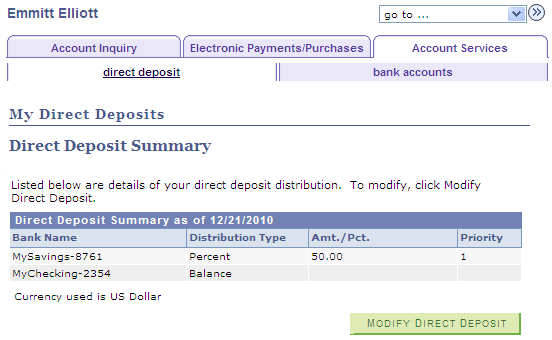
From this summary page, students can add more distributions and edit or delete their existing distributions by clicking the Modify Direct Deposit button.
Using the My Direct Deposits Page
Access the My Direct Deposits page ().
Image: My Direct Deposits page
This example illustrates the fields and controls on the My Direct Deposits page. You can find definitions for the fields and controls later on this page.
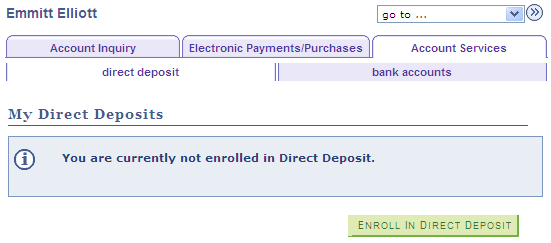
This is how the landing page appears the first time that a student enrolls in direct deposit.
|
Field or Control |
Definition |
|---|---|
| Enroll in Direct Deposit |
To enroll in direct deposit, the student must have already set up at least one bank account. If the student has set up at least one bank account, then when the student clicks the Enroll in Direct Deposit button, the student is taken to the next step of the process. If the student clicks the Enroll in Direct Deposit button and has not set up a bank account, the Manage My Bank Accounts - Add Bank Account Details page appears. The student continues through the process of setting up one or more bank accounts. When the Manage My Bank Accounts - Result page appears, the student clicks the Enroll in Direct Deposit link on that page and then completes the direct deposit distribution set up. For information about the Manage My Bank Accounts pages, refer to the previous documentation section: Setting Up Bank Accounts. |
Reviewing Bank Accounts for Enrolling in Direct Deposit
Access the My Direct Deposits - Bank Account Summary page (click the Enroll in Direct Deposit button on the My Direct Deposits - Direct Deposit Summary page).
Image: My Direct Deposits - Bank Account Summary page
This example illustrates the fields and controls on the My Direct Deposits - Bank Account Summary page. You can find definitions for the fields and controls later on this page.
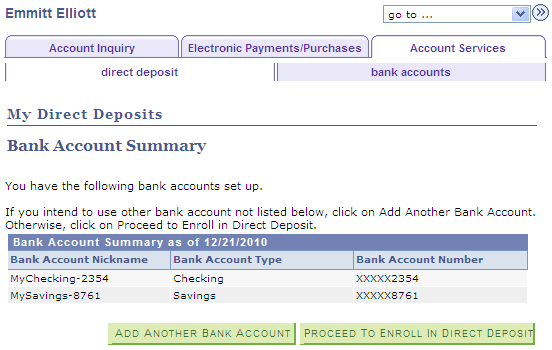
For students who have set up bank accounts but have not enrolled in direct deposit, the page appears as in the example page shown above.
Students can view the bank accounts that can be used for refund distributions. Students can also add additional bank accounts.
Students then proceed to the next step in the enroll in direct deposit process from this page.
If students have set up bank accounts and enrolled in direct deposit, the Proceed to Enroll in Direct Deposit button is replaced with a Proceed to Modify Direct Deposit button.
Adding Direct Deposits
Access the Enroll in Direct Deposit - Add Direct Deposit page (click the Proceed to Enroll in Direct Deposit button on the My Direct Deposits - Bank Account Summary page).
Image: Enroll in Direct Deposit - Add Direct Deposit page
This example illustrates the fields and controls on the Enroll in Direct Deposit - Add Direct Deposit page. You can find definitions for the fields and controls later on this page.
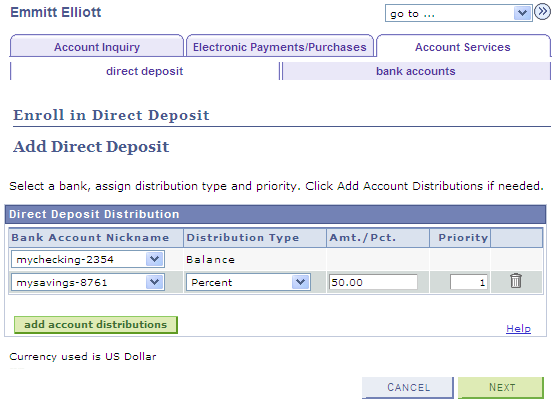
On this page, students specify how they want refunds distributed between bank accounts.
|
Field or Control |
Definition |
|---|---|
| Bank Account Nickname |
Students must enter a value in the Nickname field when they set up their bank accounts. That nickname, followed by the last 4 digits of the account number, appears here. Note: Only one distribution per bank account (nickname) is allowed. |
| Distribution Type |
Values are Amount, Balance, and Percentage. One bank account must be assigned a distribution type of Balance. If the maximum distribution allowed is 1 (based on the Maximum Distributions field on the SF Institution Set-General Options page) the only Distribution Type value available is Balance. The whole refund amount is disbursed to one account. If multiple distributions are allowed and the student does not assign one account as Balance, an error appears on save. |
| Amt./Pct. (amount/percentage) |
This field is available only if the maximum distributions allowed is greater than 1. The value that the student enters can include up to 2 decimal points—for example, 100.50 or 50.25. This field is not available for entry if the Distribution Type is Balance. |
| Priority |
The student enters a value to indicate the order in which bank accounts are selected when a refund is posted. The value must be a whole number. The lower the number, the higher the priority—for example, an account with value 1 is used first, then an account with value 2 is used next. When the Distribution Type is Balance, the default value of the Priority field is 999 (the value is hidden) and the field is not available for entry. |
| add account distributions |
This button is available only if the maximum distributions allowed is greater than 1. |
| Help |
The student clicks this link to access the URL that you set up in the Direct Deposit Options group box on the SF Institution Set-General Options page. If the setup is not done, the link does not appear. |
| Delete |
When a record is deleted, the row is removed and all other rows are stamped with the current effective date and a new effective sequence number. The Delete icon does not appear for the row with a Distribution Type of Balance. |
Note: For further information about this page, refer to the documentation about the related administrative component.
See Setting Up and Managing Direct Deposit Distributions for AP Refunding.
Reviewing the Direct Deposit Agreement
Access the Enroll in Direct Deposit - Agreement page (click the Next button on the Enroll in Direct Deposit - Add Direct Deposit page).
Image: Enroll in Direct Deposit - Agreement page
This example illustrates the fields and controls on the Enroll in Direct Deposit - Agreement page. You can find definitions for the fields and controls later on this page.
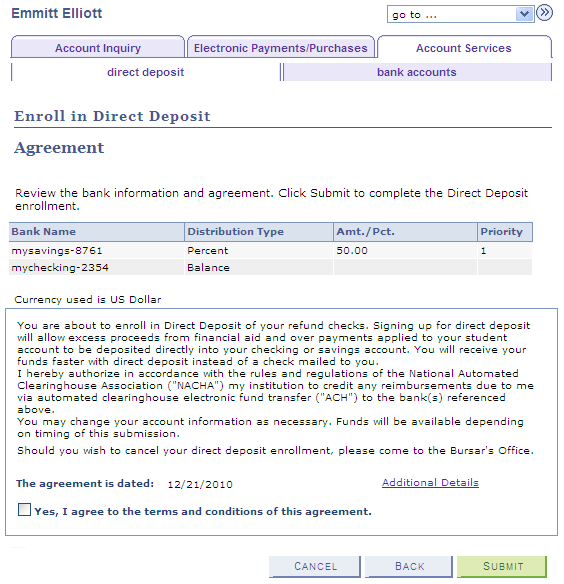
This page appears automatically the first time that a student sets up direct deposit distributions.
When the student selects the check box and clicks the Submit button, an agreement type of DD Enroll is inserted into the Agreement table.
If the Display Subsequent Agreement check box is selected in the Direct Deposit Options group box on the SF Institution - General Options page, compliance text appears when the student edits direct deposit distributions.
When the student selects the check box and clicks the Submit button, an agreement type of DD Change is inserted into the Agreement table.
The student clicks the Additional Details link to access the URL that you set up in the Direct Deposit Options group box on the SF Institution Set-General Options page. If the setup is not done, the link does not appear.
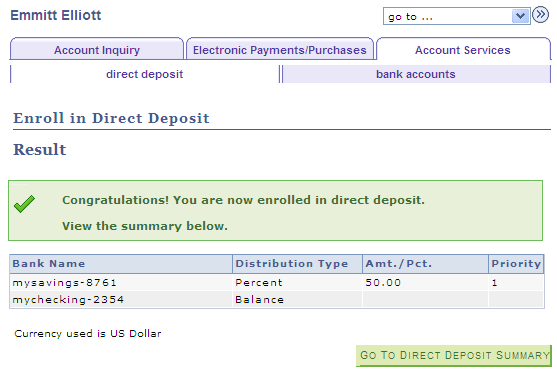
Confirming Direct Deposit Details
Access the Enroll in Direct Deposit - Result page (click the Submit button on the Enroll in Direct Deposit - Agreement page).
Image: Enroll in Direct Deposit - Result page
This example illustrates the fields and controls on the Enroll in Direct Deposit - Result page. You can find definitions for the fields and controls later on this page.
|
Field or Control |
Definition |
|---|---|
| Go To Direct Deposit Summary |
The student click this button to access the My Direct Deposits - Direct Deposit Summary (landing) page. You can view an example of the landing page earlier in this section. From the landing page, students can access the My Direct Deposits - Modify Direct Deposit page where they can edit existing distributions, add more distributions, and delete distributions. |
When a student enrolls in direct deposit or edits direct deposit distributions, an email notification is sent to the student based on Event ID setup on the SF Installation page.
Students can link their charges to a specified payment plan.
Select Payment Plan
Access the Account Services - Enroll in Payment Plan - Select Payment Plan page ().
Image: Account Services - Enroll in Payment Plan - Select Payment Plan page
This example illustrates the fields and controls on the Account Services - Enroll in Payment Plan - Select Payment Plan page. You can find definitions for the fields and controls later on this page.
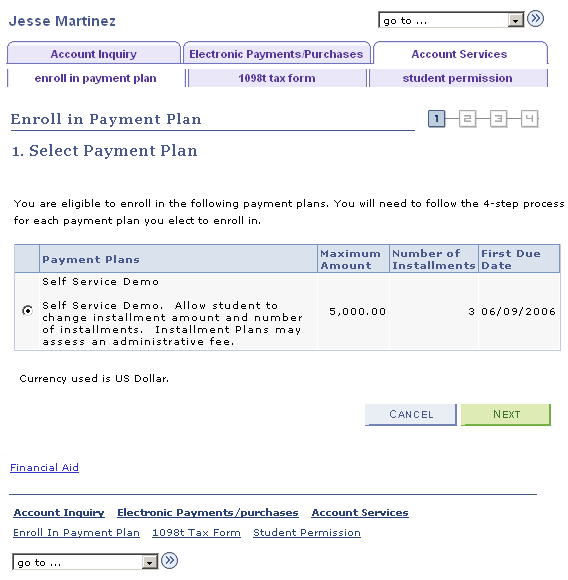
This page enables students to select a payment plan from among all eligible payment plans.
Click a plan. The first line of the Plan Description is derived from the Payment Plan description. The text after the first line is derived from the Payment Plan setup - Self Service description.
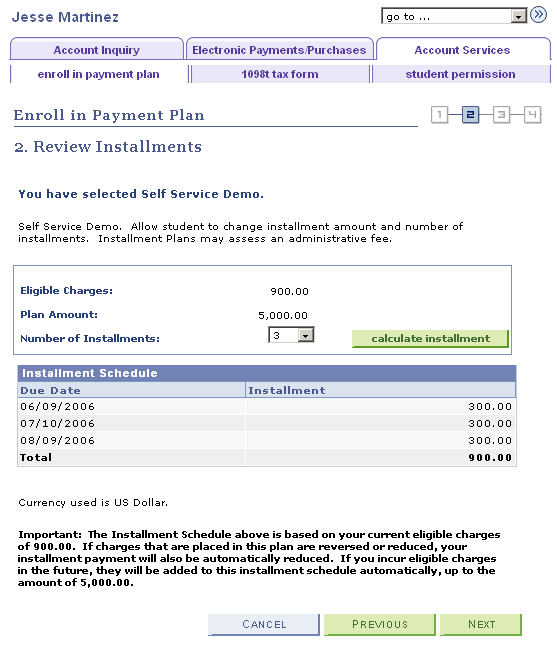
Review Installments
Access the Enroll in Payment Plan - Review Installments page ( and click the Next button).
Image: Account Services - Enroll in Payment Plan - Review Installments page
This example illustrates the fields and controls on the Account Services - Enroll in Payment Plan - Review Installments page. You can find definitions for the fields and controls later on this page.
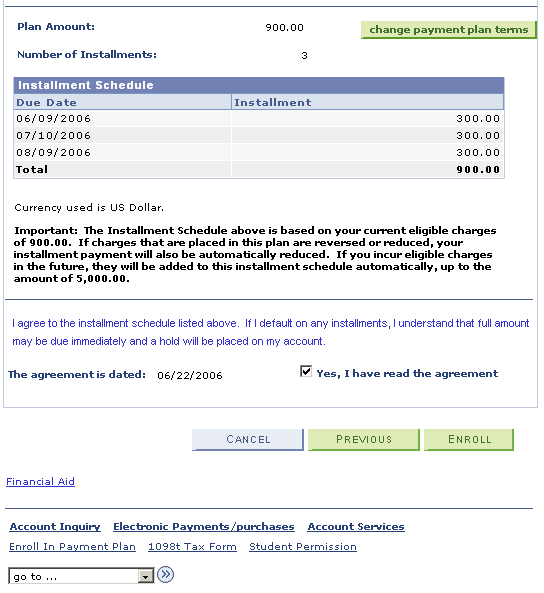
Agreement
Access the Enroll in Payment Plan - Agreement page ( and click the Next button).
Image: Account Services - Enroll in Payment Plan - Agreement page (1 of 2)
This example illustrates the fields and controls on the Account Services - Enroll in Payment Plan - Agreement page (1 of 2). You can find definitions for the fields and controls later on this page.
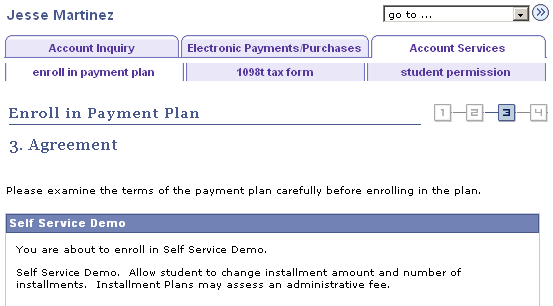
Image: Account Services - Enroll in Payment Plan - Agreement page (2 of 2)
This example illustrates the fields and controls on the Account Services - Enroll in Payment Plan - Agreement page (2 of 2). You can find definitions for the fields and controls later on this page.
Administrators can use the Review Self Service Agreements page to view enrollment agreement data.
Results
Access the Account Services - Enroll in Payment Plan - Result page ( and click the Next button).
Image: Account Services - Enroll in Payment Plan - Result page
This example illustrates the fields and controls on the Account Services - Enroll in Payment Plan - Result page. You can find definitions for the fields and controls later on this page.
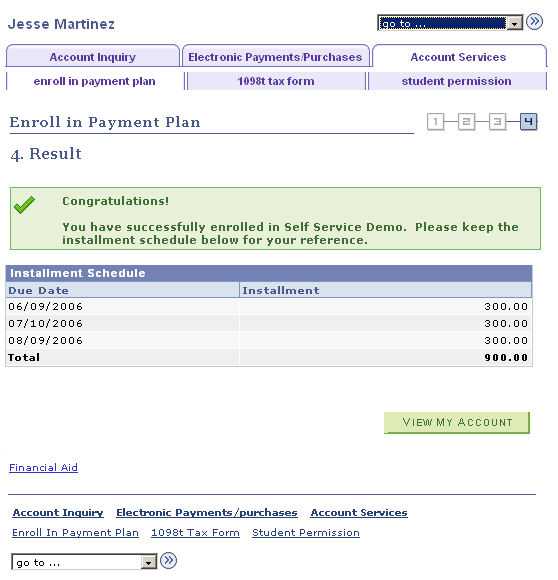
Administrators can use the Review Self Service Agreements page to view enrollment agreement data.
The 1098-T is an Internal Revenue Service (IRS) form that reports tuition and related expenses that a student can use to claim an educational tax credit.
Student Financials enables a student to view and reprint a substitute copy of the 1098-T after having received a paper copy through postal mail.
It also enables the student to consent to accessing an electronic version of the 1098-T form through the student self-service feature.
On the View 1098–T page, the Box Amount tab enables the student to access the details for individual box amounts.
Access the Account Services - View 1098-T page ().
Image: Account Services - View 1098-T page
This example illustrates the fields and controls on the Account Services - View 1098-T page. You can find definitions for the fields and controls later on this page.
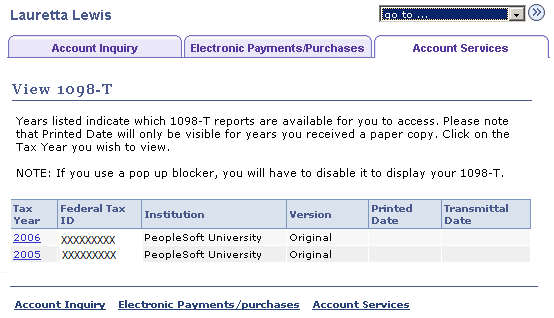
Select the tax year you want to view.
Access the 1098-T page.
Image: 1098-T page
This example illustrates the fields and controls on the 1098-T page. You can find definitions for the fields and controls later on this page.
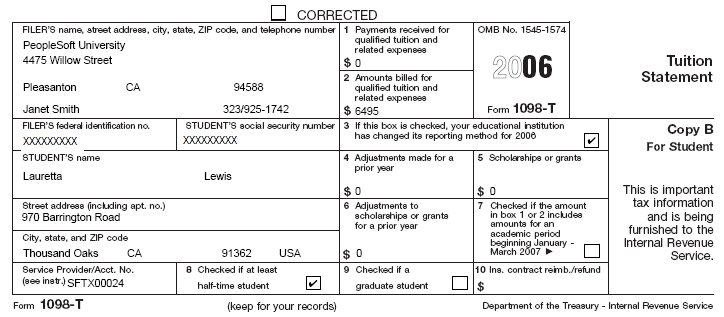
Until you generate a 1098-T form for the current tax year, only previous years are available.
View 1098-T Amount Detail
Access the Account Services - View 1098-T, Box Amount tab.
Image: View 1098-T page, Box Amount tab
This example illustrates the fields and controls on the View 1098-T page, Box Amount tab. You can find definitions for the fields and controls later on this page.
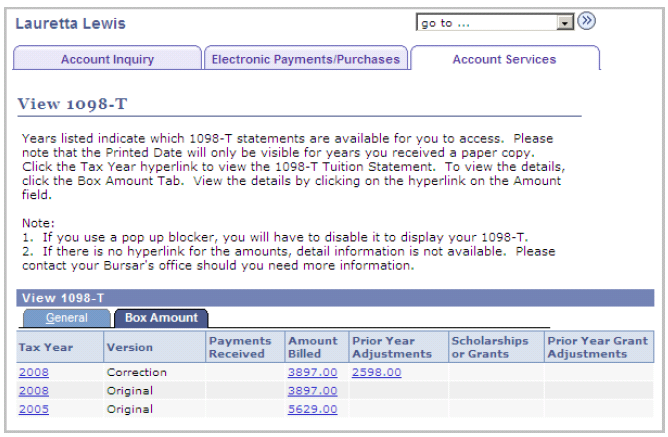
View the total amounts displayed on the 1098-T statement.
Access the View 1098- T - Amount Billed page.
Image: View 1098-T- Amount Billed page
This example illustrates the fields and controls on the View 1098-T- Amount Billed page. You can find definitions for the fields and controls later on this page.
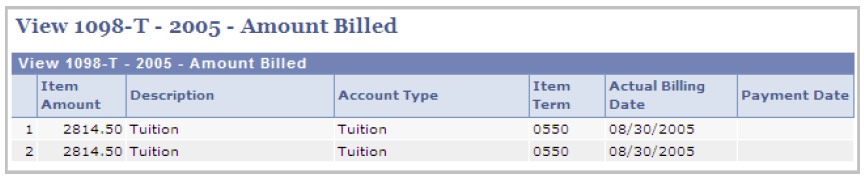
View the details of the eligible items billed for the calendar year. This includes the term for which the charged occurred.
Access the View 1098-T - Prior Year Adjustments page.
Image: View 1098-T - Prior Year Adjustments page
This example illustrates the fields and controls on the View 1098-T - Prior Year Adjustments page. You can find definitions for the fields and controls later on this page.
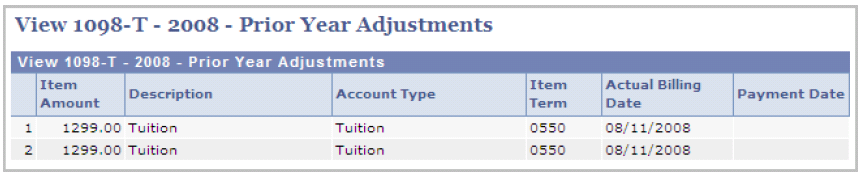
View prior year adjustments to the amount billed for an aid year.
Access the View 1098-T - Scholarships or Grants page.
Image: View 1098-T - Scholarships or Grants page
This example illustrates the fields and controls on the View 1098-T - Scholarships or Grants page. You can find definitions for the fields and controls later on this page.

View a detailed summary of the scholarship or grant for an aid year. This includes the type of account, offered amount and payment date.
Access the View 1098-T-Payments Received page.
Image: View 1098-T - Payments Received page
This example illustrates the fields and controls on the View 1098-T - Payments Received page. You can find definitions for the fields and controls later on this page.
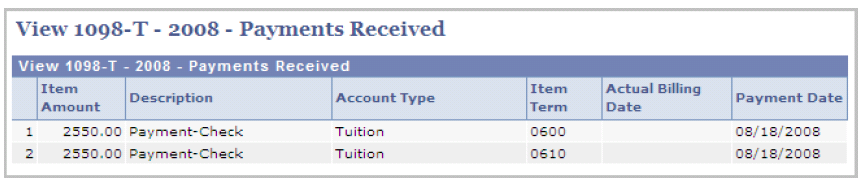
View the payment received for an item. This includes the type of account and payment date.
Your institution can provide the 1098-T form to students electronically. Students can consent to accessing an electronic version of the 1098-T form through student self service.
The student only sees the Consent Agreement for the 1098-T if they have not consented. After consent to receive the 1098-T electronically is granted, the agreement is no longer needed.
After consent is granted, it is effective for all years for which a 1098-T form was processed.
A student cannot revoke their consent online. Instead, the student must contact the institution to request that consent be revoked. Consent is revoked from an administrator page.
Access the 1098-T Consent Agreement page ( and click the Submit button).
Image: 1098-T Consent Agreement page
This example illustrates the fields and controls on the 1098-T Consent Agreement page. You can find definitions for the fields and controls later on this page.
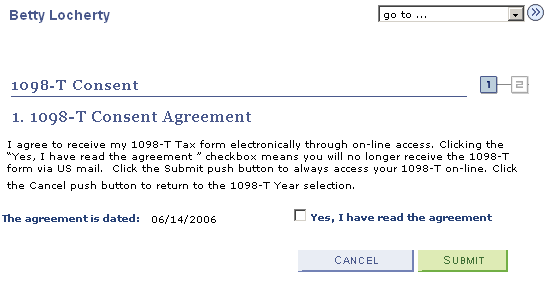
|
Field or Control |
Definition |
|---|---|
| Yes, I have read the agreement |
Select to agree to receive 1098-T statements online. |
| Cancel |
Click to cancel submission of the 1098-T Consent Agreement. |
| Submit |
Click to submit the accepted 1098-T Consent Agreement. |
Access the 1098-T Consent Confirmation page.
Image: 1098-T Consent Confirmation page
This example illustrates the fields and controls on the 1098-T Consent Confirmation page. You can find definitions for the fields and controls later on this page.
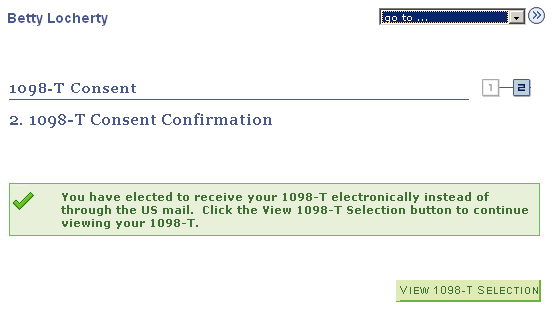
This page confirms the 1098-T Consent Agreement.
|
Field or Control |
Definition |
|---|---|
| View 1098-T Selection |
Click to select and view a 1098-T. Administrators can use the Review Self Service Agreement page to view Enrollment agreement data. |
U.S. Department of Education regulations require that Title IV financial aid awards be used to pay only allowable charges, for example, tuition, mandatory fees, and contracted housing and board, for the period of enrollment covered by the aid year in which those funds are awarded. Regulations require schools to collect individual authorization from a student in order to pay non-allowable charges such as parking fees or library fines, or for the prior year immediately preceding the current year.
Access the Account Services - Student Permissions page ().
Image: Account Services - Student Permissions page
This example illustrates the fields and controls on the Account Services - Student Permissions page. You can find definitions for the fields and controls later on this page.
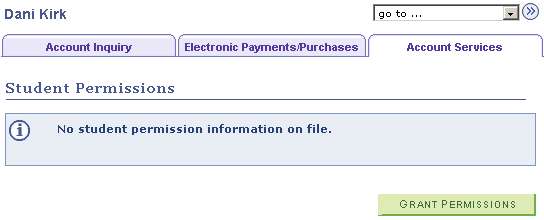
This page enables the student to begin the grant permission self-service process.
|
Field or Control |
Definition |
|---|---|
| Grant Permissions |
Click to grant permissions. |
Access the Select Permission Form page ( and click the Grant Permissions button).
Image: Select Permission Form page
This example illustrates the fields and controls on the Select Permission Form page. You can find definitions for the fields and controls later on this page.
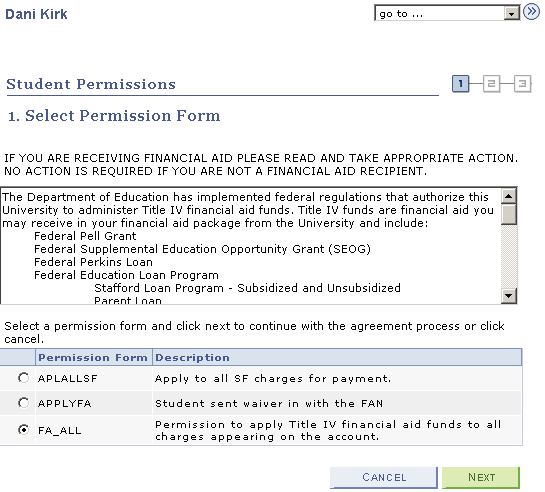
This page enables the student to read the Disclosure Statement. If multiple permissions exist, the student can select only one and then select Next to complete the process. Then the student can select another permission for review and submission.
Access the Permission Form Agreement page ( and click the Next button).
Image: Permission Form Agreement page
This example illustrates the fields and controls on the Permission Form Agreement page. You can find definitions for the fields and controls later on this page.
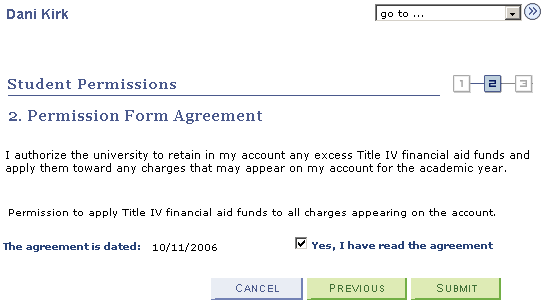
This page enables the student to select the Yes, I have read the agreement check box to verify reading of the agreement and permission.
The student clicks Submit to submit the permission form agreement.
Access the Student Permission Confirmation page ( and click the Submit button).
Image: Student Permission Confirmation page
This example illustrates the fields and controls on the Student Permission Confirmation page. You can find definitions for the fields and controls later on this page.
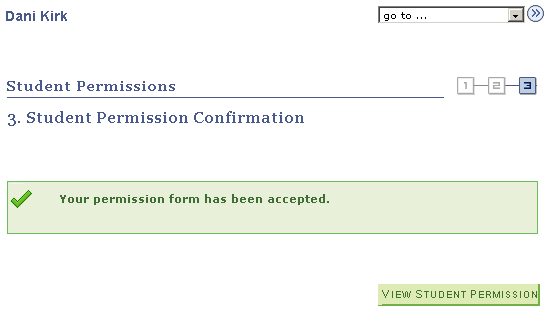
Click View Student Permission to return to the authorization page.
The student cannot revoke permission using self service; this can be done only by the administrator.
Access the Student Permission Agreement page ( and click the Display Student Agreement link).
Image: Student Permission Agreement page
This example illustrates the fields and controls on the Student Permission Agreement page. You can find definitions for the fields and controls later on this page.
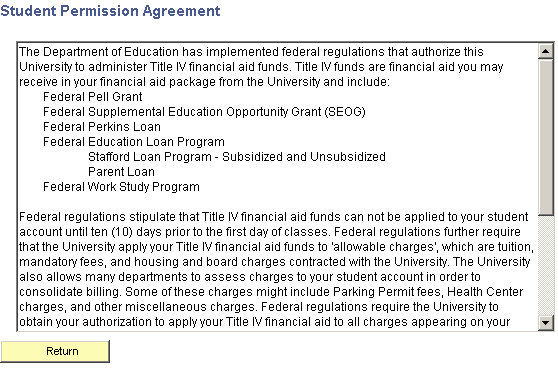
The student can read the student permission agreement.