Setting Up Self-Service Features for Student Records
To set up self-service Student Records, use the Student Records component (SSR_SS_ENRL_OPT) and the Weekly Schedule Time Period component (SETUP_TIME_PERIODS).
This section discusses how to:
Define Student Records setup.
Defining other Student Record self-service options.
Set up weekly schedule time periods.
Set up self-service graduation application and tracking.
Defining a name type display.
Configure name display rules.
Set up self-service graduation options.
Set up other graduation options.
|
Page Name |
Definition Name |
Navigation |
Usage |
|---|---|---|---|
|
Enrollment |
SSR_SS_ENRL_OPT |
|
Enable self-service features and define parameters and rules for self-service Student Records functionality. |
|
Other |
SSR_SS_OTHR_OPT |
|
Controls the display of phone details for advisors and committee members on the My Advisors page, controls whether advisors have access to non-advisee data from the View My Advisees page, and provides options for how to search for a Faculty member. |
|
Weekly Schedule Time Periods |
SETUP_TIME_PERIODS |
|
Define the times that define the ranges of time that the system displays on the Weekly Schedule page for both instructors and students. The PeopleSoft system delivers a set of time periods for every hour in a 24-hour period. You can modify or add to these values to meet your business requirements; for example, you can add half-hour intervals. |
|
Academic Institution 8 |
SSR_INST_TBL_GRAD |
|
Set up self-service graduation at the institution level; however, these settings can be overridden at the career or program level. |
|
Name Display Type |
SCC_NMD_TYP_TBL |
Click the Add Name Display Type link on the Academic Institution 8 page. |
Define how names will appear for graduation. |
|
Name Display Type Parameters |
SCC_NMD_TYP_PRM |
Click the Edit Parameters button on the Name Display Type page. |
Further define how names will appear. |
|
Self Service Options |
SSR_ACDCAR_SELFSRV |
|
Set up for career-specific usage of the graduation tracking process. |
|
Graduation |
SSR_PROG_TBL_GRAD |
|
Set up for program-specific usage of the graduation tracking process. |
Access the Enrollment page ().
Image: Enrollment page
This example illustrates the fields and controls on the Enrollment page. You can find definitions for the fields and controls later on this page.

|
Field or Control |
Definition |
|---|---|
| Note |
Enter descriptive information about the setup. This field is for informational purposes only. |
Enrollment Shopping Cart
|
Field or Control |
Definition |
|---|---|
| Allow Validation |
Select to enable the Validation feature. This feature enables self-service users to validate their Shopping Cart entries against a subset of edits from the Enrollment Engine. You can select which edits the Enrollment Engine runs. The options are time conflicts, repeats, requisites, and unit limits. If you select this check box, you must select at least one of these options. If you clear this check box, all references to validation in the system are hidden. |
| Time Conflict |
Select this check box if you want the Enrollment Engine to check time conflicts while validating Shopping Cart entries. |
| Repeats |
Select this check box if you want the Enrollment Engine to check repeats while validating Shopping Cart entries. |
| Allow During Enrollment Appt (allow during enrollment appointment) |
Select to enable users to validate their Shopping Cart entries during their enrollment appointment. If you select this check box, the Validate button appears in the Shopping Cart during the student's enrollment appointment. If you clear this check box, the Validate button is not available in the Shopping Cart during the student's enrollment appointment. This option prevents you from having to set up validation appointments that parallel your enrollment appointments. |
| Requisites |
Select this check box if you want the Enrollment Engine to check requisites while it validates Shopping Cart entries. |
| Unit Limits |
Select this check box if you want the Enrollment Engine to check unit limits while it validates Shopping Cart entries. |
Enrollment Features
|
Field or Control |
Definition |
|---|---|
| Use Wait Listing |
Select to enable wait listing. If you clear this check box, the system hides all references to wait listings in self-service. If you clear this check box, the system selects the Swap option by default and makes the Enroll with Drop if Enroll and Swap fields unavailable for edit. |
| Swap Enrollment Action |
This field controls the processing of enrollment requests submitted from the Swap component in student self-service. Select one of these options: Enroll with Drop if Enroll: Select this check box to enable Drop if Enroll processing for self-service swaps. If you select this check box, when a student swaps from one class to another or to a different enrollment component of the same class, the enrollment engine drops the student from the class that the student wants to swap only after the student is enrolled in the preferred class. The enrollment engine does not drop a student who is on the wait list for the preferred class. The enrollment engine processes the preferred class with an enrollment action of Enroll. Swap: If you select this check box, when a student swaps from one class to another (or a different enrollment section of the same class), the enrollment engine drops the student from the unwanted class if they are successfully enrolled or when they are placed on the wait list in the preferred class. Note: If the swap is for non-enroll components only, the request is processed with a Swap action regardless of the option that is selected on this setup page. When a student tries to swap only the non-enroll component(s) on the Swap component (no change to the enrollment component), the transaction is submitted to the enrollment engine with an enrollment action of Swap (instead of Enroll with Drop if Enroll). This ensures that the student is enrolled (or wait listed) in the right combination of enrollment and non-enroll components. For example, if a student is enrolled in CHEM 102 lecture section 1 plus related lab 1A and tries to swap to a closed lab, 1B, electing to wait list, the transaction is submitted as non-enroll swap (for example, swap section 1 to section 1 with related section 1B) where the student's status will be changed from enrolled to wait listed for the lecture section, wait listed in the non-enroll lab section (1B), and dropped from their original lab section (1A). |
Enrollment Preferences
Select the information that you want to appear in student self service.
|
Field or Control |
Definition |
|---|---|
| Enrollment Information |
Select to display enrollment requisite information about the self-service Enrollment Preferences page during the enrollment process. |
| Class Notes |
Select to display class notes information on the self-service Enrollment Preferences page during the enrollment process. |
| Class Meeting Information |
Select to display class meeting information on the self-service Enrollment Preferences page during the enrollment process. |
| Variable Unit Increments |
Enter a value to control how unit increments appear to students when students select a unit value for a variable unit course. For example, if students are allowed to enroll in half units, enter 0.50 in this field. A student who enrolls in a class with a variable unit range of 1 to 3 units is then presented with the following options: 1.00, 1.50, 2.00, 2.50, 3.00. |
Additional Self Service Setup
|
Field or Control |
Definition |
|---|---|
| Display Typically Offered Data |
Select to display when a course is usually offered at the institution. If this check box is selected, the data appears on a variety of self-service pages, including Browse Course Catalog, Course Detail, My Planner, and My Academic Requirements. If you clear the check box, the system does not display typically offered data within self-service, but it continues to display it on administrative pages. Typically offered values are institutionally defined within a typically offered setup page. They are then assigned to courses on the Course Catalog - Offerings page. |
| Show Student Photos on Rosters |
Select this check box if you want student photos to appear on the class and advisee rosters in the Faculty Center. |
Access the Other page ().
Image: Other page
This example illustrates the fields and controls on the Other page. You can find definitions for the fields and controls later on this page.
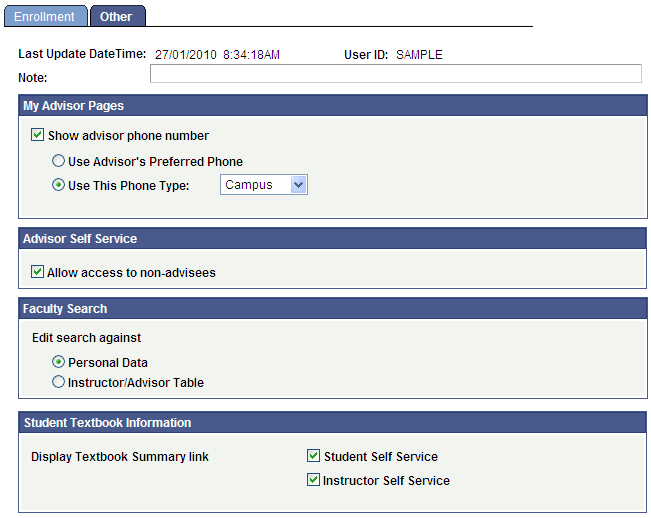
My Advisor Pages
Use the My Advisor Pages group box to control the display of phone details of advisors, committee members, or both on the My Advisors page.
Note: You should select the same advisor phone number value on this page and on the Student Center Options page in the Student Center component (SSS_STUDENT_CENTER).
Advisor Self Service
|
Field or Control |
Definition |
|---|---|
| Allow access to non-advisees |
If this check box is selected, the VIEW DATA FOR OTHER STUDENTS button becomes available on the View My Advisees – Advisee Roster page in Faculty Center. The check box is selected by default. Advisors can access student data for non-advisees by clicking the VIEW DATA FOR OTHER STUDENTS button, which takes them to a search page. If the Allow access to non-advisees check box is cleared, advisors cannot access student data for non-advisees. The VIEW DATA FOR OTHER STUDENTS button is hidden. If, when viewing an advisee's data, an advisor clicks the Return to Search button, the advisor is taken to a search page on which only their advisees are available. |
Faculty Search
Use this group box to control the data that you want to search against when you use the Locate a Faculty Member page in Faculty Center.
You can search against the entire population in the database or against data in the Instructor/Advisor Table component (INSTR_ADVSR_PERS).
|
Field or Control |
Definition |
|---|---|
| Personal Data |
Select this option to search against the entire population in the database when you use the Locate a Faculty Member page in Faculty Center. |
| Instructor/Advisor Table |
Select this option to search against data in the Instructor/Advisor Table component when you use the Locate a Faculty Member page in Faculty Center. |
Warning! You must be careful when setting up Self Service Faculty Search. You do not have to use the Instructor/Advisor Table component to assign instructors to classes. You should therefore select the option to edit the search for faculty members against data in the Instructor/Advisor Table component only if the Instructor/Advisor option is selected in the Edit Instructor Against group box on the Academic Organization Table page.
Student Textbook Information
|
Field or Control |
Definition |
|---|---|
| Display Textbook Summary link |
If you select the Student Self Service and Instructor Self Service check boxes, the View Textbook Summary link appears on the Student Self Service, My Class Schedule page and the Faculty Center, My Schedule page. Students and faculty staff can use the link to access a summary of the textbook assignments for each of their classes for the term. Clear the check boxes if you do not use the textbook feature or if you want to disable access to the Textbook Summary page. |
Access the Weekly Schedule Time Periods page ().
|
Field or Control |
Definition |
|---|---|
| Time |
Enter a range of values to define the periods of time that you want to appear on the self-service weekly schedule. The PeopleSoft application delivers a set of time periods for every hour in a 24-hour period. You can modify these values. This field also controls the self-service exam schedule weekly view, in both the Student Center and Faculty Center. Hours can be subdivided into 30- and 15-minute intervals. |
Note: To print the weekly schedule in full color, Internet Explorer users must change their settings as follows: Tools, Internet Options, Advanced, Printing, select "Print background colors and images." Without this setting, the schedule will print, but without background color.
Access the Academic Institution 8 page ().
Image: Academic Institution 8 page (1 of 2)
This example illustrates the fields and controls on the Academic Institution 8 page (1 of 2). You can find definitions for the fields and controls later on this page.
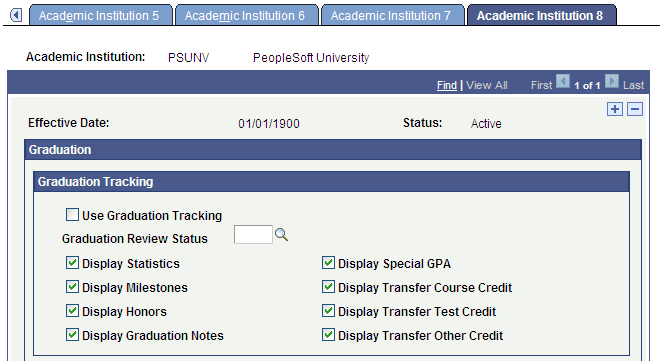
Image: Academic Institution 8 page (2 of 2)
This example illustrates the fields and controls on the Academic Institution 8 page (2 of 2). You can find definitions for the fields and controls later on this page.
Graduation Tracking
|
Field or Control |
Definition |
|---|---|
| Graduation Tracking |
Select this check box to set up graduation values at the institution level. If you select this check box, then all careers and programs will use graduation tracking. If you do not, then a selection made at either the career or the program level will determine whether graduation tracking is used. In addition, if you select this check box, the system creates a graduation tracking row during the self-service graduation application. |
| Graduation Review Status |
Select a value to be used during the self-service graduation application process. |
Note: The remaining check boxes determine whether these grids appear on the Graduation Tracking page. This is determined at the institution level.
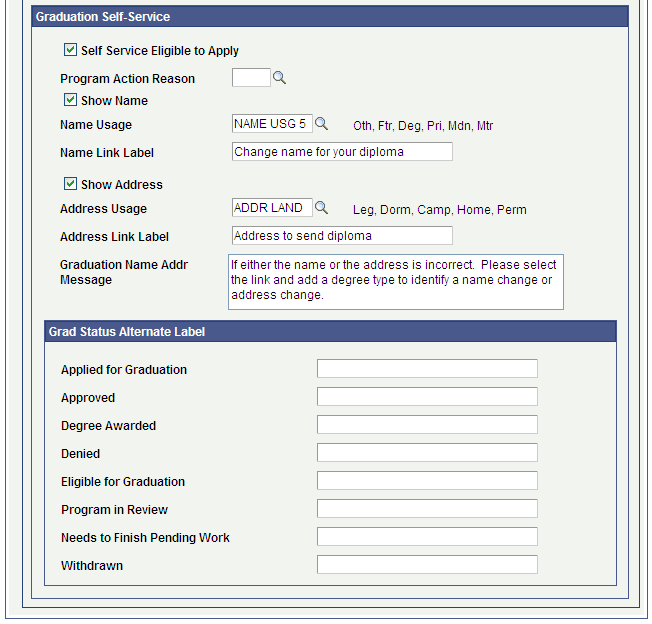
Graduation Self-Service
The Name Display framework provides a configurable solution that allows institutions to define how a display name will appear for graduation. Note that this functionality only appears on the View Graduation Status page in self service. The function called GetDegreeName is located in the FUNCLIB_SR.NAME_DISPLAY_TYPE.FieldFormula. This function returns the degree name that is derived using the Name Display Type settings on the Academic Institution Table component. The function requires an institution value and an EmplID value as parameters, and returns a string value of the degree name. Use this function to retrieve the derived Degree Name when needed for reporting or other processing.
|
Field or Control |
Definition |
|---|---|
| Self Service Eligible to Apply |
When this check box is selected, the self-service Apply for Graduation process looks for a degree checkout status of Eligible to Graduate on the student's academic program. The institution can set the degree checkout status using the Graduation Processing process to limit the students who can apply to graduate. |
| Program Action Reason |
Enter the program action reason used in the self-service Apply for Graduation process. |
| Show Name |
Select this check box to allow the student's name to appear on the View Graduation Status page. |
| Name Link Label |
Enter text that will appear as a link when the Show Name check box is selected. It will direct students to the Self Service Campus Community page where they can enter the name they want to use for graduation. The name type identified in the setup will be the name type edited or created. |
| Name Display Type |
Click the Add Name Display Type link or manually enter a Name Display Type, then click the Edit Name Display link. |
| Name Type |
This is the name type that will be added or edited through the Graduation self-service page. The system formats this name type based on the name display type entered above. |
| Show Address |
Select this check box to allow the student's address to appear on the View Graduation Status page. |
| Address Usage |
Identify value to use for the display of the address on the View Graduation Status page. |
| Address Link Label |
Enter text that will appear as a link when the Show Address check box is selected. It will direct the student to the Self Service Campus Community page where addresses can be changed in self service. |
| Graduation Name Addr Message |
Enter text to direct the student how to make name and address changes. These directions appear on the View Graduation Status page. |
Grad Status Alternate Label
The fields in this group box allow the institution to display a different message for the various degree checkout values.
Access the Name Display Type page (click the Add Name Display Type link on the Academic Institution 8 page).
Image: Name Display Type page
This example illustrates the fields and controls on the Name Display Type page. You can find definitions for the fields and controls later on this page.
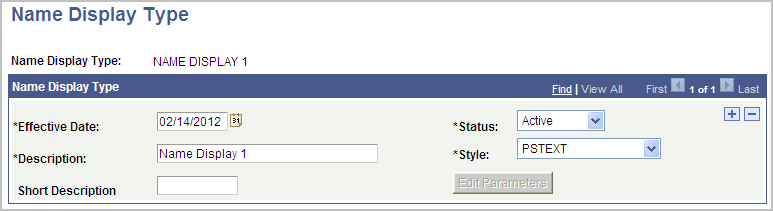
The Name Display framework provides a configurable solution that allows institutions to define how a display name will appear for graduation. Note that this functionality only appears on the View Graduation Status page in self service.
There are four delivered Style choices; these are currently not enabled for the View Graduation Status page.
Click the Edit Parameters button to access the Name Display Type Parameters page, where you can further define how names will appear.
Access the Name Display Type Parameters page (click the Edit Parameters button on the Name Display Type page).
Image: Name Display Type Parameters page
This example illustrates the fields and controls on the Name Display Type Parameters page. You can find definitions for the fields and controls later on this page.
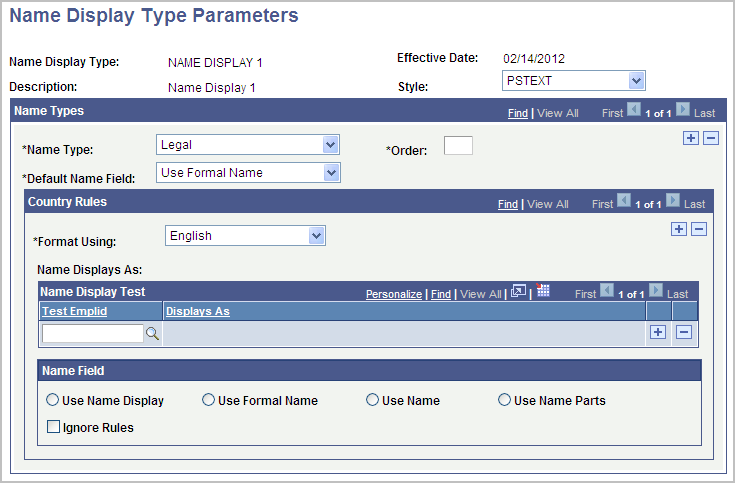
Name Types
|
Field or Control |
Definition |
|---|---|
| Name Type |
Select a name type, which is defined on the Name Type Table page. You can assign multiple name types (such as Primary, Preferred, and Legal) to each Name Display Type. |
| Order |
Rank the Name Type in the Name Type hierarchy for the Name Display Type. |
| Default Name Field |
Select from three delivered options: Use Formal Name, Use Name, or Use Name Display. |
Country Rules
You can define multiple sets of country rules for each Name Type. For example, your institution might define English country rules for the primary name type and Belgian country rules for the preferred name type. If you specify country rules, then you must select an option in the Name Field group box.
|
Field or Control |
Definition |
|---|---|
| Format Using |
The system only displays PeopleSoft-supported countries in this list. |
| Test EmplID |
Add person IDs to this grid, which allows you to select test IDs to see how a name will actually appear on a page based on the rules entered. You can only add IDs whose names include parts associated with the country. The test EmplID must have the name type you are formatting to see anything in the displays as area. |
Name Field
Use the fields in this group box to override the Default Name Field option in the Name Types group box and customize names for a specific country format. You can define the name's appearance part by part, as you go; the appearance of each ID added to the Name Display Test group box will refresh on any field change you make. There are four options in this group box: Use Name Display, Use Formal Name, Use Name, and Use Name Parts. If you select the Use Name Parts option, the Name Parts grid appears. The grid displays name fields specific to the country selected.
|
Field or Control |
Definition |
|---|---|
| Part Type |
Available options are: Name Field, Space, or User Defined. Name Field: contains values that are dependent on the selected country format such as First Name, Middle Name, Last Name. Space: allows you to add a single space between other part types. Spaces can only be specified from Part 2 onward. User Defined.: allows you to define other characters (such as commas or periods), or a character string up to 35 characters long. |
| Name Field |
The values that appear in this column are country-specific, based on your selection in the Format Using field. |
| Dependency |
Enter a number to specify a dependent part, so that parts will only be displayed when their dependent parts contain a value. For example, if a prefix is listed but a person has no prefix associated with their name record, the system ignores the entire prefix (name part, punctuation, and spaces) and moves to the next part in the list. |
Ignore Criteria
This group box is hidden by default; select the Ignore Rules check box to make it appear. Use the fields here to ignore any Name Field parts of a name. For example, you can make selections here to remove any special characters (such as * or !) used as placeholders for people with single names in your database.
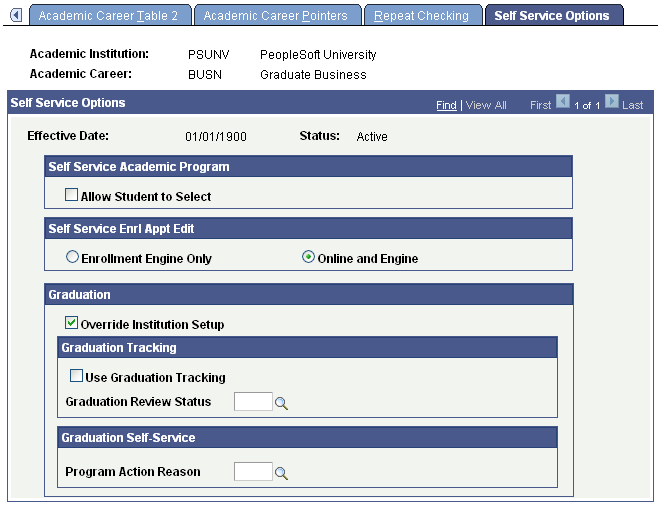
Access the Self Service Options page ().
Image: Self Service Options page
This example illustrates the fields and controls on the Self Service Options page. You can find definitions for the fields and controls later on this page.
|
Field or Control |
Definition |
|---|---|
| Override Institution Setup |
If you select this check box, the Graduation Tracking and Graduation Self-Service group boxes appear. |
| Use Graduation Tracking |
Select this check box to add a row to the graduation tracking process during self-service apply for graduation. Then select the appropriate Graduation Review Status. |
| Program Action Reason |
Select the appropriate program action reason. |
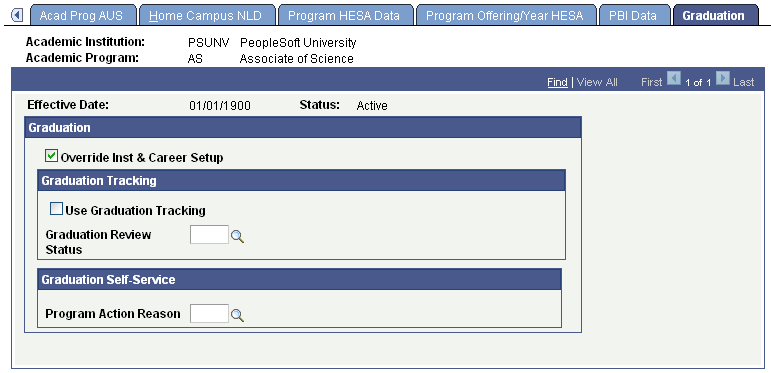
Access the Graduation page ().
Image: Graduation page
This example illustrates the fields and controls on the Graduation page. You can find definitions for the fields and controls later on this page.
|
Field or Control |
Definition |
|---|---|
| Override Inst & Career Setup (Override Institution and Career Setup) |
If you select this check box, the Graduation Tracking and Graduation Self-Service group boxes appear. |
| Use Graduation Tracking |
Select this check box to add a row to the graduation tracking process during self-service apply for graduation. Then select the appropriate Graduation Review Status. |
| Program Action Reason |
Select the appropriate program action reason. |