Setting Up a Self-Service Student Center
To set up a student center, use the Student Center component (SSS_STDNCTR_OPT).
This section provides an overview of defining student center setup options and discusses how to define self-service Student Center setup options.
The Student Center page is a self-service page that provides students a single entry point from which to navigate to student-related transactions. It also provides a single location where students can see information that is important to them, such as their class schedule, enrollment dates, and account information.
Using the Student Center Options page in conjunction with security setup, you can configure the Student Center page to control the user's experience. On the Student Center Options page, you can decide which major sections will appear on the Student Center page. You can also use the Student Center Options page to configure some of the individual items that will appear on the Student Center page. Using security setup, you can limit student access to self-service transactions. You must use the Student Center Options page in conjunction with security setup to create a self-service experience for students. For example, if your institution uses the enrollment functionality in PeopleSoft Student Records but does not use swap functionality, you can show the Academics section by selecting the Show Academic Section option on the Student Center Options page but not grant students access to the Swaps page using security. In this case, the Academic section would appear on the Student Center, but the swap functionality would not. Also, not displaying a feature on the Student Center does not remove it from the navigation. To remove a feature from the navigation, you must use security.
|
Page Name |
Definition Name |
Navigation |
Usage |
|---|---|---|---|
|
Student Center Options |
SSS_STDNCTR_OPT |
|
Define the sections that you want to appear to your students in the self-service Student Center. |
Access the Student Center Options page ().
Image: Student Center Options page (1 of 2)
This example illustrates the fields and controls on the Student Center Options page (1 of 2). You can find definitions for the fields and controls later on this page.
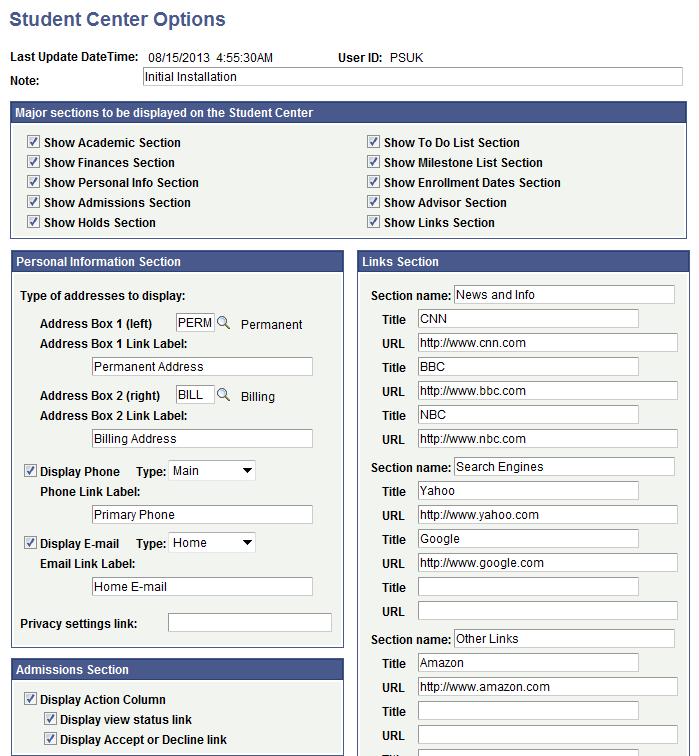
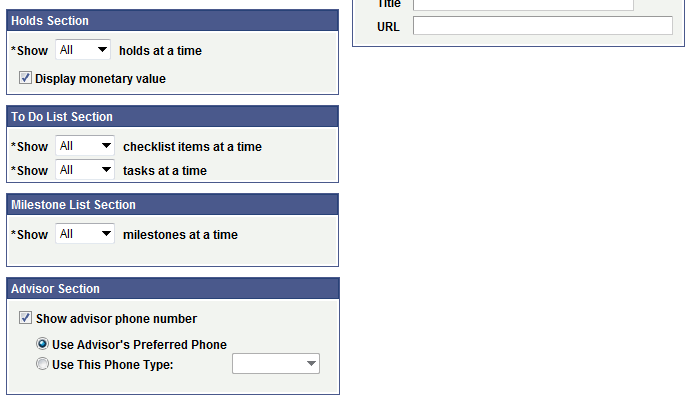
Image: Student Center Options page (2 of 2)
This example illustrates the fields and controls on the Student Center Options page (2 of 2). You can find definitions for the fields and controls later on this page.
|
Field or Control |
Definition |
|---|---|
| Note |
Enter a note. This field is for informational purposes only. |
Major Sections to Be Displayed on the Student Center
|
Field or Control |
Definition |
|---|---|
| Show Academic Section |
Select to show the Academic Section on the self-service Student Center page. This section contains links to My Class Schedule, Wish List, enrollment, and other Student Records functionality. |
| Show Finances Section |
Select to show the Finances Section on the self-service Student Center page. This section contains links to PeopleSoft Student Financials and PeopleSoft Financial Aid functionality, such as Account Summary and View My Financial Aid. |
| Show Personal Info Section (show personal information section) |
Select to show the Personal Info Section on the self-service Student Center page. This section contains links to biographical information features, such as addresses, phone numbers, email address, emergency contacts, and user preferences. If you select this check box, the fields in the Personal Information Section group box become available for edit. |
| Show Admissions Section |
Select to show the Admissions Section on the self-service Student Center page. This section contains links to PeopleSoft Recruiting and Admissions functionality, such as applying to another academic program, requesting admissions information from your institution, or checking on the status of an application. If you select this check box, the fields in the Admissions Section group box become available for edit. |
| Show Holds Section |
Select to show the Holds Section on the self-service Student Center page. If you select this check box, the fields in the Holds Section group box become available for edit. |
| Show To Do List Section |
Select to show the To Do List Section on the self-service Student Center page. If you select this check box, the field in the To Do List Section group box becomes available for edit. |
| Show Milestone List Section |
Select to show the Milestones section on the self-service Student Center page. In the Milestones section, students click the details link to access the Student Milestones self-service page. Advisors can also access milestone information from the Advisor Center. The Milestone Table setup controls which milestones are available in the list on the Student Center page. |
| Show Enrollment Dates Section |
Select to show the Enrollment Dates Section on the self-service Student Center page. This section contains enrollment appointments, validation appointments, and open enrollment dates. |
| Show Advisor Section |
Select to show the Advisor Section on the self-service Student Center page. This section displays academic advisors and committees assigned to the student. Within the Advisor Section, students click the Details link to go to the View My Advisors page. |
| Show Links Section |
Select to show the Links Section on the self-service Student Center page. If you select this check box, the fields in the Links Section group box become available for edit. |
Personal Information Section
|
Field or Control |
Definition |
|---|---|
| Address Box 1 (left) and Address Box 2 (right) |
Enter the address types to display in the Personal Information Section of the Student Center page. Only address types that are set up on the Type Control page as Display Only, Edit - No Delete, or Full Edit are available. |
| Address Box 1 Link Label and Address Box 2 Link Label |
Enter the label to be displayed for the address links on the Student Center page. |
| Display Phone |
Select to display the student's phone number on the Student Center page. |
| Type |
Enter a phone type to display. Only phone types that are set up on the Type Control page as Display Only, Edit - No Delete, or Full Edit are available. |
| Phone Link Label |
Enter the label to be displayed for the phone link on the Student Center page. |
| Display E-mail |
Select to display the student's email address on the Student Center page. |
| Type |
Enter email types to display. Only email types that are set up on the Type Control page as Display Only, Edit - No Delete, or Full Edit are available. |
| Email Link Label |
Enter the label to be displayed for the email link on the Student Center page. |
| Privacy settings link |
If you do not use Family Educational Rights and Privacy Act (FERPA), enter a URL to your institution's privacy site. When you enter a URL in this field (starting with http://) a Privacy Settings link appears on the self-service Student Center page. It will direct users to the website you defined. If your institution uses FERPA, leave this field blank and give your self-service users access to the FERPA self-service page. In this case, users will access FERPA from the Personal Information prompt by selecting the Privacy Settings option. |
Admissions Section
|
Field or Control |
Definition |
|---|---|
| Display Action Column |
Select to display the Action column in the Admissions section on the Student Center page. The Action column—which displays the View Status and Accept/Decline links—appears only when there is an allowable action for the applicant to take. If Display view status link is selected here on the setup page and a checklist is associated with the application and the checklist is incomplete, the View Status link appears on the Student Center page. If Display Accept or Decline link is selected here on the setup page and the applicant is admitted, the Accept or Decline link appears on the Student Center page. |
| Display view status link |
Select to display the View Status link, which accesses the to-do list(s) associated with the application. |
| Display Accept or Decline link |
Select to display the Accept or Decline link, which accesses the Accept Admissions page. |
Holds Section
|
Field or Control |
Definition |
|---|---|
| Show <> holds at a time |
Select the number of holds that you want to display at one time. You can display all holds or from 1 to 10 holds. The system sorts holds by date—most current to oldest—on the Student Center page. |
| Display monetary value |
Select to display the monetary value of the holds on the Student Center page. |
To Do List Section
|
Field or Control |
Definition |
|---|---|
| Show <> checklist items at a time |
Select the number of checklist items that you want to display at one time. You can display all checklist items or from 1 to 10 checklist items or you can choose to not display checklist items at all. The system sorts checklist items by earliest due date on the Student Center page. |
| Show <> tasks at a time |
Select the number of tasks (activity guide instances) that you want to display at one time. You can display all tasks or from 1 to 10 tasks or you can choose to not display tasks at all. The system sorts tasks by earliest due date on the Student Center page. |
Note: If you have selected the Show To Do List Section check box, then at least one checklist item or one task must be enabled to be displayed. That is, if the Show To Do List Section check box is selected, then you should not select None for both Show <> checklist items at a time and Show <> tasks at a time.
Also, note that if you have selected the Show To Do List Section check box and there are no open checklist items or tasks for the student, then the To Do List section of the Student Center page indicates that there are no to do's for the student.
Advisor Section
|
Field or Control |
Definition |
|---|---|
| Show advisor phone number |
Select to indicate whether to use an advisor's preferred phone number or a particular phone type when displaying the advisor's phone number in the Advisor section of the Student Center. This setup controls the phone number on the Student Center page only. Note: You should select the same Advisor phone number value on this page and on the Other page in the Student Records component. |
Milestone List Section
Select the number of milestones that you want to display at one time. The system sorts milestone items based on the order in which the milestones were added to the student's record.
Links Section
Use this group box to define link sections that will be available on the Student Center page. By defining sections and URLs, you can provide links to institution websites such as University Library, Campus Directory, University Home Page, Free Application for Federal Student Aid (FAFSA), and others. You can define three sections with a maximum of three URLs per section.