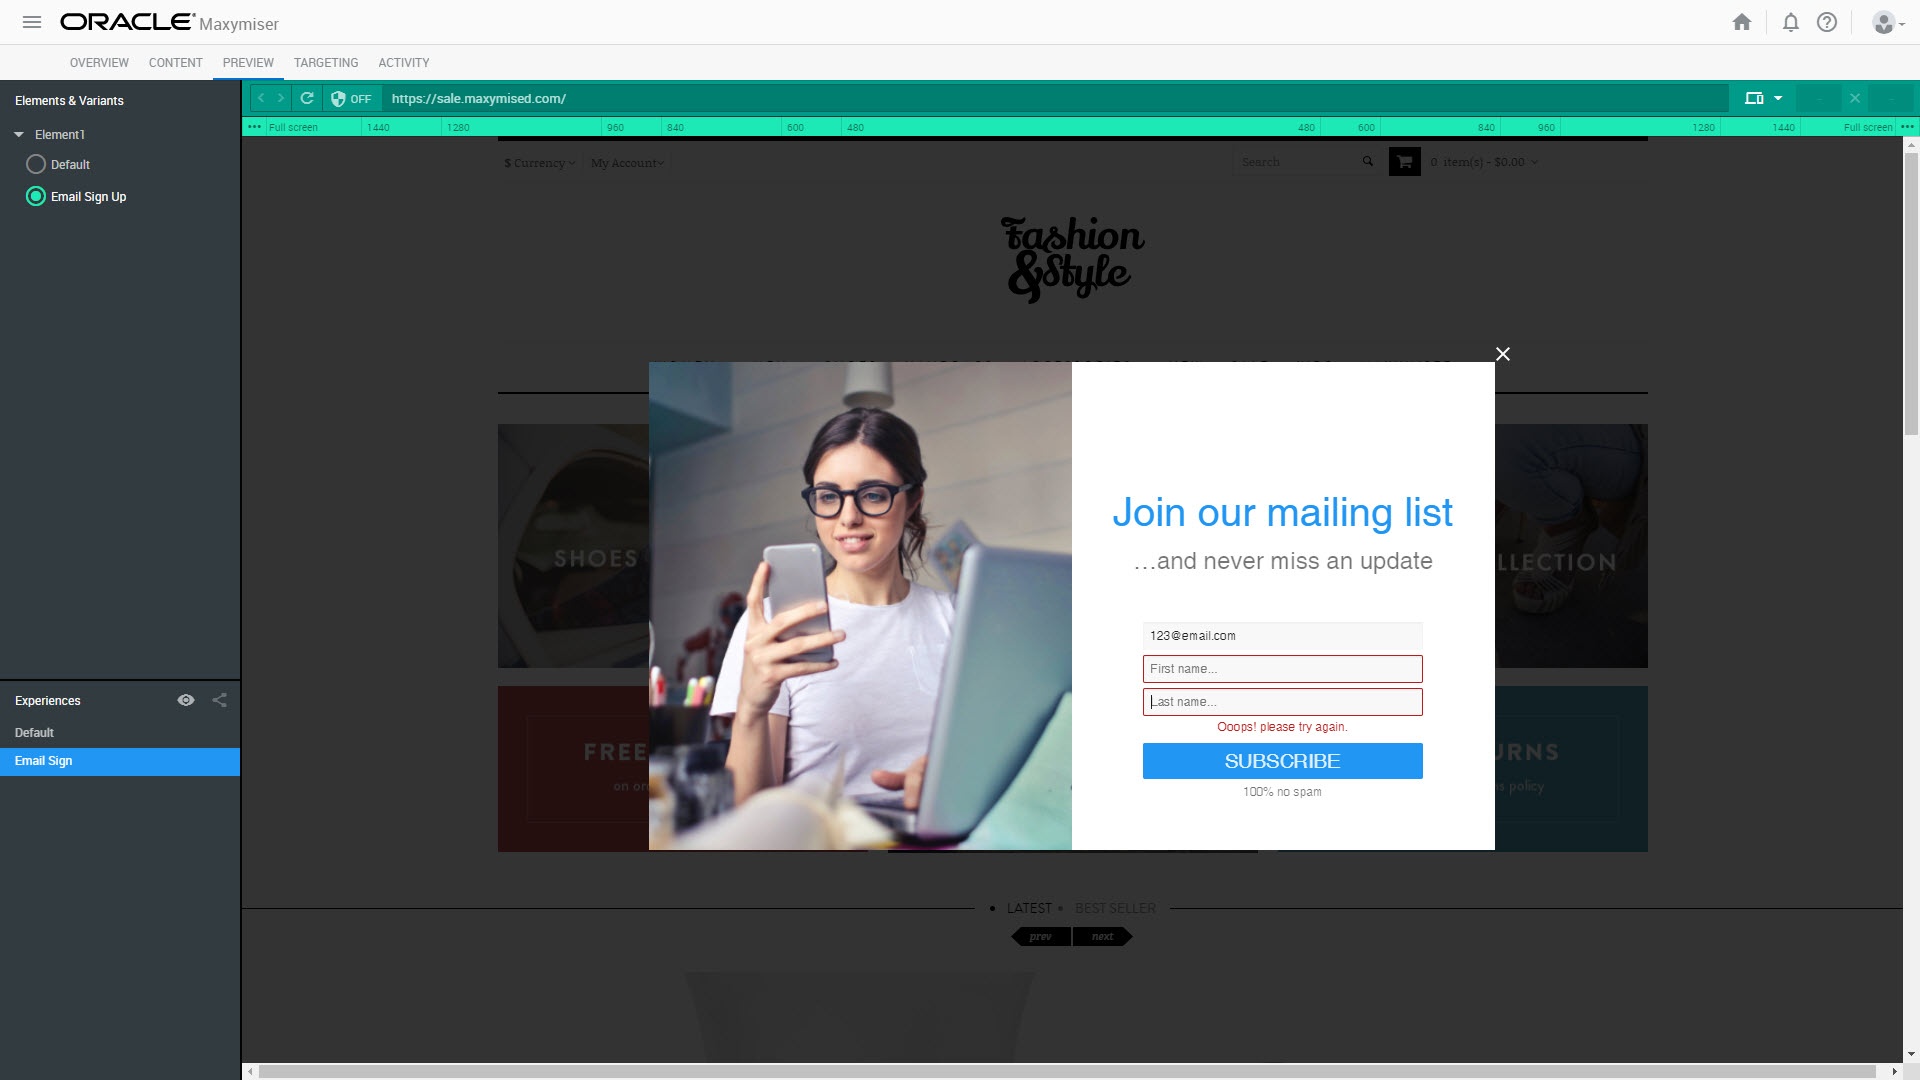
Responsysサインアップ・ライトボックスへのフィールドの追加
デフォルトでは、電子メール・サインアップ・ライトボックスのテンプレートにはEmailaddressフィールドのみが含まれています。ライトボックスのコードを手動で編集して、名、姓、国などの機能を追加できます。
次の例は、電子メール・サインアップ・ライトボックスに名と姓のフィールドを追加する方法を示しています。
- Responsysリスト・スキーマで、ライトボックスに追加するフィールドの名前を選択します。これは、Oracle Maxymiserライトボックスのフィールド名と照合する必要があるためです。この例でのフィールド名は次のとおりです。
FIRST_NAMELAST_NAME
- Oracle Responsysサインアップ・ライトボックスを作成します。
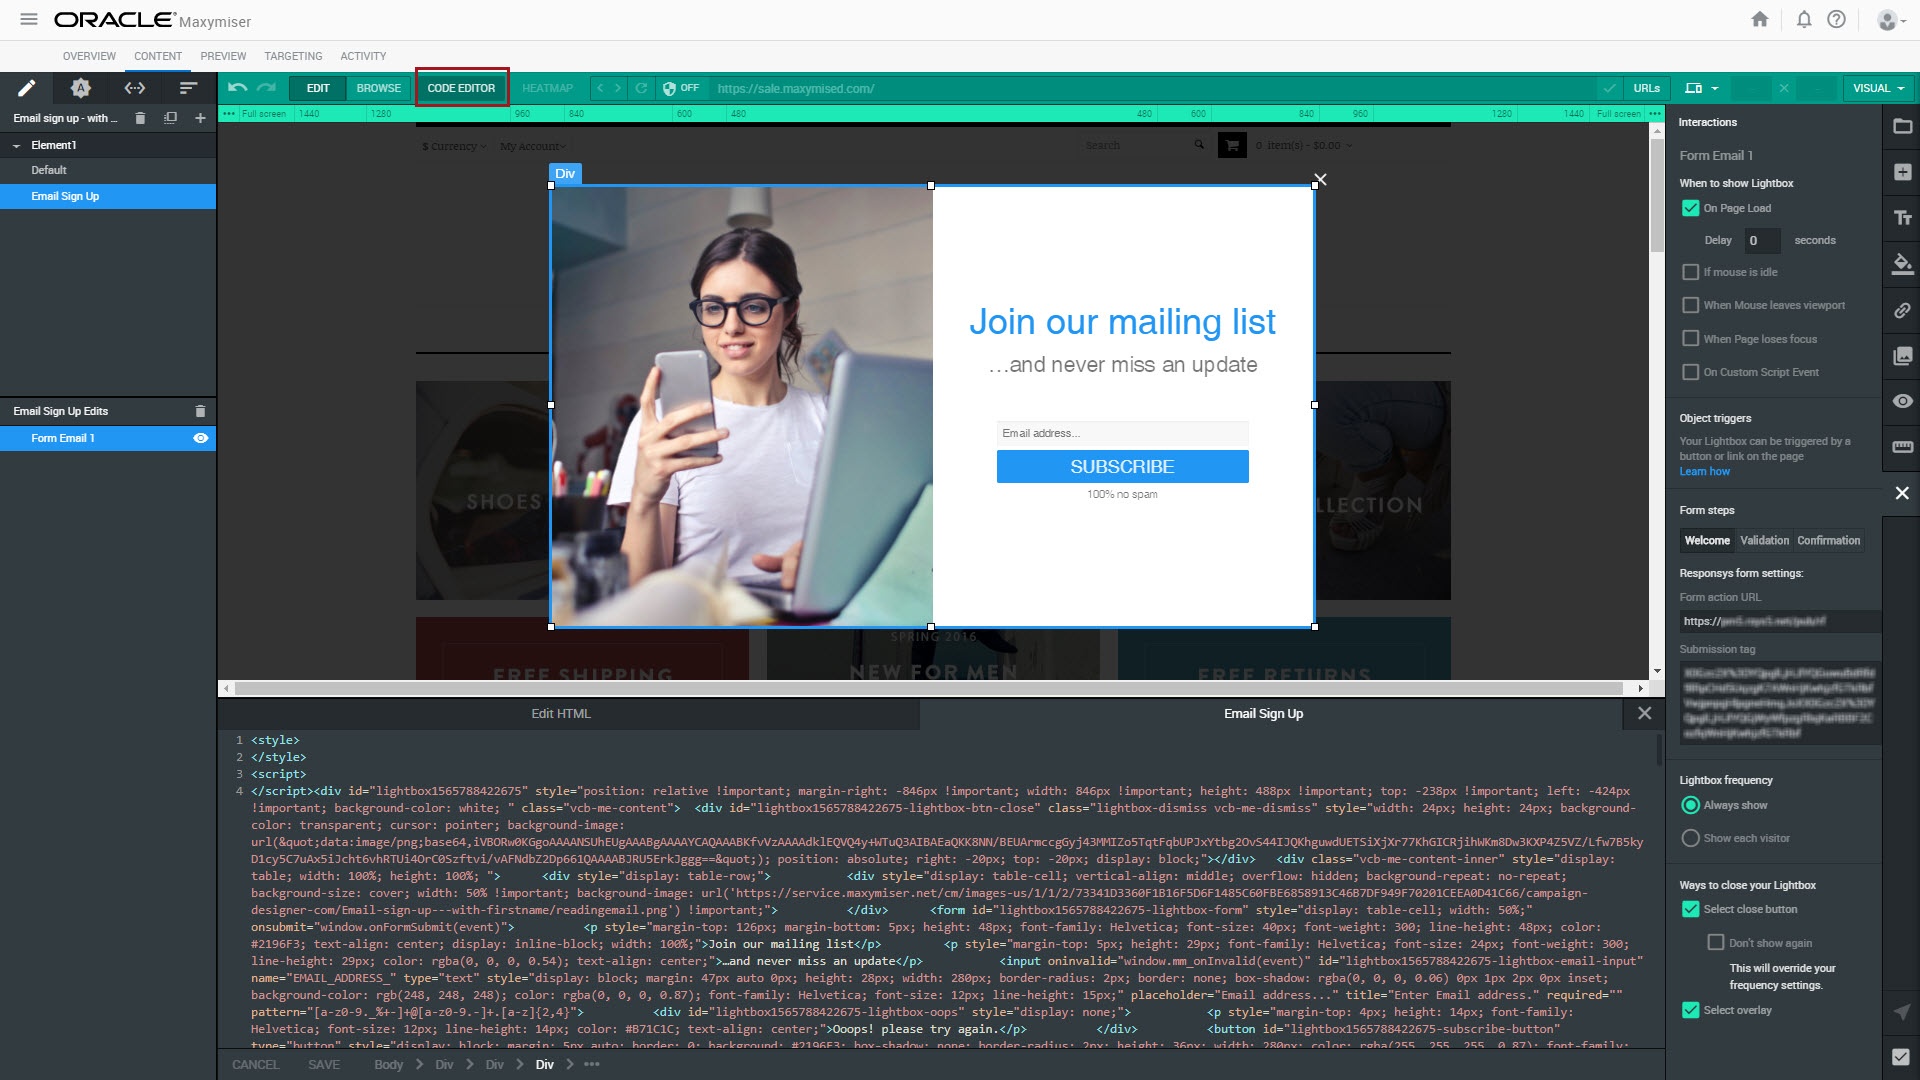
- 「コード・エディタ」をクリックします。
<form>タグ内で次の操作を実行します。emailaddressフィールドの<input>タグを検索します。- 前述のタグの後に、名の新しい
<input>タグを追加します。 - 次のように
<input>属性を変更します。 - ID: ライトボックスIDと入力フィールド名およびタイプで構成される一意のID。例:
lightbox1565788422675-lightbox-firstname-input。 - 名前: ステップ1のResponsys表のフィールド名。
- プレースホルダ: テキスト・ボックスが空のときに表示されるヒント・テキスト。
- パターン: テキスト・ボックスに入力できる文字を決定する正規表現。この例では、a-zまたはA-Zの範囲内の文字を使用できますが、ハイフンやスペースなどの他の文字も使用できます。
- 姓の別の
<input>タグを追加および変更します。
<input oninvalid="window.mm_onInvalid(event)" id="lightbox1565788422675-lightbox-email-input" name="EMAIL_ADDRESS_" type="text" style="display: block; margin: 47px auto 0px; height: 28px; width: 280px; border: none; box-shadow: rgba(0, 0, 0, 0.06) 0px 1px 2px 0px inset; background-color: rgb(248, 248, 248); color: rgba(0, 0, 0, 0.87); font-family: Helvetica; font-size: 12px; line-height: 15px;" placeholder="Email address..." title="Enter Email address." required="" pattern="[a-z0-9._%+-]+@[a-z0-9.-]+.[a-z]{2,4}"><input oninvalid="window.mm_onInvalid(event)" id="lightbox1565788422675-lightbox-firstname-input" name="FIRST_NAME" type="text" style="display: block; margin: 5px auto 0px; height: 28px; width: 280px; border-radius: 2px; border: none; box-shadow: rgba(0, 0, 0, 0.06) 0px 1px 2px 0px inset; background-color: rgb(248, 248, 248); color: rgba(0, 0, 0, 0.87); font-family: Helvetica; font-size: 12px; line-height: 15px;" placeholder="First name..." title="Enter First name." required="" pattern="^[a-zA-Z]+$">
ノート: ライトボックスを作成する場合は、ライトボックスの外側のdivの属性として、または前述の電子メール・フィールドのID属性の一部として検出できる一意のIDを指定します。
<input oninvalid="window.mm_onInvalid(event)" id="lightbox1565788422675-lightbox-lastname-input" name="LAST_NAME" type="text" style="display: block; margin: 5px auto 0px; height: 28px; width: 280px; border-radius: 2px; border: none; box-shadow: rgba(0, 0, 0, 0.06) 0px 1px 2px 0px inset; background-color: rgb(248, 248, 248); color: rgba(0, 0, 0, 0.87); font-family: Helvetica; font-size: 12px; line-height: 15px;" placeholder="Last name..." title="Enter Last name." required="" pattern="^[a-zA-Z]+$">
- フォームが送信されたら、新しい入力フィールドが送信URLに追加されていることを確認します。
window.onFormSubmit関数を見つけて、その中の次のコード行を探します。- この行の下に、次の行を追加して変数に名と姓を格納します。
var emailInput = document.getElementById(id + '-lightbox-email-input');
var firstnameInput = document.getElementById(id + '-lightbox-firstname-input');
var lastnameInput = document.getElementById(id + '-lightbox-lastname-input');
これらの変数に格納された値は、エラーがないかチェックしてフォームを送信する際に使用されます。
- 名と姓のフィールドの内容を検証するようにエラーチェック・コードを更新する必要があります。
- この例では、次の既存のコードを置き換えます。
- 次のコードに置き換えます。
var re = /[a-z0-9._%+-]+@[a-z0-9.-]+.[a-z]{2,4}/;if (!re.test(emailInput.value)) {oops.style.display = 'block';
emailInput.style.cssText = emailInput.style.cssText.replace(/border:[^;]*;/, "border: 1px solid #B71C1C;");
emailInput.style.cssText = emailInput.style.cssText.replace(/border-radius:[^;]*;/, "border-radius: 2px;");
return;
}
var re = /[a-z0-9._%+-]+@[a-z0-9.-]+.[a-z]{2,4}/;var reName = /^[a-zA-Z]+$/;
emailInput.style.cssText = emailInput.style.cssText.replace(/border:[^;]*;/, "border: none;");
firstnameInput.style.cssText = firstnameInput.style.cssText.replace(/border:[^;]*;/, "border: none;");
lastnameInput.style.cssText = lastnameInput.style.cssText.replace(/border:[^;]*;/, "border: none;");
if (!re.test(emailInput.value) || !reName.test(firstnameInput.value) || !reName.test(lastnameInput.value)) {oops.style.display = 'block';
if (!re.test(emailInput.value)) {emailInput.style.cssText = emailInput.style.cssText.replace(/border:[^;]*;/, "border: 1px solid #B71C1C;");
emailInput.style.cssText = emailInput.style.cssText.replace(/border-radius:[^;]*;/, "border-radius: 2px;");
}
if (!reName.test(firstnameInput.value)) {firstnameInput.style.cssText = firstnameInput.style.cssText.replace(/border:[^;]*;/, "border: 1px solid #B71C1C;");
firstnameInput.style.cssText = firstnameInput.style.cssText.replace(/border-radius:[^;]*;/, "border-radius: 2px;");
}
if (!reName.test(lastnameInput.value)) {lastnameInput.style.cssText = lastnameInput.style.cssText.replace(/border:[^;]*;/, "border: 1px solid #B71C1C;");
lastnameInput.style.cssText = lastnameInput.style.cssText.replace(/border-radius:[^;]*;/, "border-radius: 2px;");
}
return;
}
- To ensure the new values get submitted when the visitor clicks the Subscribe button, find the following code:
- このコードの後に、次の行を追加して、フォーム送信URLに名と姓を追加します。
- 「プレビュー」パネルに切り替えて、新しく作成したフィールドをライトボックスでテストします。

ノート: コード・エディタでライトボックス・コードを手動で編集し、「インタラクション」パネルに切り替えて変更を行う場合、formSubmit関数への手動による変更は「インタラクション」パネルで上書きされます。
parameters.push(encodeURIComponent('EMAIL_ADDRESS_') + '=' + encodeURIComponent(emailInput.value));
parameters.push(encodeURIComponent('FIRST_NAME') + '=' + encodeURIComponent(firstnameInput.value));parameters.push(encodeURIComponent('LAST_NAME') + '=' + encodeURIComponent(lastnameInput.value));