If a serial attached SCSI (SAS) hard disk drive (HDD) fails, replace a failed SAS HDD with a drive of the same type and capacity as soon as possible.
- Prerequisites:
Before handling a component, touch a grounded surface to discharge any static electricity.
Attach an electrostatic discharge (ESD) wrist strap to your wrist, and stand on an ESD mat while replacing components.
Ensure that you have a replacement SAS HDD available immediately. Otherwise, if the drive compartment is left empty, the Pilot might overheat due to improper airflow.
A SAS HDD is a storage drive that is used to store or retrieve system information and retains its data even when powered off. Each Pilot has a SAS HDD located inside the Pilot’s storage drive compartment. The SAS HDD is a customer replaceable unit (CRU). A Pilot can continue to operate during the SAS HDD replacement. Replacing a SAS HDD requires you to bring the HDD offline. When the SAS HDD is offline, applications are not allowed to access the HDD and data corruption cannot occur. The following figure shows the location of the HDD and HDD LEDs.
Figure 1 SAS HDD location 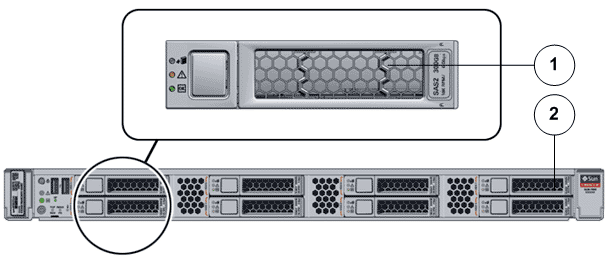
- Legend
1 SAS HDD 3 Pilot front
- Locate the failed
component by checking the status of the component LEDs. You can also use Oracle FS System Manager (GUI) to view the status. From the GUI, navigate to and then select the chassis type of interest.
- From the GUI, prepare the system for component replacement.
- On the Pilot with the failed SAS HDD, press the drive carrier latch to disengage the SAS HDD.Figure 2 SAS HDD removal
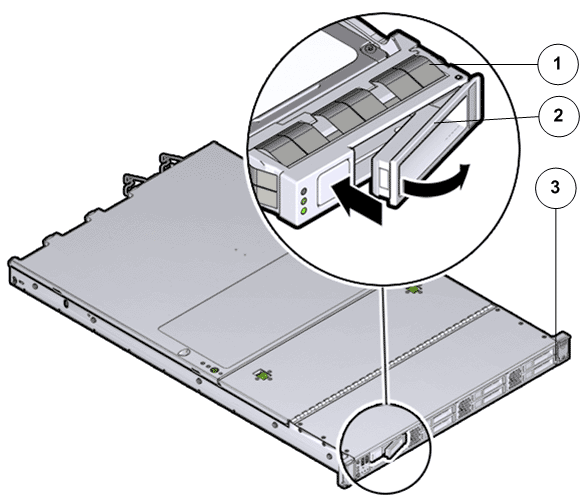
- Legend
1 SAS HDD 2 Drive carrier latch 3 Pilot front
Important! The drive carrier latch is not an ejector. Do not bend the latch too far to the right. Bending the latch can damage the latch. - Grasp the drive carrier latch and pull the SAS HDD out of the Pilot drive compartment.
- Place the failed SAS HDD on an antistatic mat.
- Unpack the
component from its shipping carton.Note: Place the component on an antistatic mat if it must be set aside for any reason.
- Insert and slide the replacement SAS HDD into the drive slot until the SAS HDD is fully seated into the slot.Figure 3 SAS HDD insertion
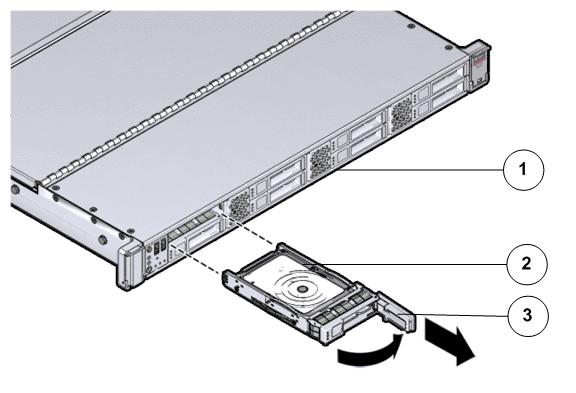
- Legend
1 Pilot front 2 SAS HDD 3 Drive carrier latch
Note: Replacing the failed SAS HDD with a blank SAS HDD into the Pilot drive slot will not boot up the Pilot. Use Guided Maintenance (GM) to re-install the operating system on the Pilot SAS HDD and enable the Pilot to re-join the network automatically without any special configuration. - Close the drive carrier latch to lock the SAS HDD in place.Note: Do not force open the drive carrier latch. You can damage the drive carrier latch if you apply too much force.
- Re-configure the SAS HDD by creating a Pilot image on the SAS HDD.
- From Guided
Maintenance, verify that the status is Normal. You can also verify the status by navigating to and then selecting a chassis. The Overview page for the selected chassis lists the status of each component.Note: The Controller status will be visible several minutes after being powered on.
- Review the status of the LEDs to confirm a status of Normal.
Identify the Pilot component for replacement
Remove the failed Pilot SAS HDD
Insert the failed Pilot SAS HDD
Verify the Pilot component status