| Siebel Customer Relationship Management Siebel Fundamentals for Siebel Open UI Siebel Innovation Pack 2014 E52425-01 |
|


 Previous |
 Next |
View PDF |
| Siebel Customer Relationship Management Siebel Fundamentals for Siebel Open UI Siebel Innovation Pack 2014 E52425-01 |
|
Previous |
Next |
View PDF |
You can send email messages, faxes, pages, and outbound wireless messages (for example, text messages or Short Message Service messages) from within the Siebel application. The following commands are available when you choose File on the application-level menu:
Send Email. Allows you to send email directly from the Siebel application. For more information, see "Setting Outbound Communications Preferences for Send Email".
Send Fax. Allows you to send a fax directly from the Siebel application.
Send Page. Allows you to page someone directly from the Siebel application.
Send Wireless Message. Allows you to send a message to another person's wireless device from the Siebel application.
Sending a fax, page, or an outbound wireless message is similar to sending an email. Choose the appropriate Send command after you choose File from the application-level menu. If you cannot send a fax, page, or outbound wireless message, then contact your Siebel administrator.
The configuration of your Siebel application determines whether you have access to send functionality. For more information, contact your Siebel administrator.
Using the Send Email command, you can send email messages from any context (location) within the Siebel application. The Siebel administrator can configure the Siebel application so that you can use context-specific email message templates to improve efficiency and standardize replies for the types of communications that occur frequently.
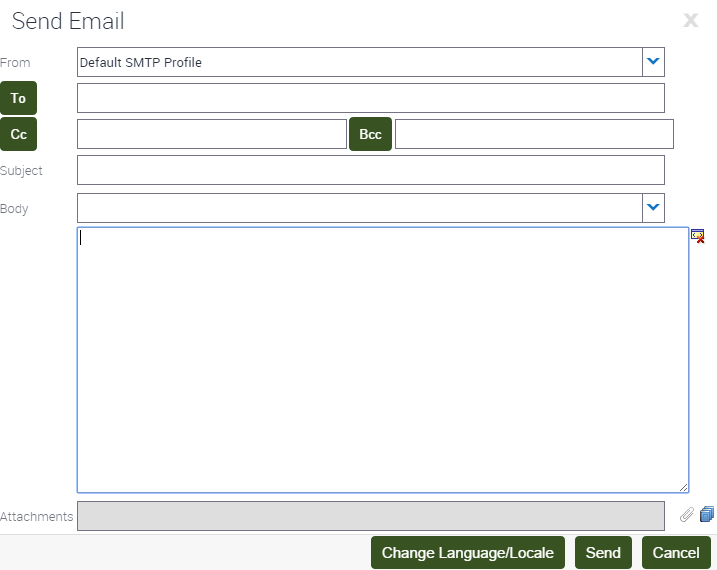
Figure 10-1 shows an example of the Send Email dialog box.
The Siebel application supports user choice regarding the software for Send Email. The choice of software is determined by the value of the Email Client user preference setting in your Siebel application.
Figure 10-1 Example of the Send Email Dialog Box
To send an email from the Siebel application
Navigate to the screen.
Select the record for which you want to send the email.
On some screens, data associated with the selected record might be inserted into the email.
From the application-level menu, choose File, then Send Email.
|
Note: On some screen, the Pick Recipients dialog box might appear. If this dialog box appears, then select a recipient (or select None) from the list, and click OK. |
The Send Email dialog box appears.
Complete the appropriate fields in the dialog box.
Verify that the From field includes your profile name. If this field does not include your profile name, then select a profile name from the drop-down list for this field. If no profile is available, then contact your Siebel administrator.
You can select a template containing predefined text for the email from the drop-down list for the Body field.
(Optional) Complete the following additional steps:
Attach literature and other files to the email by clicking the Add literature or Attachment button next to the Attachments field.
Launching the Send Email dialog box from an attachment record automatically attaches the file in the attachment record to the email.
|
Note: If you attach multiple items (literature or attachments) to the email, then only the last item you attach appears in the Attachments field. To see a list of all attachments, click the Attachment button. |
If you select HTML as your Default Message Format user preference, then edit aspects of the message text, such as font size, font color, paragraph justification, and so on. For more information, see "Using the HTML Editor".
The email recipient sees this formatting if the recipient's email client software supports HTML.
Click Send to send the email.
You can set your user preferences to allow you to use the HTML editor in the Send Email dialog box. For more information, see "Setting Outbound Communications Preferences for Send Email".
In the Siebel application, you might come across various screens in which you can invoke the HTML editor. The HTML editor provides special editing controls that allow you to use supported HTML formatting, and also provides some standard editing features, such as cut and paste. Figure 10-1 shows the buttons available in the toolbar for the HTML editor above the body of the message.
It is recommended that you use CTRL+Enter to move to a new line using the HTML editor. Doing so avoids empty rows.
