|
Siebel Installation Guide for Microsoft Windows > Overview of Installing Siebel Business Applications >
Roadmap for Installing and Configuring Siebel Business Applications in an Upgrade Case (Existing Database)
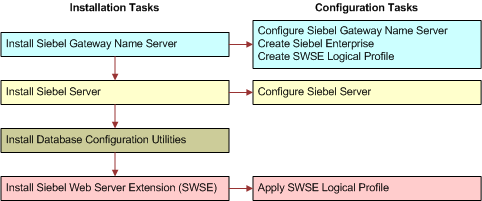
Use this roadmap to guide you in performing the installation and configuration tasks for deploying the current release of Siebel CRM, where there is an existing Siebel database, such as when you are upgrading to the current release. The current release is Siebel CRM version 8.1.1.14 or version 8.2.2.14 (Siebel Innovation Pack 2014). Figure 3 presents a simplified view of the installation and configuration tasks for server-based modules that apply in an upgrade installation case. You install Database Configuration Utilities with the first installed Siebel Server.
Figure 3. Installing and Configuring Servers in an Upgrade Case
|
NOTE: It is recommended that, for each applicable Siebel module, you install the latest Siebel Patchset release, where available. Install the patchset after you install the current release and before you run the Siebel Configuration Wizards. In some cases, installing a particular Siebel Patchset release might be required. For more information, see About Siebel CRM Releases.
This roadmap does not include the database upgrade tasks. Before you upgrade, you must have installed at least one Siebel Server with Database Configuration Utilities and installed Siebel Tools. For more information about upgrading, see About Installing in Upgrade Environments and see Siebel Database Upgrade Guide. The installation process for Siebel Business Applications in an upgrade installation case requires multiple tasks that you perform in the following general sequence:
- Create the network images for all applicable releases of Siebel CRM:
- For the Siebel Enterprise Server, install the current release. Install the following Siebel Enterprise Server components:
- Siebel Gateway Name Server
- Siebel Server
- Database Configuration Utilities (install with the first Siebel Server)
See Installing Siebel Enterprise Server Components and the Siebel Web Server Extension.
- Configure the following Siebel Enterprise Server modules, in the sequence shown:
- Siebel Gateway Name Server
- Siebel Enterprise on the Siebel Gateway Name Server computer
See Configuring Siebel Enterprise Server Components and the Siebel Web Server Extension and Additional Postinstallation and Configuration Tasks.
- Configure the Siebel Server, and perform the postinstallation tasks.
NOTE: You must install and configure a Siebel Server before you can configure the Siebel Web Server Extension (SWSE).
See Configuring Siebel Enterprise Server Components and the Siebel Web Server Extension and Additional Postinstallation and Configuration Tasks.
- For the Siebel Web Server Extension (SWSE), install the current release.
See Installing Siebel Enterprise Server Components and the Siebel Web Server Extension.
- Configure the Siebel Web Server Extension (SWSE) in the following sequence:
- Configure the logical profile for the SWSE on the Siebel Gateway Name Server computer.
- Apply the SWSE logical profile on the Web server computer where you installed SWSE.
See Configuring Siebel Enterprise Server Components and the Siebel Web Server Extension and Additional Postinstallation and Configuration Tasks.
- (Optional) If you are using Siebel load balancing, then you also generate the load balancing configuration file lbconfig.txt after installing and configuring participating Siebel Servers. Place the file in the SWSE logical profile directory, and reapply the logical profile.
For more information, see Process of Configuring Load Balancing for Siebel Business Applications.
- For Siebel Mobile Web Clients or Developer Web Clients, install the current release.
See Installing Siebel Web Clients and Siebel Tools.
- For Siebel Tools, install the current release.
See Installing Siebel Web Clients and Siebel Tools.
- Verify the installation of Siebel Business Applications modules.
See Verifying and Troubleshooting Your Installation.
- (Optional) Install additional Siebel modules.
See Installing Siebel Charts.
- (Optional) Install and configure additional Siebel Server instances or additional Web server and SWSE instances if they are required for your deployment.
- Install any required third-party products.
See the Certifications tab on My Oracle Support. See also the Siebel Business Applications Third-Party Bookshelf in the product media pack on Oracle Software Delivery Cloud.
- (Optional) Install Siebel Search software.
For specific guidelines and requirements about installing search software, see Siebel Search Administration Guide.
- Perform any additional postinstallation tasks.
See Additional Postinstallation and Configuration Tasks.
Related Topics
Roadmap for Installing and Configuring Siebel Business Applications for a New Deployment
Roadmap for Installing Siebel Business Applications in a Migration Installation Case (Existing Installation)
|