39 Set Up Material & Capacity Requirements Planning
This chapter contains these topics:
-
Section 39.1, "Setting Up Material and Capacity Requirements Planning,"
-
Section 39.2, "Setting Up MRP Supply and Demand Inclusion Rules,"
-
Section 39.5, "Setting Up Forecast Consumption Periods for MRP,"
-
Section 39.6, "Setting Up the Capacity Requirements Display."
39.1 Setting Up Material and Capacity Requirements Planning
Before you can run a successful Material Requirements Planning (MRP) regeneration, you must define the information to use during processing. The system uses setup information to determine how to select and display data.
If you use other JD Edwards World software, you must set up some of this information in other systems, such as Shop Floor Control and Inventory Management.
Complete the following tasks:
-
Setting Up MRP Supply and Demand Inclusion Rules
-
Setting Up Message Types for MRP
-
Setting Up Time Fence Rules for MRP
-
Setting Up Forecast Consumption Periods for MRP
-
Setting Up the Capacity Requirements Display
The programs that you use to set up MRP and CRP are the same programs that you use to set up Distribution Requirements Planning, Master Production Schedule, and Rough Cut Capacity Planning.
39.2 Setting Up MRP Supply and Demand Inclusion Rules
From Material Planning Operations (G34), enter 29
From Material Planning Setup (G3442), choose Supply/Demand Inclusion Rules
You set up supply and demand inclusion rules to display the supply, demand, and available quantities for an item. These quantities and their formulas are as follows:
| Quantity Type | Description |
|---|---|
| On-hand inventory | Quantity on hand - hard commits - quantity on sales orders - quantity on work orders |
| Purchase orders | Open quantity on purchase orders |
| Manufacturing work orders | Quantity entered on work order - quantity shipped |
| Safety stock | Safety stock |
| Sales Orders | Quantity entered on sales order - quantity shipped - quantity canceled |
| Work order requirements | Quantity required - quantity issued |
| Co-/by-products supply from work orders | Quantity ordered - quantity completed |
| Co-/by-products supply from rates | Quantity ordered - quantity completed |
39.3 Setting Up Message Types for MRP
From Material Planning Operations (G34), enter 29
From Material Planning Setup (G3442), choose Action Messages
Message type character codes are already defined for all the messages that the system can create when you generate a material requirements plan. Because the character code is hard coded, you can change the description, but not the function of the message type. You can change the description for clarity in your environment.
The exception to this rule is A type warning messages. A warning type message may be suppressed from displaying by performing the following procedure:
Two Methods to delete MRP warning messages
1. UDC 34/MT
Warning messages (type A) can be deleted from this table and no warning messages will be written to the F3411 file when P3482 or P3483 are run. This is an all or nothing approach to the following messages: Leadtime is Zero, BOM does not Exist for Item, Planning BOM does not Exist for Item, W.O. is Missing Parts List, Defer Parts List, Increase Parts List, Decrease Parts List, Expedite Parts List, Cancel Parts List, Lot quantity expired, No BOM, Co/By product item.
2. Vocabulary Overrides for R3482 & R3483
Go to Vocabulary Overrides and inquire on R3482 or R3483 - all 32 messages are displayed including the warning messages listed above. With a C in the action code, you can blank out a line if you do not want that particular warning message to appear on the message detail video.
Note: In order to easily recover original warning messages we suggest the following:
Before any modifications are made to the R3482/3483 Vocabulary Overrides, they should be copied to a new, user defined report (for example, the X3482/3483). The R3482/3483 overrides can then be modified as necessary. To revert back to the original R3482/3483 overrides, simply delete the Vocabulary Overrides for the X3482/3483 and re-add them, copying from the X3482/3483 to the R3482/3483.
|
See Also:
|
39.4 Setting Up Time Fence Rules for MRP
From Material Planning Operations (G34), enter 29
From Material Planning Setup (G3442), choose Time Fence Rules
Time fences are points in time at which you can make changes to either policy or operating procedures. The Manufacturing and Distribution Planning system supports three time fences:
|
See Also:
|
39.5 Setting Up Forecast Consumption Periods for MRP
From Material Planning Operations (G34), enter 29
From Material Planning Setup (G3442), choose Forecast Consumption Periods
You define forecast consumption periods to identify a period of time in which forecasts are consumed by sales orders. The system stores this information in the Forecast Consumption Periods table (F3405).
39.5.1 Before You Begin
-
Verify that the following information has been set up:
-
Planning fence rule H in user defined code table 34/TF
-
The order types in user defined code table 40/CF, to include in shipped order calculations
-
The -SHIP quantity type in user defined code table 34/QT, to calculate shipped orders quantity
-
The Planning Fence Rule field on the Plant Manufacturing Data screen, with a value of H
-
The order types in user defined code list 40/IU, to update inventory (includes order type SO)
-
The Planning Fence field on Plant Manufacturing Data, with a value beyond the end of the planning horizon
-
The appropriate processing options in the DRP/MPS generation program
-
|
Note: You must set up the planning fence field on Plant Manufacturing Data with a value beyond the end of the planning horizon (JD Edwards World recommends a planning fence of 999). If you do not set the planning fence beyond the planning horizon, the batch programs (DRP/MPS/MRP Regeneration and Net Change) will not work properly. |
|
See Also:
|
39.6 Setting Up the Capacity Requirements Display
From Resource & Capacity Planning (G33), enter 29
From Resource/Capacity Planning Setup (G3341), choose Capacity Requirements Display
Use Capacity Requirements Display to specify row descriptions for CRP on all screens and reports. The digit code is hard-coded.
To set up the capacity requirements display
On Capacity Requirements Display
Figure 39-1 Capacity Requirements Display screen
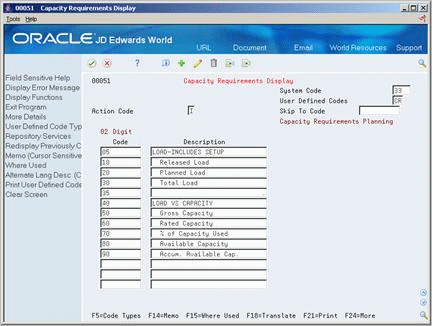
Description of ''Figure 39-1 Capacity Requirements Display screen''
Complete the following fields:
-
Code
-
Description