6 Work with Simulated Cost Components
This chapter contains these topics:
-
Section 6.2, "Reviewing and Revising Simulated Cost Components,"
-
Section 6.4, "Assigning Values to User Defined Cost Components,"
-
Section 6.5, "Reviewing the Standard Cost Simulation Report,"
-
Section 6.6, "Setting Up Cost Bucket Codes for Costed Bills of Material,"
-
Section 6.8, "Setting Up Operation Bucket Codes for Costed Routings,"
6.1 Working with Simulated Cost Components
After you have created simulated costs, review costing information to determine the effects of the current rollup scenario. Revise the costing information as necessary. When costs are correct, run the Frozen Update program.
6.2 Reviewing and Revising Simulated Cost Components
From Manufacturing Systems (G3), choose Product Costing
From Daily Product Costing (G3014), choose Enter/Change Cost Components
You review costing information and set up simulated cost scenarios to help plan for future cost changes.
You can change only simulated costs. You can set a processing option if you want to manually maintain the routing cost components (B and C) and protect them from being overwritten.
For the system to calculate B and C cost components, all of the following conditions must be met:
-
A routing operation must have a work center with rates in the Work Center Master table for the cost component to display.
-
The type operation code on the routing must indicate a normal operation (that is, the type operation code is blank).
-
The effective dates on the routing must be valid. The default for As Of date is today's date.
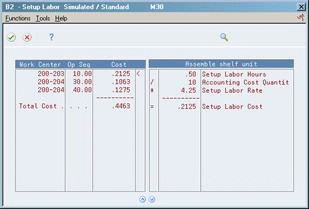
You can access the Setup Labor form if you want to view the detail calculations for one of the net added values. These values are calculated from work center data, work center rates, and manufacturing constants.
The detailed calculation at the right indicates how the program calculates the cost component value for the operation sequence that is highlighted.
The Setup Labor form displays real-time costs. These costs might be different from those shown on the Enter/Change Cost Components form, if you have changed the item's routing, work center rates, or manufacturing constants since you last ran the Simulate Cost Rollup program.
If you perform costing by work center, ensure the Cost by Work Center field is set to Y in the Manufacturing Constants program (P3009). You can access the Item Cost Component By WC form (P300261) to further distribute costs in cost components for manufactured items to work centers. You can only enter or change extra costs for manufactured items at the work center level. The system calculates, accumulates, and then updates the extra costs for each cost type in the work center in the Item Cost Component Add-Ons records (F30026). When you enter extra costs at the work center level by entering values in the Rate and Factor fields, the system stores these rates and factors only in the F300261 and not in the F30026.You cannot delete Cost Component records (F30026) when related Cost Detail records (F300261) exist. Deleting the F300261 records deletes the F30026 records.
Additionally, you can access the calculation detail for the work center for cost types B through D. When the cursor is in the Net Added field, you can choose Calc. Detail (cursor on net added cost) (F10) to access the Cost Type Calculation Detail window with this information.
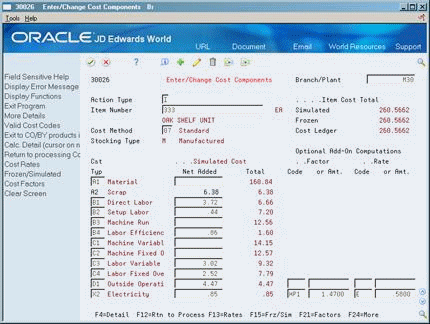
On Enter/Change Cost Components
Figure 6-1 Enter/Change Cost Components screen
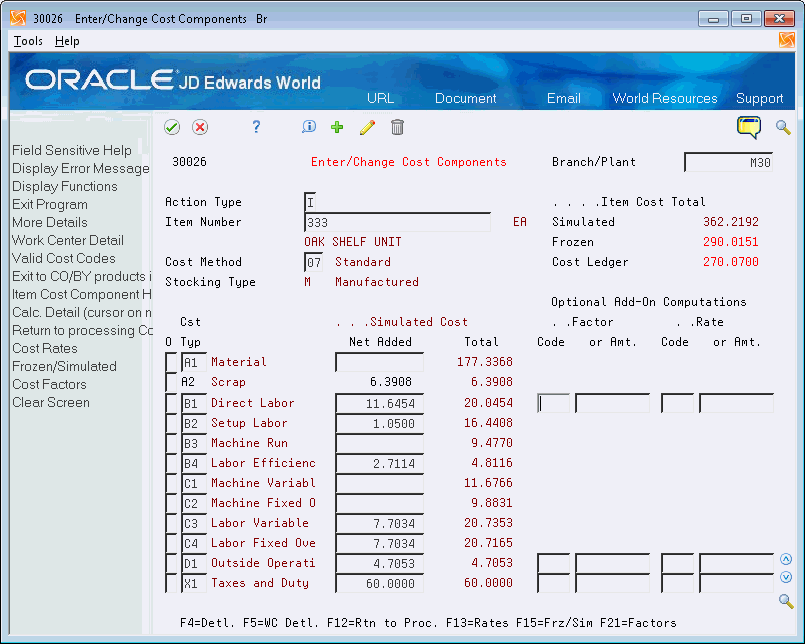
Description of "Figure 6-1 Enter/Change Cost Components screen"
-
Review or revise the following fields:
-
Item Cost Total - Simulated
-
Item Cost Total - Cost Ledger
-
Cost Method
-
Cost Type
-
Simulated Cost Net Added
-
Simulated Cost Total
-
-
To view the detail calculations for net added value of a routing cost component on the Setup Labor form, choose Calc. Detail (cursor on net added cost) (F10).
-
Click Exit.
-
On Enter/Change Cost Components, choose Work Center Detail (F5) to access Item Cost Component By WC.
SCREEN CAPTURE TO BE INSERTED WHEN NEW UI IS AVAILABLE.
-
On Item Cost Component By WC, enter extra costs for the cost component detail to a non-blank work center and click Add.
-
To view the detail calculations for a work center on the Cost Type Calculation Detail Window, choose Calc. Detail (cursor on net added cost) (F10).
SCREEN CAPTURE TO BE INSERTED WHEN NEW UI IS AVAILABLE.
| Field | Explanation |
|---|---|
| Cost Method | A user defined code (system 40, type CM) that identifies a cost method. Cost methods 01 through 08 are hard-coded. |
| Cst Type | This code designates each element of cost for an item. An example of the coding structure is:
A1 – Purchased raw material B1 – Direct labor routing sheet rollup B2– Setup labor routing sheet rollup C1 – Variable burden routing sheet rollup C2 – Fixed burden routing sheet rollup Dx – Usually used for outside processing routing sheet rollup Xx – Usually used for extra add-ons, such as electricity, water, and so forth The optional add-on computations usually operate with the type "X" extra add-ons. This cost structure allows you to use an unlimited number of cost components to calculate alternative cost rollups. The system then associates these cost components with one of six user defined summary cost buckets. Form-specific information The field to the right of the code describes the cost. |
| Net Added | Used to calculate cost during the simulation process.
Form-specific information This is the cost to build this item at this level in the bill of material. This cost does not include materials (lower-level components). The heading above the Net Added and Total columns indicates if the costs are simulated or frozen values. |
| Simulated Cost | For the designated cost method, used to calculate the cost of all the lower levels during the simulation process.
Form-specific information This is the sum of the net added cost at this level plus the sum of the total costs of the item's direct components (which includes those items' lower-level component costs.) The heading above the Net Added and Total columns indicates if the costs are simulated or frozen values. |
| Work Center | A number that identifies a branch, plant, work center, or business unit. |
6.2.1 What You Should Know About
| Topic | Description |
|---|---|
| Item cost totals | The Item Cost Total values are the total costs of all cost components as of the last cost simulation for simulated values, and as of the last frozen update for frozen values. Simulated and frozen values are from the Item Cost Components table.
If the program finds a discrepancy between the Frozen Total and Cost Ledger Total fields, it highlights both fields. See also Section 7.7, "Reviewing the Cost Integrity Report" for more information on comparing frozen and cost ledger values. |
| Deleting costs | You must delete costs at the bill of material level at which they occur. For example, you cannot delete costs for lower-level components by locating the parent item. Instead, locate the component item number and remove the costs for the component. The system does not make the corresponding cost change to the higher level components and parent item until you run the Simulate Cost Rollup program.
To delete outside processing costs (usually cost component Dx), delete the cost component from the routing. Then, delete the cost component and net added value from Enter/Change Cost Components. |
| Net Added Routing Costs and Frozen Costs | If the Net Added on routing costs does not match frozen costs, the routings may have been changed after the frozen costs were established.
To work around this issue, simulate and freeze the costs. |
6.3 Setting Up Standard Rate and Factor Codes
From Product Costing Setup (G3042), choose Standard Rates or Standard Factors
Standard rate and factor codes represent overhead costs or other indirect costs that cannot be attributed directly to a certain production process or operation, but must be accounted for in product costing for an item. These types of costs include utilities, insurance, research and development costs, rent or lease costs, or other overhead or general operating costs. Rate and factor codes are user defined.
The Simulate Cost Rollup program uses the rates and factors you define to calculate some of the costs that appear on Enter/Change Cost Components or Cost Components by Work Center.
To set up standard rate and factor codes
On Standard Rates or Standard Factors
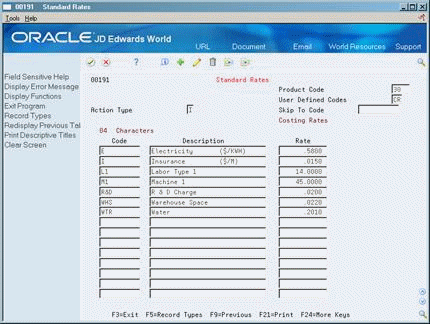
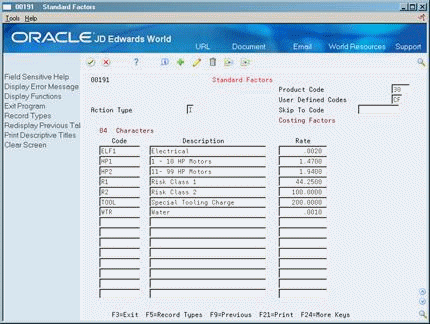
Complete the following fields:
-
Code
-
Description
-
Rate
| Field | Explanation |
|---|---|
| Code | This column contains a list of valid codes for a specific user defined code list. The number of characters that a code can contain appears in the column title. |
| Description | A user defined name or remark. |
| Rate | A code used to define rate information in the General Rate/Message Records table (F00191). |
6.3.1 What You Should Know About
| Topic | Description |
|---|---|
| Code | A rate or factor code used to define the value in the Rate field, as follows:
|
| Description | A description of the rate code or factor code. |
| Rate | This rate is used to calculate extra costs. |
6.4 Assigning Values to User Defined Cost Components
From Manufacturing Systems (G3), choose Product Costing
From Daily Product Costing (G3014), choose Enter/Change Cost Components
You can define net added values for user defined extra costs in one of the following ways:
-
Assigning a net added value manually
-
Assigning a predefined value
-
Assigning a calculated value based on another component's total value
-
Assigning a calculated value based on another component's net added value
-
Assigning a calculated value by multiplying a rate and factor
You can also change cost information or delete extra cost components.
If Cost By Work Center is set on, assigning values for manufactured items will happen in the work center Level.
Figure 6-5 Enter/Change Cost Components (Assigning Values) screen
Description of "Figure 6-5 Enter/Change Cost Components (Assigning Values) screen"
6.4.1 Assigning a Net Added Value Manually
On Enter/Change Cost Components
Complete the following fields:
-
Cost Component
-
Simulated Cost Net Added
|
Note: The program writes manually entered costs to the Total field when you run the Simulate Cost Rollup program. |
6.4.2 Assigning a Predefined Value
Use user defined rate codes and factor codes to identify net added costs. For example, to calculate the value for cost component X5, the program uses the amount defined for rate code R&D.
On Enter/Change Cost Components
Complete the following fields:
-
Cost component
-
Factor Code
-
Factor Amount
-
Rate Code
-
Rate Amount
| Field | Explanation |
|---|---|
| Code | A code used to retrieve rate or factor information from the Generic Rate File (F00191).
System Code 30 Record Type CF or CR |
| Amt | A generic factor number used to calculate data. |
To assign a calculated value based on another component's total value
The system can calculate the net added value based on the total value for an existing cost component. The system calculates this value when you enter the data on Enter Cost Components. The costs are then rolled up into the cost of the item when you run Simulate Cost Rollup.
On Enter/Change Cost Components
-
Complete the following field:
-
Cost component
-
-
Enter an ampersand (&) followed by the cost component code in the following field:
-
Factor Code
-
-
Complete one of the following fields:
The program retrieves the total value for the cost component and multiplies it by the rate value indicated.
To assign a calculated value based on another component's net added value
The system can calculate the net added value based on the net added value for an existing cost component. The system calculates this value when you enter the data on Enter Cost Components. The costs are then rolled up into the cost of the item when you run Simulate Cost Rollup.
On Enter/Change Cost Components
-
Complete the following field:
-
Cost Component
-
-
Enter an asterisk (*) followed by the cost component code in the following field:
-
Factor Code
-
-
Complete one of the following fields:
-
Rate Code
-
Rate Amount
-
The program retrieves the net added value for the cost component and multiplies it by the rate value indicated.
6.4.3 Assigning a Calculated Value by Multiplying a Rate and Factor
The system can calculate the net added value by multiplying a rate amount and factor amount. If you enter both amounts, the system multiplies the two numbers to calculate the net added cost for that cost component for that item. If either the rate or factor is blank, the system multiplies by zero (0).
On Enter/Change Cost Components
-
Complete the following field:
-
Cost Component
-
-
Complete both of the following fields:
-
Factor Amount
-
Rate Amount
-
6.5 Reviewing the Standard Cost Simulation Report
The Simulate Cost Rollup program (P30820) generates the Standard Cost Simulation report (R30825). The report shows the previous cost of the item, the simulated rolled up cost, and the variance between the two.
The report also includes work center level of detail and it subtotals the work centers costs for each cost type. If no cost detail record exists, system prints the report in cost type format.
After reviewing the simulated costs, you revise incorrect information and create simulated costs again to include the changes.
Figure 6-6 Standard Cost Simulation report
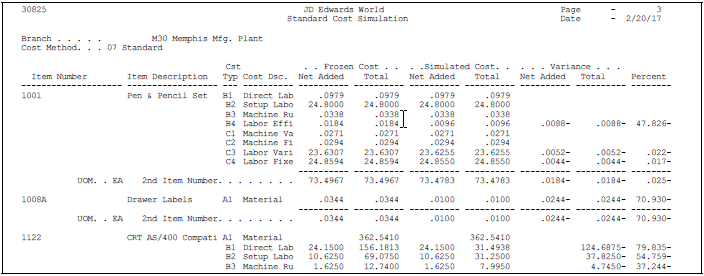
Description of "Figure 6-6 Standard Cost Simulation report"
6.6 Setting Up Cost Bucket Codes for Costed Bills of Material
From Product Costing Setup (G3042), choose Cost Buckets
Use cost bucket codes to combine the material and value-added cost for each item into one group. With cost buckets, you can total cost components by groups according to their use. In addition, you can assign a cost bucket sequence number to each cost component to tell the system how to group the costs on costed bill inquiries and reports.
Each cost bucket can contain several defined cost components. Column sequence is defined by the number in the Description-2 field. For example, you might define the columns (buckets) and user defined codes as follows:
| Bucket # | Title | Cost Components Included in Buckets |
|---|---|---|
| Column 1 | Purchase | Cost components A1 (material), A2 (scrap), and D1 (outside operations) |
| Column 2 | Labor | Cost components B1 (direct labor), B2 (setup labor), and B4 (labor efficiency) |
| Column 3 | Machine | Cost component B3 (machine run) |
| Column 4 | Overhead | Cost components C1 (machine variable) and C2 (machine fixed) |
| Column 5 | Extras | Cost components X1 (taxes) and X2 (electricity) |
On Cost Buckets
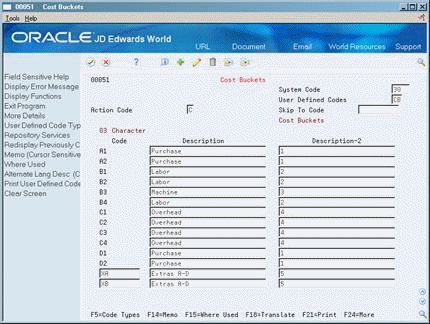
Complete the following fields:
-
Code - Cost Component
-
Description - Component Description
-
Description-2 - Column Number
6.6.1 What You Should Know About
| Topic | Description |
|---|---|
| Code - Cost Component | Designates the cost components to be grouped. |
| Description - Sequence Number | The name that you want to appear as the heading for the cost bucket column on costed bill inquiries and reports. You only need to enter this title once for each sequence number. If the program finds more than one name for a bucket, it uses the name defined for the last cost component that it accumulates into the cost bucket. |
| Description-2 | Specifies in what column (bucket) each cost component is grouped. |
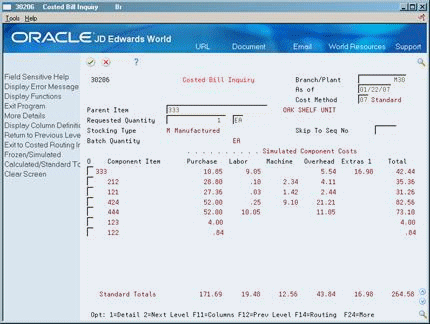
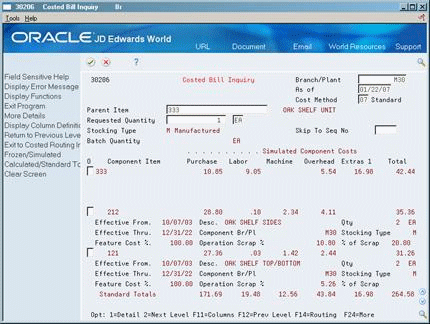
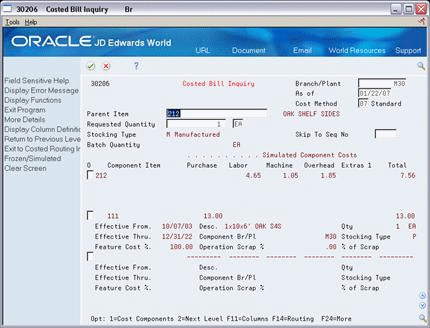
6.7 Reviewing Costed Bills of Material
From Manufacturing Systems (G3), choose Product Costing
From Daily Product Costing (G3014), choose Costed Bill Inquiry
Effective cost and profit projection depend on accurate and comprehensive item cost information. Use Costed Bill Inquiry to view costs for both parent items and components to assist you in budgeting resources and planning for future cost of items.
The program displays summarized costs for the direct components of a parent item, and net added and total costs for the parent item:
-
For the parent item, the costs displayed are the net added cost components from the Cost Components table.
-
For each component, the costs displayed are calculated based on the as of date from the bill of material and the cost method used. The program uses the as of date to ignore obsolete component lines in the bill of material.
For example, you can view all costs of manufacturing a parent item, including assembly, subassembly, and component costs. In addition, the manufacturing cost of a component is divided into five user defined categories for precise costing calculations:
-
Purchase
-
Labor
-
Machine
-
Overhead
-
Extras
|
Note: The program can accumulate purchase costs for up to 999 components on each bill of material. Components beyond 999 are not included in the costing process. |
To review a costed bill of material
On Costed Bill Inquiry
-
-
As of
-
Cost Method
-
Requested Quantity
-
Unit Of Measure
-
Skip to Sequence Number
-
Component Item
-
Purchase
-
Labor
-
Machine
-
Overhead
-
Extras
-
Total (row)
-
Total (column)
-
-
Access the detail area (F4).
Figure 6-9 Cost Bill Inquiry (Detail) screen
Description of "Figure 6-9 Cost Bill Inquiry (Detail) screen"
-
Review the following fields:
-
Effective - From Date
-
Effective - To Date
-
Feature Cost Percent
-
Operation Scrap Percent
-
Quantity
-
Percent of Scrap
-
-
Access the costed bill information for the components.
Figure 6-10 Costed Bill Inquiry (Component Information) screen
Description of "Figure 6-10 Costed Bill Inquiry (Component Information) screen"
-
Toggle to review frozen or simulated costs (F15).
-
Access Cost Bucket Key (Columns) to review an item's cost buckets.

| Field | Explanation |
|---|---|
| As of | This field is used for effectivity checking. Enter a specific date to display documents (orders, bills of material, routings, as applicable) that are effective on or after that date. The current system date is the default, but you can enter any future or past date.
Form-specific information The system uses the bill of material that is effective as of this date. |
| Component Item | A number that the system assigns to an item. It can be in short, long, or 3rd item number format.
Form-specific information In the header, this is the item number of the parent. In the detail area, these are the item numbers of the components. |
| Requested Quantity | The number of parent items you want to process. The system calculates lower-level values in quantity per the number of parent items requested. For example, if 3 components are needed for a parent item, and the requested quantity is 10, the system plans for 30 components.
Form-specific information This is the number of parent items for which you want to view cost breakdowns. Costs are figured in quantity per the parent item. |
| Skip To Seq No | A number that indicates the sequence of the components on a bill of material. It initially indicates the relative sequence in which a component was added to a kit or single level bill of material. You can modify this number to change the sequence in which the components appear on the bill of material.
Skip To fields allow you to enter a component line number that you want to begin the display of information. Form-specific information You can enter a component line number with which to begin the display. |
| Purchased | Work Amount field for the Manufacturing System.
Form-specific information This is cost bucket No. 1 as defined for user defined code 30/CB, Cost Buckets. You can view the cost components assigned to the cost bucket. Cost extras must be defined in cost buckets to be included in the amounts in this display. The total of this column appears at the bottom of the screen in the "Totals" row. The heading above the columns indicates which costs are displayed: frozen or simulated. You can toggle between simulated and frozen values. |
| Labor | Work Amount field for the Manufacturing System.
Form-specific information Cost bucket No. 2 as defined for user defined code 30/CB, Cost Buckets. You can view the cost components assigned to the cost bucket. Cost extras must be defined in cost buckets to be included in the amounts in this display. The total of this column appears at the bottom of the screen in the "Totals" row. The heading above the columns indicates which costs are displayed: frozen or simulated. You can toggle between simulated and frozen values. |
| Setup | Work Amount field for the Manufacturing System.
Form-specific information Cost bucket No. 3 as defined for user defined code 30/CB, Cost Buckets. You can view the cost components assigned to the cost bucket. Cost extras must be defined in cost buckets to be included in the amounts in this display. The total of this column appears at the bottom of the screen in the "Totals" row. The heading above the columns indicates which costs are displayed: frozen or simulated. You can toggle between simulated and frozen values. |
| Overhead | Work Amount field for the Manufacturing System.
Form-specific information Cost bucket No. 4 as defined for user defined code 30/CB, Cost Buckets. You can view the cost components assigned to the cost bucket. Cost extras must be defined in cost buckets to be included in the amounts in this display. The total of this column appears at the bottom of the screen in the "Totals" row. The heading above the columns indicates which costs are displayed: frozen or simulated. You can toggle between simulated and frozen values. |
| Extras | Work Amount field for the Manufacturing System.
Form-specific information Cost bucket No. 5 as defined for user defined code 30/CB, Cost Buckets. You can view the cost components assigned to the cost bucket. Cost extras must be defined in cost buckets to be included in the amounts in this display. The total of this column appears at the bottom of the screen in the "Totals" row. The heading above the columns indicates which costs are displayed: frozen or simulated. You can toggle between simulated and frozen values. |
| Total | Work Amount field for the Manufacturing System.
Form-specific information Contains system calculated totals for item costs, that is, for each component and parent item. |
| Effective From | A date that indicates one of the following:
When a component part goes into effect on a bill of material When a routing step goes into effect as a sequence on the routing for an item When a rate schedule is in effect The default is the current system date. You can enter future effective dates so that the system plans for upcoming changes. Items that are no longer effective in the future can still be recorded and recognized in Product Costing, Shop Floor Control, and Capacity Requirements Planning. The Material Requirements Planning system determines valid components by effectivity dates, not by the bill of material revision level. Some forms display data based on the effectivity dates you enter. |
| Qty | The number of units to which the system applies the transaction.
Form-specific information This is the quantity per assembly and indicates how many of a component are used in the parent. |
| Effective Thru | A date that indicates one of the following:
The default is December 31 of the default year defined in the Data Dictionary for Century Change Year. You can enter future effective dates so that the system plans for upcoming changes. Items that are no longer effective in the future can still be recorded and recognized in Product Costing, Shop Floor Control, and Capacity Requirements Planning. The Material Requirements Planning system determines valid components by effectivity dates, not by the bill of material revision level. Some forms display data based on the effectivity dates you enter. |
| Feature Cost % | A percentage used by the Simulate Cost Rollup program to calculate the cost of a feature or option item as a percentage of the total cost of the parent.
Enter the percentage as a whole number: 5% as 5.0 |
| Operation Scrap % | The system uses this value to increase or decrease the amount of materials to account for loss within the operation. The system updates this value on Enter/Change Bill of Material when you run the Planned Yield Update program. The system calculates this value by compounding the yield percentages from the last operation to the first operation. Use a processing option in Enter/Change Routing to enable the system to calculate the component scrap percent. |
| % of Scrap | Scrap is the percentage of unusable component material created during the manufacture of a particular parent item. During DRP/MPS/MRP generation, the system increases gross requirements for the component item to compensate for the loss.
Note: Shrink is the expected loss of parent items (and hence, components) due to the manufacturing process. Shrink and scrap are compounded to figure the total loss in the manufacture of a particular item. Accurate shrink and scrap factors can help to produce more accurate planning calculations. Enter percents as whole numbers: 5% as 5.0 |
6.7.1 What You Should Know About
| Topic | Description |
|---|---|
| Displayed costs | This program calculates the cost associated with each cost component in the same way as the Simulate Cost Rollup program.
See also Appendix A, "Calculations in Cost Rollup." The top line (the parent) is the net added cost of the parent from the Cost Components table. The lines for the components are the cost breakdown for all next level components. The totals across the bottom are the total costs of the parent item from the Cost Components table. The right-most bottom total is the total of all costs for the parent item. The costs on Costed Bill Inquiry are real-time costs, so they can change if you update the bill of material or routing for an item. The Enter/Change Cost Components screen displays the costs computed when you run Simulate Cost Rollup. As a result, the values might differ from those on Costed Bill Inquiry if you have changed the bill of material, routing, or manufacturing constants since you last ran the rollup. |
|
See Also:
|
6.8 Setting Up Operation Bucket Codes for Costed Routings
Use operation bucket codes to combine component costs in each step in the routing. That is, you can group operation costs into totals that appear on costed routing inquiries and reports.
For example, you might track labor costs by separate cost components that represent setup, run, and overhead labor for an item. You could combine these cost components into one total cost for labor on the costed routing inquiry or report for the item by assigning the same sequence number to each cost component.
To set up an operation bucket code
On General User Defined Codes
Figure 6-12 General User Defined Codes (Operation Bucket Code) screen
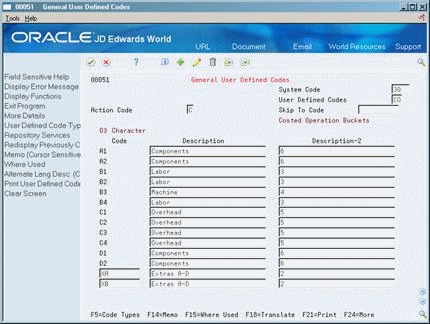
Description of "Figure 6-12 General User Defined Codes (Operation Bucket Code) screen"
Complete the following fields:
-
Code - Cost Component
-
Description - Sequence Number
-
Description-2
6.8.1 What You Should Know About
| Topic | Description |
|---|---|
| Code - Cost Component | Designates the cost components to be grouped. |
| Description - Sequence Number | The name that you want to appear as the heading for the operation bucket column on costed routing inquiries and reports. You only need to enter this title once for each sequence number. If the program finds more than one name for a bucket, it uses the name defined for the last cost component that it accumulates into the operation bucket. |
| Description 2 | Specifies in what column (bucket) each cost component is grouped. |
6.9 Reviewing a Costed Routing
From Manufacturing Systems (G3), choose Product Costing
From Daily Product Costing (G3014), choose Costed Routing Inquiry
Use Costed Routing Inquiry (P30208) to review the summarized costs of an item for each operation in the routing. This information can help you effectively manage production costs. For example, you can:
-
View the work center responsible for an operation
-
Determine if a work center performs multiple operations
-
Display simulated or frozen costs for labor values for cost methods
-
Calculate the totals for all costs by cost categories
|
Note: The program can accumulate purchase costs for up to 999 components on each bill of material. Components beyond 999 are not included in the costing process. |
On Costed Routing Inquiry
Figure 6-13 Costed Routing Inquiry screen
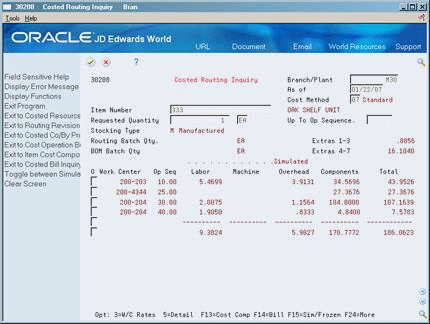
Description of "Figure 6-13 Costed Routing Inquiry screen"
-
-
As of Date
-
Cost Method
-
Requested Quantity
-
Unit Of Measure
-
Up to Operation Sequence
-
Extras 1-3
-
Extras 4-7
-
Work Center
-
Operation Sequence Number
-
Labor
-
Machine
-
Overhead
-
Components
-
Total (row)
-
Total (column)
-
-
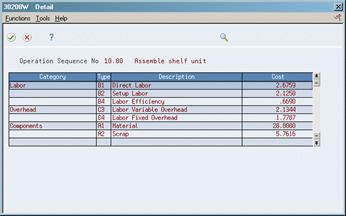
Access the Detail screen (Option 5).
-
On Detail, review the following fields:
-
Category
-
(Cost) Type
-
Description
-
Cost
-
-
On Costed Routing Inquiry, toggle to review frozen or simulated costs (F15).
-
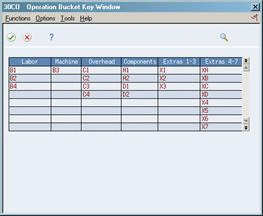
To review an item's operation buckets, access Operation Bucket Key Window (F11).
| Field | Explanation |
|---|---|
| As of | This field is used for effectivity checking. Enter a specific date to display documents (orders, bills of material, routings, as applicable) that are effective on or after that date. The current system date is the default, but you can enter any future or past date.
Form-specific information The routing that is effective as of this date is used. |
| Requested Quantity | The number of parent items you want to process. The system calculates lower-level values in quantity per the number of parent items requested. For example, if 3 components are needed for a parent item, and the requested quantity is 10, the system plans for 30 components.
Form-specific information This is the number of parent items for which you want to see cost breakdowns. Costs are figured in quantity per the parent item. |
| Op Seq | In routings, this number is used to sequence the fabrication or assembly steps in the manufacture of an item. You can track costs and charge time by operation.
In bills of material, this number designates the routing step in the fabrication or assembly process that requires a specified component part. You define the operation sequence after you create the routing for the item. The Shop Floor Control system uses this field in the backflush/preflush by operation process. In engineering change orders, this number is used to sequence the assembly steps for the engineering change. Skip To fields allow you to enter an operation sequence that you want to begin the display of information. You can use decimals to add steps between existing steps. For example, use 12.5 to add a step between steps 12 and 13. Form-specific information Top of form: A processing option controls whether "Skip to" or "Up to" operation sequence mode is in effect. In "Skip to" mode, the system uses an entered operation sequence number as the starting point when displaying operations, and displays the total from that point forward on the total line. In "Up to" mode, the system uses an entered operation sequence number as the cutoff for displaying operations. The total for all operations up to and including the operation sequence number entered appears on the total line. Bottom of form: The Op Seq field contains a number that indicates the order of each step in the manufacturing operation. |
| Purchased | Work Amount field for the Manufacturing System.
Form-specific information Cost bucket No. 1 as defined for user defined code 30/CO, Operation Buckets. A processing option controls whether the system adds cost bucket 1 (Extras 1-3) and cost bucket 2 (Extras 4-7), at the top of the screen, into the grand total of all costs for the parent item at the bottom of the screen. |
| Work Center | A number that identifies a branch, plant, work center, or business unit.
Form-specific information This is the business unit assigned to the work center for the operation sequence listed. |
| Labor | Work Amount field for the Manufacturing System.
Form-specific information Cost bucket No. 3 as defined for user defined code 30/CO, Operation Buckets. The total of this column appears at the bottom of the screen in the "Totals" row. The heading above the columns indicates which costs are displayed: frozen or simulated. You can toggle between simulated and frozen values. You also can view a detailed breakdown of the cost components added to determine the total for the work center. |
| Machine | Work Amount field for the Manufacturing System.
Form-specific information Cost bucket No. 4 as defined for user defined code 30/CO, Operation Buckets. The total of this column appears at the bottom of the screen in the "Totals" row. The heading above the columns indicates which costs are displayed: frozen or simulated. You can toggle between simulated and frozen values. You also can view a detailed breakdown of the cost components added to arrive at the total for the work center. |
| Overhead | Work Amount field for the Manufacturing System.
Form-specific information Cost bucket No. 5 as defined for user defined code 30/CO, Operation Buckets. The total of this column appears at the bottom of the screen in the "Totals" row. The heading above the columns indicates which costs are displayed: frozen or simulated. You can toggle between simulated and frozen values. You can also view a detailed breakdown of the cost components added to arrive at the total for the work center. |
| Total | Work Amount field for the Manufacturing System.
Form-specific information This column contains system-calculated totals for each row of costs, that is, for each operation sequence. The totals across the bottom of the screen are the totals of each cost bucket. The right-most bottom total is the total of all costs for the routing for an item. |
6.9.1 What You Should Know About
| Topic | Description |
|---|---|
| Displayed costs | This program calculates the cost associated with each cost component in the same way as the Simulate Cost Rollup program.
See also Appendix A, "Calculations in Cost Rollup." The costs on Costed Routing Inquiry are real-time costs, so they can change if you update the bill of material or routing for an item. The Enter/Change Cost Components screen displays the costs computed when you run Simulate Cost Rollup. As a result, the values might differ from those on Costed Routing Inquiry if you have changed the bill of material, routing, or manufacturing constants since you last ran the rollup. |
| Master routings | The program uses the master routing for the item from the Routing Master table (F3003) if all of the following are true:
|