17 Work with Enrollment Information
This chapter contains the following topics:
17.1 Working with Enrollment Information
To work with enrollment information for flexible spending accounts, complete the following tasks:
-
Enrolling an Employee in a Flexible Spending Account
-
Entering Automatic Deposit Instructions
-
Changing an Election for the Current Year
-
Revising the Balance for the Current Year
-
Entering COBRA Contributions
17.2 Enrolling an Employee in a Flexible Spending Account
From Human Resources (G08), choose Benefits Administration
From Benefits Administration (G08B1), choose Benefit Group Selections
Use the same steps to enroll employees in flexible spending accounts that you use for any benefit plan your company offers. The setup process identifies a benefit as a flexible spending account and indicates the processing instructions required for deductions and reimbursements.
17.2.1 Before You Begin
-
Ensure the master plans for flexible spending accounts have been set up and identified as flexible spending account plans
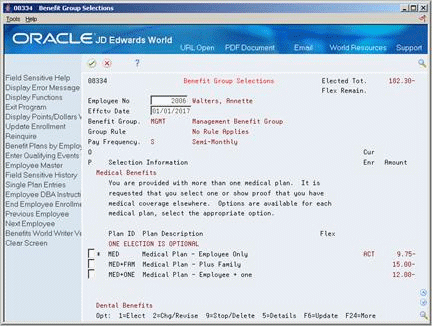
To enroll an employee in a flexible spending account
Figure 17-1 Benefit Group Selections screen
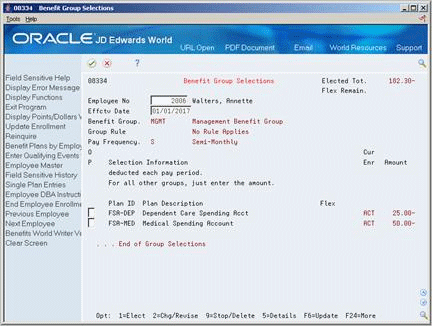
Description of "Figure 17-1 Benefit Group Selections screen"
-
Complete the following fields and press Enter:
-
Employee Number
-
Effective Date
The group benefit plans available to the employee appear.
-
-
Review the information in the following fields:
-
Benefit Group
-
Group Rule
-
Pay Frequency
-
-
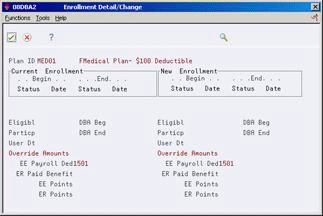
For each flexible spending account in which your want to enroll the employee, choose the Elect option.
Figure 17-2 Enrollment Detail/Change screen
Description of "Figure 17-2 Enrollment Detail/Change screen"
-
To designate a new amount or rate, complete the following field:
-
Override Amounts
-
-
Choose the Return with Information function.
-
On Benefit Group Selections, choose the Update function.
-
Review the information in the following fields:
-
Elected Total
-
Flexible Remaining
-
| Field | Explanation |
|---|---|
| Flex Remain | The total dollar or point value of the flexible dollars available for the employee to spend on benefits. If the value in this field displays a negative number, the employee has spent more than the amount allocated. This is a display only field. |
17.2.2 What You Should Know About
17.3 Entering Automatic Deposit Instructions
From Human Resources (G08), choose Flexible Spending Accounts
From Benefits Administration (G08F1), enter 27
From FSA Advanced/Technical Operations (G08F3), choose Balance Revisions
If you use the JD Edwards World Payroll system, employees can choose to be reimbursed either by automatic deposit or by check. The automatic deposit or check is separate from the employee's regular pay. If the employee wants to be reimbursed by check instead of automatic deposit, the system automatically generates a check for the reimbursement through the JD Edwards World Payroll system.
If the employee wants to be reimbursed by automatic deposit, you can credit the reimbursement to either a checking or savings account. Even if your payroll department has set up the employee's regular pay for automatic deposit, you must still enter automatic deposit instructions for each flexible spending account.
You must set up automatic deposit instructions at least one pay period before actually processing a deposit. When you use a code called a pre-note, the system includes this individual in the next applicable payroll to test the instructions to the bank. For flexible spending accounts, you must manually reset the pre-note code after the test has completed successfully.
To enter automatic deposit instructions for flexible spending accounts, complete the following tasks:
-
Set up automatic deposit instructions
-
Reset the pre-note code
To set up automatic deposit instructions
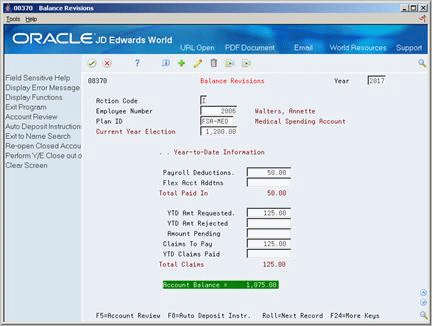
On Balance Revisions
-
Complete the following fields:
-
Employee Number
-
Flexible Spending Account plan
-
-
Choose the Auto Deposit Instructions function.
Figure 17-4 Auto Deposit Instructions screen
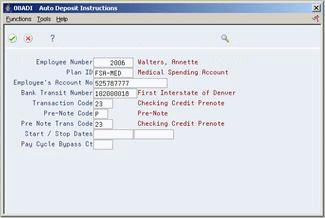
Description of "Figure 17-4 Auto Deposit Instructions screen"
-
On Auto Deposit Instructions, complete the following fields:
-
Employee's Account Number
-
Bank Transit Number
-
Transaction Code
-
Pre Note Transaction Code
-
On Balance Revisions
-
Locate the employee.
-
Choose the Auto Deposit Instructions function.
-
Enter N in the following field:
-
Pre-Note Code
-
| Field | Explanation |
|---|---|
| Bank Transit Number | The transit routing number used to identify the financial organization in which the employee maintains an account. These numbers can be obtained from the employee's check or deposit slip. They are located between the MICR colons (:) at the bottom of the check. If nine digits are not present, the employee's financial organization must be contacted to obtain the correct nine-digit code.
If you change this number for an employee, the system prenotes the employee's auto deposit record again. |
| Employee's Account No | The employee's unique account number at the financial institution. You can obtain the number from the MICR line of a voided check or a deposit slip from the employee's account. You must include dash cue symbols in the field. However, they are recorded in a translated mode as a hyphen (-). You can also obtain account numbers from other sources, such as passbooks or debit cards. When transcribing information, left justify and enter only numbers (0 through 9), alphabetic (A through Z), and hyphens (-). If less than 17 characters are required, leave the unused spaces blank. Spaces left within the depositor's account number will be ignored when the paperless entry is prepared. For example, 0123 4 56789 will appear as 0123456789 in the entry record, and 0123-4 56789 will appear as 0123-456789.
If you change this number, the system automatically prenotes the employee's auto deposit record again. Note: The Financial Organization Account Number (FOA#) is used as the company's unique bank account number rather than the employee's unique bank account number in the following tables: F06560 - Bank Reconciliation - Issue Table F06561 - Bank Reconciliation - Paid Table Form-specific information The number of the bank account in which the employee wants the FSA reimbursement automatically deposited. |
| Pre-Note Code | A code that lets you test the deposit instructions for one pay period before actually processing a deposit. Adding an employee to this form automatically activates this person in the automated deposit system. The system prenotes this employee in the next applicable payroll run to test the auto deposit instructions you have set up before actually depositing a check. In the prenote test, the system creates a no-dollar entry for this employee and sends it to the employee's bank account.
Form-specific information When you set up the automatic deposit instructions, enter P. This field must be N to reimburse a flexible spending account claim with an automatic deposit. After you run the prenote test, you must manually change this field to N. |
| Pre Note Trans Code | A code used to distinguish various types of debit and credit non-dollar prenotification transactions that must precede the first actual automated paperless transaction with dollars for an employee.
Demand Account Credits 23 – Prenotification of Credit Authorization 24 – Prenotification of Credit/Mailed Authorization Savings Account Credits 33 – Prenotification of Credit Authorization 34 – Prenotification of Credit/Mailed Authorization Debits are not currently handled by this Payroll system. Automatic prenoting is only done one time. Therefore, if your bank requires multiple prenote cycles, you can manually set the transaction code (TCOD) for this record to a prenote code and leave it that way for as long as necessary. |
|
See Also:
|
17.4 Changing an Election for the Current Year
From Human Resources (G08), choose Benefits Administration
From Benefits Administration (G08B1), choose Benefit Group Selections
Employees can change their elections or deduction amounts whenever a change in family status occurs, for example, when a child is born or adopted. You must enter the changes to ensure that the correct deductions are made and that the employee's records contain accurate information.
When you change the enrollment information for a flexible spending account, the system calculates an elected year total from the change date through the end of the calendar year. The program uses the master pay cycles and the employee's pay frequency to determine the number of remaining pay periods. The system multiplies the number of pay periods times the deduction amount to calculate an elected year total. If the employee changes an election amount in a flexible spending account in which he or she is currently enrolled, you must also change the balance information to reflect the amount deducted to date from the employee's pay.
To change an election for the current year
Figure 17-5 Benefit Group Selections screen
Description of "Figure 17-5 Benefit Group Selections screen"
-
Complete the following fields and press Enter:
-
Employee Number
-
-
Enter the date that the changes go into effect in the following field:
-
Effective Date
-
-
For each election the participant wants to change, choose the Change/Revise option.
Figure 17-6 Enrollment Detail/Change screen
Description of "Figure 17-6 Enrollment Detail/Change screen"
-
On Enrollment with Options, complete the following field:
-
Override Amounts
-
-
Choose the Return with Information function.
-
On Benefit Group Selections, choose the Update function.
-
Review the information in the following fields:
-
Elected Total
-
Flexible Remaining
-
17.5 Revising the Balance for the Current Year
From Human Resources (G08), choose Flexible Spending Accounts
From Benefits Administration (G08F1), enter 27
From FSA Advanced/Technical Operations (G08F3), choose Balance Revisions
When you change the deduction amount during a plan year, you must add any amount the employee paid into the account prior to the change date to the new total and manually enter it as a revised balance.
For example, assume that an employee who is paid monthly on the first day of the month changed the deduction to a flexible spending account from 50.00 to 75.00 for each monthly pay period. If you made the change on July 15, the system calculates the account balance for the remainder of the year as 375.00 (75.00 for five pay periods). Because the employee has already had 350.00 deducted (50.00 for seven pay periods), you must add this amount to the elected year total (375.00 + 350.00).
17.5.1 Before You Begin
-
Change the effective date and amount for the employee's election. See Section 17.4, "Changing an Election for the Current Year."
To revise the balance for the current year

-
To locate the employee, complete the following fields:
-
Employee Number
-
Plan ID
-
-
When you are revising for a current plan year, manually add the amount previously deducted to the amount displayed in the following field:
-
Current Year Election
-
-
Enter your calculation in the following field:
-
Current Year Election
-
17.6 Entering COBRA Contributions
From Human Resources (G08), choose Flexible Spending Accounts
From Benefits Administration (G08F1), enter 27
From FSA Advanced/Technical Operations (G08F3), choose Balance Revisions
COBRA participants can also maintain a flexible spending account. If a COBRA participant maintains a flexible spending account, the participant must make contributions to the account. These contributions are not pre-tax dollars.
