4 Language Upgrades for Customers with Non-English as the Base Language
This chapter contains these topics:
4.1 Who Should Use this Method?
Use this method to perform the language upgrade if you are:
An existing client (A7.3 release or above) that uses a language other than English as the base language. This method preserves any changes to text that you made in the lower release.
|
Caution: This section assumes you have not yet upgraded to the new A9.4 release level. The instructions in this section will walk you through upgrading to A9.4 while preserving your custom language records. |
4.2 Overview
Flow of the language upgrade process for a customer upgrading to a new JD Edwards World release level:
-
Existing Customer Site
-
Download and Restore Language Library
-
Run Upgrade Step 1 to restore A9.2 JDFOBJ and JDFDATA
-
Perform Language Upgrade on A92 JDFDATA to replace base English
-
Run Upgrade Step 2 to convert your files and run merges from non-English JDFDATA
The following sections outline the steps to be taken, including:
-
Check for Adequate Disk Space
-
Download the Language Library from the Update Center
-
Upgrade to the new A9.4 Release Level
-
Perform the Language Upgrade to the Setup Environment
-
Upgrade your Production Environment
4.2.1 Check for Adequate Disk Space
Be sure you have enough disk space to create a setup environment. To determine the space required for a copy of the JD Edwards World data (JDFDATA) and object library (JDFOBJ), refer to Disk Space Considerations in Phase 1 - Upgrade Process Overview of the JD Edwards World Upgrade Guide.
4.2.2 Download the Language Library from the Update Center
Refer to Doc ID 761132.1 JD Edwards World Language Libraries Available for Download. Proceed to the Update Center once you obtain the appropriate update number to download.
4.2.3 Upgrade to the New A9.4 Release Level
Refer to Phases 1 and 2 of the A9.4 JD Edwards World Upgrade Guide. Note that when you start the installation, you will submit both steps on hold, and then only release UPG_STEP1. Keep UPG_STEP2 on hold. Once UPG_STEP1 has completed, proceed with step 4 below.
4.3 Perform the Language Upgrade to the Setup Environment
The following sections explain how to perform the language upgrade to your setup environment.
4.3.1 Create an Upgrade Plan to Perform the Language Upgrade
You must create an upgrade plan for merging the language text from the language library into your setup environment control files.
-
Sign on as JDEINSTAL.
The Software Upgrade Menu (A97JDE) appears. Take menu selection 2 for the Upgrade Planner. Inquire on plan ZJDE. Press Enter. Specify an 'A' in the Action Code, then a name for your plan, and a description. Press Enter.
Re-inquire on your new plan and press F5. The Libraries for This Plan screen appears.
Figure 4-1 Plan the Upgrade (Libraries for this Plan) screen
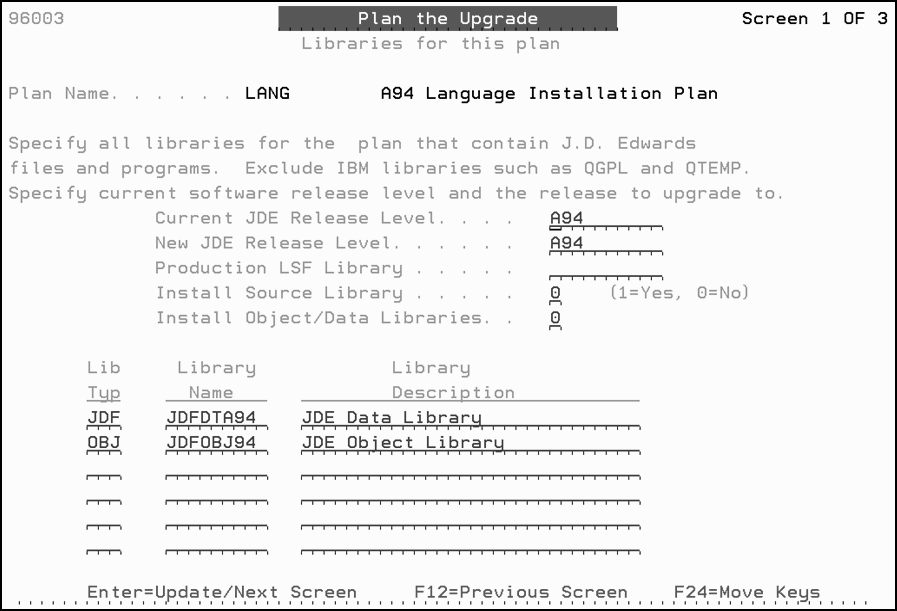
Description of ''Figure 4-1 Plan the Upgrade (Libraries for this Plan) screen''
-
Specify A94 in the Current JDE Release Level and New JDE Release Level fields. Specify your object library in the Production LSF Library field. Enter 0 for the Install Source Library and the Install Object/Data Libraries fields. Also, specify your A9.4 JDEOBJ and JDFDATA libraries in the Library Name field.
-
From the Merge Information screen, set the merge modes for data dictionary, vocabulary overrides, DREAM Writer, menus, and user-defined codes to 3 (Replace). Set the other merge modes to 0 (No Merge). Your screen looks similar to the following graphic.
Figure 4-2 Plan the Upgrade (Merge Information) screen
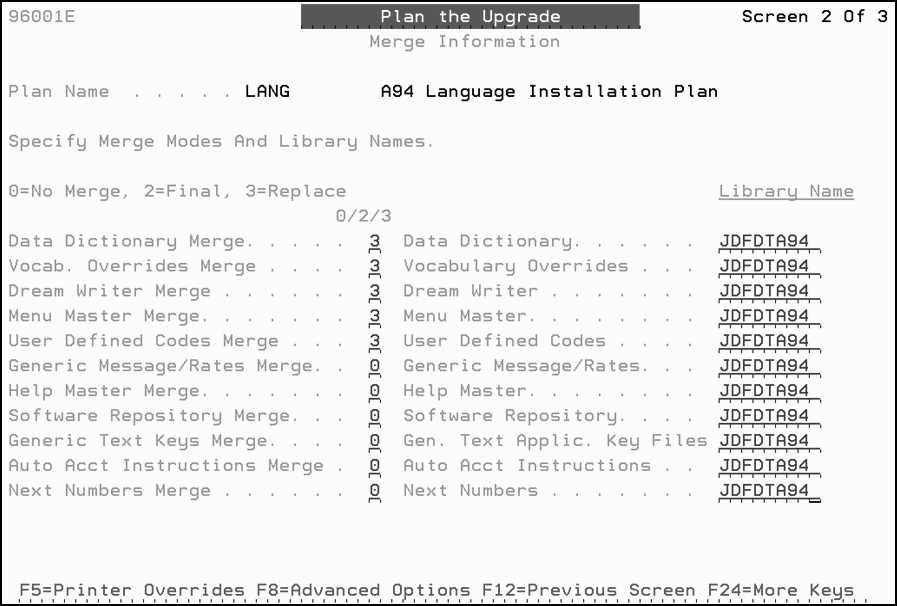
Description of ''Figure 4-2 Plan the Upgrade (Merge Information) screen''
4.3.2 Perform the Language Upgrade
To perform the language upgrade to the setup environment, follow the steps below:
-
Sign on as JDE. Ensure that your A9.4 JDFOBJ and JDFDATA are the only libraries in your library list.
-
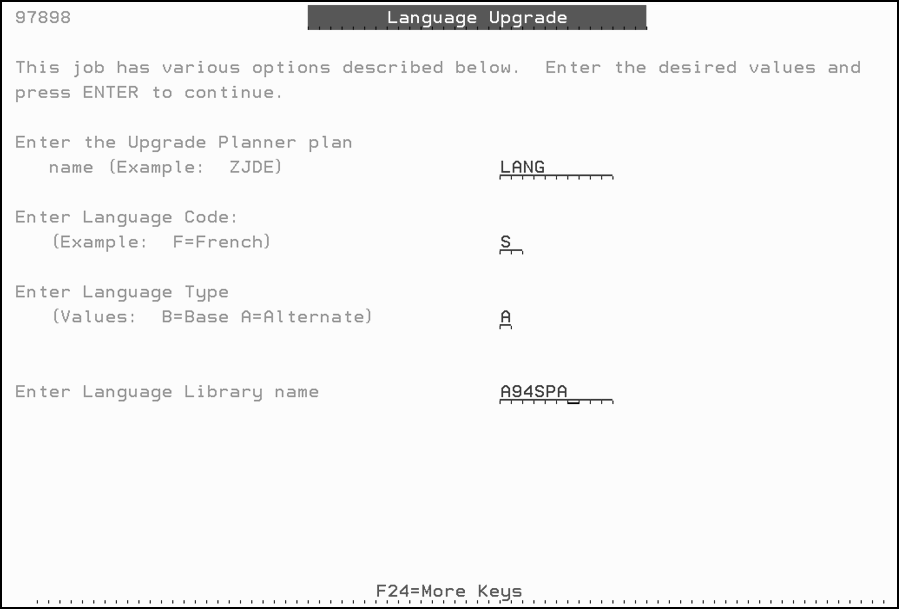
From the Merges menu (G97R41), select Language Upgrade. The Language Upgrade screen appears.
-
In the Enter the Upgrade Planner plan name field, type the name of the upgrade plan you created for the language upgrade.
-
In the Enter Language Code field, leave the field blank.
-
In the Enter Language Type field, type B (B=Base).
Caution:
Do not specify A (Alternate Language) in this field. -
In the Enter Language Library name field, type the name of your language library. This is the name of the library to which you restored the language files.
The language upgrade overlays the targeted English text in the control files with the new language text.
-
Upgrade your Production Environment
Sign on as JDEINSTAL. Release UPG_STEP2.