10 Work with Promotion Paths and Projects
This chapter contains these topics:
10.1 Working with Promotion Paths and Projects
A promotion path defines how a project's source code members and control file data will move from one environment to another. An environment consists of source code members and control file data. For source code members, the environment consists of:
-
A source file
-
A source library
-
An object library
For control file data, the environment consists of a data library.
10.2 Understanding Promotion Paths
A promotion path specifies the current locations of source code members and control file data and where they will be moved. For example, promoting a project's source code members and control file data from a development environment to a test environment could look similar to the following illustrations.
Figure 10-1 Promoting a Project's Source Code Members and Control File Data from Development to Test
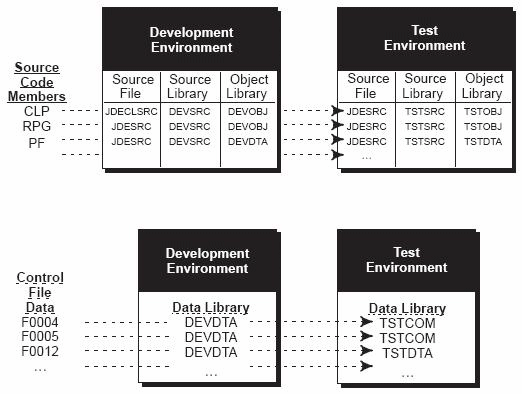
Description of "Figure 10-1 Promoting a Project's Source Code Members and Control File Data from Development to Test"
Each move between two environments requires that you define a unique promotion path.
A project is a collection of software and data you want to group together for promotion. A project is defined by the following characteristics:
-
SARs that are associated with the project
-
Promotion paths that determine the movement of the project software and data between environments

10.2.1 Before You Begin Defining a Promotion Path
-
Verify that the SARs and promotion paths you want to associate with a project have been set up.
-
The SAR system uses the Work Order files (F4801 and F4802). If your production environment uses these files, and if the F4802 file has different record types than what version control needs, define a separate library that contains these files for version control purposes only.
10.3 Defining a Promotion Path
Several steps are involved in defining promotion paths. Complete the following tasks:
-
Locate a promotion path
-
Add a promotion path
-
Define a promotion path for source code members
-
Define a promotion path for control tables
From the Version Control menu (G9261), select Manage Promotion Paths.
Figure 10-3 Manage Promotion Paths screen (part 1)
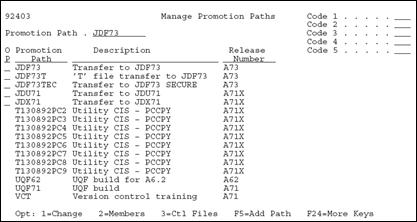
Description of "Figure 10-3 Manage Promotion Paths screen (part 1)"
Figure 10-4 Manage Promotion Paths screen (part 2)
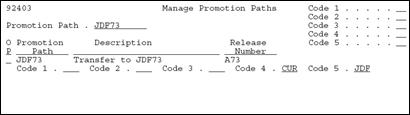
Description of "Figure 10-4 Manage Promotion Paths screen (part 2)"
Select one of the following methods to locate a promotion path:
-
On a blank Manage Promotion Paths form, press Enter.
The screen displays a complete list of promotion paths.
-
On Manage Promotion Paths, enter the path name in the Promotion Path field.
The screen displays the path name. If the promotion path does not exist, the screen displays the path name that is closest alphabetically.
-
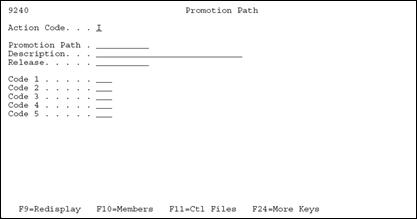
Complete the Promotion Path form:
-
Add a new path name, a path description, and a release level.
-
Use the Code 1 through 5 fields for additional classifications.
-
Code 1 through 5 fields are user defined in system 92, types E1, E2, E3, E4, and E5.
-
Specify the status of the promotion path in the Code 4 field.
-
Field-sensitive help (function key F1) provides valid values for the Code 4 and 5 fields.
-
Specify the type of promotion environment in the Code 5 field.
-
To define a promotion path for source code members
-
Locate Promotion Path Members using one of the following methods:
-
On the Manage Promotion Paths form, locate the promotion path you want to define.
-
Enter 2 (Members) in the OP (Option) field next to the promotion path name.
-
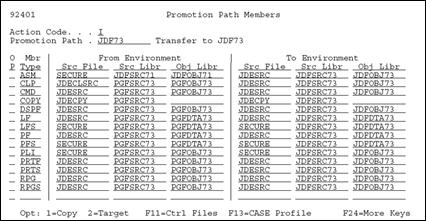
Figure 10-6 Promotion Path Members screen
Description of "Figure 10-6 Promotion Path Members screen"
The From Environment area on the Promotion Path Members form shows the current locations of the source and object code. The To Environment area shows the locations to which the code will be moved.
-
-
Specify source files and library names for each member type you list on this screen.
-
To display valid member types and their descriptions, press F1 while your cursor is in a Mbr Type field. The member types are defined in the Function Codes user defined code table (98/FN).
-
To copy source file and library names from one member type to another, type 1 (Copy) in the OP (Option) field next to the member type you want to copy. Type 2 (Target) in the OP fields next to the member types you want the information copied to, and press Enter. You can specify multiple targets.
The following chart shows some of the function keys available on this screen.
-
| Key | Description |
|---|---|
| F9 | Redisplays the record for the previously-changed path. |
| F11 | Displays the Promotion Path Control Files form. |
| F13 | Displays the CASE Profiles form. |
| F14 | Retrieves the source file, source library, and object library from your CASE profile and fills in the From environment. This overwrites any information currently in the fields. |
| F15 | Duplicates the source file and library names from the first member type to the remaining member types. |
10.3.1 What You Should Know About
| Topic | Description |
|---|---|
| Copying an existing promotion path | If you copy an existing promotion path to create a new path, be sure that the source files and library names for the members are correct for the new path. |
| Changing library names | To change library names, enter the new library names over the current ones. |
To define a promotion path for control files
-
Locate the Promotion Path Control Files using one of the following methods:
-
On Manage Promotion Paths (P92403), locate the promotion path you want to define and enter 3 (Ctl Files) in the OP (Option) field next to the promotion path name.
-
On the Promotion Path (F5 from P92403) form, press F11 (Ctl Files).
-
On the Promotion Path Members form (Opt 2 from P92403), press F11 (Ctrl Files).
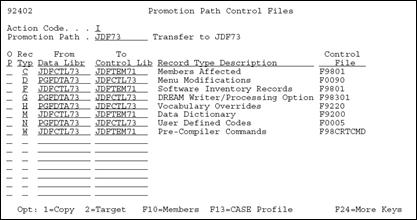
Figure 10-7 Promotion Path Control Files screen
Description of "Figure 10-7 Promotion Path Control Files screen"
The From Data Libr column on the Promotion Path Control Files form shows the current location of the data records. The To Control Lib column shows the location to which the data records will be moved.
-
-
Specify library names for each record type listed on this form.
Function keys available on this form include:
Key Description F9 Redisplays the record for the previously changed project. F10 Displays the Promotion Path Members Files form. F13 Displays the CASE Profiles form. F14 Retrieves the data library from your CASE profile and fills in the first From Data Libr field. This overwrites any information currently in the field. F15 Duplicates the library names from the first record type to the remaining record types. -
To copy library names from one record type to another, type 1 (Copy) in the OP (Option) field next to the record type you want to copy.
-
Type 2 (Target) in the OP fields next to the record types you want the information copied to, and press Enter. You can specify multiple targets.
10.4 Defining a Project
To define a project, complete the following tasks:
-
Locate a project
-
Add a project
-
Assign promotion paths
-
Assign project SARs
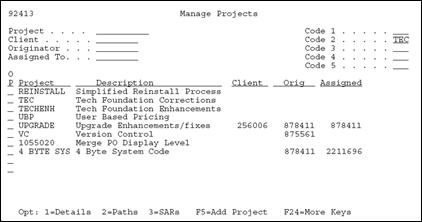
From the Version Control menu (G9261), choose Manage Projects.
Figure 10-8 Manage Projects screen (part 1)
Description of "Figure 10-8 Manage Projects screen (part 1)"
Figure 10-9 Manage Projects screen (part 2)
Description of "Figure 10-9 Manage Projects screen (part 2)"
Locate a project using one of the following methods:
-
On a blank Manage Projects form, press Enter.
-
A complete list of projects displays.
-
-
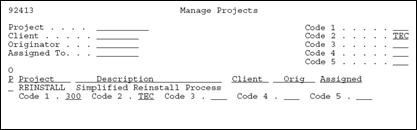
On the Manage Projects form, enter the project name in the Project field.
-
The project name displays on the form. If the project does not exist, the project name that is closest alphabetically displays on the form.
-
-
On Manage Projects, choose Add Project.
Figure 10-10 Software Development Project screen
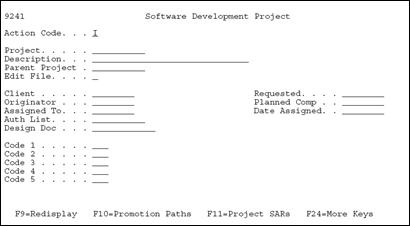
Description of "Figure 10-10 Software Development Project screen"
-
On the Software Development Project form, do the following:
-
Enter a new project name.
-
Enter a project description.
-
Enter any other information you want to associate with the project.
-
Complete the Code 1 through 5 fields for additional classifications.
-
The Code 1 through 5 fields are user defined in system 92, types P1, P2, P3, P4, and P5.
-
-
-
If you want to attach this project to a parent project, specify the parent project name in the Parent Project field.
The following chart shows some of the function keys available on this form.
| Key | Description |
|---|---|
| F9 | Redisplays the record for the previously-changed project. |
| F10 | Displays the Project Promotion Path form. |
| F11 | Displays the Project Elements form. |
| F14 | Displays the generic text associated with this project, and gives you access to text model selections. |
You must assign promotion paths and SARs to the project you set up here. The following sections explain how to assign them.
-
Locate the project to which you want to assign promotion paths using one of the following methods.
-
On Manage Projects selection (Option 4 on menu G9261), locate the project to which you want to assign promotion paths.
-
In the OP (Option) field next to the project name, enter 2 (Paths)
-
-
On Software Development Project (Manage projects, F5), press F10 (Promotion Paths).
Figure 10-11 Project Promotion Paths screen

Description of "Figure 10-11 Project Promotion Paths screen"
-
-
Specify the promotion paths you want to assign to this project.
To display the available promotion paths, press F1 (Help) while the cursor is in a Promotion Path field.
Some of the function keys available on this form include:
-
F9 - Redisplays the record for the previously-changed project.
-
F11 - Displays the Project Elements form.
Options available on this form include:
-
1 - Edit the promotion path details.
-
2 - Edit the promotion path members.
-
3 - Edit the promotion path control files.
-
SARs are one element of a project; other projects can also be elements of a project.
-
Access the Project Elements form using one of the following methods:
-
On the Version Control menu (G9261), choose Edit and Promote.
-
On the Manage Projects form, locate the project to which you want to assign elements.
-
Enter 3 (SARs) in the OP (Option) field next to the project name.
-
-
On the Software Development Project form, press F11 (Project SARs).
-
On the Project Promotion Paths form, press F11 (Project SARs).
The Project Elements form displays the elements (usually SARs) assigned to the project.
-
-
Specify the elements (usually SARs) you want to assign to this project. You can also assign projects, which have SARs associated with them, as elements on this screen.
In the TY (Type) fields, specify the corresponding element types (S for SARs, and P for projects). Some of the function keys available on this screen include:
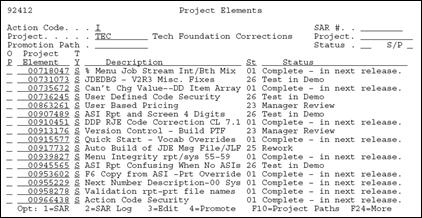
| Key | Description |
|---|---|
| F9 | Redisplays the record for the previously-changed project. |
| F10 | Displays the Project Promotion Paths screen. |
Options available on this screen include:
-
1 - Displays or edits the SAR detail.
2 - Displays or edits the SAR log. The SAR Log Transfer screen displays, which lets you edit the SAR log and update the project SARs. For more information about updating the SARs by using this log, see Section 11.2, "Update the SARs" in this publication. For information about the SAR log, refer to the Computer Assisted Design Reference Guide.
3 - Displays the Pre-Promotion Edit History form. For information about this function, see Section 11.2, "Update the SARs" in this publication.
4 - Promotes a project. For information about this function, see Section 11.1, "About Promoting a Project"in this publication.
5 - Displays the promotion history of a SAR ('Z' record).
6 - Displays or edits notes associated with a SAR (for JD Edwards World environments only; '*' record).