31 Use Additional DREAM Writer Options
This chapter contains these topics:
-
Section 31.5, "Changing Default OUTQ Library in Printer Overrides,"
-
Section 31.8, "Technical Considerations for Recursive Version Setup."
31.1 Setting Up Processing Options
From Master Directory (G), choose Hidden Selection 27
From Advanced & Technical Operations (G9), choose Run Time Setup
From Run Time Setup (G90), choose DREAM Writer
From DREAM Writer (G81), choose Processing Option Set-up
The program establishes the Form ID's Processing Options Set-up option number and editing sequence. The system then uses DREAM Writer to write the text for the processing option and illustrate how it displays on the processing option form.
When adding custom or additional processing options, add 10 to the last processing option used. You need to code the program to accommodate any new processing options that you add.
F18 designates language-specific processing options.
See Section 49.2, "About Language and Jargon" for more information.
Figure 31-1 Processing Options Set-up screen
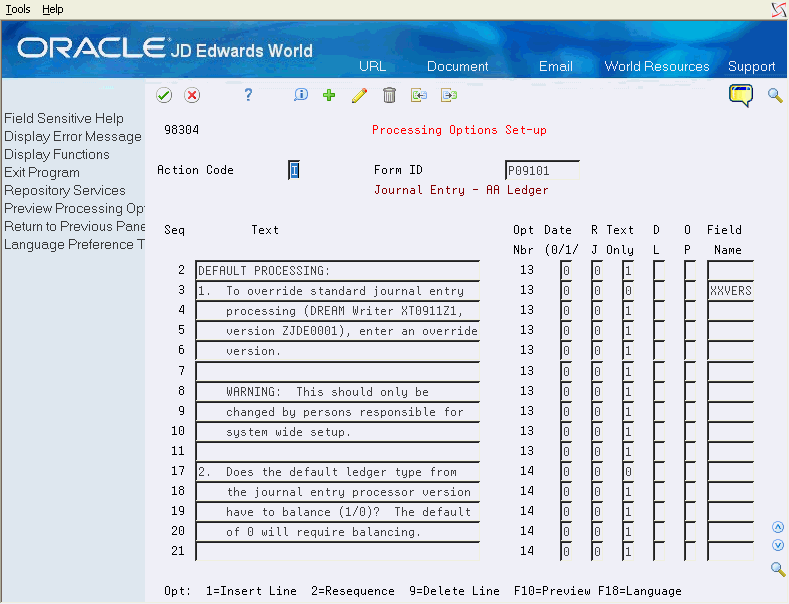
Description of "Figure 31-1 Processing Options Set-up screen"
| Field | Explanation |
|---|---|
| Seq | This number is used to control the sequence of Processing Options, DDS Selection values and DDS Key sequences.
The sequence number is relative, meaning that the sequence need not start 001, 002, etc. A sequence of 003 and 005 sorts the report with the 003 field before the 005 field. For Financial Reports, company MUST be sequence 001 in order to access the specific company Automatic Accounting Instruction (AAI) records. If company is not sequence 001, company 00000 AAIs are used. |
| Text | The title that appears at the top of the report. It can include up to three lines with 40 characters each. The lines are automatically centered on the report.
Form-specific information This is the descriptive text for the processing option. |
| Opt Nbr | The Processing Option Number field specifies for DREAM Writer processing options the array index position for each processing option. This number should never change once assigned. The sequence number of processing options may be changed to allow for better presentation on the Processing Options Entry program but the processing option number should never be changed. This field is not input capable for existing lines of text. |
| Date (1/0) (0/1/2) | The Date Field specifies whether or not the processing option refers to a date.
Valid values are: 0 – Indicates that the information is not a date. 1 – Indicates that a date is to be stored in the processing option as a Gregorian date in month, day and year format. 2 – Indicates that a date is to be stored in the processing option as a Julian date in century, year and day format. 3 – Indicates the same as a "2" with the exception that the display AND entry format is "YYYY/MM/DD" (full four digit year). NOTE: All data entry for date information is entered in SYSTEM FORMAT with the exception of the "3". |
| R J | Valid codes are:
1 – The processing option information to be entered is numeric and should be right justified. 2 – The processing option information to be entered is to be right justified and left-filled with blanks (e.g. business unit edit). |
| Text Only | The Text Only field is used to specify whether the text line is text only or a processing option value entry line. This allows you to specify multiple lines of text to document each processing option. The values for this field are
1 – For text only 0 – For a value entry line Each separate processing option can have only one input value, or "0" value. |
| D L | This field controls which processing options are displayed to a user based upon the user's Display Level value in the JD Edwards World User Information file. Display Levels are optional. If the processing option's Display Level value is greater than the user's Display Level, the processing option text does not appear.
NOTE: An exception to this is a special hard-coded value of 'P' on the processing option Level of Display. If this value is used on the processing option definition, all users running any version may see but not change the processing option. |
| O P | Selection exit codes are options and function keys that are used to perform a specific function for a selected line or form of data. The most commonly used selection exits for each program are displayed in highlighted text at the bottom of the screen. To display all available selection exits, press F24. Press F1 in the Option field to display all available Options for the program. |
31.2 Working With Versions Print
From Master Directory (G), choose Hidden Selection 27
From Advanced & Technical Operations (G9), choose Run Time Setup
From Run Time Setup (G90), choose DREAM Writer
From DREAM Writer (G81), choose Versions Print
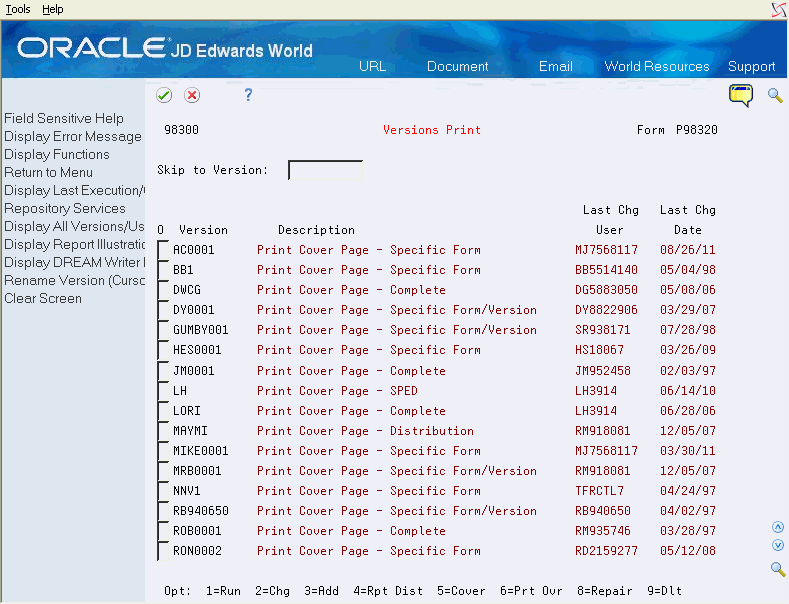
Use the versions print selection to print the Cover Page for all DREAM Writer Versions.
You can print a cover page for a specific screen and version.
Add, Change, or Run a version.
31.2.1 What You Should Know About
31.3 Copying or Moving DREAM Writer Parameters
From Master Directory (G), choose Hidden Selection 27
From Advanced & Technical Operations (G9), choose Run Time Setup
From Run Time Setup (G90), choose DREAM Writer
From DREAM Writer (G81), choose Copy/Move DW Parameters
You must create all DREAM Writer files in a custom library if you are:
|
Note: This is a copy, not a move. |
Use this option to retrieve a DREAM Writer from JDFDATA if it is accidentally deleted from your production file.
To copy or move DREAM Writer parameters
Complete the fields and click Enter.
Figure 31-3 Copy/Move DW Parameters screen
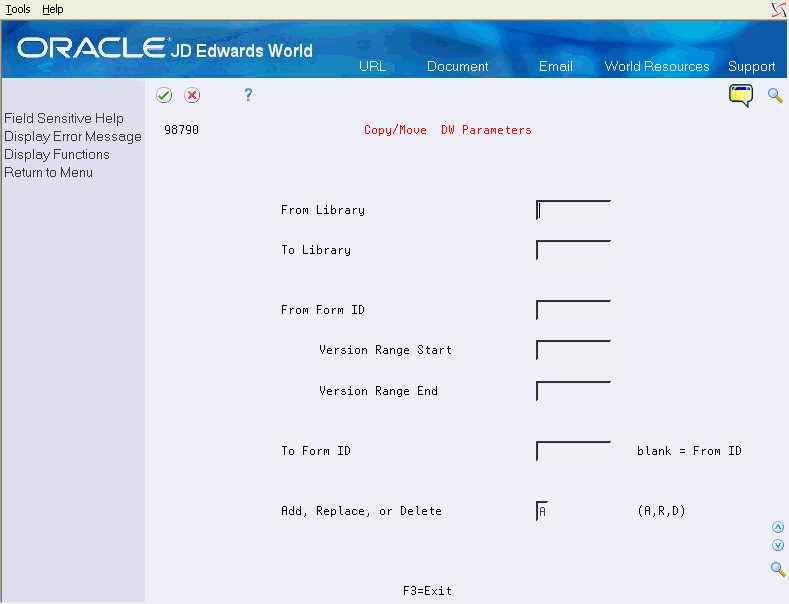
Description of "Figure 31-3 Copy/Move DW Parameters screen"
| Field | Explanation |
|---|---|
| From Library | The Library Name field contains the name of a valid System i library name. |
| To Library | The Library Name field contains the name of a valid System i library name. |
| From Form ID | This screen name is the name of the RPG program which controls the function format of this DREAM Writer report. For FASTR and Property & Equipment FASTR reports, the screen name can normally be any name the users may create. |
| Version Range Start | Determines the lowest version number to be copied from the From Form ID field to the To Form ID field. You must enter an appropriate Version Range Start, for example, ZJDE0001.
Form-specific information If you are using either of the copy functions from ASI Work with Instructions programs, you can determine the available versions in the JDFDATA library by viewing the new version from the ASI Inquiry/Update form. If you are using the Copy/Move DW Parameters from G81, you need to know the beginning version number you want to copy. |
| Version Range End | Determines the highest version number to be copied from the From Form ID field to the To Form ID field. You must enter an appropriate Version Range End, for example, ZJDE9999.
Form-specific information If you are using either of the copy functions from ASI Work with Instructions programs, you can determine the available versions in the JDFDATA library by viewing the new version from the ASI Inquiry/Update form. If you are using the Copy/Move DW Parameters from G81, you need to know the ending version number you want to copy. |
| To Form ID | This form name is the name of the RPG program that controls the function of this DREAM Writer selection. For FASTR and Property & Equipment FASTR reports, the screen name can normally be just about any name the users may think up. The controlling program for these types of forms is always the same. |
| Add or Replace | Specifies whether the versions you copy replace the versions in the To Form ID or are added to the list of existing versions. Valid codes are:
A – Add the versions to the current versions list. This is the default value. R – Delete all existing versions in the Screen ID being copied to and then copy the specified versions, keeping their current version numbers. |
31.4 Overriding the Global Versions Print
From Master Directory (G), choose Hidden Selection 27
From Advanced & Technical Operations (G9), choose Run Time Setup
From Run Time Setup (G90), choose DREAM Writer
From DREAM Writer (G81), choose Global Versions Print Override
Use this option to override DREAM Writer Versions on a global basis.
This job changes existing DREAM Writers in the DREAM Writer file. If you want to change the defaults so that all newly created DREAM Writers also have the new values, you must change the default values in the Data Dictionary. Choose Field Level Help (F1) in the field to obtain the data item name, then change the default value field in the Data Dictionary for that item.
When changing the default value field for an item in Data Dictionary, be aware of the following:
-
A blank means that no change occurs.
-
An asterisk (*) means tmeans that the system retrieves the default parameter for that field from the Data Dictionary.
-
The field you change is only for that Form ID.
-
This functionality does not apply to special forms.
-
This functionality allows you to change the specifications if you acquire a new printer.
An alternative to this utility is to use the IBM command CHGPRTF_R*.
To override the Global Versions print
Figure 31-5 Global Versions Print Override screen
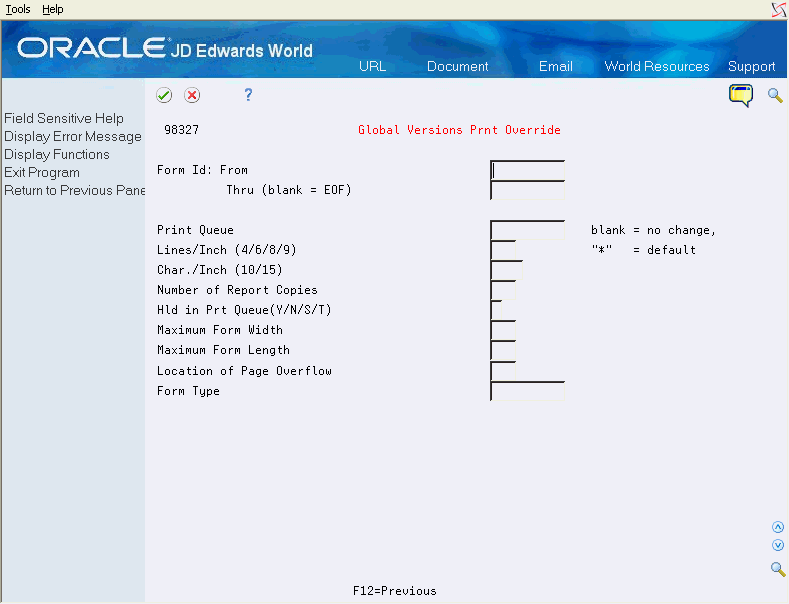
Description of "Figure 31-5 Global Versions Print Override screen"
| Field | Explanation |
|---|---|
| Form Id: From | The RPG report program name that defines the report template. |
| Print Queue | A designation of a specific print queue, such as QPRINT.
If left blank, this field defaults to the print queue specified in your user profile. |
| Lines/Inch (4/6/8/9) | The line spacing should be entered as the number of lines per inch and must be supported by your printer. The valid values are:
4 – IBM 5219, 5224, 5225, and 3287 printers only 6 – IBM 5224 printer only 8 – IBM 5224 printer only 9 – IBM 5225 printer only The standard computer print is 6 LPI and 10 CPI. If you are printing on 8 1/2" x 11" paper, you would specify 8 LPI and 15 CPI. |
| Char./Inch (10/15) | The horizontal printing density. This should be entered as the number of characters per inch and must be supported by your printer. |
| Number of Report Copies | The number of copies of this report to be printed. One copy is the default. |
| Hld in Prt Queue(Y/N/S/T) | This flag is used to determine whether to hold the print file in the print queue rather than printing it.
Valid values are: Y – hold on the print queue N – do not hold on the print queue S – same as Y but print file will be saved on the print queue T – same as N but print file will be saved on the print queue Note: You can use 1 for Y and 0 (zero) for N. UPGRADE PLANNER: If you are entering information into your Upgrade Plan, the following values are valid: 1 – hold on print queue 0 – do not hold on the print queue |
| Maximum Form Width | A field used in the definition of a report version used to indicate the width of the form on which the requested report is to be printed.
The standard form width is 132 characters. If more than 132 characters is specified, you must compress printing to 15 characters per inch. |
| Maximum Form Length | A field used in the definition of a report version to indicate the length of the form on which the requested report is to be printed. This is expressed in lines per page. |
| Location of Page Overflow | A field used in the definition of a report version to indicate the number of lines to be printed on a specific form before page overflow is detected. |
| Form Type | A field used in the definition of a report version used to indicate the special forms number to be used in the printing of a particular report. |
31.5 Changing Default OUTQ Library in Printer Overrides
Object List Overrides control the default libraries used by the P98OBJL Object List Window. The Object List Window can be accessed in Printer Overrides by placing the cursor in the Print Queue field and pressing the F1 key. The default OUTQ library may be changed in the Object List Overrides program on the System Administration menu (G944).
To change the default OUTQ Library printer
On Object List Overrides
-
Enter *OUTQ in the Object Type field to locate the library.
-
Place the cursor in the Library field for the *OUTQ object type and enter the default library name.
-
To verify your change, access the Global Versions Print Override screen and press F1 in the Print Queue field to view the new default library in the Object List Window.
If you do not have an *OUTQ on the Object List Overrides screen, you can add one. Enter *OUTQ on a blank line in the Object Type field and enter the desired library in the Library field.
You may also limit user changes to the default OUTQ library in the Object List Overrides program. To prevent changes to the OUTQ Library on the Object Search Window, use the Object List Overrides screen. Enter 0 in the Allow Changes field for the Object Type *OUTQ. A value of 1 in this field permits users to make changes.
31.6 Setting Up Recursive DREAM Writer Versions
From Master Directory (G), choose Hidden Selection 27
From Advanced & Technical Operations (G9), choose Run Time Setup
From Run Time Setup (G90), choose DREAM Writer
From DREAM Writer (G81), choose Recursive Versions - Set-up
Use this utility when more than one user submits the same version at the same time. This allows you to maintain your own set of processing parameters, even when using the same version concurrently with another user. For example, there is only one version for GL Post. If you submit more than one post at a time, the system uses the parameters for the last one you submit for both versions..
JD Edwards World has created a file of the versions that could cause problems. If you have a specific version that your users run often, you should add this version to the list.
To set up recursive DREAM Writer versions
-
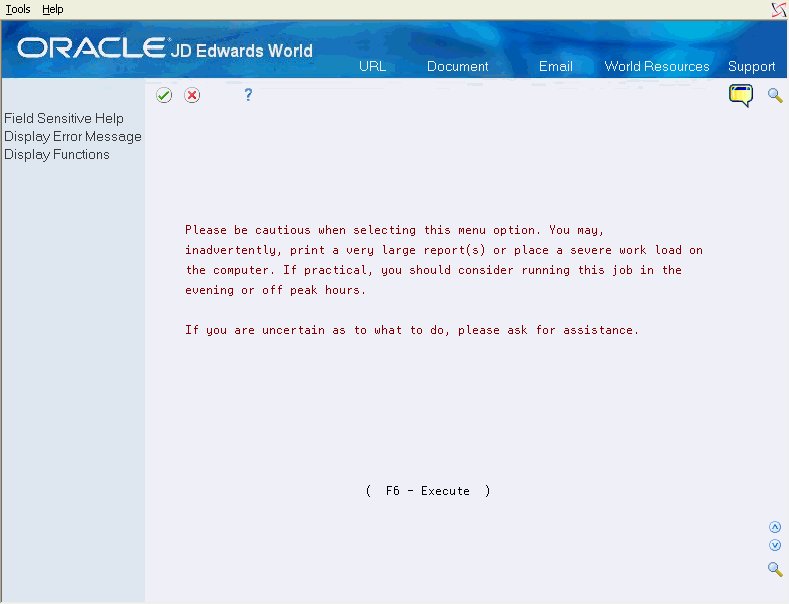
Press F6 to execute the program after reading the runtime message.
Figure 31-6 Runtime Message (Recursive DW Versions) screen
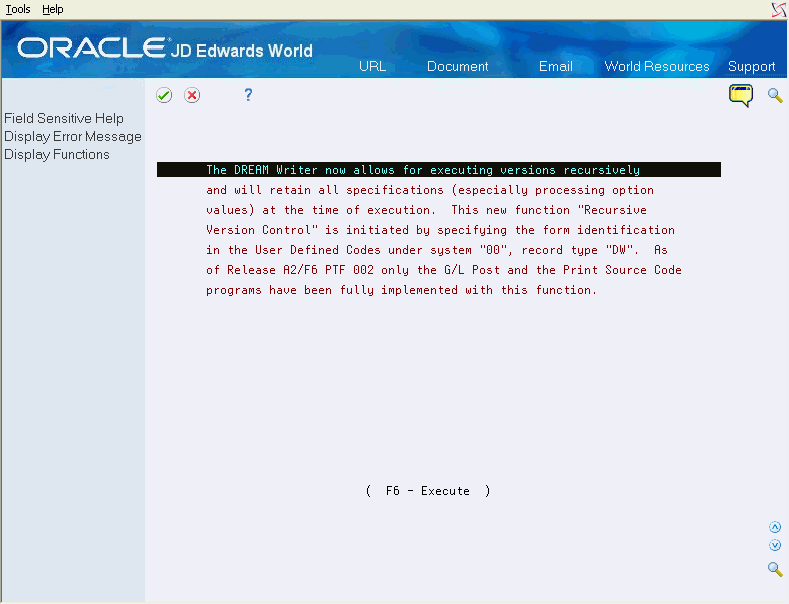
Description of "Figure 31-6 Runtime Message (Recursive DW Versions) screen "
-
Complete any of the following fields and click Enter.
Figure 31-7 Recursive Version Setup screen
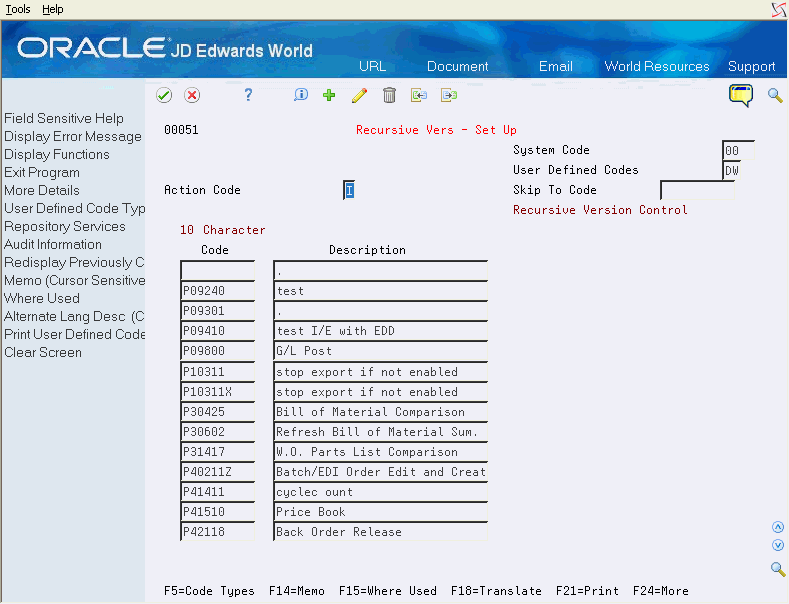
Description of "Figure 31-7 Recursive Version Setup screen"
31.6.1 What You Should Know About
| Recursive Versions | Description |
|---|---|
| Recursive Versions | If you add a version to the 00/DW list, your version leaves the +PXXXX objects behind after the job runs. To avoid this build up of versions, write a clean-up program.
Duplicate parameters use a plus sign (+) preceding the form ID. To tie the job run with the version submitted, you must print the cover page. You can view the version changes by displaying a DREAM Writer Form ID processing option. For example, P09800, the post program. The recursive versions process is:
|
31.7 Deleting Recursive DREAM Writer Versions
From Master Directory (G), choose Hidden Selection 27
From Advanced & Technical Operations (G9), choose Run Time Setup
From Run Time Setup (G90), choose DREAM Writer
From DREAM Writer (G81), choose Recursive Versions - Global Dlt
The operation performs the following:
-
Removes recursive version parameters left in the DREAM Writer file.
-
Reads through the whole file, and deletes those records that are preceded with a plus sign (+).
P98310 numbers the DREAM Writer versions from 0001 through 9999. Once the job is run, the system deletes that recursive version. However, versions that never go through the JOBQ remain in the files. For this reason, it is possible that the files can eventually contain all the 9999 versions available. When this happens, you cannot submit the job.
Run the Recursive Versions Global Delete program (P98305G) to delete all DREAM Writer forms that are set up as recursive. This program deletes the records in the DREAM Writer files with the + sign in front of the form ID. You can set up this program to run periodically in sleeper mode.
To delete recursive DREAM Writer versions
The system displays a line of text at the bottom of the DREAM Writer menu informing you that it submitted the recursive version's global delete to batch.
31.8 Technical Considerations for Recursive Version Setup
If a program is set up to run recursively, the system maintains the values you enter in the processing options as it processes the job. For example, you submit a version of the post program with a batch number in the processing option. The system does not process the version immediately and it remains in the JOBQ. A coworker submits the same version of the program with a different batch number. It also remains in the JOBQ, waiting for the system to process your version first. Because the post program is recursive, both versions run using different batch numbers from the processing option. If the program was not recursive, both versions run with the batch number from the coworker's version.
When you submit a DREAM Writer, the system examines the UDC file 00/DW to determine if the DREAM Writer form ID is recursive. If the system locates the form ID, the program places a plus sign (+) preceding the program number. The DREAM Writer - Copy Version program (P98310) copies the version and appends a 4-digit number to the version. For example, when you submit P42565 version POSTBATCH, the system creates +P42565 and submits version POSTBA0001.
P98310 creates version numbers by appending a number to the original version. If that version is in use, the system creates a version with the next available number. For example, if recursive versions POSTBA0001, POSTBA0003 and POSTBA0005 exist, the system creates version number POSTBA0002 and submits the version. The system numbers the next version you submit as POSTBA0004.
When the job ends, the system deletes the version from the DREAM Writer Master Parameter file (F98301). The versions remain in the file only if you delete the version from the JOBQ before you run the job.
JD Edwards World includes some recursive form IDs
31.8.1 What You Should Know About
| OUTQ | Description |
|---|---|
| Changing Default OUTQ Library | Locate the OUTQ library by pressing F1 in the Print Queue field on the Global Versions Print Override screen. The Object Search Window displays the objects.
Change the default OUTQ library in the Object List Overrides program on the System Administration menu (G944). On the Object List Overrides screen, enter *OUTQ in the Object Type field to locate the library. Place the cursor in the Library field for the *OUTQ object type and enter the default library name. To verify your change, access the Global Versions Print Override screen and press F1 in the Print Queue field to view the new default library in the Object List Window. If you do not have an *OUTQ on the Object List Overrides screen, you can add one. Enter *OUTQ on a blank line in the Object Type field and enter the desired library in the Library field. |
| Limiting changes to the OUTQ Library | Limit user changes to the default OUTQ library in the Object List Overrides program on the System Administration menu (G944).
To prevent changes to the OUTQ Library on the Object Search Window, use the Object List Overrides screen. Enter 0 in the Allow Changes field for the Object Type *OUTQ. A value of 1 in this field permits user to make changes. |
