35 Work with Miscellaneous Menu Utilities
This chapter contains these topics:
-
Section 35.2, "Defining the Role of DREAM Writer Processing Options (F18),"
-
Section 35.5, "Submitting an IBM Query from a JD Edwards World Menu,"
-
Section 35.7, "Enabling the Menu Word Search function on double-byte machines."
From Master Directory (G), choose Hidden Selection 27
From Advanced & Technical Operations (G9), choose Run Time Setup
From Run Time Setup (G90), choose Menus
From Menus (G901), choose Revisions
35.1 Defining DREAM Writer Selections
35.1.1 What is a Blind DREAM Writer Version?
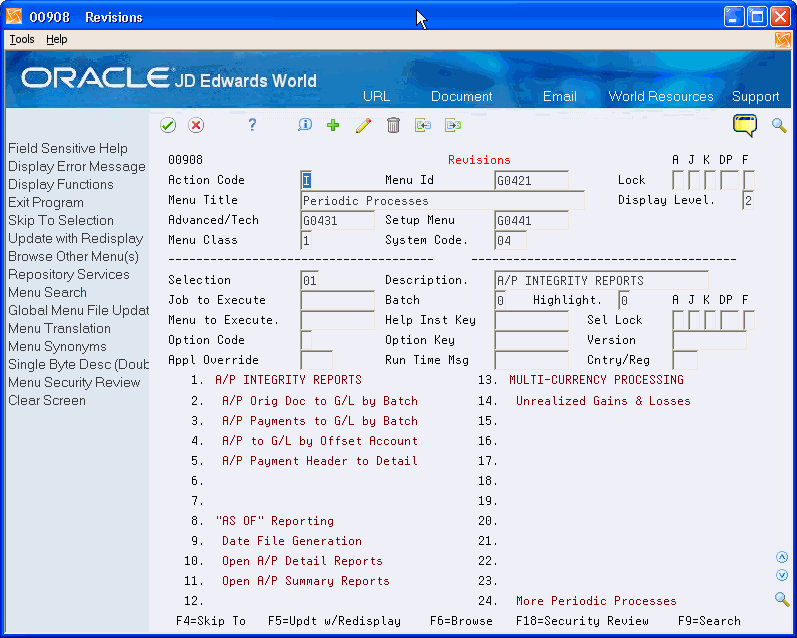
A blind DREAM Writer version is a menu selection that submits a specific report or version with no user input. Processing Options can appear for user input on a blind DREAM Writer version.
-
Option Key specifies the Form ID to call
-
Version specifies which version you call
For blind DREAM Writer Submissions:
-
The Batch field must be 1.
-
The Option Code field must be 2.
-
You must have an active version in the Version field.
-
On the Additional Parameters screen, the Mandatory Processing Option field must be N.
-
35.1.2 Revisions Bypasses the Versions List for a Blind DREAM Writer
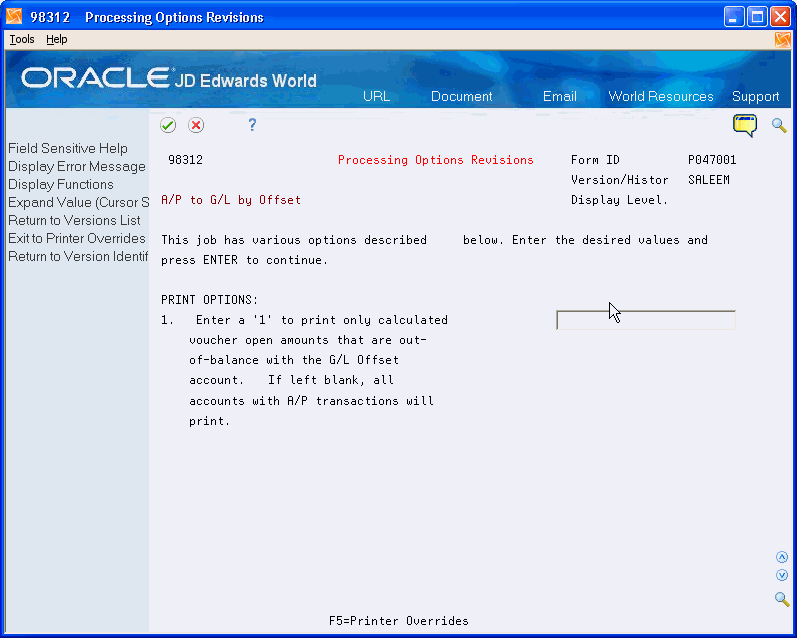
For example, the program ID for A/P to G/L Offset links directly to the Processing Options for user input and bypasses the Versions List screen, as it is a blind DREAM Writer.
Figure 35-1 Revisions (Blind DREAM Writer) screen
Description of "Figure 35-1 Revisions (Blind DREAM Writer) screen"
Figure 35-2 Processing Options Revisions screen
Description of "Figure 35-2 Processing Options Revisions screen"
35.2 Defining the Role of DREAM Writer Processing Options (F18)
35.2.1 Determining What DREAM Writer Processing Options (F18) Displays
You can determine what DREAM Writer Processing Options (F18) displays with each DREAM Writer job and what occurs when a selection is entered. On menus, set selections to display their processing options using DREAM Writer Processing Options (F18).
35.2.2 How to Set Up Interactive DREAM Writer Jobs Using DREAM Writer Processing Options (F18)
In addition to specifying the Form ID in the Option Key field, use the Option Cntrl and Version fields to set up a selection as a DREAM Writer interactive job. Option Control 1 requires that you specify a version and Option control 2 does not require that you specify a version. The following shows the two ways of defining an interactive job:
| Option Cntrl | Result of Selection | Result of F18 |
|---|---|---|
| 1 | Execute job | Options |
| 2 | Execute job | DW List |
35.2.3 How to Set Up Batch Jobs Using DREAM Writer Processing Options (F18)
In addition to specifying the Form ID in the Option Key field, use the Option Cntrl, Batch, and Version fields on the Revisions screen to set up a selection as a DREAM Writer batch job.
These three fields work together with the Mandatory Processing Option field on the Additional Parameters (983011) screen of DREAM Writer to define the job.
| Mandatory Option | Batch | Option Cntrl | Version | Result of Selection | Result of F18 |
|---|---|---|---|---|---|
| 1 | 1 | 2 | Version # | Processing options then submit | DW List |
| 0 | 1 | 2 | Version # | Submit | DW List |
| 1 | 1 | 1 | Version # | Processing options then submit | Processing options |
| 0 | 1 | 1 | Version # | Submit | Processing options |
| 1 | 0 | 2 | blank | DW List | DW List |
| 0 | 0 | 2 | blank | DW List | DW List |
|
Note: You can secure DREAM Writer Processing Options (F18) by setting up function key security for V00MENU, field #F03. |
35.3 Locating a Job ID
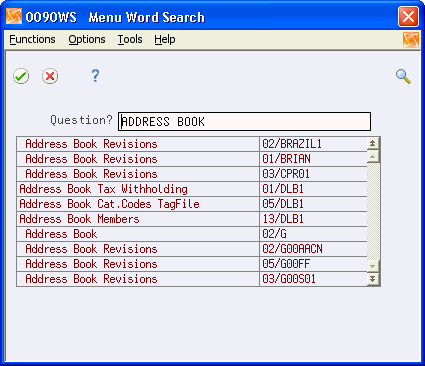
Use Menu Word Search to locate the job ID for a menu selection.
-
On Revisions, choose Menu Word Search (F9). The Menu Word Search screen displays.
-
In the Question? field, enter the menu name or selection description. A list of menus and menu selections that meet the search criteria displays.
-
Choose (Option 6) the menu or menu selection for the Job ID you want to know. A second screen displays showing the menu specifications.
-
Click Exit (F3) to exit this screen.
35.4 Adding an IBM Command on a Menu
To add an IBM command on JD Edwards World menu selection
-
On Revisions, enter a description.
-
Set the execute job to J00CMD.
-
Enter 0 (zero) in the Batch field.
-
Enter 1 in the Option Code field.
-
Enter the IBM command you want to execute in the Option Key field.
-
Set Version to blank if you want to prompt the command (F4) or set Version to *NOPROMPT if you want to execute the command without prompting.
35.5 Submitting an IBM Query from a JD Edwards World Menu
You can create a CL to submit a query with and without prompting for selected records, and then add it to a JD Edwards World menu.
To submit a query without prompting for selected records
-
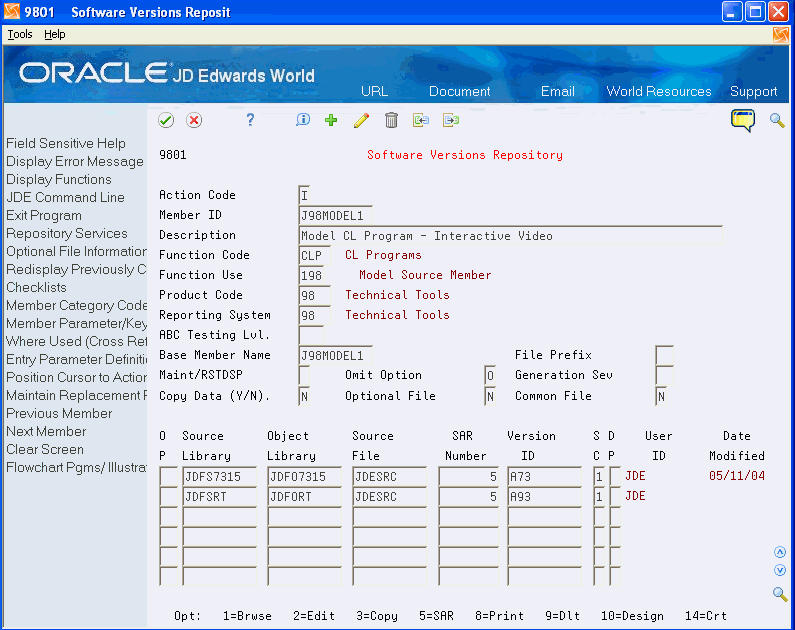
On the Command Line, enter SVR.
-
On Software Versions Repository, enter J98MODEL1 in the following field:
-
Member ID
Figure 35-4 Software Versions Repository screen
Description of "Figure 35-4 Software Versions Repository screen"
-
-
Copy J98MODEL1 using a similar object name. For example, you might enter JQUERY1.
-
Change the Product Code and Reporting System fields to a number between 55 and 60.
-
Ensure you change the Base Member Name. For example, change the Base Member Name to PQUERY1.
-
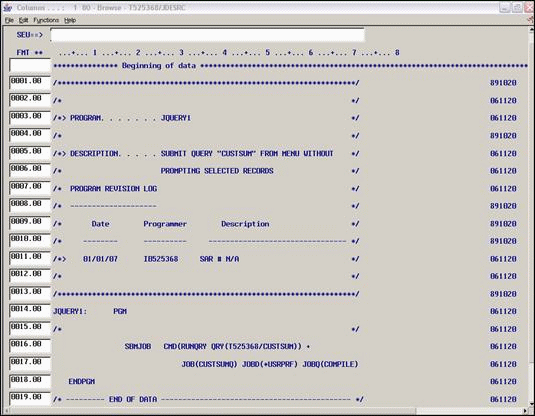
Edit the CL program as shown in the following example:
Figure 35-5 CL Program (IBM Query) screen
Description of "Figure 35-5 CL Program (IBM Query) screen"
-
On Software Versions Repository, create the new object ensuring that the system places it in a custom object library in your library list.
-
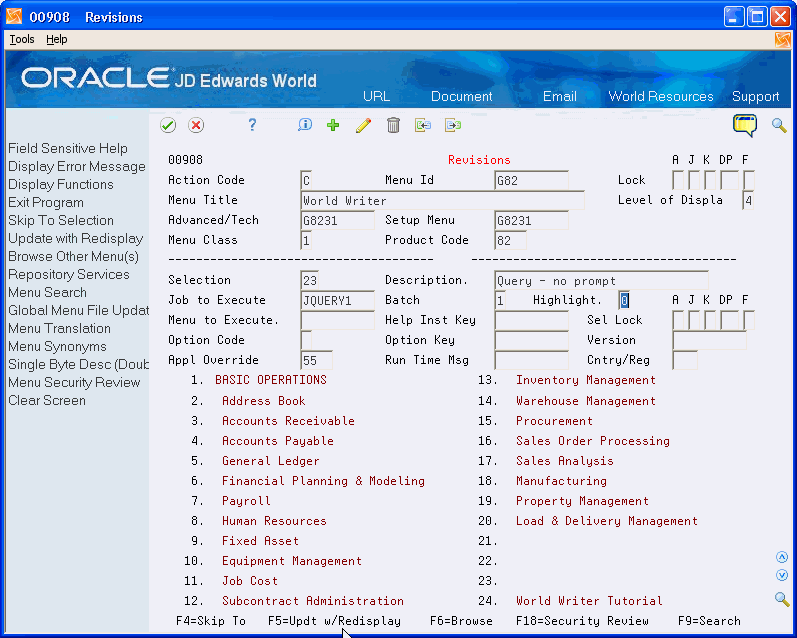
Access Revisions and locate the new menu.
-
Using the change action, page down to locate an available selection and add the CLP as shown in the following example:
To submit a query and prompt for selected records
-
On the Command Line, enter SVR.
-
On Software Versions Repository, enter J98MODEL1 in the following field:
-
Member ID
-
-
Copy J98MODEL1 using a similar object name. For example, you might enter JQUERY.
-
Change the Product Code and Reporting System to a number between 55 and 60.
-
Ensure you change the Base Member Name. For example, change the Base Member Name to PQUERY.
-
Edit the CL program as shown in the following example:
Figure 35-7 CL Program (Submit a Query) screen
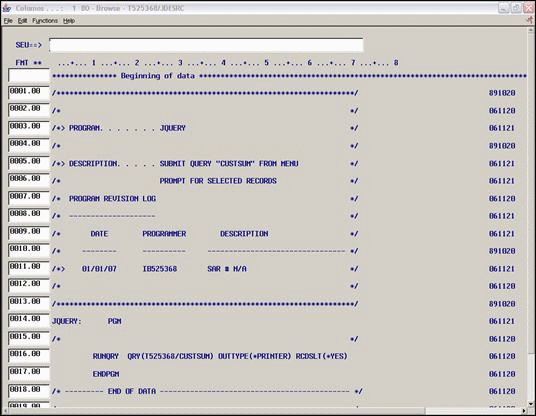
Description of "Figure 35-7 CL Program (Submit a Query) screen"
-
On Software Versions Repository, create the new object ensuring that the system places it in a custom object library in your library list.
-
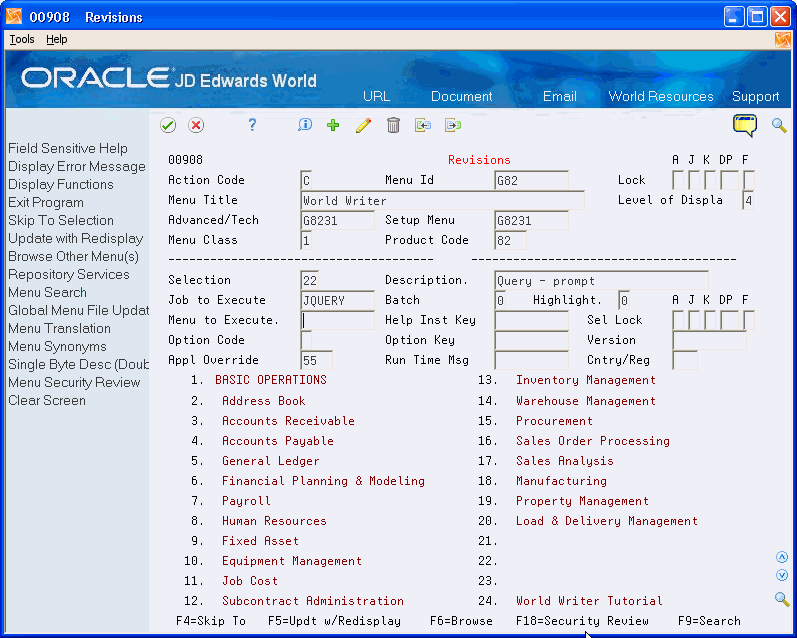
Access Revisions and locate the new menu.
-
Using the change action, page down to locate an available selection and add the CLP as follows:
35.6 Reviewing the Global Menu Update Utility
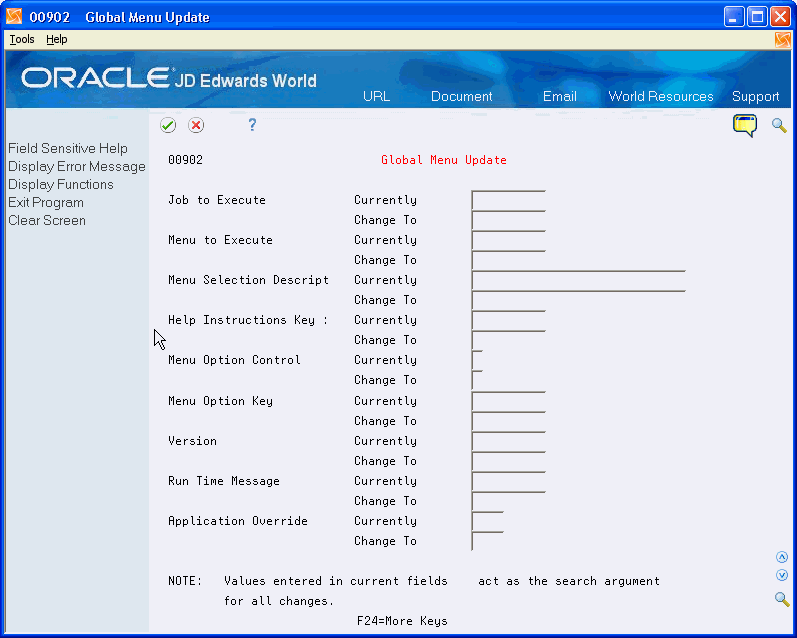
This utility is useful when replacing obsolete programs, versions, or messages. This reads every record in the file. There is no Boolean logic. This is an interactive job that reads the menu files (F0082, F00821, F0083).
To review the global menu update utility
On Revisions, choose Global Menu File Update (F11) to display this utility.
If there is a value in the Currently field, the utility updates each record with the value in the Change To field.
35.7 Enabling the Menu Word Search function on double-byte machines
To enable the Menu Word Search function on double-byte machines, you must enter single-byte menu titles and selection descriptions for menus you create or change.
To enable the Menu Word Search function on double-byte machines
-
On Revisions, choose Single Byte Desc. (F17) to access the Single Byte Menu Revisions screen.
Figure 35-10 Single Byte Menu Revisions screen
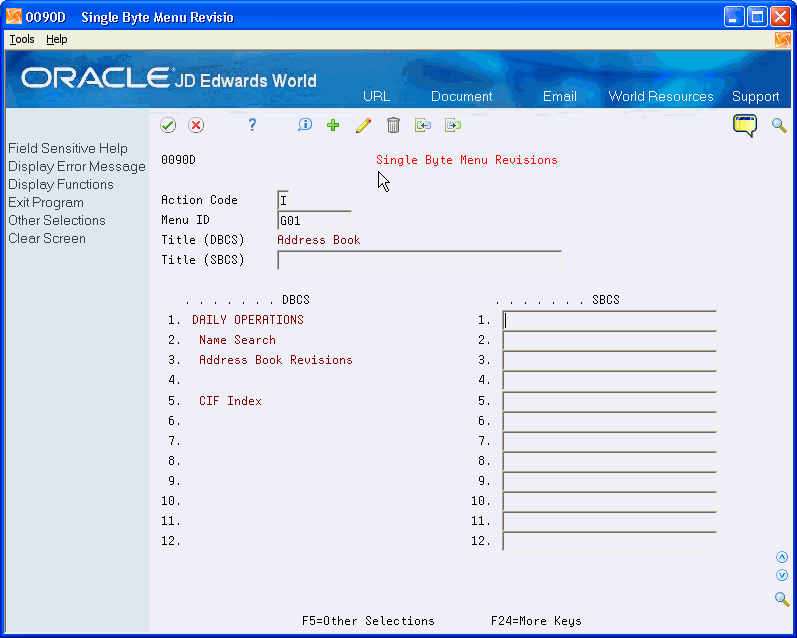
Description of "Figure 35-10 Single Byte Menu Revisions screen"
-
Complete the following fields:
-
Title (SBCS)
-
SBCS
-
-
To display additional menu selections, choose Other Selections (F5).
-
After you enter single-byte menu text, run the Menu Word Search program from the Rebuilds & Global Updates (G9642) menu.
