34 Work with Menus

This chapter contains these topics:

Navigation

From Master Directory (G), choose Hidden Selection 27

From Advanced & Technical Operations (G9), choose Run Time Setup

From Run Time Setup (G90), choose Menus

From Menus (G901), choose Revisions

34.1 Creating a New Menu by Copying

To create a new menu by copying

  1. On Revisions, locate on an existing menu.

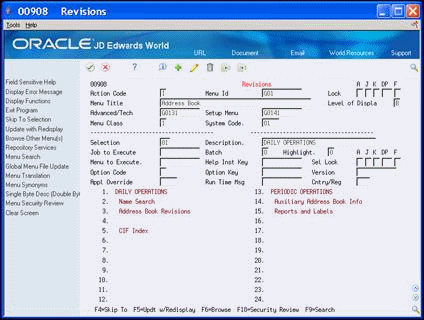
    Figure 34-1 Revisions (Copy) screen

    Description of Figure 34-1 follows
    Description of "Figure 34-1 Revisions (Copy) screen"

  2. Assign an unused menu ID and enter the new menu title in the Title field.

  3. Click Add.

Field Explanation
Menu ID The menu name which can be up to 9 characters. JD Edwards World Standards are:
  • Menu numbers are preceded with a G prefix.

  • The two characters following the prefix are the system code.

  • The next characters further identify the menu.

  • The 4th character specifies a specific skill level.

  • The 5th character is used to distinguish between two menus of the same system with the same skill level.

For example, the menu identification G0911 specifies the following:

G – Prefix

09 – System Code

1 – Display Level/Skill Level

1 – First menu

Screen-specific information

The percent menus are not required to follow the G naming convention but they are required to start with a %, for example %MONTHEND.

Lock Complete with a user-defined value. This field exists in the JD Edwards user profile and within each menu and menu selection. When security is active, the value of this field in the user profile is compared with the value in the corresponding menu lock. Comparison of the values in the user profile and the menu lock is hierarchical.

A blank represents the highest level of authority. A through Z are the next levels, then 0 though 9. The user's value must be greater than or equal to that of the menu lock in the corresponding menu field to access the menu.

NOTE: The Lock field is no longer used when Advanced Menu Security is activated.

Menu Title A text description of the menu.
Level of Display Designates the menu skill level. The display level appears under the time in the upper left corner of the current menu only if the menu skill level is greater than that of the user. The display levels are as follows:

A – Product Groups (for example, Job Cost, Manufacturing)

B – Major Products (for example, GL, AP)

1 – Basic Operations

2 – Intermediate Operations

3 – Advanced Operations

4 – Computer Operations

5 – Programmers

6 – Sr. Programmers

Advanced/Tech The advanced operation key is used to direct the menu selection '27' (Advanced Operations) to the appropriate menu.
Setup Menu The technical operations control key is used to direct the menu selection '29' (Technical Operations) to the appropriate menu.
Menu Class The menu classification indicates the type of a menu. For example, a JD Edwards World Master menu or Company Master menu.
System Code A user defined code (98/SY) that identifies a JD Edwards system.

34.2 Copying a Selection (Browse)

Use this procedure when creating custom menus to add new selections to existing menus in your menu file.

34.2.1 Before You Begin

  • Locate a menu or create a new menu.

To copy a selection from another menu

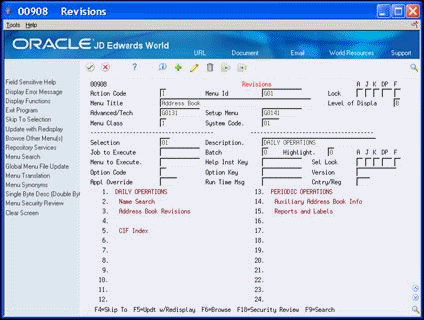
  1. On Revisions, enter a number in the Selection field and then choose Skip to Selection (F4) to advance to the selection you want the new selection copied into.

    Figure 34-2 Revisions (Copy a Selection) screen
    Description of Figure 34-2 follows
    Description of "Figure 34-2 Revisions (Copy a Selection) screen"

  2. Choose Browse Other Menus (F6). The Search window displays.

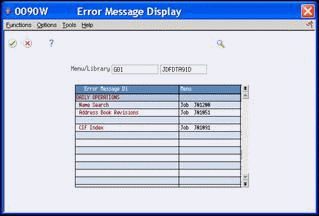
  3. On Revisions in the Menu ID field, enter the ID of the menu you want to copy the selection from. The selections for the menu appear on the Menu Information screen.

    Figure 34-3 Error Message Display screen

    Description of Figure 34-3 follows
    Description of "Figure 34-3 Error Message Display screen"

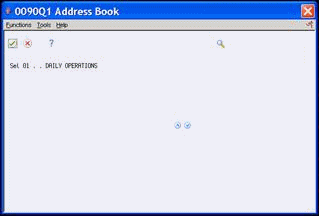
  4. To verify the full detail for each menu option, place the cursor next to a selection, and choose Skip to Selection (F4).

    Figure 34-4 Address Book screen

    Description of Figure 34-4 follows
    Description of "Figure 34-4 Address Book screen"

  5. Page up and page down to scroll through menu selections and detail.

  6. Click Exit (F3) to exit this screen.

  7. From Menu Information, enter 4 next to the selection you want to copy. The new parameters display for the selection on the Revisions screen.

  8. Make any changes you want to the new selection.

  9. Click Change.

Field Explanation
Selection Used to determine the order of menu items and allow them to be selected by this number.
Description Contains menu titles and menu selection descriptions.
Job to Execute The specific job or program number to run. JD Edwards never calls RPG programs directly from menus. Instead, all JD Edwards RPG programs are called through Control Language (CL) programs.

Screen-specific information

For column only versions, use J93410. For row versions, use J83500.

Batch This code designates the method of execution as follows:

0 – Interactive or Video

1 – Batch

2 – Delayed (Display a screen to gather information and submit to batch)

3 – Interactive with return value containing fast path menu instruction

If your menu selection is using the DREAM Writer AND it is a report:

  • Enter a code of 0 if you are NOT specifying a DREAM Writer version number. If version number is blank, the DREAM Writer Versions List is displayed. You can then submit a job to batch from this list. In addition, enter 0 if your menu selection is for an online program because online displays cannot be submitted to the batch.

  • Enter 1 if you are specifying a DREAM Writer version number.

  • Enter 2 if your menu selection displays a screen and then submits it to batch. A 2 displays a submitted-to-batch message.

Highlight Specifies whether the selection number or both the number and description are highlighted when entering menu selections. The selection number is normally set to high intensity when the selection is driven by processing options. The menu level field in User Information determines whether the menu selection highlights. The field values function as follows:

0 – Normal Intensity

1 – Selection number high intensity

2 – Selection number and description high intensity

Menu to Execute The specific menu to call as a selection on a menu. To call an IBM menu, use an ampersand '&' as a prefix; for example: &SUPPORT.
Help Inst Key The Help Start Key is used to cross-reference the menus to specific program help instructions. Typically, this key is simply the program number. It is always preceded with a P as in Program - never a J as in Job. This is the starting key for displaying help instructions for this item.
Sel Lock Complete with a user-defined value. This field exists in the JD Edwards user profile and within each menu and menu selection. When security is active, the value of this field in the user profile is compared with the value in the corresponding menu lock. Comparison of the values in the user profile and the menu lock is hierarchical.

A blank represents the highest level of authority. A through Z are the next levels, then 0 through 9. The user's value must be greater than or equal to that of the menu lock in the corresponding menu field to access the menu.

Option Code This code specifies the function of a menu selection using the DREAM Writer when F18 is pressed. F18 may be locked out by simply replacing code 1 with 3 or code 2 with 4. This code, in conjunction with the version number and the option key, provide the following functions:

Code

1 – version - mandatory; option key field - form ID. F18 displays processing options. Selection = blind DREAM Writer execution.

2 – version - blank option; option key field - form ID. F18 displays DREAM Writer versions list. Selection = DREAM Writer versions list.

2 – version - not blank; option key field - form ID. F18 displays DREAM Writer versions list. Selection = blind execution, batch.

Review the HELP instructions for Menu Information (Menu Locks) (P0082) for a detailed explanation of codes related to job submission and control.

Option Key The menu option key refers to the report version form ID. This ID is used either by this processing option or by the report version set up for the program being executed.

Screen-specific information

This field is form ID specific, such as GENERAL, JOB COST, and so on.

Version Version identifies a specific set of data selection and sequencing settings for the application. Version may be named using any combination of alpha and numeric characters. Versions that begin with 'XJDE' or 'ZDE' are set by JD Edwards.
Appl Override A code used to designate the reporting system number for entering specific text or "jargon". See User Defined Codes, system code '98', record type 'SY' for a list of valid values.
Run Time Msg Any run time message can be defined in the Data Dictionary. These messages serve as precautions to prevent the inadvertent execution of a job. Further, they can be used to draw correlations between one job and another. For example, a run time message might advise you of an excessively long run time, a particularly bulky report, or a prerequisite step to executing a job (for example, you must build the data cross reference file before you can do a Data Cross Reference Inquiry). An example of a run time message is "MENUMSG001", which has been defined in the Data Dictionary.
Cntry/Reg The Menu Country/Region Codes field contains the region code (3 bytes) for all 24 menu selections for each menu record. This region code is used to mask those international selections that are country specific; i.e. 1099 processing in the US and VAT tax processing in Europe.

34.2.2 What You Should Know About

Job to Execute field Description
Job to Execute field
  • JD Edwards World Jobs: All JD Edwards World jobs are CL programs that call an RPG program. CL programs begin with a J and are followed by the identifying ID of the program. For example, to call the Address Book Revisions P01051, enter J01051 in the Job to Execute field.
  • RPG Jobs - Enter an RPG job if it is your custom program.

  • IBM Menus - All IBM menu IDs must be preceded by the ampersand (&) sign. Example: To call the IBM Support Menu, enter &SUPPORT in the Job to Execute field.

  • Blank - If the Job to Execute field is left blank and you enter a description, it is considered a heading. When the menu displays, the description is highlighted and preceded by three periods.


34.2.3 Shortcuts and Procedures with Menu Selections

You can perform several actions when working with menu selections:

  • Advance to the appropriate menu selection

  • Add/change/delete selection information

  • Locate a Job ID for a menu or menu selection

  • Copy a selection to another menu

  • Rearrange selections

  • Highlight a selection

  • Delete a selection

34.3 Swapping Selections

To swap two selections

When swapping, always begin with the lowest menu option.

  1. On Revisions, advance to the first option you wish to swap.

  2. Key the selection number of the option you wish to swap with.

  3. Perform a change.

34.4 Deleting Selections

There are two ways to delete an individual menu selection. Complete the following tasks:

  • Delete selections using Method 1

  • Delete selections using Method 2

You can choose Menu Search (F9) to perform a menu search.

To delete selections using Method 1

  1. On Revisions, advance to the selection you want to delete.

  2. Blank out each item in the selection information.

  3. Perform a change.

To delete selections using Method 2

  1. On Revisions, advance to the selection you want to delete.

  2. Enter two asterisks (**) in the Selection field of the option you want to delete.

  3. Perform a change.

34.5 Translating Selections

You can translate any selections you need to. The system stores the translations individually in the Menu Selection Text (F0083) file.

To translate selections

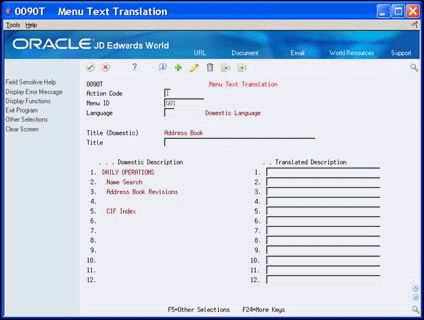
  1. On Revisions, choose Menu Translation (F15).

    Figure 34-5 Menu Text Translation screen

    Description of Figure 34-5 follows
    Description of "Figure 34-5 Menu Text Translation screen"

  2. If Menu Text Translation is not displaying the menu you want to translate, inquire on the menu ID that you want.

  3. Enter the language value in the Language field.

  4. If applicable, enter a title in the Title field.

  5. Enter the translated descriptions in the Translated Description fields for each selection you want to translate.

  6. Choose Other Selections (F5) to display the other twelve selections on the menu you are translating.

  7. Click Add.

  8. When you have finished translating the selections, choose Exit (F3) to return to Revisions.

34.6 Adding a New Menu

Avoid creating menus from scratch. It is much more efficient to copy an existing menu.

To add a new menu

  1. On Revisions, enter information into the following fields:

    • Display Level

    • Menu Class

    • Menu ID

    • Title

    • System Code

  2. If you want your menu to have selections, complete the selection information.

  3. Click Add.

34.7 Deleting the Entire Menu

To delete the entire menu

  1. On Revisions, locate the menu you want to delete.

  2. Choose Delete.

There is no confirmation on a delete.