19 Work with User Profiles
This chapter contains these topics:
19.1 Defining User Profiles
To define your user profiles for the JD Edwards World software, complete the following tasks:
-
Review the IBM user profile
-
Define JD Edwards World user profiles
To review the IBM User Profile
-
On the command line, enter DSPUSRPRF USRPRF(xxx), where xxx is a user profile. If you copy a JD Edwards user profile, you can use Function Key F8=IBM Profile from the Copy User/Group Security video. The IBM Display User Profile or Work with User Profiles screen displays.
-
Ensure that the Group profile field is JDE.
You must use *JOBCTL in the Special authority field if the user is compiling programs or manipulating the distribution or human resource subsystems. If the user has no need to use distribution or human resource subsystems, *NONE is acceptable.
-
Page down to view the next portion of Display User Profile.
Figure 19-2 Display User Profile (J98INITA) screen
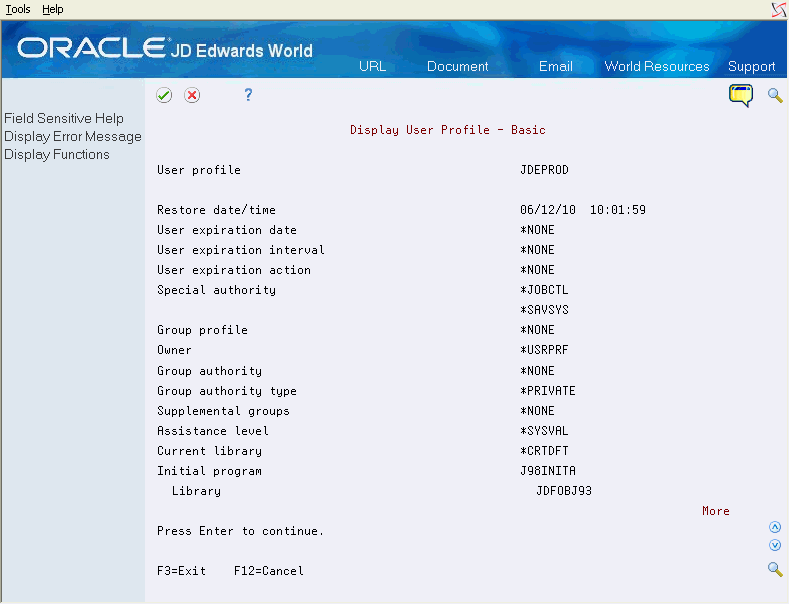
Description of "Figure 19-2 Display User Profile (J98INITA) screen"
-
Ensure that the Initial Program field is J98INITA, using the object library.
When the Limit Capabilities field is set to *YES on the IBM User Profile, it overrides a Y setting in the Allow Command Entry field in the User Information program (P0092N) on the Security Officer menu (G9401). This restricts the use of commands on the Command Line, Group Jobs, and in Software Versions Repository (SVR). It is recommended that you review all IBM user profiles that access JD Edwards World software. Set the Limit Capabilities field to *NO or *PARTIAL to allow the user to run commands from these options. If some users' profiles have the Limit Capabilities field set to *YES, then you can set up the system to allow them to execute certain commands by entering CHGCMD on the Command Line. For example, to allow users to execute the CHGOBJ command, enter CHGCMD CHGOBJ on the Command Line and then set the Allow Limit Users (ALWLMTUSR) field to *YES.
-
Page down to view the next portion of Display User Profile.
Figure 19-3 Display User Profile (Limit Capabilities) screen
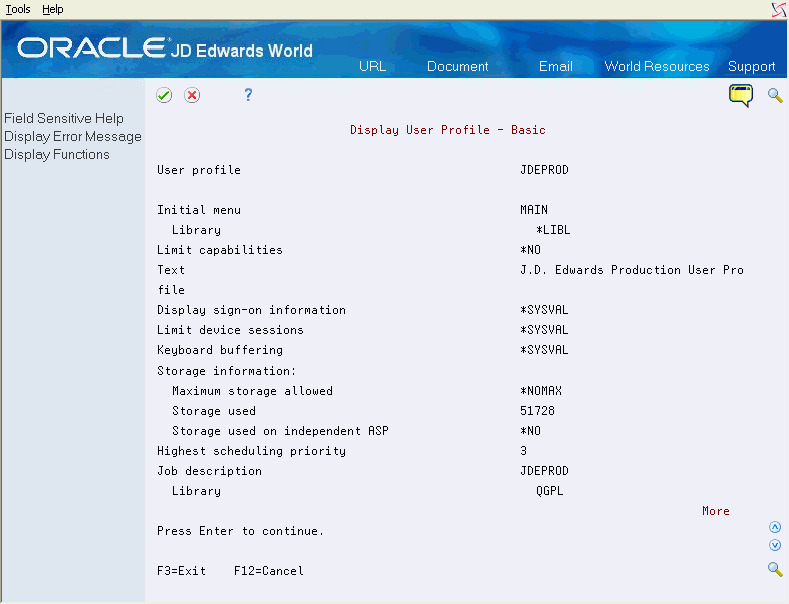
Description of "Figure 19-3 Display User Profile (Limit Capabilities) screen"
-
Page down to view the next portion of Display User Profile.
Figure 19-4 Display User Profile (Library) screen
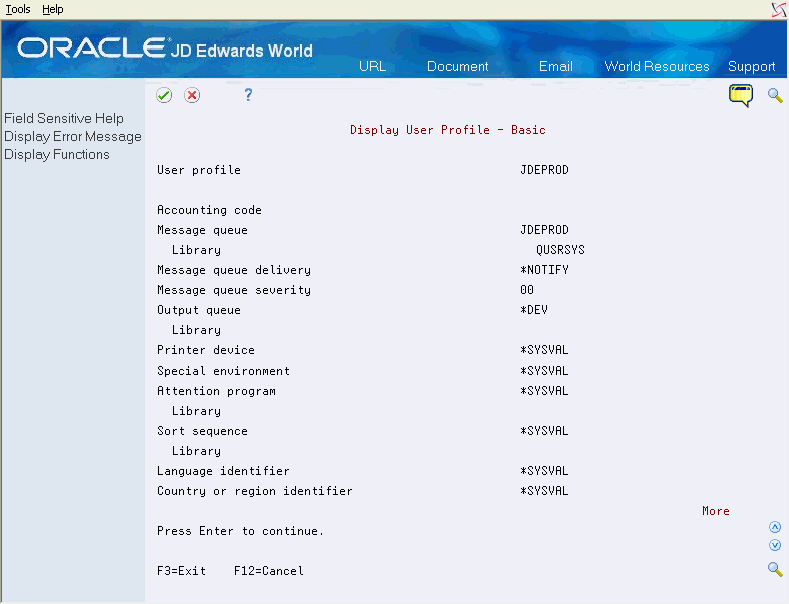
Description of "Figure 19-4 Display User Profile (Library) screen"
19.1.1 Required IBM Object Authority for Users
All users must have *USE authority to the following commands to function properly within JD Edwards World. The JDE profile has *USE authority. JD Edwards World recommends that you use JDE as the Group Profile on the user's IBM profile.
Use the DSPOBJAUT command to view the object authority.
| IBM Commands A - C | IBM Commands D - O | IBM Commands R - W |
|---|---|---|
| ALCOBJ
ADDJOBQE ADDLIBLE ADDMSGE ADDRTGE CHGJOBD CHGLIBL CHGOBJOWN CHGPGMVAR CRTDTAARA CRTJOBD CRTJOBQ CRTCLPGM CRTCLS CRTDSPF CRTDTAQ CRTLF CRTLIB CRTMSGF CRTMSGQ CRTPF CRTPRTF CRTRPGPGM CRTRPTPGM CRTSBSD CRTSRCPF |
DLCOBJ
DLTF DLTPGM DSPBKP DSPDBG DSPDBR DSPDEVD DSPFD DSPFFD DSPNETA DSPPGMVAR DSPSYSVAL DUPDKT ENDDBG INZDKT MONMSG MOVOBJ OVRDBF OVRDKTF OVRDSPF OVRPRTF |
RGZPFM
RMVBKP RMVLIBLE RSTLIB RSTOBJ RTVJOBA RTVMSG SAVLIB SAVOBJ SAVSYS SBMJOB SNDBRKMSG SNDMSG SNDPGMMSG STRDBG STRSBS STRSEU WRKCFGSTS |
Other objects include:
| Object | Type | Authority Required |
|---|---|---|
| QWCCLFEC
QGPL QADSPOBJ QAFDMBR |
*PGM
*LIB *FILE *FILE |
*USE
*USE, *OBJMGT, and *ADD *ALL *ALL |
To define JD Edwards World user profiles
From Master Directory (G), choose Hidden Selection 27
From Advanced & Technical Operations (G9), choose Security & System Admin
From Security & System Administration (G94), choose Security Officer
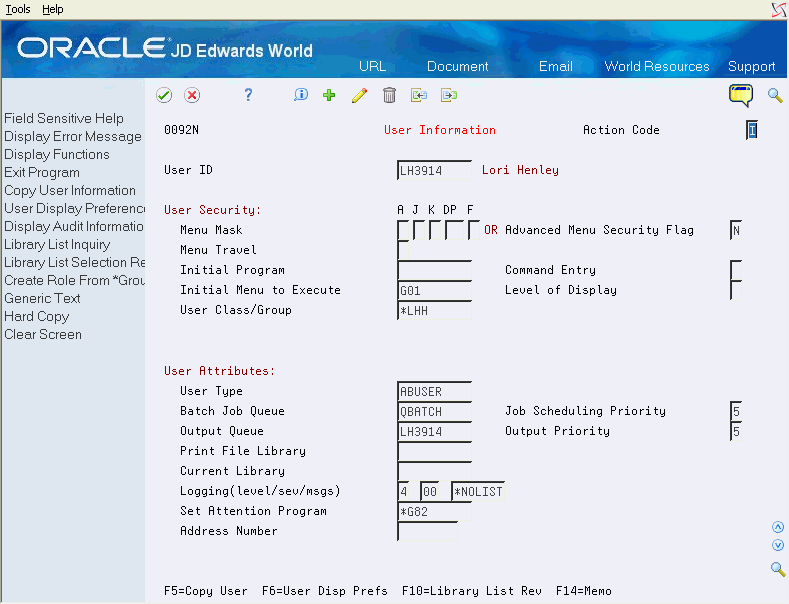
From Security Officer (G9401), choose User Information
Use the User Information screen to establish profile defaults for each user and their library list and establish JD Edwards World security at the user level.
-
After reading the menu message, press F6.
User Information Revisions displays.
A tag file, F0092T, stores the following information:
-
Description for a Group ID record
-
Advanced Menu Security Flag
Note that Fast Path field is no longer displayed on the screen, but still resides in the file for compatibility with JD Edwards World releases prior to A9.3
F5 – Copy User Information.
See Section 19.6, "Copying User/Group Security."
F8 – Display Audit Information Window is used to retrieve Audit information for a User Profile record.
F9 – Library List Inquiry is used to access the Library List Control Inquiry screen. Use this screen to view all of the libraries associated with a particular User Profile.
F14 – Allows you to input or view Generic Text.
-
-
Choose User Display Preferences (F6) to display language and display preferences at the User level. The User Display Pref Revisions screen displays.
Figure 19-6 User Display Pref Revisions screen
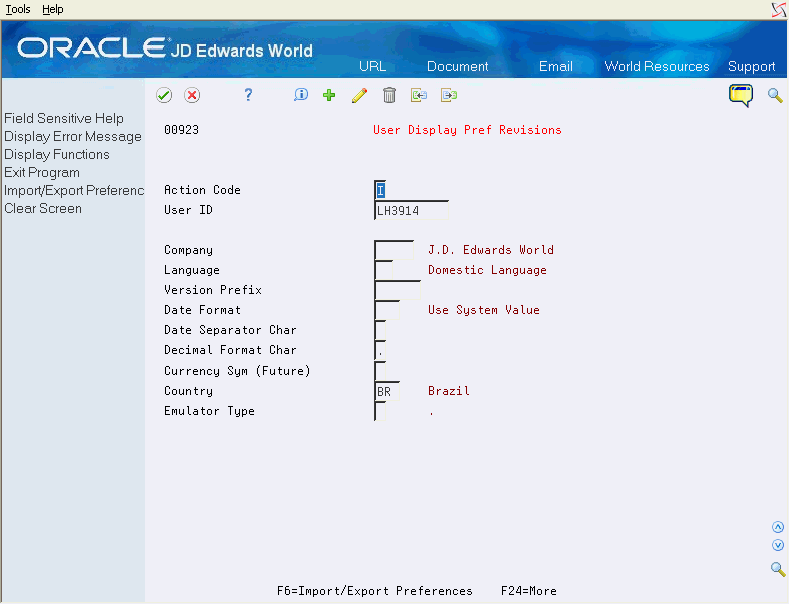
Description of "Figure 19-6 User Display Pref Revisions screen"
F6 – Import/Export Preferences: Use this function key to specify preferences at the User level for using Import/Export.
-
Press Enter to create your JD Edwards World user profile.
Note:
The program creates the user's job description with the same name as the user ID. Optionally, the program creates an output queue for the new user. If an output queue is created, it has the same name as the Uuer ID.-
If the user who is entering the profiles does not have authority for the CRTJOBD, CHGJOBD or DLTJOBD commands, the system issues a warning. However, the program adds the record to the User Information files (F0092 and F0092T), but does not create a job description for this user.
-
The program also creates the Inquiry Message Reply parameter for the user's job description to *SYSRPYL, to instruct the system to use the reply list entries.
-
19.2 Deleting a User or Group
The Delete User/Group Security program is a full delete program for JD Edwards user profiles and security records. You can delete either individual user profiles or group profiles. To do so, specify a 'D' in the Action Code field on the User Information screen.
When you delete a user or group profile, objects owned by that profile may be deleted, versions may be unlocked or the ownership of versions may be changed to another user or group. All security records coded to the user or group profile are deleted.
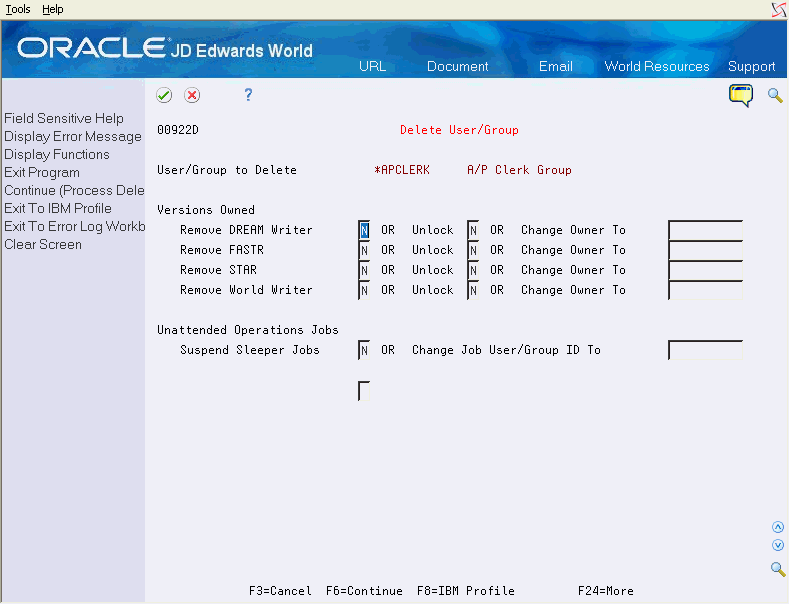
You can access Delete User/Group (P00922D) from User Information or from the Security Workbench. The calling program provides the user or group profile to be deleted. You fill in the parameters for how to disposition report versions etc.
If you are deleting an individual user profile, the IBM User Profile is not automatically deleted or deactivated by this program. To make changes to the IBM user profile, access the IBM 'Work with User Profiles' video.
The Delete User/Group screen enables you to specify the following information:
You can specify how you want report versions to be dispositioned when you delete a user or group profile:
-
Remove versions belonging to the User/Group profile
-
Unlock versions (set the User Exclusive Flag to 0)
-
Change ownership of versions to another User/Group profile
You can specify whether to suspend Sleeper jobs for this user or group or change the ownership to another user or group profile.
You can specify whether to delete an IBM output queue, if there is an output queue by that user profile name.
F6 - Continue - when the video parameters are ready, press F6 to process the delete. The delete will not be done until you press F6.
F8 - IBM Profile - if you are authorized, use this option to access the IBM 'Work with User Profiles' program to remove or deactivate the IBM User Profile.
19.3 Setting Up Your Initial Program (J98INITA)
From Advanced & Technical Operations (G9), choose Security & System Admin
From Security & System Administration (G94), choose Security Officer
From Security Officer (G9401), choose User Signon List Revisions
The J98INITA program is your access to the JD Edwards World software. Your users can receive a multiple environment list where they have a choice of which library list they want to set for the JD Edwards World software.
Using J98INITA allows you to:
-
Establish a library list once and then attach multiple users to it.
-
Create multiple environments where one user profile has a choice of multiple environments.
-
Transfer easily among your software environments.
For example, you can create a custom master menu to access JD Edwards World software, your company software, and other purchased software. You then exit JD Edwards World software and return to your custom master menu without redefining your environment.
The Library List Selection screen shows a sample selection of environments:
Figure 19-8 Library List Selection screen
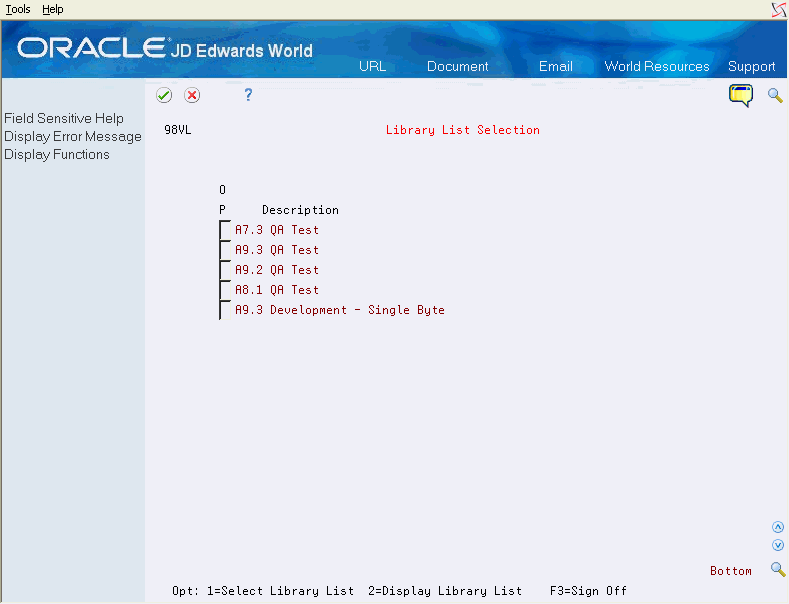
Description of "Figure 19-8 Library List Selection screen"
The Library List Selection screen displays immediately after sign-on or when the user takes hidden selection 30 from any JD Edwards World menu.
Starting with the IBM Operating System V5R1, there is a new data area, QLILMTLIBL, which resides in QUSRSYS library. The existence of this data area limits the number of libraries in the user part of the library list to 25 for all jobs on the system. Deleting or renaming this data area allows users to have up to 250 libraries in their user portion of the library list.
An additional data area was introduced with the V5R2 IBM Operating System, QLMTUSRLIB, exists with a 0 (zero) in the first position set, allowing up to 250 libraries in the user portion of the library list. Changing this value to a 1 restricts the number of libraries to 25.
The Library List Revisions program (P0094) searches the system to determine if the QLILMTLIBL data area exists. If it exists, the program then displays a maximum of 25 entry fields for libraries.
The screen below will display for a setup of a maximum of 250 libraries:
Figure 19-9 Library List Revisions screen
Description of "Figure 19-9 Library List Revisions screen"
If this data area does not exist, a maximum of 250 entry fields for libraries displays (as shown in the steps below).
If you intend to change the mode to 250 library lists, you need to delete or rename the data area QLILMTLIBL. If you are on V5R2 or above also verify that the first position in data area QLMTUSRLIB is set to '0' (zero).
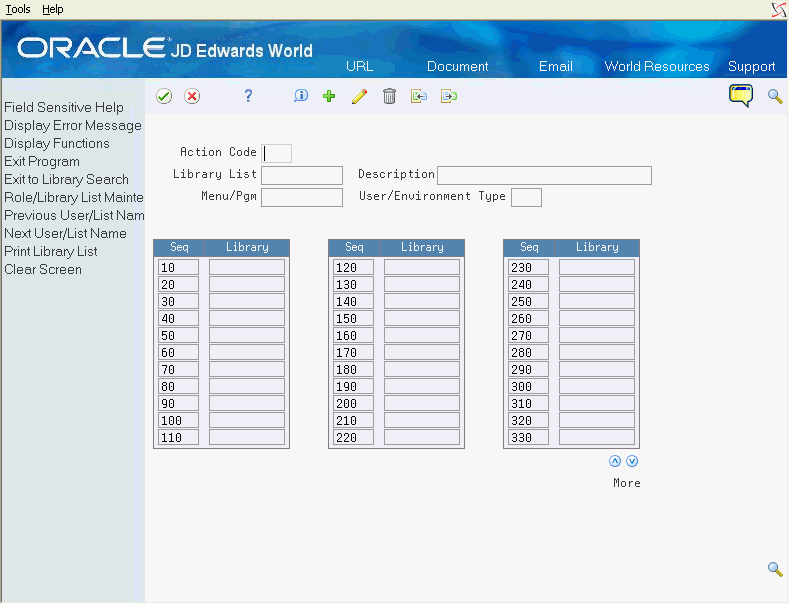
To set up the J98INITA program
-
On Library List Revisions, confirm that specific files are in the same library.
If you established a Security Library when creating your environments, this step should already be complete. If not, verify that F0092, F0092T, F00921, F0093, F0093T, F0094, F00944, F0095, F00926, F009261, F009262, F009264 and all associated logical files are in the same library.
-
Add each library list and establish the proper order of libraries for each library list. Ensure that QTEMP comes before QGPL in your library list.
-
After you make the appropriate entries, press Enter. Exit (F3) the program.
-
To assign the appropriate library list to each user, choose User Signon List Revisions from the Security Officer menu (G9401).
Figure 19-10 User Signon List Revisions screen
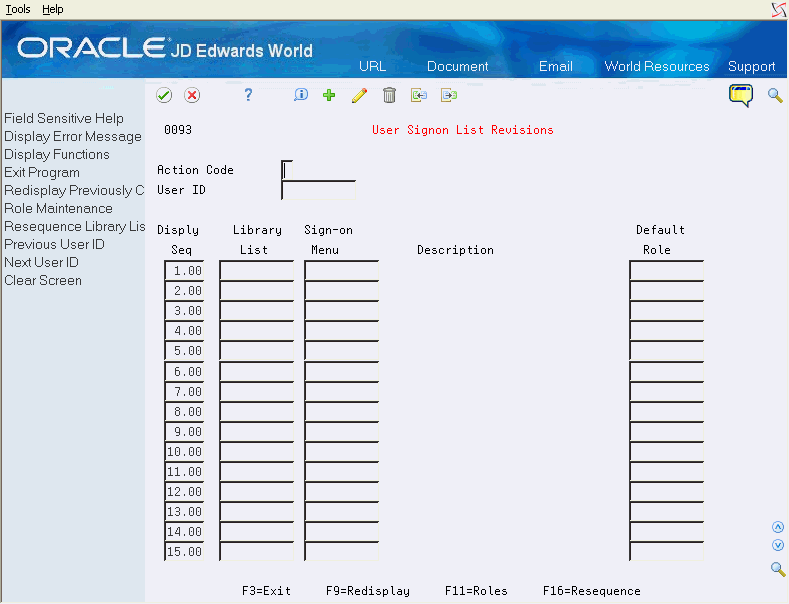
Description of "Figure 19-10 User Signon List Revisions screen"
-
Enter the library lists you want to allow the user to access and press Enter.
The Default Role for the User (if one exists) for each Library List is retrieved from the F0093T file and displayed.
F11 – Exit to the Role Maintenance screen.
F3 – To Exit the program.
19.3.1 What You Should Know About
| Topic | Description |
|---|---|
| J98INITA | Because J98INITA duplicates and changes the job description from QGPL to QTEMP, you must first authorize all users to the CRTDUPOBJ and the CHGJOBD commands.
For information regarding custom initial programs, see Appendix A, "Custom Initial Programs." |
19.4 Working with Library Lists
Based on your user setup, the JD Edwards World sign on process determines which libraries the system assigns to you during your user session. This set of libraries is known as a library list. The library list specifies which files, programs, videos, and so forth the system accesses first.
It is possible for two objects with the same name to exist in different libraries in the library list. The system searches the libraries in the order set in the library list (top to bottom). You can control which objects the system uses by changing the order of the libraries in the list or by deleting or adding libraries to the list.
For example, the library list can contain two versions of a program, the standard JD Edwards World program and a custom version. These programs have the same name, such as P42565, but the custom version resides in a custom object library. The custom object library is higher in the library list than the JDFOBJ object library containing the standard program from JD Edwards World. When you select the program, the system searches the library list and retrieves the first occurrence, which is the custom program because it is higher in the list.
You can use the following commands to work with library lists:
DSPLIBL - Display Library List: Use this command to determine a user's library list and/or to investigate whether there is a custom library in the list. On the Command Line, enter DSPLIBL. Hidden Selection 38 also executes this command.
ADDLIBLE - Add Library List Entry: Use this command to add a library to the user portion of the library list. On the Command Line, enter ADDLIBLE libname, where libname is the name of the library you want to add. The system adds the library at the top of the list and it remains here until you remove it or until you sign off. Using F4, the List Position field allows you to set the library in the first or last position of your library list.
RMVLIBLE - Remove Library List Entry: Use this command to remove a library from the user portion of the library list. You can also use this command to temporarily remove a library, such as a custom object library, that is normally in the library list when a user logs on. On the Command Line, enter RMVLIBLE libname, where libname is the name of the library you want to remove. Your changes are only effective for the current session and the libraries are available the next time you sign on to the system.
EDTLIBL - Edit Library List: Use this command to edit the current user portion of the library list. You can move, add, or delete libraries from the list. On the Command Line, enter EDTLIBL. All the libraries and their sequence numbers display. To change the position of a library in the list, enter a new sequence number over the current number. To add a library, enter the library name and the sequence number. To remove a library, clear the library name. Your changes are only effective for the current session and do not exist the next time you sign on to the system.
19.4.1 Objects to Exclude from the Mirroring Process
When mirroring from one IBM i to another, you must exclude the following JD Edwards World objects. Failure to do so will result in issues after you sign on to the mirroring machine.
| Area | Objects |
|---|---|
| Data Areas | JDEDT1
JDEDT2 QJDF |
| User Indexes | JD Edwards World_IDX_1
JD Edwards World_IDX_2 JD Edwards World_IDX_3 JD Edwards World_IDX_4 JD Edwards World_IDX_5 JD Edwards World_IDX_6 |
| Programs | X98UBP
X0001M |
| Libraries | SEALMS |
| Files | F99LSF |
19.4.2 Working With Invalid Library List or Library List Not Set Correctly Error Messages
To work with invalid library list or library list not set correctly error messages
-
On the Command Line, enter DSPUSRPRF and a user profile, to display the IBM user profile.
-
Page down and verify the Initial Program field contains J98INITA.
If the Initial Program field does not display either of these programs, determine which program the system is using.
-
Identify the name of the library in the Library field from which the system is calling the J98INITA program.
The library name is in the Library field below the Initial Program field. This is the library from which the system reads the QJDF data area.
-
On the Command Line, enter DSPDTAARA and the press F4.
-
On Display Data Area, enter QJDF in the following field:
-
Data area
-
-
Enter the name of the library in the Library field that you identified in the previous step and press Enter.
The Display Data Area screen redisplays with QJDF data area.
-
Identify the name of the library at the end of Offset line 150 Software Data File Library.
-
Verify this is the correct library for the User Information (F0092) file.
This library is usually the Security library or the Common library if you do not have a Security library.
-
On the Command Line, enter DSPPFM and the press F4.
-
On Display Physical File Member, enter F0092 in the following field.
-
File
-
-
Enter the name of the library in the Library field that you identified in the previous step.
-
On Display Physical File Member, enter the user profile in the Find field to locate the user profile and press F4.
If the system does not find the user profile in the F0092 file, add the record to the file. You can use Hidden Selection 40 to verify the file layout.
-
Verify that there is an IBM Job Description for the user profile.
If no Job Description exists for the user profile, you must create one.
-
On the Command Line, enter CHGJOBD and press F4.
On Change Job Description, the value in the Job description field is the user name of the profile you are confirming. The library is QGPL.
-
On Change Job Description, press Enter to display the job description.
-
Press F10 for Additional Parameters.
-
Page down and locate the value in the Initial library list field. The value should be *NONE or the library list in this filed should not contain access JD Edwards World Software.
-
Verify the following:
-
Access the User Signon List Revisions program on the Security Officer menu (G9401) to confirm the library lists for the user. Access the Library List Revisions program on the Security Officer menu (G9401) to review the list of libraries for each library list the user has.
-
When J98INITA is the initial program, you might receive either of the following messages when you attempt to sign on to a JD Edwards World environment:
19.5 Setting Up Pre-Open Files
The pre-open of database files for users at time of sign-on is a performance consideration. How often do your users sign-on and -off? Will this process of pre-opens be utilized in such a nature to help or hinder performance?
You need to look at pre-opens like a house full of doors. You open the front door and that opens all the doors in the house, so as when you go room to room, you do not have to stop to open each of the doors. However, if you leave all the doors opened in the house and you don't go into those rooms, you are losing energy. The pre-open data base files and the computer are similar in nature to the doors in the house.
Different categories of users use different groups of files. You can define a User Type at the individual User level or associate a User Type with a Role. To assist you in determining these common user categories, as sample list of User Types has been provided in the F0095 file in JDFDATA. This includes the following profiles:
| Profile | Description |
|---|---|
| ABENTRY | Maintains People, Places, and Things (Address Book) |
| ABUSER | ABENTRY plus DREAM Writer reporting |
| APREVW | Accounts Payable Review, Name Search, Supplier Inquiry, DREAM Writer |
| APENTRY | Accounts Payable Entry, Name Search, Inquiry, Voucher Entry |
| APSUPR | Accounts Payable Supervisor, APENTRY plus Speed Release, Checks, and DW |
| ARREVW | Accounts Receivable Review, Name Search, Customer Inquiry, DREAM Writer |
| ARENTRY | Accounts Receivable Entry, Name Search, Inquiry, Invoice Entry, Cash Rcpts |
| ARSUPR | Accounts Receivable Supervisor, ARENTRY plus Online Journal Review |
| GLREVW | General Ledger Review, Online T/Bs, G/Ls, Budget Compare, DREAM Writer |
| GLENTRY | General Ledger Entry, Journal Entry functions |
| GLSUPR | General Ledger Supervisor, GLENTRY plus Business Unit, Acct Master, and DW |
| INVENTORY | Inventory system profile |
| SALES | Order processing profile |
| PURCHASING | Purchasing system profile |
From System Administration menu (G944), you can also access:
-
Valid Library Lists, which provides an inquiry, list of currently defined library lists, and their descriptions.
-
Library List Users, which lets you view all users for a particular library.
-
Library List Global Update, which provides a program to allow mass changes to library lists in both the User Profile (F0092) file and the Master Library List (F0094) file.
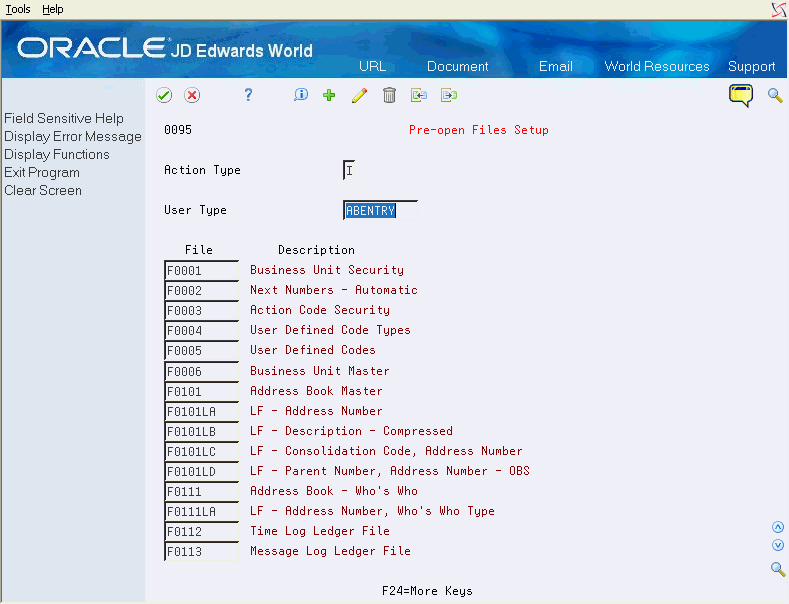
From Advanced & Technical Operations (G9), choose Security & System Admin
From Security & System Administration (G94), choose Security Administration
From System Administration (G944), choose Pre-open Files Setup
-
On Pre-open Files Setup, set up the lists of files you want the system to open.
-
Enter the name of the list on the User Information screen.
-
Exit (F3) the program.
-
From Security Officer (G9401), choose User Information.
Figure 19-12 User Information (Security Officer) screen
Description of "Figure 19-12 User Information (Security Officer) screen"
-
For each end user, enter the name of the list in the User Type field.
-
Exit (F3) the program.
JD Edwards World also gives you a set of pre-defined files for use in the pre-opens. If you access HELP through F24, you see the ones identified for your use.
Use these lists as starting points for creating your own lists.
Note:
Use a user type of *SYS to set up files opened for every user.
19.6 Copying User/Group Security
The Copy User/Group Security program (P00922C) provides full copy capability for JD Edwards user profiles and security records. You can copy either individual user profiles or group profiles, as well as all or selected parts of the 'From' profile and the 'From' profile's security setup. If you are authorized, you can access programs where you can setup IBM User Profiles and Address Book records.
You access Copy User/Group Security by pressing F5 on User Information or by selecting option 3 on a user or group subfile record on Security Workbench.
Figure 19-13 Copy User/Group Security screen
Description of "Figure 19-13 Copy User/Group Security screen"
When you access Copy User/Group Security, the 'From' profile is populated from the calling program. Complete the 'To' Profile field and select the security types that you want to copy. You must copy from individual users to individual users and from groups to groups.
If you are copying an individual user profile, the 'To' profile must already have an IBM user profile. If you are copying a group profile, no IBM user profile is needed, and you can enter a descriptive name for the group profile.
You can override the following user attributes that are derived from the 'From' user profile:
-
Allow Menu Travel: Only available when you copy a user
-
Allow Command Entry: Only available when you copy a user
-
Level of Display
-
Advanced Menu Security: Only available when you copy a user
You can specify whether to copy the following types of security information from the 'From' user's security records:
-
Role membership
-
Menu security
-
Business unit security
-
Action code security
-
Name search security
-
Batch approval security
-
Report form security
-
Generic text security
-
Function code security
-
UDC security
-
Fast path security
-
File/field security
The program provides the following additional selections for copying user profile and security records:
-
Copy User Display Preferences: This selection is available only for copying a user.
-
Create Output Queue: If you create an output queue for the 'To' user, the Output Queue will be the same name as the 'To' User Profile. This selection is available only for copying a user.
-
User Address Number: This is the 'To' user's address book number.
-
User Default IFS: This selection enables you to specify a default IFS folder for the 'To' user.
The following function keys are available on the screen:
-
F2 - Long Name: Use this function key to access a video that displays the full length available for the user default IFS path.
-
F4 - IFS Path: Use this function key to access a video that displays the IFS directory structure to find or create the IFS Folder to use for the 'To' Profile.
-
F6 - Continue: Use this function key to a start the actual copy process when the video parameters are ready. The system does not copy the information until you press F6.
-
F8 - IBM Profile: If you are authorized, use this function key to access the IBM 'Work with User Profiles' program to view or set up the IBM user profile if needed.
-
F10 - Default Locations: Use this function key to access the Default Locations video (V400951) to set up a default branch/plant for the 'To' user profile if needed.
-
F11 - Address Book: Use this function key to access the Address Book Addition window (V01AB) to set up a new address book record for the 'To' user profile if needed.
19.6.1 DREAM Writer Considerations
DREAM Writer provides processing options for the Copy User/Group Security program to control how this program functions.
-
User Default IFS: Enter '1' to automatically populate the 'User Default IFS' field. The default value is set to 'HOME/' + TO user ID. The default value automatically populate the User Default IFS Folder field in the copy parameters video. The User Default IFS folder requires that you copy the user display preferences.
-
Output Queue: Enter 1' to allow the creation of a new output queue with the name of the user ID being created. If you leave this processing option blank, the default value for the output queue is the user ID being copied.
-
Employee Search Type: Use this processing option to specify the search type to write on address book records entered for the 'To' User. The default value is E (Employees).
19.6.2 Technical Considerations
When you copy a user profile, the copy program ensures that the 'To' user has the same security setup as the 'From' user. Therefore, for every security type, any pre-existing security records for the 'To' user are removed before the copy.
The default IFS folder is part of the user display preferences. If you set up a default IFS folder for the 'To' user profile, the system also sets up a User Display Preferences record, which is either copied from the 'From' user or set up with defaults.