1 European Sales List (ESL)
This chapter contains the following topics:
-
Section 1.2, "Setting Up Transaction Types and Credit Memos Document Types,"
-
Section 1.3, "Setting up the Tax Area and Transactions Types Process,"
1.1 Understanding EU Sales List
The European Council's '2010 VAT Package' agreement contains substantial changes that relate tax assessment on B2B cross-border services to the place of supply and establish new rules on cross-border VAT refunds. The primary aim of the adopted changes is to levy VAT at the actual place of consumption of the services.
The 2010 VAT Package introduces a new report to be created by EU companies, namely the European Community Sales Listing (ECSL) for Services.
Some EU countries require companies to submit a European Community Sales List (ECSL or ESL) for Goods, some for Services, and some countries require both.
The solution for JD Edwards World will generate a generic European Sales Listing (ESL) for Goods and Services according to the definitions of EU authorities. The generic template for the ESL can then be adapted by the users in each country as needed.
The steps to generate the ESL are:
-
Run a generic extract of all required data into workfiles.
-
From workfiles, publish either of two reports using Oracle BI Publisher:
|
Note: Oracle BI Publisher can publish the output in many different formats, including PDF, HTML, XML, Word and Excel. |
1.2 Setting Up Transaction Types and Credit Memos Document Types
Access the Menu EU VAT Package- European Sale List - G7403
Figure 1-1 EU VAT Package - European Sales List screen
Description of "Figure 1-1 EU VAT Package - European Sales List screen"
-
Access the Transaction Types screen.
Figure 1-2 General User Defined Codes (ESL Transaction Type) screen
Description of "Figure 1-2 General User Defined Codes (ESL Transaction Type) screen"
The UDC 74/VT, Transaction Type, will be used to identify Transaction Types for the ESL Reports. The code is Hard Coded inside the program.
-
In the Description 2 field, enter the Indicator Codes to print on the report. In the above example, the letter L will print on the ESL beside all transactions for goods. These codes vary by country. Consult your country's fiscal authority for the correct codes.
To set up credit memos document types
-
Access the Credit Memos Document Types screen.
Figure 1-3 Credit Memos Document Types screen
Description of "Figure 1-3 Credit Memos Document Types screen"
UDC 74/CM, ESL Credit Memos, is used to identity Credit Memos that print on the report in the Adjustments column.
-
In the Code field, enter the Document Type that will identify transactions as Credit Memos.
To set up tax area and transaction type
-
Access the Tax Area and Transaction Type screen.
Figure 1-4 Tax Area and Transaction Type screen
Description of "Figure 1-4 Tax Area and Transaction Type screen"
To identify the transactions for the report, a new Set Up based on Tax Areas will be defined. Only the tax areas entered to this new application will be considered by the EU ESL VAT process.
-
In the Tax Area field, enter the tax area. This value must be in the Tax Rates & Areas Standard Set Up.
-
In the Transaction Type field, enter the code that will be used for classifying transactions to be included in ESL-European Sales List Report. These codes represent Goods, Goods with Triangulations and Services. The value must be in the UDC 74/VT.
-
G=Goods
-
S=Services
-
GT=Triangulation Goods
Triangulation occurs for Goods transactions when a company in one EU-member country makes a sale or purchase with a company in another EU-member country and the goods are physically shipped from a third EU-member country.
-
1.2.1 Definitions
Documents must be totally of Services or totally of Goods. All invoices linked to a Credit Memo for a single Receipt must be in the same Reporting Period.
The Document Type set up in UDC 74/CM is the unique Credit Memo that will be printed in the Adjustments column of the European Sales List.
An Out of Period Adjustment is associated with Invoices of a period that is previous to the current Reporting Period. The G/L Date will be considered to select the transaction records.
Business-to-Business Transactions
Both participants must be defined in Address Book Master as Companies and with VAT Id.
Records are included if the transactions are between EU Countries. See UDC 00/CN (Country Codes) and UDC 74/ EC (European Community Members).
1.3 Setting up the Tax Area and Transactions Types Process
This program is based on the VAT tax file (F0018). All VAT information from customers for a selected Taxpayer Company is recorded in detail. The reporting Period defines the period in which the transactions were posted.
The Intra-Community Vat amount is registered in a segment that must have previously been set up in the Tax Areas definition. There are five segments available. The Vat information is stored in only one segment.
For AR Transactions to be selected from VAT Tax file (F0018) and included on the ESL- European Sales List, the transactions must be:
Transaction participants are:
-
First Party (Taxpayer): The supplier company, who is responsible to submit the ESL to the fiscal authority
-
Third Party (Customer): The customer company; the buyer of the goods/services.
Transactions must occur between companies. The sales to Individual persons, consumers or entities without VAT ID will not be included. This means that the value of Person/Corporation Code must be 2 or blank for each participant.
1.4 Setting up the Workfiles Generation Process
Access the menu G7403 and Select option 7 Workfiles Generation Process.
This program will process transactions that exist in the VAT Tax file (F0018) and will generate the workfiles corresponding to Header, Summary and Detail Information. The workfiles are used by the BI Publisher application to print the ESL Summary and Detail Reports.
The program works in the following way:
-
It processes the F0018 transactions according to the Set Up and the User Selections for a Reporting Period.
-
At the beginning of process, workfile records are purged depending on specification in the Processing Option 'Workfiles Purge'.
To execute the workfiles generation program
|
Note: The program works with a set of Processing Options. The values entered will be validated and if any errors are found, the error report section will be printed and the process will stop. |
1.5 Setting up the Oracle BI Publisher
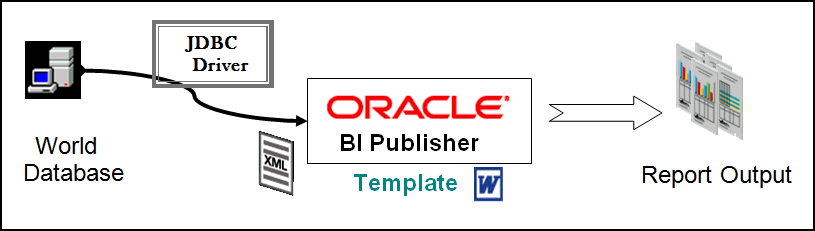
BI Publisher and the JDBC driver for World are used to print the reports from the workfiles. Customers are already licensed for BI Publisher and the JDBC driver.
BI Publisher installs on a windows or Linux server.
For information on how to install and setup BI Publisher, sign in to MyOracleSupport (https://support.oracle.com) and search for Document ID 789078.1.
1.5.1 Understanding BI Publisher
BI Publisher is Oracle's operational reporting solution. It provides a flexible report designer to allow creation and modification of report templates and a connection to the JD Edwards World database through a JDBC driver. BI Publisher allows the report text to be translated and the format to be modified by an end-user. Graphics such as a logo or a signature can be added easily.
This section provides:
-
The names of the 2 Templates for the EU Sales List Reports: Detail Report and Summary Report. The templates are included in the downloadable update for the EU Sales List.
-
The SQL statements used in BI Publisher to extract data from JD Edwards World.
-
Steps to define the reports in BI Publisher.
-
An example of the Detail Report and of the Summary Report.
1.5.3 SQL Statements
Select f740300.e0txt1, f740300.e0ctr, f740300.e0dl01, f740300.e0eftj, f740300.e0tax, f740300.e0efdj, f740300.e0alph, f740300.e0dl03, f740300.e0add1, f740300.e0add2, f740300.e0add3, f740300.e0add4, f740300.e0adds, f740300.e0cty1, f740300.e0addz, f740300.e0dl02, f740300.e0dl04,f740310.e2ctr, f740310.e2tax, f0101.abalph, f740310.e2iadm, f740310.e2oadm, f740310.e2tnyp, f740310.e2trrc from f740300, f740310, f0101 where (f740300.e0fco =f740310.e2fco) and (f740310.e2an8=f0101.aban8) Order by F740310.e2ctr, f740310.e2an8, f740310.e2tnyp
SQLs for the Detail Report (Three SQL Statements are Required)
Select f740300.e0txt1, f740300.e0ctr, f740300.e0dl01, f740300.e0eftj, f740300.e0tax, f740300.e0efdj, f740300.e0alph, f740300.e0dl03, f740300.e0add1, f740300.e0add2, f740300.e0add3, f740300.e0add4, f740300.e0adds, f740300.e0cty1, f740300.e0addz, f740300.e0dl02, f740300.e0dl04 from f740300
Select f740311.e3fco, f740311.e3doc, f740311.e3dct, f740311.e3kco, f740311.e3ctr, f740311.e3tax, f0101.abalph, f740311.e3tnyp, f740311.e3kco, f740311.e3dct, f740311.e3doc, f740311.e3divj, f740311.e3dgj, f740311.e3iafm, f740311.e3crcd, f740311.e3iadm from f0101, f740311 where (f740311.e3an8=f0101.aban8) order by f740311.e3ctr, f740311.e3an8, f740311.e3tnyp
Select f740312.e4fco, f740312.e4doc, f740312.e4dct, f740312.e4kco,f740312.e4okco, f740312.e4odct, f740312.e4odoc, f740312.e4divj, f740312.e4dgj from f740312
|
Note: The Templates and SQL statements are included in the corresponding downloadable update for the EU Sales List |
To define BI Publisher reports
Access the Admin tab
Access the JDBC tab
Select "Add Data Source"
-
Download and install BI Publisher and the JDBC Driver for World before continuing with these steps.
-
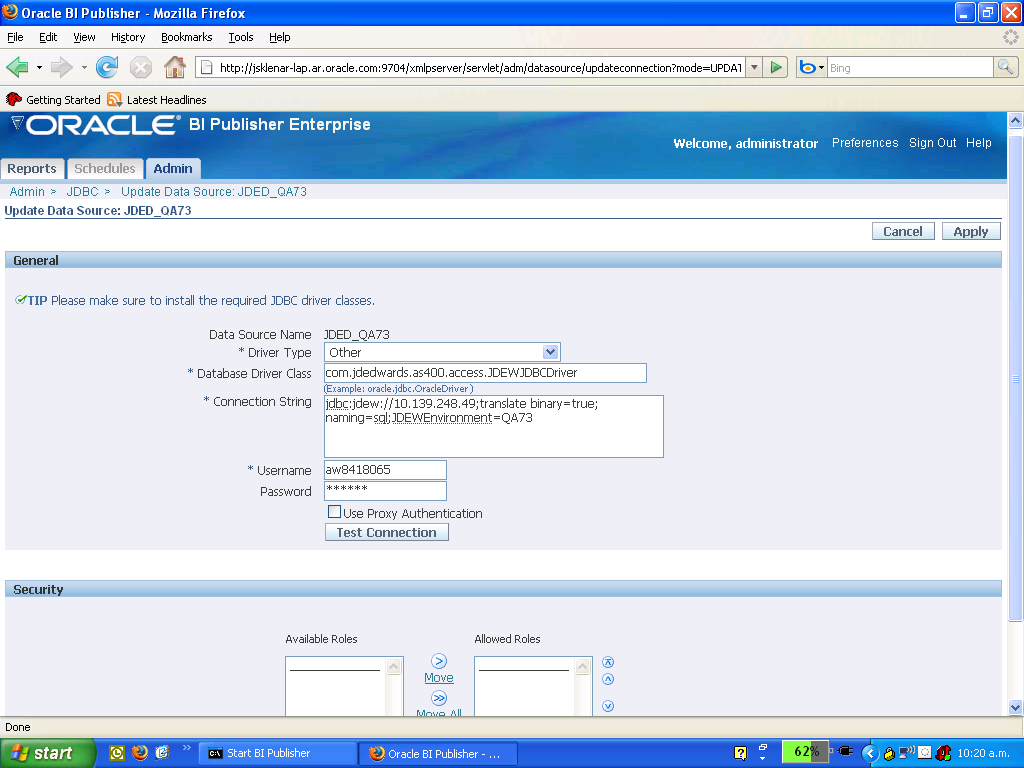
Sign into BI Publisher and define the JDBC connection
Connection String: Referring to the example above, replace the value, 10.130.248.49, with the IP Address of your System i. Replace the value QA73 with your Environment name according to your user's Library List (G944 / 2)
For more information, see the User Guide that accompanies the JDBC Driver for JD Edwards World.
-
Summary Report
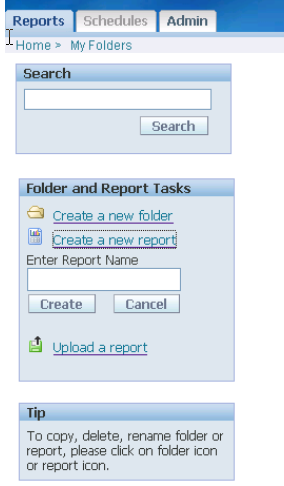
On the Reports tab, choose "Create a new report."
Then, 'Edit' your report. Verify that the Default Data Source is the JDBC connection that you defined in Step 2. Choose "Data Model" and then "New."
-
For the Summary report, copy the SQL for the Summary report. Paste it into the SQL Query window in BI Publisher. Click "Save."
Figure 1-9 SQL Query (Summary Report) screen
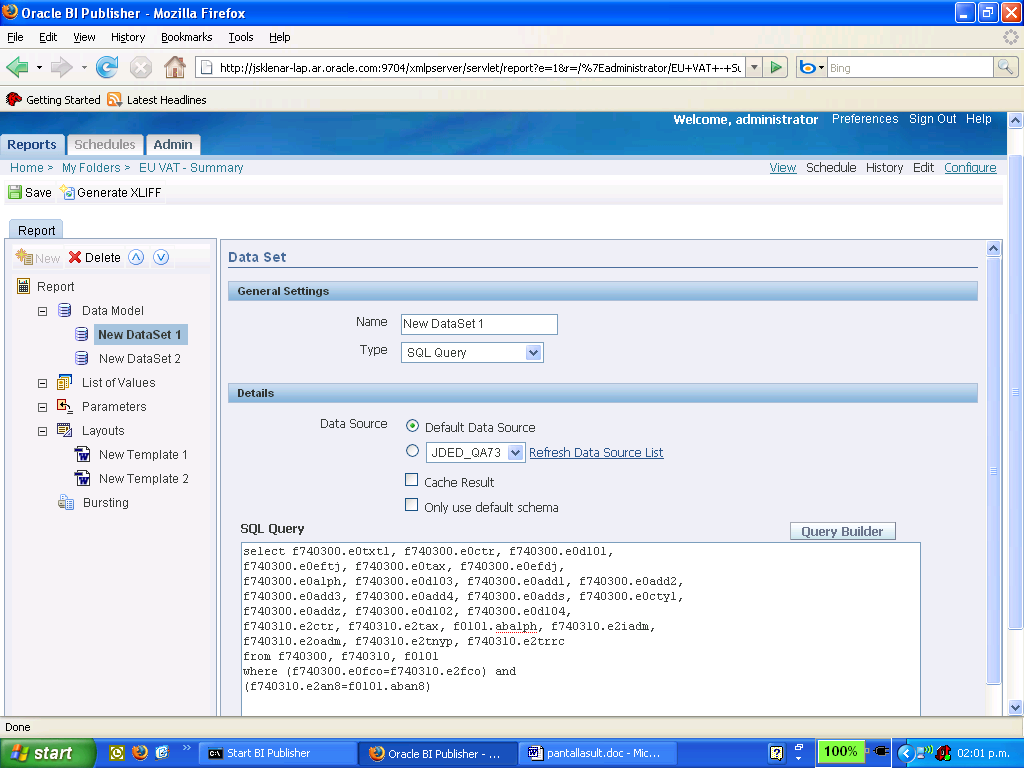
Description of "Figure 1-9 SQL Query (Summary Report) screen"
-
Click the "View" link, and then the "View" button to verify that XML is generated by the SQL statement and the JDBC driver.
Figure 1-10 BI Publisher View Link screen

Description of "Figure 1-10 BI Publisher View Link screen"
-
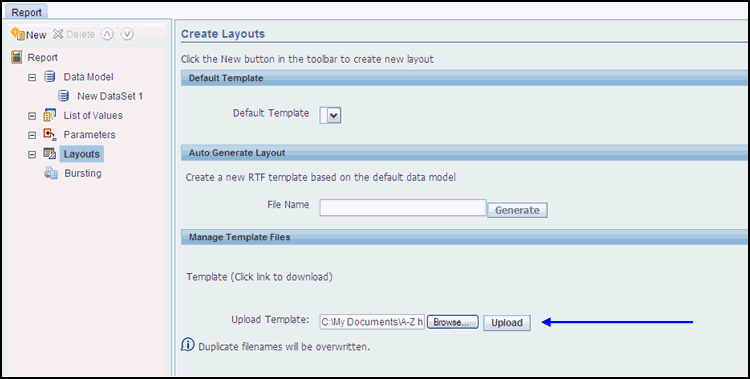
Click the "Edit" link to return. The next step is to upload the template for the report. Two templates were delivered with the JD Edwards World downloadable update. See page 10 for the names of each of the templates. Move both templates to your PC. Then, go to the Layouts section of the report, browse, and upload the template into BI Publisher as shown below.
-
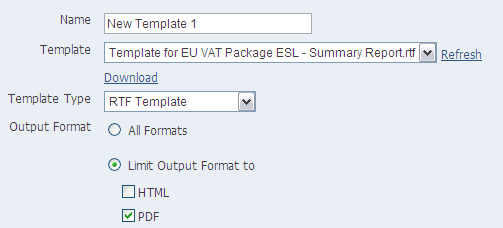
While still on the Layouts screen, click "New" to create a new layout. On this screen, you can click the check-box to Limit Output to PDF or you can choose any other format.
Figure 1-13 Reports Tab (New Layout) screen
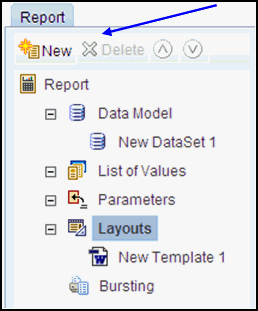
Description of "Figure 1-13 Reports Tab (New Layout) screen"
-
Click "Save."
-
Click the "View" link to view the report. The Export button allows you to download the report so that it can be sent to the fiscal authorities or printed.
-
From now on, the report can be scheduled or run as needed. Remember that the World workfiles must be refreshed for the report's data to change.
-
Detail Report:
The Detail report can be created in BI Publisher by following the same steps as the Summary report. Begin with step 3, but replace Step 4 with the instructions in Step 12, below.
-
The Detail Report requires three SQL statements. You must create three New Data Sets (1, 2 and 3) inside the Data Model.
On the first new Data Set, copy the first of the SQL statements, and paste it into the SQL Query window, as shown below. Click "Save."
To create the second data set, click "Data Model" and then click "New." Copy the second SQL statement for the Detail report and paste it into the SQL Query window, as shown below. Click "Save."
Figure 1-15 SQL Query (Second Data Set) screen
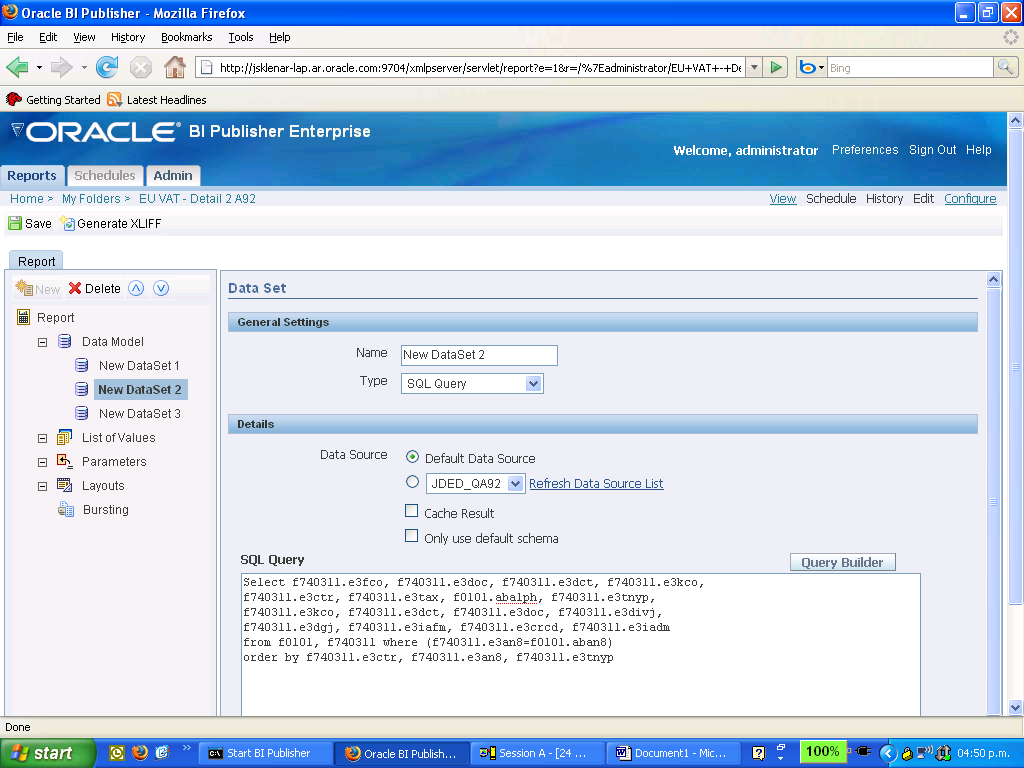
Description of "Figure 1-15 SQL Query (Second Data Set) screen "
To create the third data set, click "Data Model" and then click "New." Copy the third SQL statement for the Detail report and paste it into the SQL Query window, as shown below. Click "Save."
Figure 1-16 SQL Qeury (Third Data Set) screen
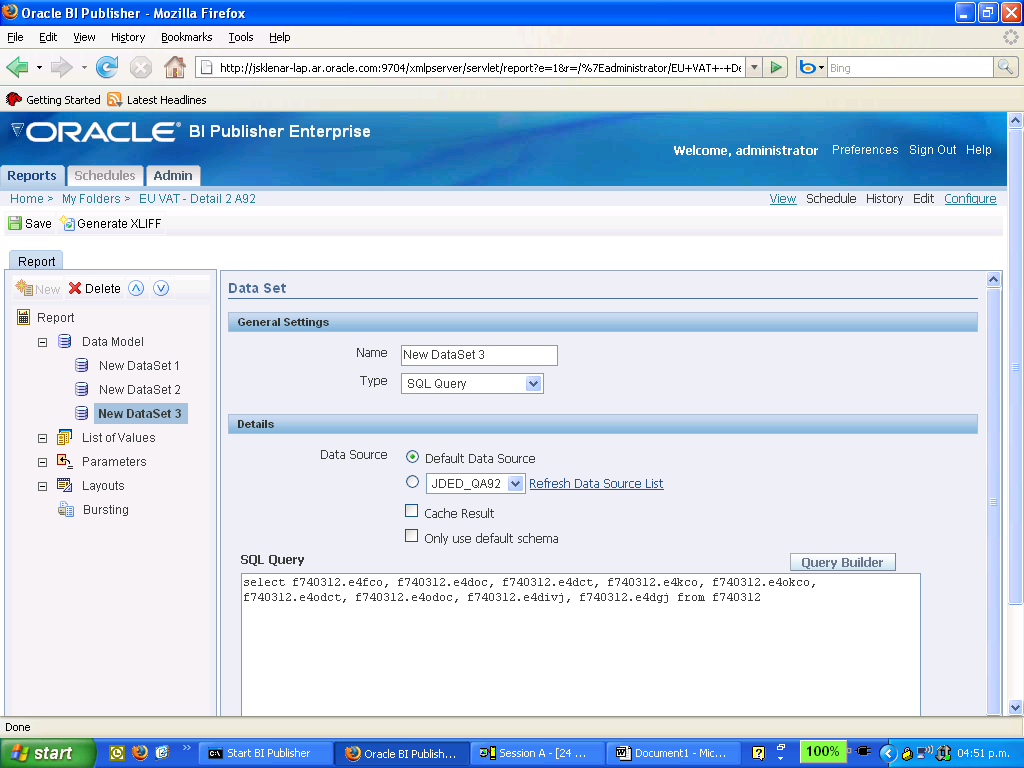
Description of "Figure 1-16 SQL Qeury (Third Data Set) screen"
-
Click on "Data Model" and then click the drop-down arrow beside "Main Data Set." Choose "Concatenated SQL Data Source." Click "Save."
Figure 1-17 Create Data Sets (Concatenated) screen
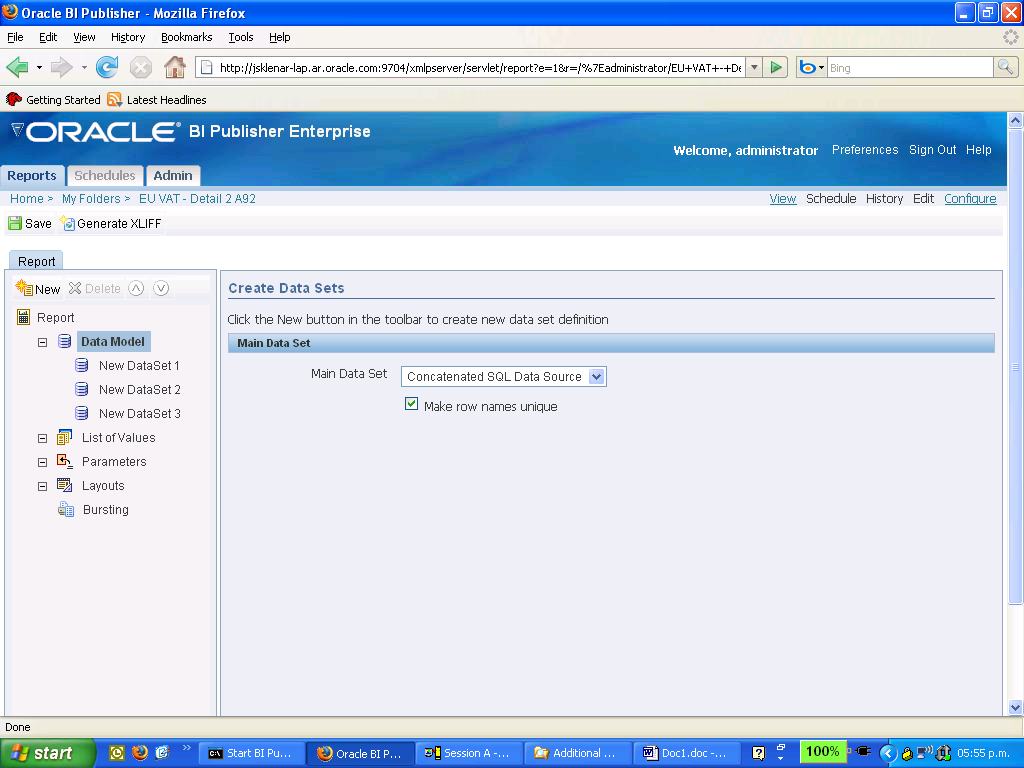
Description of "Figure 1-17 Create Data Sets (Concatenated) screen"
-
Complete the report by following steps 5-10 to upload the template for the Detail report and run it.
1.5.4 Example of the Summary Report
Figure 1-18 VAT European Sales List Summary report
Description of "Figure 1-18 VAT European Sales List Summary report"
1.5.5 Example of the Detail Report
Figure 1-19 VAT European Sales List Detail report (1 of 2)
Description of "Figure 1-19 VAT European Sales List Detail report (1 of 2)"
Figure 1-20 VAT European Sales List Detail report (2 of 2)
Description of "Figure 1-20 VAT European Sales List Detail report (2 of 2)"