Creating Update Profiles
An update profile defines the component configuration of the systems that you want to manage. Update profiles specify which components are to be installed and which are prohibited, and any additional actions to be performed on an Oracle Solaris or Linux OS.
Use profiles to accomplish the following:
-
Manage multiple systems in a consistent manner
-
Automate repetitive administration jobs
-
Record the requirements of your enterprise
-
Automatically configure servers and workstations
-
Manage dependencies and ensure consistency
The profile settings Required, Not Allowed, and Upgrade affect a managed host only during the actual deployment of that profile. At any time, you can run a job that contradicts the settings of a previously used profile; therefore you must understand your system settings and requirements thoroughly.
Predefined profiles are provided to perform common system-wide checks and to automate the operating system updates. These profiles cannot be edited or deleted.
You identify the profile type when you create the profile. The profile type is a tag that filters the required profiles when you create a deployment plan.
The following are profile types:
-
Install: Indicates that new components are added, or installed. Use the Install profile type for Oracle Solaris operating system updates, baselines, and patchclusters.
-
Upgrade: Indicates that existing components are upgraded.
-
Script: Indicates that action scripts are executed.
Note:
You can create profiles that perform all of the actions for the profile type. The profile tag filters the required profiles in deployment plans.
Creating a New Profile
Procedure to create a new profile.
-
Expand Plan Management, then click Update Profiles in the Navigation pane.
-
Click Create New Profile in the Actions pane.
-
Enter a profile name and brief description of the profile.
-
Enter a name and description for the profile.
-
Select a Profile Type tag, either Upgrade, Install, or Script, to categorize and filter the profiles later.
-
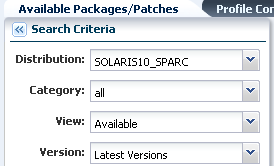
Select a distribution from the drop-down list. For example, SOLARIS10_SPARC.
-
(Optional) You can further define the criteria by choosing a category, view, and version from the drop-down list.
Figure 8-6 OS Update Profile Search Criteria

Description of "Figure 8-6 OS Update Profile Search Criteria" -
-
Locate and select a Component from the Component tree.
-
If required, select the check box to specify that the component is added to all applicable distributions.
Note:
This only applies to distributions that are active at the time the profile is created. As new distributions are activated you must edit the profile to explicitly add any components for those distributions.
-
Specify whether the action is Required, Upgrade, or Uninstall.
Note:
Some actions might not apply. For example, a component cannot be Required if the system does not have the information about how to obtain the component.
-
(Optional) You can repeat the preceding actions to select multiple components for the same or different operating systems.
-
Click Save as Named Profile. When an existing profile has the same name, you are asked to confirm that you want to replace the profile.
Note:
You cannot replace system-defined profiles.
