Oracle® Enterprise Manager Ops Center
Creating IPMP Groups in Oracle Solaris 11 Non-Global Zone on Oracle SuperCluster
12c Release 3 (12.3.0.0.0)
E63733-01
October 2015
This guide provides an end-to-end example for how to use Oracle Enterprise Manager Ops Center.
Introduction
Oracle Enterprise Manager Ops Center provides comprehensive lifecycle management for Oracle Solaris and Linux operating systems in your data center.
IP Multipath (IPMP) provides physical interface failure detection, transparent network access failover, and packet load spreading for systems with multiple interfaces. Oracle Enterprise Manager Ops Center provides an option to create IPMP groups. You can configure one or more interfaces into an IPMP group. The group functions like an IP interface with data addresses to send and receive network traffic. When an underlying interface in the group fails, the data addresses are redistributed among the remaining underlying active interfaces in the group. Thus, the group maintains network connectivity despite an interface failure. With IPMP, network connectivity is always available, provided a minimum of one interface is usable for the group.
IPMP groups can be created in a zone, server pool, and also as a standalone outside of Oracle SuperCluster.
In this document, you learn how to create IPMP groups on Ethernet and InfiniBand interfaces for Oracle Solaris 11 non-global zone on Oracle SuperCluster.
See Related Resources for links to related information and articles about discovering and managing other assets.
The following sections are described in detail:
Pre-requisites
The following are the prerequisites before you start the procedure:
-
Oracle SuperCluster discovered and managed by Oracle Enterprise Manager Ops Center.
-
Agent-managed Oracle Solaris 11 global zone.
-
Server pool for Oracle Solaris 11 non-global zones.
-
Zone without a network interface created in the server pool for Oracle Solaris 11 non-global zones.
-
Oracle Solaris version S11.1 SRU 10.0.5.0. or higher.
-
Logical Domains Manager version 3.1.0.0.24 or higher.
Setup the Network
Perform the following steps to setup the network for creating an IPMP group.
-
Log in to Oracle Enterprise Manager Ops Center.
-
In the Navigation pane, under Assets, select Server Pools.
-
In the server pool, select the non-global zone (without a network interface) where you want to create an IPMP group.
Note:
Oracle Enterprise Manager Ops Center can assign only one interface to Oracle SuperCluster non-global zones.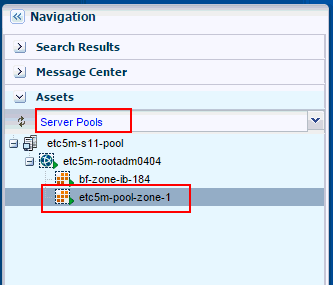
Description of the illustration ''navig_sel_serverpool.gif''
-
Shut down the non-global zone server pool. In the Actions pane, click Shutdown Zone. Click Shutdown Zone again to confirm.
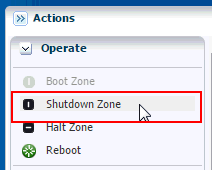
Description of the illustration ''act_shutdown_zone.gif''
After the zone is shutdown, it is displayed in the navigation pane as shown in the following figure.
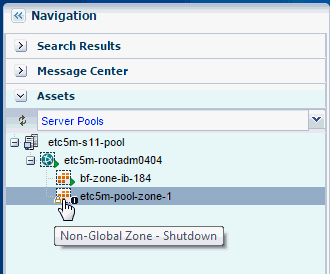
Description of the illustration ''navig_zone_shutdown.gif''
-
Connect two network interfaces to the non-global zone. Perform the following steps to connect the network interfaces.
-
In the Navigation pane, select the non-global zone.
-
In the Actions pane, click Connect Network. The Connect Networks to Zone window opens.
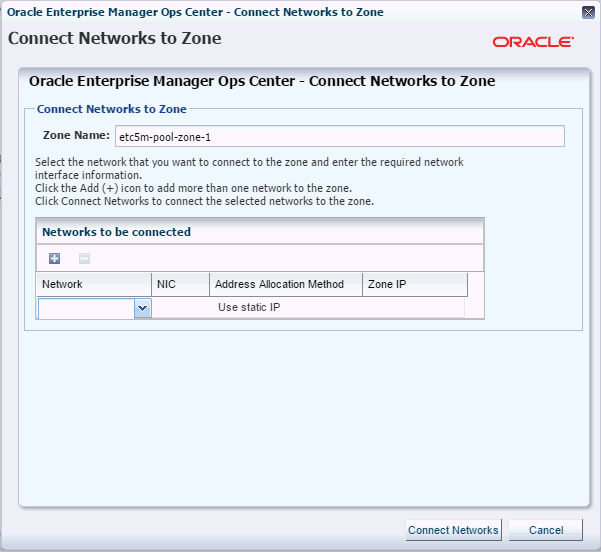
Description of the illustration ''con_network2zone_window.gif''
-
Click the Add icon to create an empty network field.
-
In the Network field, select a network to connect to the zone.
-
In the NIC field, select a network interface card.
-
Click the Add icon to create an empty network field to add a standby network.
-
In the Network field, select the same network that you selected in step 5d to connect to the zone.
-
In the NIC field, select another network interface card.
The network interface card must be different from the one you selected before. -
Click Connect Networks.
-
In the selected non-global zone, navigate to Network > Network Connectivity and verify if the networks connected are present in the Network Interface Connectivity table.
-
-
In the Actions pane, click Boot Zone to boot the non-global zone. Click Boot Zone again to confirm.
Create an IPMP Group for Ethernet Interface
Perform the following steps to create an IPMP group for an Ethernet interface. Use the Ops Center Administrator role to perform the following steps.
-
Select the non-global zone.
-
In the center pane, click Networks, then select the IPMP Groups tab.

Description of the illustration ''cp_networks_ipmp.gif''
-
Click the Add icon to create an IPMP group. The Create IPMP Group wizard opens.
-
In the Specify IPMP Group screen, enter the required values.
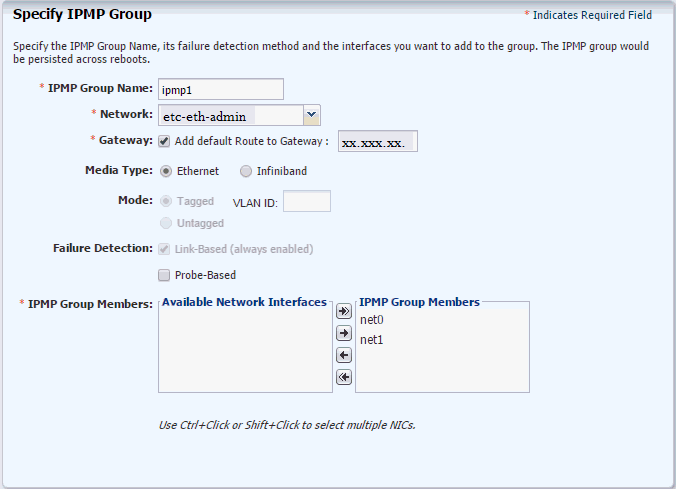
Description of the illustration ''specify_ipmp_group.gif''
-
In the IPMP Group Name field, enter a name for the IPMP group.
Note:
The IPMP name must consist of a string followed by a numeric value. For example, ipmp1. If you want to create more groups, increase the numeric value. For example, ipmp2, ipmp3, ipmp4, and so on. -
In the Network field, select a network from the drop-down list.
-
In the Gateway field, select the check box Add Default Route to Gateway.
-
In the Media Type field, select Ethernet.
-
In the IPMP Group Members field, select the networks from the Available Networks column and move them to the IPMP Group Members column.
-
Click Next.
-
-
In the Specify NIC Settings screen, select the first network interface to serve as standby. Select the check box against the network in the Standby Interface field, then click Next. Leave the check box against the second network interface unchecked.
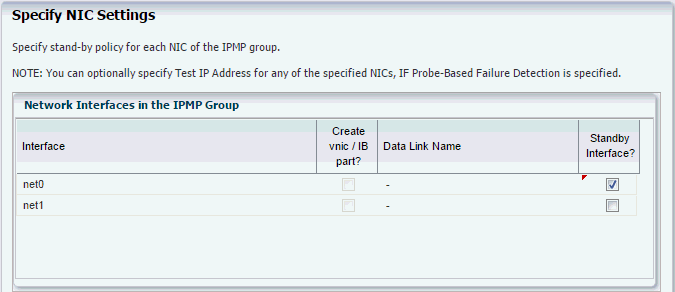
Description of the illustration ''specify_nic_setings.gif''
-
In the Specify Data Addresses screen, click the Add icon and enter an unused IP address of the IPMP group, then click Next.
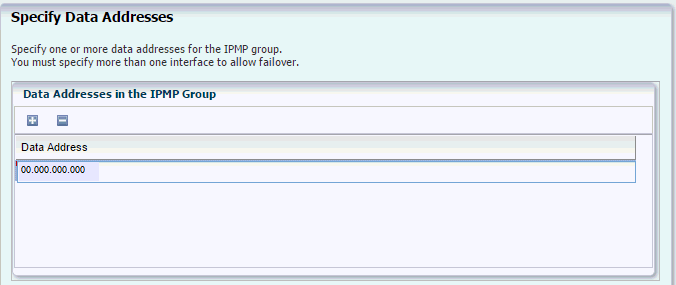
Description of the illustration ''specify_data_addr.gif''
-
Review the Summary, then click Finish.
Create an IPMP Group for InfiniBand Interface
Perform the following steps to create an IPMP group for an InfiniBand interface. Use the Ops Center Administrator role to perform the following steps.
Note:
Creation of IPMP on Oracle Solaris 10 non-global zone is not supported.-
Select the non-global zone.
-
In the center pane, click Networks, then select the IPMP Groups tab.

Description of the illustration ''cp_networks_ipmp.gif''
-
Click the Add icon to create an IPMP group. The Create IPMP Group wizard opens.
-
In the Specify IPMP Group screen, enter the required values.
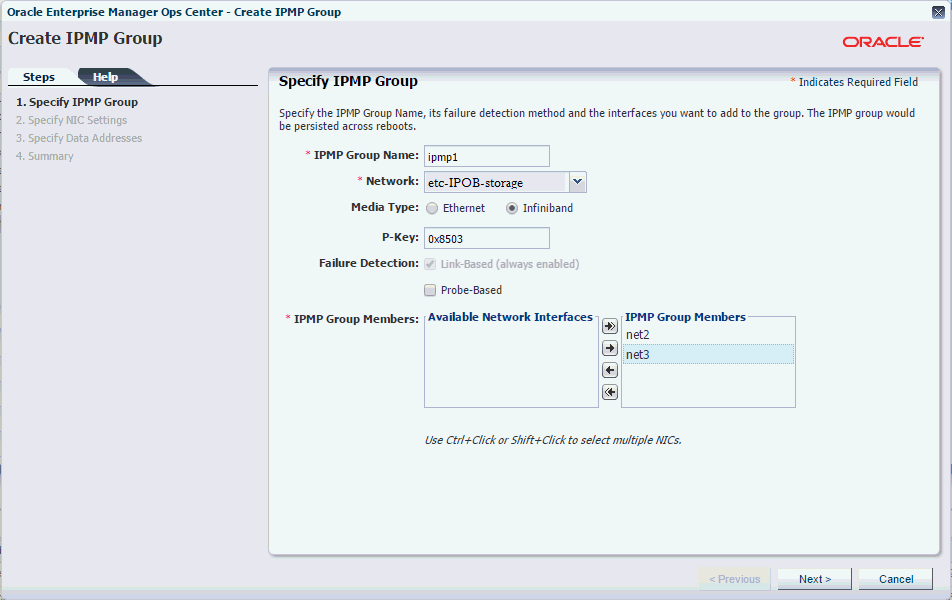
Description of the illustration ''specify_ipmp_group_ib.gif''
-
In the IPMP Group Name field, enter a name for the IPMP group.
Note:
The IPMP name must consist of a string followed by a numeric value. For example, ipmp1. If you want to create more groups, increase the numeric value. For example, ipmp2, ipmp3, ipmp4, and so on. -
In the Network field, select a InfiniBand network from the drop-down list.
-
In the Media Type field, select InfiniBand.
-
In the P-Key field, the value is populated by default.
-
If the default value starts with 8 or higher, do not edit.
-
If the default value starts with 0 - 7, then edit the P-Key value and add 8 to the first digit.
The P-Key value must be similar as shown in the following example.
-
-
In the IPMP Group Members field, select the networks from the Available Networks column and move them to the IPMP Group Members column.
-
Click Next.
-
-
In the Specify NIC Settings screen, select the first network interface to serve as standby. Select the check box against the network in the Standby Interface field, then click Next. Leave the check box against the second network interface unchecked.
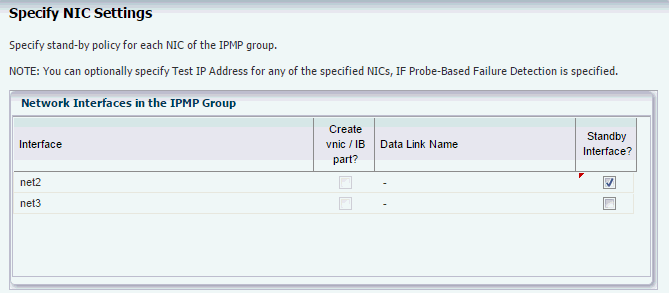
Description of the illustration ''specify_nic_setings_ib.gif''
-
In the Specify Data Addresses screen, click the Add icon and enter an unused IP address of the IPMP group, then click Next.

Description of the illustration ''specify_data_addr.gif''
-
Review the Summary, then click Finish.
Verify the IPMP Group
After the job completes, you can perform the following checks to verify if the IPMP group has been created.
-
Verify if the IPMP group is successfully created. Perform the following steps:
-
In the Navigation pane, select the non-global zone.
-
In the center pane, click Networks, then select the IPMP Groups tab.
The newly created IPMP group is displayed.
Description of the illustration ''ipmp_created_display.gif''
-
-
Login to the non-global zone using the command line interface to check if the group is created.
-
(Optional) Reboot the non-global zone to verify if the IPMP configuration is preserved after reboot.
Type init 6
-
Use the following commands to display the IPMP configuration:
-
Type ipmpstat -g
-
Type ipadm
-
-
Test the network connectivity by performing the following steps:
-
Login to the non-global zone and type ping -s <IP_outside_of_SSC>.
-
Login to the Operating System outside of Oracle SuperCluster and type ping -s <IP_entered_in_Data_Addresses>.
-
What's Next
Now that the IPMP group is configured, the non-global zone's connectivity is always available. IPMP also provides load spreading for the outbound network traffic across the network interfaces in the group.
Related Resources
For more information, see the Oracle Enterprise Manager Ops Center Documentation Library at http://docs.oracle.com/cd/E59957_01/index.htm.
Documentation Accessibility
For information about Oracle's commitment to accessibility, visit the Oracle Accessibility Program website at http://www.oracle.com/pls/topic/lookup?ctx=acc&id=docacc.
Oracle customers that have purchased support have access to electronic support through My Oracle Support. For information, visit http://www.oracle.com/pls/topic/lookup?ctx=acc&id=info or visit http://www.oracle.com/pls/topic/lookup?ctx=acc&id=trs if you are hearing impaired.
Oracle Enterprise Manager Ops Center Creating an IPMP Group in Oracle Solaris 11 Non-Global Zone on Oracle SuperCluster, 12c Release 3 (12.3.0.0.0)
E63733-01
Copyright © 2007, 2015, Oracle and/or its affiliates. All rights reserved.
This software and related documentation are provided under a license agreement containing restrictions on use and disclosure and are protected by intellectual property laws. Except as expressly permitted in your license agreement or allowed by law, you may not use, copy, reproduce, translate, broadcast, modify, license, transmit, distribute, exhibit, perform, publish, or display any part, in any form, or by any means. Reverse engineering, disassembly, or decompilation of this software, unless required by law for interoperability, is prohibited.
The information contained herein is subject to change without notice and is not warranted to be error-free. If you find any errors, please report them to us in writing.
If this is software or related documentation that is delivered to the U.S. Government or anyone licensing it on behalf of the U.S. Government, then the following notice is applicable:
U.S. GOVERNMENT END USERS: Oracle programs, including any operating system, integrated software, any programs installed on the hardware, and/or documentation, delivered to U.S. Government end users are "commercial computer software" pursuant to the applicable Federal Acquisition Regulation and agency-specific supplemental regulations. As such, use, duplication, disclosure, modification, and adaptation of the programs, including any operating system, integrated software, any programs installed on the hardware, and/or documentation, shall be subject to license terms and license restrictions applicable to the programs. No other rights are granted to the U.S. Government.
This software or hardware is developed for general use in a variety of information management applications. It is not developed or intended for use in any inherently dangerous applications, including applications that may create a risk of personal injury. If you use this software or hardware in dangerous applications, then you shall be responsible to take all appropriate fail-safe, backup, redundancy, and other measures to ensure its safe use. Oracle Corporation and its affiliates disclaim any liability for any damages caused by use of this software or hardware in dangerous applications.
Oracle and Java are registered trademarks of Oracle and/or its affiliates. Other names may be trademarks of their respective owners.
Intel and Intel Xeon are trademarks or registered trademarks of Intel Corporation. All SPARC trademarks are used under license and are trademarks or registered trademarks of SPARC International, Inc. AMD, Opteron, the AMD logo, and the AMD Opteron logo are trademarks or registered trademarks of Advanced Micro Devices. UNIX is a registered trademark of The Open Group.
This software or hardware and documentation may provide access to or information about content, products, and services from third parties. Oracle Corporation and its affiliates are not responsible for and expressly disclaim all warranties of any kind with respect to third-party content, products, and services unless otherwise set forth in an applicable agreement between you and Oracle. Oracle Corporation and its affiliates will not be responsible for any loss, costs, or damages incurred due to your access to or use of third-party content, products, or services, except as set forth in an applicable agreement between you and Oracle.