Configuration
Configuration refers to a process of defining all the system
accessibility components of an information system. Configuration in the
System Configuration section facilitates you (System Administrator) to
define and maintain the user accessibility details within the Infrastructure
system.
You (System Administrator) need to have SYSADM function
role mapped to your role to access and modify the Configuration details.
Click  from the header to display the Administration
tools in Tiles menu. Click System Configuration
from the Tiles menu to view a submenu list and click Configure
System Configuration to view the Configuration
window, or click
from the header to display the Administration
tools in Tiles menu. Click System Configuration
from the Tiles menu to view a submenu list and click Configure
System Configuration to view the Configuration
window, or click  button to access
the Navigation List, click System Configuration,
and click Configure System Configuration to
view the Configuration window.
button to access
the Navigation List, click System Configuration,
and click Configure System Configuration to
view the Configuration window.
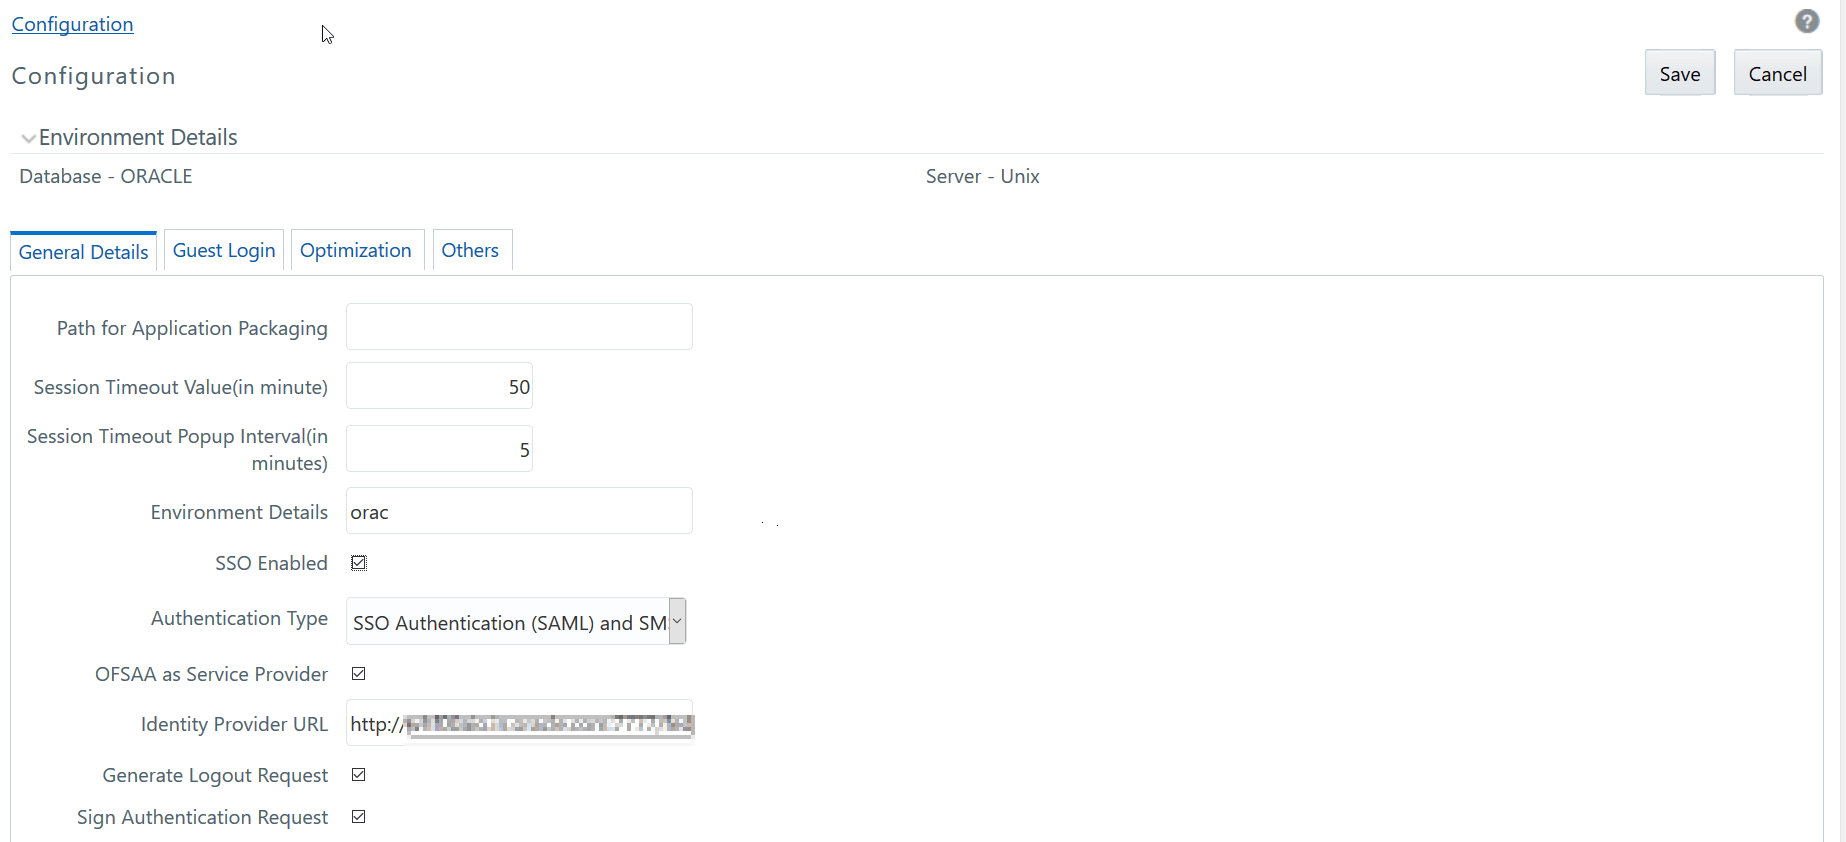
The Configuration window consists
of four sections namely General Details, Guest Login Details, Optimization,
and Others. By default the General Details
window is displayed with the pre-configured details of the Server and
Database that you are currently working on and allows you to modify the
required information.
Update
General Details
OFSAAI supports four types of authentications:
· SMS
Authentication & Authorization- By default, this is selected.
· LDAP
Authentication & SMS Authorization- Ensure that the LDAP servers
are up and running if you are selecting this option. You can configure
multiple LDAP servers. While logging in to OFSAA instance, you can select
the appropriate LDAP Server to be authenticated against.
· SSO
Authentication & SMS Authorization- Ensure SSO server is configured
if you are selecting this option.
· SSO
Authentication (SAML) and SMS Authorization
Specify the configuration details as tabulated:
Field |
Description |
Number of invalid logins |
This field is not applicable if you are
selecting SSO Enabled check box.
Enter the number of attempts permitted for
the user to enter wrong passwords, after which the user account
will be disabled. |
Path for Application Packaging |
Enter the Application Packaging path where
the JSP's generated through DEFQ is saved. |
Session Timeout Value (in
minutes) |
Enter the permitted duration of inactivity
after which the session will be automatically timed out and the
user will be requested to login again.
Note the following:
· The
session time out depends on the specified Session
Timeout Value and web server internal session maintenance.
It may vary for different web servers.
· If
SSO authentication is selected, ensure you set the Session
Timeout Value equivalent to the configured server session
time to avoid improper application behavior after session expired. |
Session Timeout Popup Interval
(in minutes) |
Enter the time left in the session timeout
at which a popup should appear and display a timer that shows
time remaining for the session to end.
For example, if you enter 50 minutes to the
Session Timeout Value and enter 5 minutes to the Session Timeout
Popup Interval, the popup appears on the screen after 45 minutes
of inactivity and displays the timer (starts from 5 minutes and
ends at 0) for the session timeout. |
Environment Details |
Enter the system environment details such
as Development, UAT, Production, and so on which are displayed
in the application top banner as the “In Setup” info. |
SSO Enabled |
Select this check box to enable SSO Authentication & SMS Authorization. |
Authentication Type |
Select the required authentication type
from the drop-down list. The options are :
· SMS
Authentication & Authorization
· LDAP
Authentication & SMS Authorization
When you select Authentication Type as LDAP Authentication
& SMS Authorization, the
LDAP Server Details popup is displayed. For more details, see
LDAP Server Details.
However, if the SSO
Enabled checkbox is selected, the options displayed for
Authentication Type are:
· SSO
Authentication & SMS Authorization
· SSO
Authentication (SAML) and SMS Authorization |
If the SSO
Enabled checkbox is selected |
SSO
Method |
This
field is displayed only if you have selected Authentication Type
as SSO Authentication
and SMS Authorization.
Select the required SSO method. These methods
are to specify how the user id should be passed from the SSO engine.
· HTTP Request Header - Returns
the value of the specified request header as a string from the
server. If selected, you need to specify the header value in SSO
Header Value field. For example, SM_USER and iv-user header values
are supported in OAM.
· HTTP Request Remote User - Returns
the login details of the user who is requesting access to the
application remotely.
· HTTP Request User Principal
- Returns a “java.security.Principal” object containing the name
of the current authenticated user. |
SSO
Logout URL |
This
field is displayed only if you have selected Authentication Type
as SSO Authentication
and SMS Authorization.
Enter the
URL of the page to invalidate SSO session. |
SSO
Redirect URL |
This
field is displayed only if you have selected Authentication Type
as SSO Authentication
and SMS Authorization.
Enter the URL of the page to which the user
should be redirected after SSO
session is invalidated. |
OFSAA
as Service Provider |
This
field is displayed only if you are selecting Authentication Type
as SSO
Authentication (SAML)
and SMS Authorization.
Select this checkbox if you want to register
OFSAA as service provider. If the checkbox is not selected, OFSAA
will act as Oneway SAML Authentication. That
is, OFSAA will only assert the identity.
For more
details on how to register OFSAA as Service Provider, see
SSO
Authentication (SAML) Configuration section
in OFSAAI Administration guide available on the OHC. |
Identity Provider URL |
This
field is displayed only if you have selected the OFSAA
as Service Provider checkbox.
Enter the IdP SingleSignOnService URL in the
Identity Provider URL
field.
Note: Enter the fully qualified domain URL
used to access the Identity
Provider. |
Generate
Logout Request |
This
field is available in version 8.0.8.1.0 and is displayed only
if you have selected Authentication Type as SSO Authentication
(SAML) and SMS Authorization.
Select to generate a SAML request
for logout. Deselect this field to direct users to the URL specified
in the SAML
Logout URL
field for logout. |
Sign
Authentication Request |
This
field is available in version 8.0.8.1.0 and is displayed only
if you have selected Authentication Type as SSO Authentication
(SAML) and SMS Authorization.
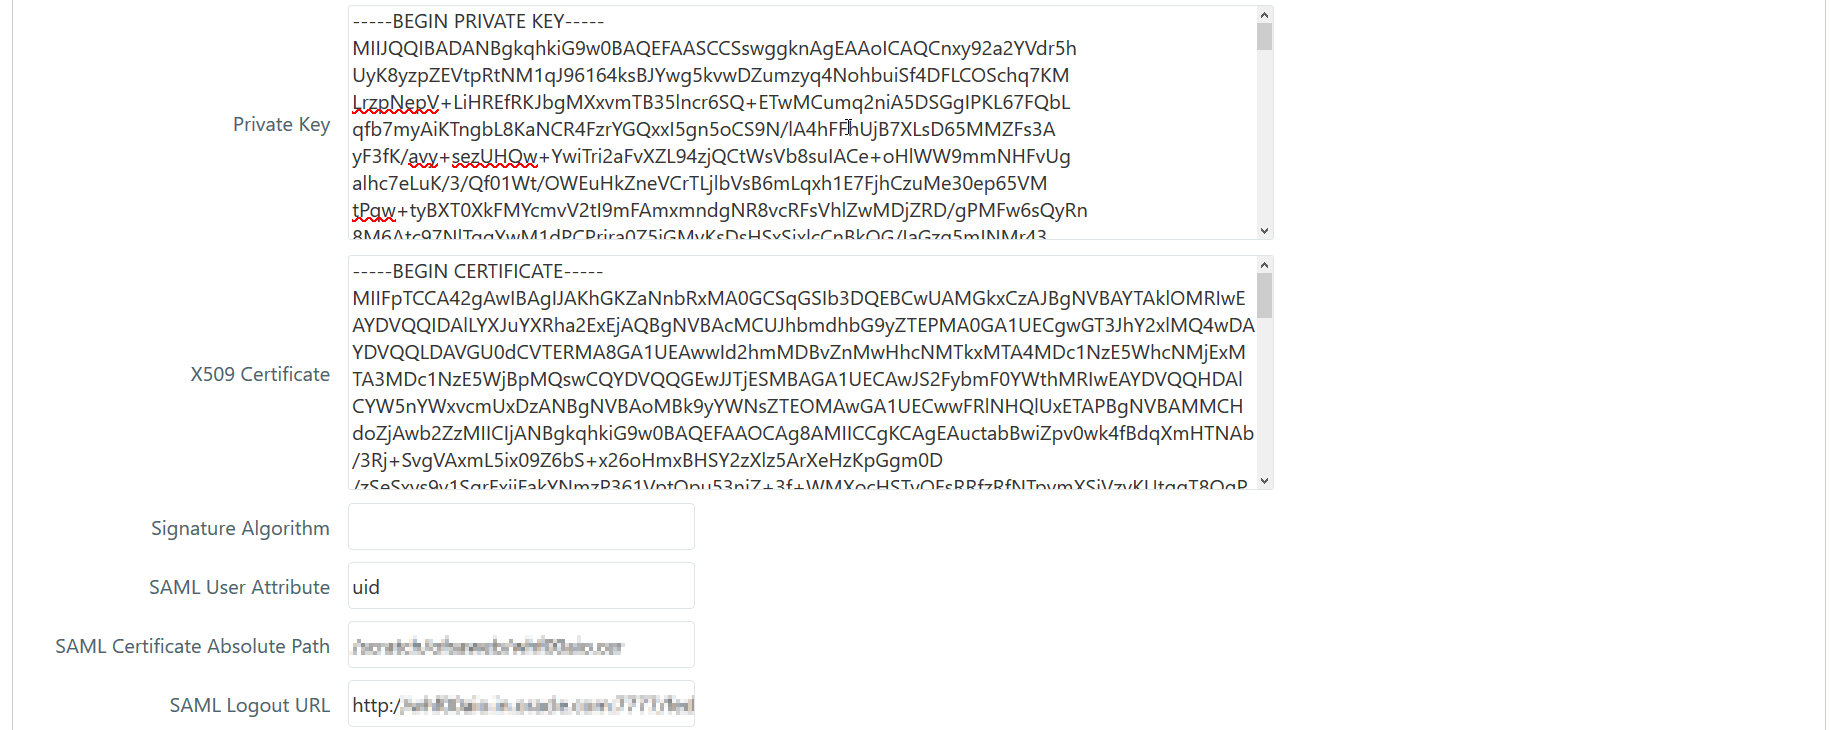
Select this field and the following fields
appear, which provide capabilities to generate signed SAML requests:
· Private
Key
· X509
Certificate
· Signature
Algorithm
|
SAML
User Attribute |
This
field is displayed only if you are selecting Authentication Type
as SSO
Authentication
(SAML) and
SMS Authorization.
Enter the
user attribute name, which is used to pass the User ID in SAMLResponse.
If this parameter is not set, users are retrieved from “Subject”
by default. |
SAML Certificate Absolute Path |
This
field is displayed only if you are selecting Authentication Type
as SSO
Authentication
(SAML) and
SMS Authorization.
Enter the
absolute path where the SAML Certificate from Identity Provider
is stored. It is required for SAML Assertion. If this parameter
is not set, signature from SAMLResponse will not be verified.
Note:
Make sure the path is accessible to the OFSAA application. |
SAML
Logout URL |
This
field is displayed only if you are selecting Authentication Type
as SSO
Authentication
(SAML) and
SMS Authorization.
Enter the
URL of the SAML logout page to
be called on logout operation. |
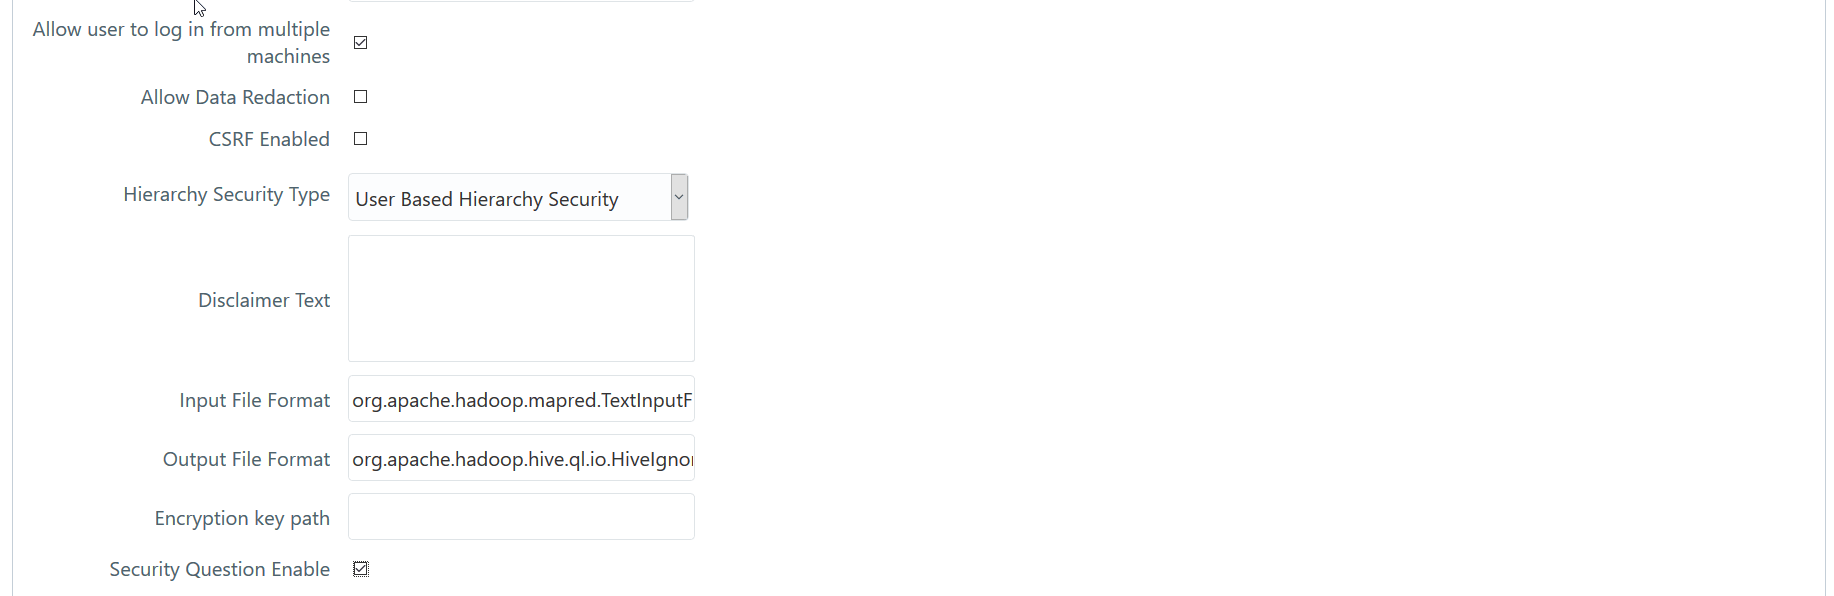
Allow user to login from
multiple machines |
Select the checkbox to allow concurrent
user login. |
Allow Data Redaction |
Select the checkbox to enable Data Redaction.
For more details, see the section Data Redaction in the OFS
AAI Administration Guide. |
Encrypt Login Password |
This field is not applicable if you have
selected SSO Enabled check box.
Select the checkbox to encrypt the login password
for more protection.
Note: For LDAP Authentication
& SMS Authorization, this checkbox should not be selected. |
CSRF Enabled |
Select this checkbox to enable protection
for Cross Site Request Forgery (CSRF) in the application. |
Hierarchy Security Type |
Select the hierarchy security node type
from the drop-down list. The available options are:
· Group Based Hierarchy Security
· User Based Hierarchy Security
Depending on the selection, the user/ group
details are displayed in the Hierarchy
Security window. |
Dormant Days |
This field is not applicable if you have
selected SSO Enabled check box.
Enter the number of inactive days permitted
after which the user is denied to access the system. |
Inactive Days |
This field is not applicable if you have
selected SSO Enabled check box.
Enter the number of inactive days permitted
after which the user access permissions are removed and the delete
flag status is set as “Y”.
Ensure that the number of Inactive days is
greater than or equal to Dormant days.
Note that, the user details still exist in
the database and can be revoked by changing the status flag. |
Working Hours |
This field is not applicable if you have
selected SSO Enabled check box.
Enter the working hours (From and To) to restrict
the user to login to the system within the specified time range.
The time is accounted in 24 hours and hh:mm format. |
Frequency of Password Change |
This field is not applicable if you have
selected SSO Enabled check box.
Enter the number of days after which the login
password will be expired and the user is navigated directly to
the Change Password window. |
Password History |
This field is not applicable if you have
selected SSO Enabled check box.
Enter the number of instances the old passwords
need to be maintained and the user will be restricted not to use
the same password again. A maximum of last 10 passwords can be
recorded. |
Password Restriction |
This field is not applicable if you have
selected SSO Enabled check box.
Select one of the following options:
· Restricted - To impose additional rules and
parameters for users while defining a password.
· Un Restricted - To allow users to define any
password of their choice ensuring that the password is alphanumeric
without any special characters. |
Disclaimer Text |
Enter any disclaimer information that you
want to make available for the users of the application on the
login window. |
These fields are displayed
only if you select Restricted option
for Password Restriction. |
Specify the following password restriction
parameters:
· Password Length - Enter the minimum and maximum
characters permitted for setting a password. The default range
is between 6 and 20 characters.
· Numbers - Enter the minimum and maximum numeric
characters permitted.
· Upper Case - Enter the minimum and maximum
numbers of upper case characters are permitted.
· Lower Case - Enter the minimum and maximum
numbers of lower case characters are permitted.
· Special Characters Occurrence Allowed - Select
the checkbox if special characters are allowed in passwords.
· Special Character - Enter the minimum and
maximum numbers of special characters are permitted.
· Special character occurrence Frequency - Enter
the number of times the same special character can occur in the
password.
· Disallowed Special Characters - Enter the
special characters (without spaces) which are not permitted in
a password.
· Running Alphabets - Select the checkbox to
allow running alphabets in a password. For example, abc, xyz,
AbC and so on.
· Sequence Of Running Alphabets- Enter the number
of times the sequence is permitted.
· Running Numbers - Select the checkbox to allow
running numbers in a password. For example, 123, 456, and so on.
· Sequence Of Running Numbers- Enter the number
of times the sequence is permitted. |
Security Question Enable |
Select to enable security questions that
users would have to answer before they can reset their passwords.
This feature enhances user authenticity validation. Enter information
for the following fields:
· Question
1 – Enter the first question to be displayed on the password reset
page.
· Answer
1 – Enter the answer to the first question.
· Question
2 - Enter the second question to be displayed on the password
reset page.
· Answer
2 – Enter the answer to the second question.
· Question
3 - Enter the third question to be displayed on the password reset
page.
· Answer
3 – Enter the answer to the third question.
The following illustration is an example:

|
Click Save to save the General
tab details.
LDAP Server
Details
This feature allows you to configure and maintain multiple
LDAP servers in the OFSAA instance. You can add a new LDAP server, modify/
view LDAP server details, and delete an existing LDAP server.
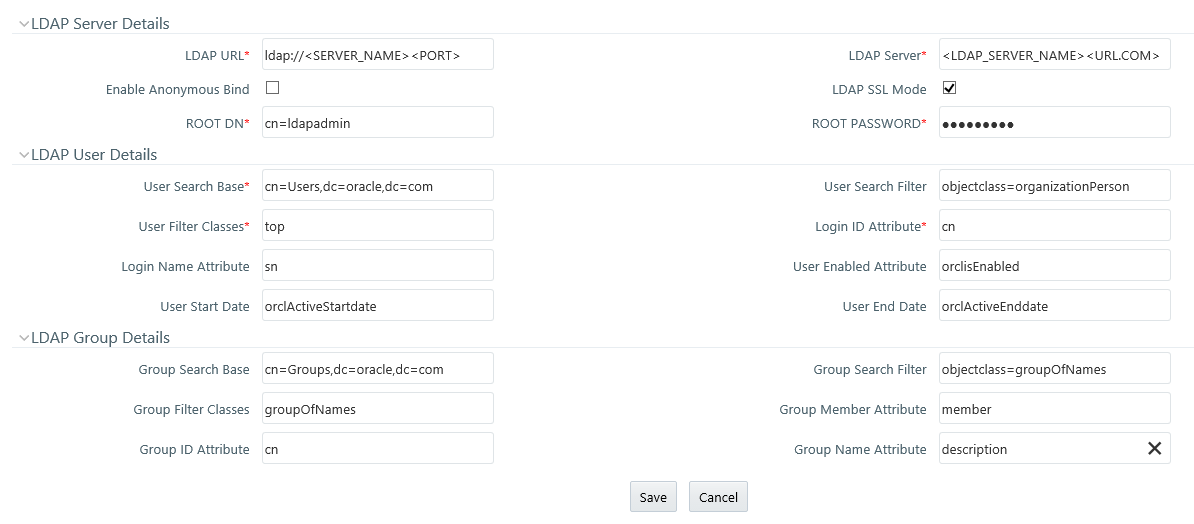
The LDAP Server Details window
displays the details such as ROOT Context, ROOT DN, LDAP URL, LDAP SSL
Mode, and LDAP Server name.
To add a new LDAP Server
1. Select LDAP Authentication & SMS Authorization from
the Authentication Type drop-down list in the General Details tab, the
LDAP Server Details window is displayed.
2. Click  button in the toolbar. The LDAP
Server Details window is displayed.
button in the toolbar. The LDAP
Server Details window is displayed.
3. Enter the
details as tabulated:
Field |
Description |
Fields market with * are
mandatory. |
LDAP Server Details |
LDAP URL |
Enter the LDAP URL from which
the system authenticates the user.
For example, ldap://hostname:3060/. |
LDAP Server |
Enter the LDAP Server name.
For example, ORCL1.in.oracle.com. |
Enable Anonymous Bind |
Select this option to login
to the database anonymously and perform functions. This is useful
when you are searching for a user in the system and cannot find
the user. For example, you cannot find a cn due to a name change
and you have to map the user to the correct dn. You can use a
property such as email to search for the dn and map it correctly.
Note: Selecting
this field disables ROOT DN and ROOT Password fields. |
LDAP SSL Mode |
Select the checkbox to enable
LDAP over SSL to ensure encryption of user credentials when transferred
over a network. |
ROOT DN |
Enter the ROOT Distinguished
Name.
For example, cn=orcladmin,cn=Users,dc=oracle,dc=com. |
ROOT Password |
Enter the LDAP server root
password for authentication. |
LDAP User Details |
User Search Base |
Enter the full path of the
location of the active directory in the LDAP server from which
to start the user search. This is a comma-delimited parameter.
For example, cn=User,dc=oracle,dc=com |
User Search Filter |
Enter search filters to limit
the user search for the results obtained from ‘User Search Base’.
For example, objectclass=organizationalPerson. |
User Filter Classes |
Enter a user search filter
to include specific user groups. For example, enter ‘top’ for
the search to access groups up to the top-level in the directory. |
Login ID Attribute |
Specify the login ID attribute
(user name) to be used in the system for users. For example, enter
‘cn’ to use the common name as the login id attribute. |
Login Name Attribute |
Specify the attribute that
maps to the Login ID. This is used for authentication purposes.
For example, ‘sn’ maps to ‘cn’. |
User Enabled Attribute |
Enter the attribute to enable
or disable a user. For example, ‘orclisEnabled’ is to enable a
user account in the LDAP server. |
User Start Date |
Enter the attribute that
stores the user-account start-date information. For example, ‘orcActiveStartdate’
contains start dates of all users. |
User End Date |
Enter the attribute that
stores the user-account end-date information. For example, ‘orclActiveEndDate’
contains start dates of all users. |
LDAP Group Details |
Group Search Base |
Enter the full path of the
location of the active directory in the LDAP server from which
to start the group search. This is a comma-delimited parameter.
For example, cn=Groups,dc=oracle,dc=com |
Group Search Filter |
Enter search filters to limit
the group search for the results obtained from ‘Group Search Base’.
For example, objectclass=groupOfNames. |
Group Filter Classes |
Enter a group search filter
to include specific groups. For example, groupOfNames. |
Group Member Attribute |
Enter a member attribute
listed for the Groups. For example, ‘member’. |
Group ID Attribute |
Enter the attribute that
identifies the group name. For example, ‘cn’. |
Group Name Attribute |
Enter the attribute that
specifies the full name of the group. For example, description |
4. Click Save.
When a business user accesses OFSAA login window where
multiple LDAP servers are configured in the OFSAA instance, the LDAP Server drop-down list is displayed. If the
user selects an LDAP server, he will be authenticated only against the
selected LDAP server. If the user does not select any LDAP server, he
will be authenticated against the appropriate LDAP server.
NOTE |
SYSADMN/ SYSAUTH/ GUEST users need not select
any LDAP server as they are always authenticated against SMS store.
Additionally, if a specific user is marked as “SMS Auth Only”
in the User Maintenance window, then
that user is authenticated against the SMS store instead of the
LDAP store even though the OFSAA instance is configured for LDAP
authentication. The user has to enter password as per SMS store. |
SSO Authentication
and SMS Authorization
Before you configure SSO authentication, ensure that:
· You have
configured OAM (Oracle Access Manager) or equivalent server for SSO user
authentication.
· The configured
SSO server is up and running and an SSO login page is displayed for users
to provide the authentication details.
· The configuration
fields are updated correctly before saving the details.
· /<context-name>/login.jsp
should be the only resource that is protected.
· The following
URLs are there in the excluded URL list in SSO server:
1. MAP_WSDL_LOCATION=$PROTOCOL$://$WEBSERVERHOST$:$WEBSERVERPORT$/$
CONTEXT$/mdbObjAppMap?wsdl
2. MDBPUBLISH_EXECUTION_WSDL_LOCATION=$PROTOCOL$://$WEBSERVERHOST$:
$WEBSERVERPORT$/$CONTEXT$/mdbPublishExecution?wsdl
3. Rest
Service for Object Migration :- $PROTOCOL$://$WEBSERVERHOST$:$WE BSERVERPORT$/$CONTEXT$/rest-api/migrationrest/MigrationRESTService/invokeMigrationService
4. Rest
Service for WSMRE :- $PROTOCOL$://$WEBSERVERHOST$:$WEBSERVERPORT$/$CONTEXT$/rest-api/rrfmrerest/RestfulMREService/RestfulMREInvoke
5. Data
Redaction = $PROTOCOL$://$WEBSERVERHOST$:$WEBSERVERPORT$/$CONTEXT$/rest-api/redaction/redact/summary
6. $PROTOCOL$://$WEBSERVERHOST$:$WEBSERVERPORT$/$CONTEXT$/servlet/com.iflex.fic.ficml.FICMaster
7. $PROTOCOL$://$WEBSERVERHOST$:$WEBSERVERPORT$/$CONTEXT$/servlet/com.iflex.fic.icc.iccwl.ICCComm
8. $PROTOCOL$://$WEBSERVERHOST$:$WEBSERVERPORT$/$CONTEXT$/help.jsp
9. $PROTOCOL$://$WEBSERVERHOST$:$WEBSERVERPORT$/$CONTEXT$/help/*
NOTE |
The place holders such as $PROTOCOL$, $WEBSERVERHOST$,
$WEBSERVERPORT$, and $CONTEXT$ in the URLs should be updated appropriately |
In case of any errors, the mapped users will not be able
to login to the application and you may need to correct the details by
logging to the system as sysadmn.
For System Users:
· You can
access OFSAAI Application using <Protocol (http/https)>://<IP/
HOSTNAME>:<SERVLET PORT>/<CONTEXT NAME>/direct_login.jsp.
· You have
to select the appropriate user id from the drop-down list.
For Application Users:
· The login
page will be their respective SSO Authentication page.
· After successful
login, you can change your locale from the Select Language
link in the application header of the landing page. Move the pointer over
the link and select the appropriate language from the listed languages.
Based on the locales installed in the application, languages will be displayed.
· The Change Password link will not be available in
the application header.
Update Guest Login Details
You (System Administrator) can facilitate Guest Users to
login to the Infrastructure system by configuring the Guest Login Details.
If a password is defined, then the guest users are required to enter the
password during logon and would then be navigated to the specific modules
based on the mapped Roles and Functions.
Ensure the following before configuring the guest user
details:
· Functions
and Roles should be mapped appropriately for tracking the guest user activities
on the system.
For example, when a guest user is permitted to modify
Metadata, the change done cannot be tracked since the system recognizes
Guest User as Modifier.
· When there
is a provision for Guest User to access the Infrastructure system from
an external machine, a specific set of .jsp’s (web pages) has to be defined
to the Guest User and maintained in the “urllist.cfg” in ficweb/conf folder.
For example, if the “urllist.cfg” contains “ficportal/Testing.jsp” and “fiv/OpenView.jsp’s”,
Guest users can view and execute Testing and OpenView.jsp’s from ficportal
and fiv contexts.
§ Any number
of pages can be defined within the “urllist.cfg” file
§ The additions
into the CFG file will be done manually.
§ Only the
links specified in the urllist.cfg file can be accessed through the guest
login.
· You can
also specify access based on wild card entries. A wildcard character can
be applied at the main folder level only and not to a subset of files
within a folder.
For example, if access is provided to ficportal/testing/*,
then all the pages under ficportal/testing folder are accessible from
Guest login.
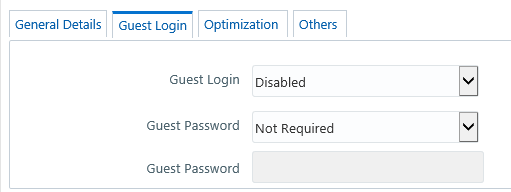
1. Select Guest
Login tab and update the details as tabulated:
Field |
Description |
Guest Login |
Select one of the following
option from the drop-down list:
ENABLED - To enable guest users and allow
them to login to the system.
DISABLED - To restrict access to guest users. |
Guest Password |
You can select the Guest
Password as one of the following from the drop-down list only
if you have ENABLED guest Login:
Required - Guest users need to specify a password
to logon.
Not Required - Guest users can logon directly. |
Guest Password |
You can specify the Guest
Password only if you have selected the previous Guest Password
field option as Required.
Enter the Guest Password as indicated:
· If
Password Restrictions is set in the General Details tab, the specified
password must satisfy all the defined parameters. However Guest
Users do not comply to change password, invalid login attempts,
or logging from multiple workstations,
· If
no Password Restrictions is set, ensure that the specified password
is alphanumeric without any extra spaces. |
2. Click Save and save the guest login configuration details.
Update Optimization Details
1. Select Optimization
Details tab and update the details as tabulated:
The Optimization details such as Hints, Scripts, and
Using ROWID instead of Primary Keys can be specified to optimize Merge
statements. The defined configurations are also fetched as Query Optimization
Settings while defining Rule definition properties.
Field |
Description |
Hint used for MERGE statement |
Specify the SQL Hint that
can be used to optimize Merge Query.
For example, “/*+ ALL_ROWS */”
In a Rule Execution, Merge Query formed using
definition level Merge Hint precede over the Global Merge Hint
Parameters defined here. In case the definition level Merge Hint
is empty / null, Global Merge Hint (if defined here) is included
in the query. |
Hint used for SELECT statement |
Specify the SQL Hint that
can be used to optimize Merge Query by selecting the specified
query.
For example, “SELECT /*+ IS_PARALLEL */”
In a Rule Execution, Merge Query formed using
definition level Select Hint precede over the Global Select Hint
Parameters defined here. In case the definition level Select Hint
is empty / null, Global Select Hint (if defined here) is included
in the query. |
Script executed before MERGE
statement |
Refers to a set of semicolon
(;) separated statements which are to be executed before
Merge Query on the same connection object.
In a Rule Execution, Global Pre Script Parameters
defined here are added to a Batch followed by Rule definition
level Pre Script statements if the same has been provided during
rule definition. However, it is not mandatory to have a Pre Script
either at Global or definition level. |
Script executed after MERGE
statement |
Refers to a set of semicolon
(;) separated statements which are to be executed after
Merge Query on the same connection object.
In a Rule Execution, Global Post Script Parameters
defined here are added to a Batch followed by Rule definition
level Post Script statements if the same has been provided during
rule definition. However, it is not mandatory to have a Post Script
either at Global or definition level. |
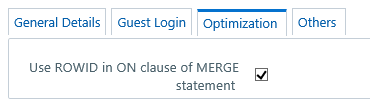
User ROWID in ON clause of
MERGE statement |
You can select the ROWID
checkbox to create a Merge Statement based on specified ROWID
instead of Primary Keys.
In a Rule Execution, ROWID is considered while
creating Merge Statement if Use ROWID
checkbox is selected in either Global Parameters defined here
or Rule definition properties.
If Use ROWID checkbox
is not selected in either Global Parameters defined here or Rule
definition properties, then the flag is set to “N”
and Primary Keys are considered while creating in Merge Statements. |
2. Click Save and save the Optimization details.
Updating
Others Tab
1. Select the
Others tab and update the details as tabulated:
You can modify the Others tab details as tabulated below:
Field |
Description |
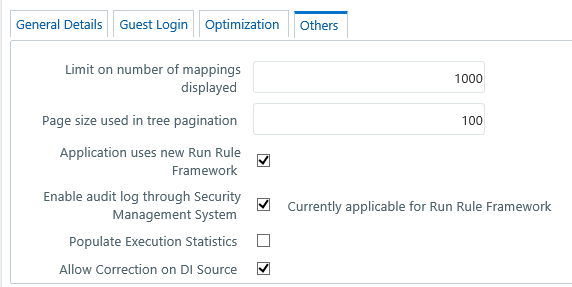
Limit on number of mappings
displayed |
Specify the number of mappings
which are to be displayed in Rule Definition
window. A maximum of 9999 records can be displayed. |
Page size used in tree pagination |
Specify the number of subcomponents
that can be displayed in each Component from the Process
Component Selector window. A maximum of 9999 records can
be displayed. |
Application uses new Run
Rule Framework |
Selecting this option will
display only the new Run Rule Framework links in Metadata
Browser and Enterprise Modeling
windows. |
Enable audit log through
Security Management System |
You can select this checkbox
to enable Infrastructure system to log all the usage and activity
reports. A System Administrator can to generate Audit Trail Reports
in HTML format to monitor user activity on regular intervals.
Note: This is currently
applicable for Run Rule Framework only. |
Populate Execution Statistics |
This feature is disabled
by default.
Select the check box to determine which case
statement of a rule has updated how many corresponding records.
Though there is no impact in Rule execution, an insert query is
used in the back-end to list the number of records processed by
each condition in the rule.
For more information, see Populate Execution
Statistics in References section. |
Allow Correction on DI Source |
Select the checkbox to allow
data correction on the data source. This enables the data correction
to be executed along with data quality checks.
If the checkbox is not selected, data corrections
will be done with T2T (LOAD DATA) executions, that is while loading
the data to the target table.
By default, the checkbox is selected. |
2. Click Save and save the Others tab changes.