NOTE |
This functionality doesn’t work when CSRF is enabled. To disable CSRF, see the section Update General Details. This functionality displays only on Microsoft Internet Explorer™ browser. |
Data Entry within the Data Entry Forms and Queries section of Infrastructure system facilitates you to view, add, edit, copy, and delete data using the various layout formats and Authorize/Re-authorize data records based on the permissions defined during the Form creation.
You can use the Search option to query the records for specific data and also export the data in Microsoft Excel format for reference. You can launch multiple instances of Data Entry window using the URL to search and update records simultaneously.
You can access DEFQ - Data Entry by expanding Data Entry Forms and Queries section of Data Model Management module within the tree structure of LHS menu.
NOTE |
An alert message is displayed if you are not mapped to any Forms in the system. |
The DEFQ - Data Entry window displays the list of Data Entry Forms and Query Forms mapped to the logged-in user in the LHS menu. You can select the required Form to view the details. In the DEFQ - Data Entry window, you can do the following:
The DEFQ - Data Entry window displays the selected Form Data in the View mode by default. The Forms are displayed based on the application names in the LHS menu. There are various layouts available to customize the view and by default, the Form details are displayed in the layout in which it was designed.
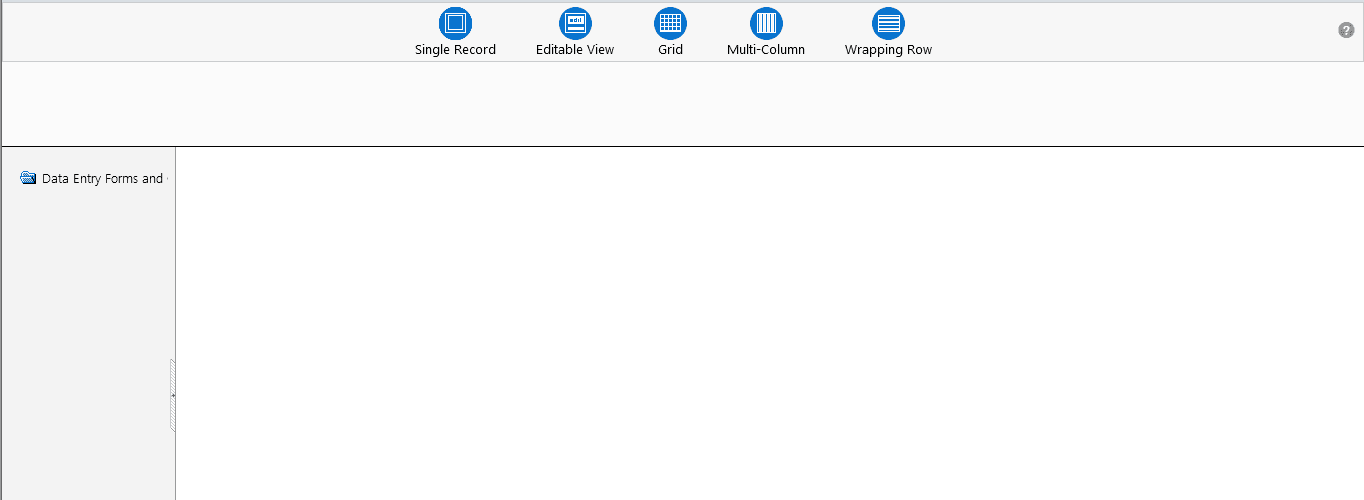
In the DEFQ - Data Entry window, the following layout types are available. You can click on any of the following layouts to view the Form details. The buttons i.e. Previous Page, Back, Next, and Next Page helps you to navigate through the records. However, the customized header sorting does not apply when you have navigate to Previous or Next pages.
NOTE |
The Roll Back option can be used only for authorized records i.e. after the records are edited and saved, you can roll back/undo the changes in view mode. |
Layout |
Description |
Single Record |
To view a single record details at any given point. You can use the navigation buttons to view the next record in the table. |
Editable View |
To view and edit a single record. A list of five rows/records is displayed by default, and the same can be changed by entering the required number in Display Rows. You need to select the required record from the list to view/edit and click Save to update the changes. |
Grid (Default) |
To view all the records in a list. A list of five rows/records is displayed by default, and the same can be changed by entering the required number in Display Rows. You can click on the column header to alphabetically sort the list of records in the table. |
Multi column |
To view all the columns of a selected record. This layout enables you to view a record without having to scroll or with minimum scrolling to view all the columns. |
Wrapped rows |
To view all the rows of a selected record. This layout enables you to view a wrapping row easily without having to scroll horizontally to view the columns. |
In the DEFQ - Data Entry window, you can Search for a record in the View, Edit, and Authorize modes. You can perform a quick Search to find a specific record or run an Advanced Search to further query the record for the required details.
To search for a record in the DEFQ - Data Entry window:
1. Click  . The search fields are displayed.
2. Select Field Name from the drop-down list.
3. Enter the value/data in the Search field.
4. Click Go. The search results are displayed in the list.
To perform an Advanced search in the DEFQ - Data Entry window:
1. Click  within the Search fields.
The Advanced Search Window is displayed.
within the Search fields.
The Advanced Search Window is displayed.
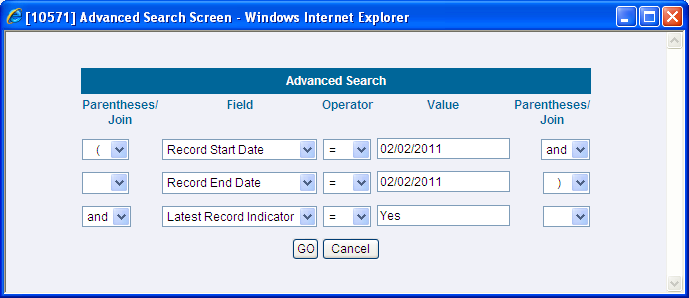
2. Select the required Parentheses/Join, Field, Operator from the drop-down list and enter the Value as required to query the Form data.
3. Click GO. The results are displayed with the field names containing the searched data.
You can edit the permitted Form field values in the DEFQ - Data Entry window. However, you cannot modify the primary key fields which are displayed in non-editable format.
To edit Form Details in the DEFQ - Data Entry window:
1. Open the required Form in view mode and click  . The editable fields are enabled.
2. Enter/update the required details.
3. Click Save and update the changes.
4. If required, you can click Reset to undo the changes and return to original field values.
If you have edited an Authorized record, the same is again marked for authorization. Once the record is updated, a modified status flag is set, and only these record changes can be rolled back. The Roll Back option is supported in view mode only for authorized records, i.e. records which are updated and saved.
You can add a row to the required table and enter the field details. To Add Form Data in the DEFQ - Data Entry window:
1. Open the required Form in view mode and click  .
.
2. By default, five rows are displayed. You can modify by specifying the number of required rows in Display Rows field and clicking Reset.
3. Enter the required numeric data in the new fields. If you want to view the numeric data separated by commas, enter the details accordingly.
4. Click Save and update the data to the selected table.
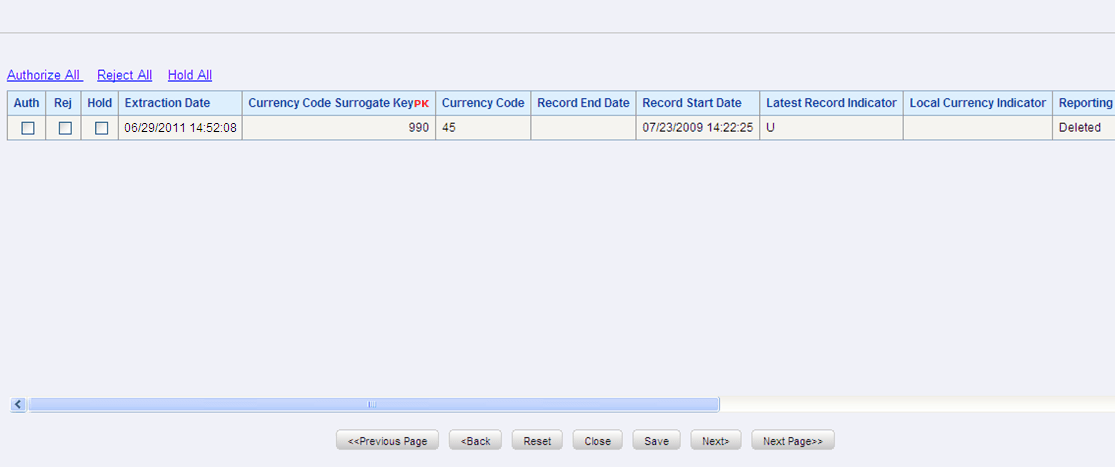
You need to have DEFQMAN and SYSAUTH function roles mapped to access and authorize Forms in the DEFQ framework. You can Authorize a single record or all the records of a selected Form with the in the DEFQ - Data Entry window. You can Authorize record in a table which has a primary key field. A primary key field in the record is indicated by “PK”. You need to have the authorization rights defined by the user who has created the record. You can also Reject or Hold inappropriate records in the table.
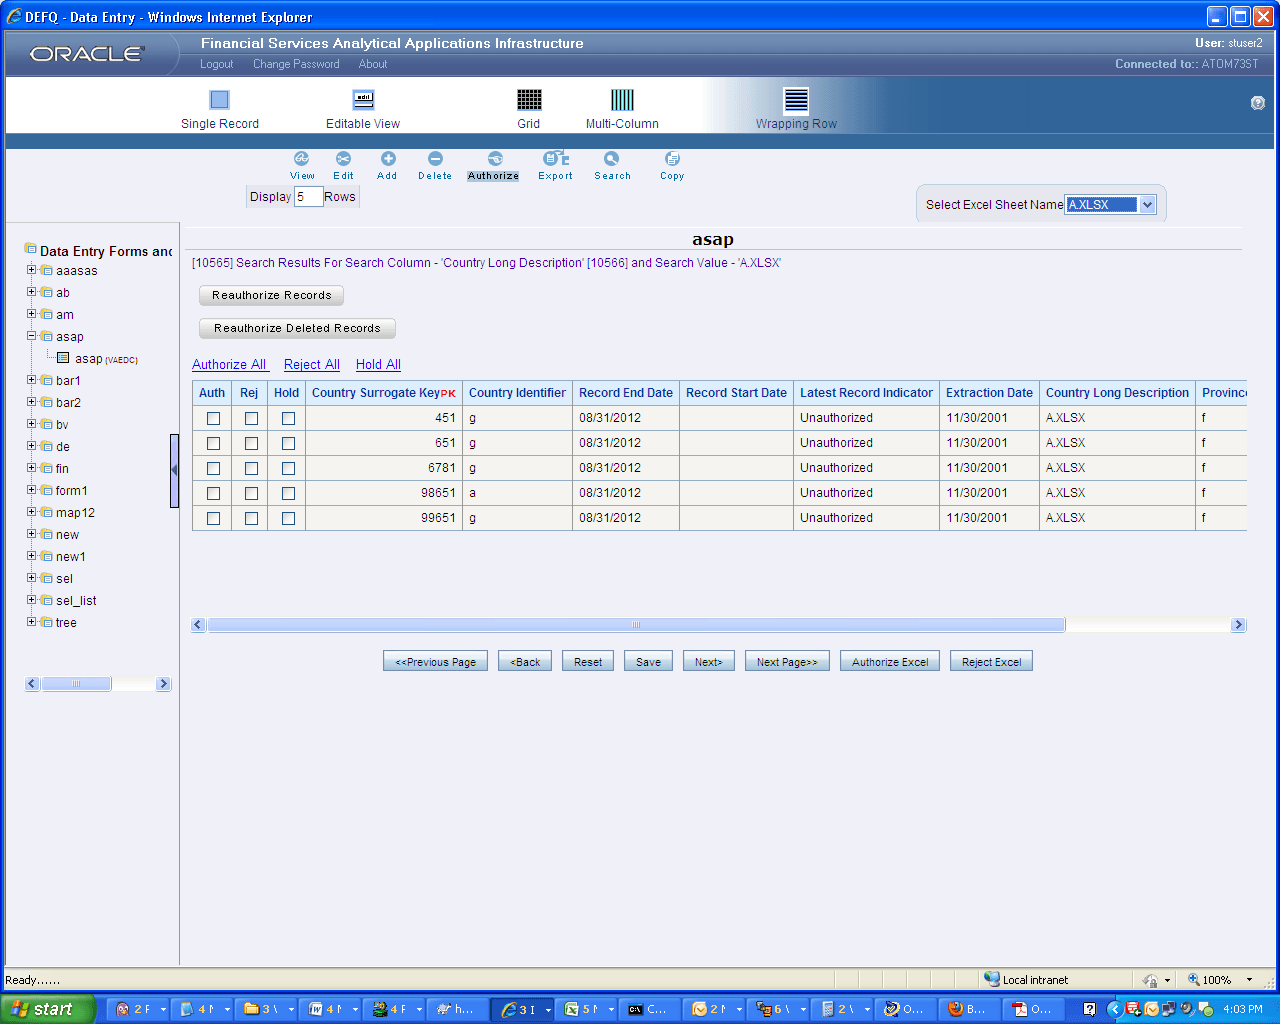
The status of each record in the table is indicated with an “AuthFlag” as indicated below:
· Unauthorized records are displayed with the status flag “U”
· Authorized records are displayed with the status flag “A”.
· Rejected records are displayed with the status flag “R”.
· Modified records are displayed with the status flag “M”.
· Deleted records are displayed with the status flag “D”.
· If an Unauthorized record is on Hold, the status flag is displayed as “H”.
· If a Modified record is on Hold, the status flag is displayed as “X”.
· If a Deleted record is on Hold, the status flag is displayed as “Z”.
To Authorize Data in the DEFQ - Data Entry window:
1. Open the required Form in view mode and click  .
.
The list of available records for Authorization is displayed. If there are “no records” for Authorization in the selected Information Domain, an alert message is displayed.
2. Select the “Auth” checkbox adjacent to the required record with the status flag “Unauthorized / Put On Hold” and click Save. A confirmation dialog is displayed. Click OK.
You can also do a Bulk Authorization if Excel Map is selected in the Sort Fields Selection window. Select the mapped Excel Name from the “SelectExcelSheetName” drop-down list. The DEFQ - Data Entry window displays only those records which are uploaded though the selected Excel sheet. Click Authorize Excel. A confirmation dialog is displayed. Click OK.
You can Reject / Hold a record by doing the following:
· To Reject a record, select the checkbox in the “Rej” column adjacent to the required record and click Save. A confirmation dialog is displayed. Click OK.
You can also Reject records in Bulk Mode if Excel Map is selected in the Sort Fields Selection window. Select the mapped Excel Name from the “SelectExcelSheetName” drop-down list. The DEFQ - Data Entry window displays only those records which are uploaded though the selected Excel sheet. Click Reject Excel. A confirmation dialog is displayed. Click OK.
· To Hold a record and to authorize or reject at a later point, select the checkbox in the “Hold” column adjacent to the required record and click Save.
In the DEFQ - Data Entry window, you can also do the following:
· Click Authorize All and click on Save to authorize all the records displayed in current page.
· Click Reject All and click on Save to reject all the records displayed in current page.
· Click Hold All and click on Save to hold all the records displayed in current page.
If you have enabled the option to send alerts to the Creator of the Form in Message Type Maintenance window, a message is sent indicating that the records are authorized/rejected/put-on-hold.
You can re-authorize an authorized record which has been updated by other users. When an authorized record is updated, the status flag (AuthFlag) is set to “M” indicating that the record has been modified and needs re-authorization.
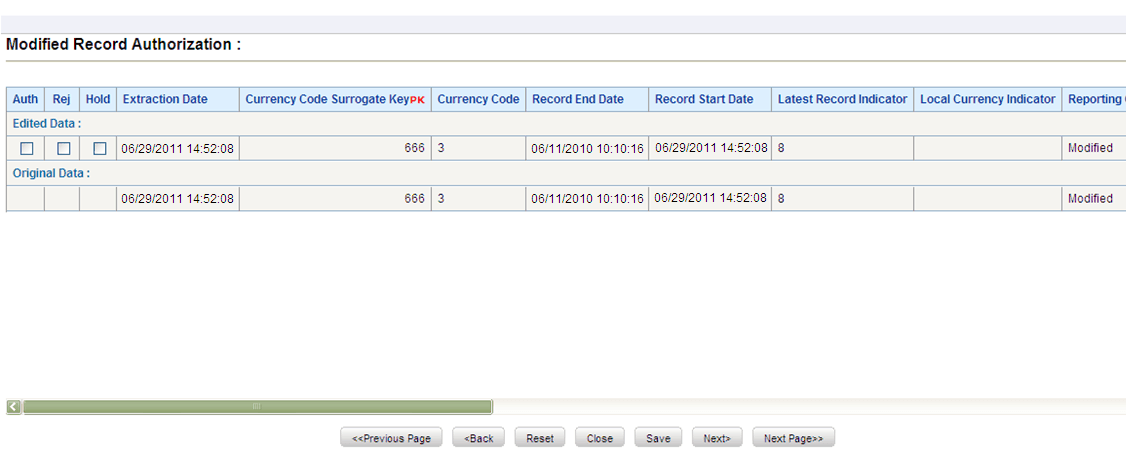
To re-authorize modified records in the DEFQ - Data Entry window:
1. Open the required Form in view mode and click .
The list of available records with the Authorization status is displayed. If there are “no records” for Authorization in the selected Information Domain, an alert message is displayed.
2. Click Reauthorize Records. The DEFQ Authorization Window is displayed.
3. Select the “Auth” checkbox adjacent to the required record.
4. Click Save. On re-authorization, a confirmation message is displayed.
You can also select the checkbox adjacent to “Rej” to reject the record, or “Hold” to re-authorize or reject at a later point. A message is sent to the Form creator indicating that records are authorized/rejected/put-on-hold.
You can re-authorize the delete action when an authorized record has been deleted by other users. When an authorized record is deleted, the status flag (AuthFlag) is set to “D” indicating that the record has been deleted and needs re-authorization.
To re-authorize deleted records in the DEFQ - Data Entry window:
1. Open the required Form in view mode and click .
The list of available records with the Authorization status is displayed. If there are “no records” for Authorization in the selected Information Domain, an alert message is displayed.
2. Click Reauthorize Deleted Records. The DEFQ Authorization Window is displayed.
3. Select the “Auth” checkbox adjacent to the required record.
4. Click Save. On re-authorization, a confirmation message is displayed.
You can also select the checkbox adjacent to “Rej” to reject the record, or “Hold” to re-authorize or reject at a later point. A message is sent to the Form creator indicating that records are authorized/rejected/put-on-hold.
You can export the required record(s) to a selected location in CSV format. To Export Form Data in the DEFQ - Data Entry window:
1. In the View mode, select the checkbox adjacent to the record(s) which you want export.
2. Click  . The File Download dialog
is displayed.
. The File Download dialog
is displayed.
3. Click Save. The Save As dialog is displayed.
4. Select the location and click Save. The selected record is exported.
You can copy the existing fields and create new fields in a record. When you copy a field, the primary key values are incremented from the pre-defined value to the next acceptable value. However, the other fields can be modified as required.
To copy fields in the DEFQ - Data Entry window:
1. Open the required Form in view mode and click  .
.
The list of available records is displayed. All the primary field data (indicated by *) is incremented by default.
2. Click Save. The field values are added to the record.
You can click Edit to modify the values or click Next to copy the next set of fields.
You can remove a Form details which are no longer required by deleting from the DEFQ - Data Entry window.
1. In the View mode, select the checkbox adjacent to the record which you want to delete.
2. Click  . An information dialog is
displayed.
. An information dialog is
displayed.
3. Click OK to confirm and delete the record.