Cube represents a multi-dimensional view of data which is vital in business analytics. It gives you the flexibility of defining rules that fine-tune the information required to reflect in the hierarchy. Cube enhances query time and provides a decision support for Business Analysts.
A cube is a combination of measures and dimensions, that is, measures represented along multiple dimensions and at different logical levels within each dimension. For example, in a cube, you can view Number of Customers, Number of Accounts, and Number of Relationships by Product, Time, and Organization.
Essbase has been derived from a history of OLAP applications based in the middle tier. The strategy of Essbase is mainly on custom analytics and Business Intelligence applications. This strategy addresses the what-if modeling and future-oriented questions that companies need answers today in order to see into the future.
Essbase - A Separate-Server OLAP: Essbase is the OLAP server that provides an environment for rapidly developing custom analytic and EPM applications. The data management strategy allows Essbase to easily combine data from a wide variety of data sources, including the Oracle Database. Essbase is part of the Oracle Fusion Middleware architecture.
Based on the role that you are mapped to, you can access read, modify or authorize Essbase Cube. For all the roles and descriptions, see Appendix A. The roles mapped to Essbase cubes are as follows:
· Essbase Cube Access
· Essbase Cube Advanced
· Essbase Cube Authorize
· Essbase Cube Phantom
· Essbase Cube Read Only
· Essbase Cube Write
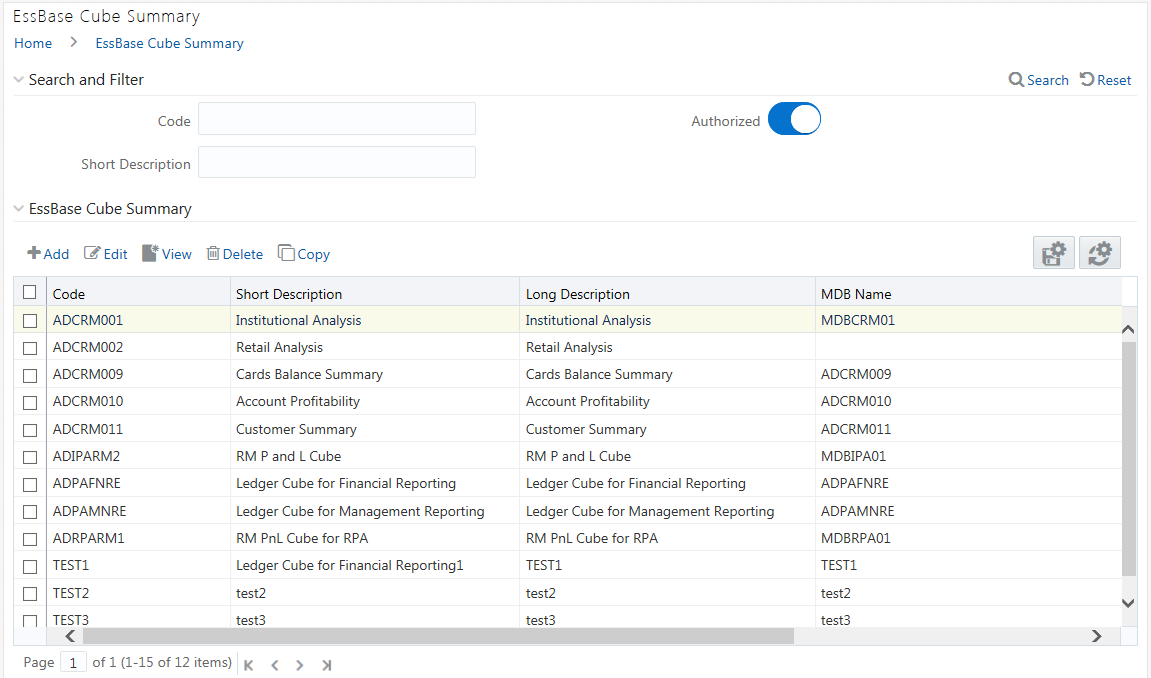
The Essbase Cube Summary window
displays the list of pre-defined Essbase Cubes with their Code, Short
Description, Long Description, and MDB Name. By clicking the Column header
names, you can sort the column names in ascending or descending order.
Click  if you want to retain your user preferences
so that when you login next time, the column names will be sorted in the
same way. To reset the user preferences, click
if you want to retain your user preferences
so that when you login next time, the column names will be sorted in the
same way. To reset the user preferences, click  .
.
You can add, view, edit, copy, and delete an Essbase Cube. You can search for a specific Essbase Cube based on the Code, Short Description, and Authorization status.
When you are defining Essbase cube for the first time, you need to specify the Cube definition details and the Cube-Building components such as Dimension, Variation, Intersecting details, DataSet, Formulae, and Roll Off period details. Your User Group should be mapped with the User Role ‘Essbase Cube Write’ to create or add an Essbase Cube.
Note the following:
NOTE |
· Cube Build with OLAP type as Essbase – If there is a Business Intelligence (BI) hierarchy in the cube definition, cube build is supported only if the data length for BI Hierarchy processing is less than 50. · You must define at least two Business Dimensions. Else, an alert message is displayed. |
To create an Essbase Cube
1. From the Essbase Cube Summary
window, click  Add.
The Essbase Cube Details window is displayed.
Add.
The Essbase Cube Details window is displayed.
2. Enter the Essbase Details as tabulated.
Field |
Description |
Code |
Enter a distinct code to identify the Cube. Ensure that the code is alphanumeric with a maximum of 8 characters in length and there are no special characters except underscore “_”. Note the following: The code can be indicative of the type of Cube being created. A pre-defined Code and Short Description cannot be changed. Same Code or Short Description cannot be used for Essbase installation: "$$$UNIVERSE$$$", "#MISSING”, "#MI”, "CALC”, "DIM”, "ALL”, "FIX”, "ENDFIX", "HISTORY”, "YEAR”, "SEASON", "PERIOD”, "QUARTER”, "MONTH”, "WEEK”, "DAY". In Unauthorized state, the users having Authorize Rights can view all the unauthorized Metadata. |
Short Description |
Enter a Short Description based on the defined code. Ensure that the description is of a maximum of 8 characters in length and does not contain any special characters except underscore “_”. |
Long Description |
Entering the Long Description is helpful when creating Cube. It could indicate the contents of the cube or any other useful information that would help an analyst. You can enter a Long Description with a minimum of one character and a maximum of 100 characters in length. |
MDB Name |
Enter the name by which you want to identify the cube while saving it in a multi-dimensional database. Saving a cube to a multi-dimensional database is different from saving the Cube definition wherein the definition (like all other metadata definitions) is stored in the repository. When saved, the cube details are updated by the cube name that you have attributed to it. Ex: NoofProd (Number of Products) Note: Ensure that the name is within 1 to 8 characters in length and can contain alphabetical, numerical (only 0-9), or alphanumerical characters without special characters and extra spaces. |
Is Build Incremental |
Turn ON the toggle button if you wish to capture all incremental changes made to the database. The cube definitions with the Is Build Incremental toggle button turned ON can be executed with different MIS dates. |
3. Enter the Cube Components in each of the tabs as tabulated.
Field |
Description |
Dimension (default) |
In the Dimension tab, the Available list consists of the pre-defined Dimensions. Select the required Dimension for the cube
and click You can click You can also click Note: It is mandatory to select at least two dimensions. One dimension should be of Measure Dimension Type. |
Variation |
In the Variation tab, you can define the Variation by mapping the Dimension against the defined Measure.
To map a Dimension to a Measure, select the corresponding check box. |
Intersection |
Note that the Intersection option is specific to Count Distinct Measures. The Count Distinct Measures should be intersected only across those dimensions on which a duplicate is expected for that measure. For example, there can be no customer who has both gender as Male and Female. Thus intersecting the Count distinct measures across a Gender dimension will not make sense. Similarly, the Count Distinct measures will have duplicates across Products or Regions. Thus, the intersecting can be across those dimensions (Product/Region). For more information, see “Selecting Aggregation Function” in Business Measures section.
Select the required Dimension from the drop-down list corresponding to the Measure. Note: Mapped Intersection should be a subset of mapped Variation. |
Dataset |
In the Dataset tab, you can select the Dataset for the cube along with the additional filters like the Date Filter and Business Exclusions.
Select the required Dataset from the drop-down list. The selected From Clause and Join Condition for the selected Dataset are displayed. To define the Date Filter,
click To define the Business
Exclusion, click |
Formulae |
Note that the Formulae tab is specific to Essbase MOLAP. In the Formulae tab, you can apply filters to a hierarchy node.
When you select a Dimension from the Selected
Dimensions drop-down list, the mapped Hierarchies will be listed
out in the Hierarchies drop-down list. Click |
Roll Off |
In the Roll Off tab, you can define the start date of the cube to specify the history of the data which is to be picked up during aggregation. The maximum period of data history that can be specified is 24 months. The Roll Off option is enabled only to BI enabled hierarchies.
Turn ON the Roll Off Required toggle button. Click Select the Dimension for which you want to specify the roll off period from the drop-down list. Select the Level from the drop-down list. The list contains the hierarchy levels of the selected Dimension. |
4. Click Save and save the Essbase Cube Definition details. A confirmation dialog is displayed.
The Cube definitions are stored in repository and accessed for query. Once saved, the cube details are displayed with non-editable Code and Short Description fields.
You can view the metadata of a selected Essbase Cube definition at any given point. You need to be mapped to the User Role Essbase Read Only to view Essbase Cube definition.
To view the existing Essbase Cube definition details:
1. From the Essbase Cube Summary
window, select the Essbase Cube definition and click  View. The Essbase Cube Details
window is displayed.
View. The Essbase Cube Details
window is displayed.
§ The User Info tab displays the metadata properties such as Created By, Creation Date, Last Modified By, Modified Date, Authorized By, and Authorized Date.
§ The User Comments tab has a text field to enter additional information as comments about the created Cube definition.
§ Click  Close.
The Copy function is similar to “Save As” functionality and helps you to copy the pre-defined Essbase Cube details to quickly create another Essbase Cube. Your User Group should be mapped to ‘Essbase Cube Write’ User Role to copy the Cube details.
To copy Essbase Cube definition:
1. From the Essbase Cube Summary window, select the
Essbase Cube definition and click  Copy. The Essbase
Cube Details window is displayed.
Copy. The Essbase
Cube Details window is displayed.
2. Enter the Code, Short Description, Long Description and MDB Name. For more information, see Create Essbase Cube section. You can also modify the cube components as required.
3. Click Save and save the updated details. A confirmation dialog is displayed.
You can update the existing Essbase Cube definition details except the Code. You need to be mapped to Essbase Cube Write User Role to modify an Essbase Cube definition. You cannot modify a cube definition which is in the un-authorized state, that is, modified by another user.
1. From the Essbase Cube Summary
window, select the Essbase Cube definition and click  Edit. The Essbase Cube Details
window is displayed.
Edit. The Essbase Cube Details
window is displayed.
2. Modify the Essbase Cube definition with the cube components details as required. For more information, see Create Essbase Cube section.
3. Click Save and save the updated details. A confirmation dialog is displayed.
You can remove Essbase Cube definition(s) which are created by you and which are no longer required in the system by deleting from the Essbase Cube Summary window. You need to have Essbase Cube Write User Role mapped to delete an Essbase Cube. Delete function permanently removes the Essbase Cube details from the database. Ensure that you have verified the details as indicated below:
· An Essbase Cube definition marked for deletion is not accessible for other users.
· Every delete action has to be Authorized/Rejected by the authorizer.
§ On Authorization, the Essbase Cube details are removed.
§ On Rejection, the Essbase Cube details are reverted back to authorized state.
· You cannot update Essbase Cube details before authorizing/rejecting the deletion.
· An un-authorized Essbase Cube definition can be deleted.
To delete an existing Essbase Cube:
1. From the Essbase Cube Summary
window, select the Essbase Cube definition you want to deleted and click
 Delete. A confirmation
dialog is displayed.
Delete. A confirmation
dialog is displayed.
2. Click OK. The Cube details are marked for delete authorization.
 button.
 button
to select all the listed Dimensions.
button
to select all the listed Dimensions. button
to deselect a Dimension or click
button
to deselect a Dimension or click  button
to deselect all the selected Dimensions.
button
to deselect all the selected Dimensions.


 button. The

 to specify
the
to specify
the