| Agile Product Lifecycle Management Administrator Guide Release 9.3.4 E52155-02 |
|

 Previous |
 Next |
| Agile Product Lifecycle Management Administrator Guide Release 9.3.4 E52155-02 |
|
Previous |
Next |
The Workflows node stores the default workflows that Agile PLM client users select to create and send routable objects for approval. From this node, you can also define and create custom workflows.
The Workflows node stores the default workflows that Agile PLM client users select to create and send routable objects for approval. From this node, you can also define and create custom workflows
A workflow is an organized sequence of stages involving people's decisions: their creation, modification, review, and approval or rejection of a routable object. An Agile PLM workflow is an automated sequence of statuses that a routable object follows as it goes through a company's change control process. (For a detailed description of a typical change control process, see the chapter about workflows in the Agile PLM Getting Started Guide.)
Workflows automate the change control process in a variety of ways:
The changes that are available for a particular routable object are completely configurable. When users create a routable object, they select a workflow from the list of workflows that are available for that routable object.
When all required fields are filled in for a released routable object, and when all the approvers and acknowledgers have signed off for a Review or Released status type, the routable object can be moved automatically—autopromoted—to the next status.
Approval, rejection, and acknowledgment of the routable object occurs within defined permissions and other checks. You can preassign default approvers, acknowledgers, and observers.
Email automatically notifies users of the creation and progress of a routable object. For example, when an approver does not respond within the specified time period, a reminder email notification is triggered to be sent.
If the approver or acknowledger does not respond within the specified period, the routable object is sent to that user's designated escalation person, who can approve, reject, or acknowledge the routable object.
By defining a workflow with multiple Review and Released statuses, routable objects can be sequentially routed to different lists of approvers, acknowledgers, and observers.
A user can transfer authority to approve or acknowledge routable objects to another user for a specified period of time. With the appropriate privileges, a user can similarly transfer signoff authority for other users.
The following sequence applies to modifying a workflow in the Workflows node.
To modify the Workflow settings:
Under Workflow Settings, double-click Workflows. The Workflows window appears.
Double-click the workflow you want to modify, for example, Default Change Orders. The Workflow: Default Change Orders window appears. The setup tabs are:
General Information
Status: the Status table defines status properties, and the Criteria table defines criteria-specific properties.
History
With the General Information setup tab selected, in the field you want to edit, enter a new value or select from the drop-down list. The two Criteria Matching Type fields on the General Information tab should be left alone at this point.
When you have finished, click Save.
To modify this workflow's status properties or criteria-specific properties, begin by clicking the Status tab.
For information about changing workflows that are active (that is, are enabled and may have routable objects moving through them), see "Changing Active Workflows."
|
Note: Alterations to workflow statuses have implications for process extensions. See "Process Extensions." Also see Agile PLM Content Service User Guide. |
This section covers basic information about Agile workflows.
Any object that can be routed for approval is a routable object. The user who oversees the routing and approval process is the routing manager. The various routing managers (see the table below) are simply roles assigned to users by the administrator. Once a user has been assigned a role of, say, change analyst, his name appears on the Change Analyst List and can be selected manually by a Java Client or Web Client user. Routing managers evaluate and assign routable objects, and they receive email notifications pertaining to the objects to which they are assigned.
The following table lists routable objects and the corresponding default routing manager.
Table 11-1 Default routing managers for each routable object
| Routable object (with base class) | Default routing manager |
|---|---|
|
Change: All changes except MCOs & PCOs: change orders (ECOs), change requests (ECRs), site change orders (SCOs), stop ships, deviations |
Change analyst |
|
Change: Manufacturer orders (MCOs) |
Component engineer |
|
Change: Price change orders (PCOs) |
Price administrator |
|
Declarations (all) |
Compliance manager |
|
Packages |
Program manager |
|
Product service requests (PSRs): problem reports and nonconformance reports (NCRs) |
Quality analyst |
|
Project: activities and gates |
PPM program manager |
|
Quality change request (QCRs): corrective and preventive actions (CAPAs) and audits |
Quality administrator |
|
Transfer Order: content transfer orders (CTOs) and automated transfer orders (ATOs) |
Content manager |
Here is some other basic information about Agile PLM workflows:
A workflow consists of a unique name, one or more matching criteria, and a status list, or sequence of statuses. An enabled workflow is visible and usable by Agile PLM client users.
Each workflow must be qualified by at least one matching criteria; these are broad qualifiers that determine which workflow a routable object may follow. Agile PLM tests the routable object against all the matching criteria for all the workflows and determines which workflows match the routable object.
A workflow can contain any number of statuses. Status names are editable, but their underlying status types are not. Only one status type, Pending, is required and this must be the first status in the workflow. Three status types—Submit, Review, and Released—may be used multiple times in a workflow, with unique names for each instance. Review and Released are the most versatile status types.
Each and every status in a workflow's status list comprises status properties and criteria-specific properties.
Status properties define some specific actions that can be automatically triggered or manually performed—or both. Status properties determine what happens to the routable object when assigned people approve, reject, acknowledge, or even forget to review the routable object.
Criteria-specific properties are defined by filters called reusable criteria, which are created separately and stored in the Criteria node. Each individual status may have many criteria-specific properties. Criteria-specific properties describe specific actions that are triggered (automatically, or they can be manually performed) if the routable object meets the conditions defined in the reusable criteria while the routable object is entering or exiting a status. Criteria-specific properties apply to individual statuses, not to the workflow as a whole.
For example, criteria-specific properties can be used to define the following actions for a specific Review status of a workflow. When a routable object enters the status, if the routable object's Product Line field contains, for example, Libra, a specific set of approvers is assigned. If the Product Line field contains Scorpio, a different set of approvers is assigned. If the Product Line field contains both Libra and Scorpio, both sets of approvers are assigned.
Agile PLM workflows are a robust feature that offers a great deal of choice and flexibility for your company's change control process. For best results, plan thoroughly and gather all necessary data and information.
To prepare properly, follow these three steps before you attempt to customize Agile PLM workflows:
Compile information for tailored workflows. You must fully understand and define your company's required change control processes. This step is crucial to successful implementation of automated workflows.
|
Note: This process is not covered in this manual. Consulting services are available from Oracle Consulting - Agile Practice consultants, who can provide you with assistance in creating business process validation plans and guidance. During business process validation, you can propose workflows to simulate real scenarios and typical usage. |
Learn about Agile PLM workflows in this chapter and elsewhere in this manual.
Be sure you understand the purposes and limitations of the status types. See "Status Types Defined."
Use default workflows at first, which you can use immediately without modification. See "Default Status-Based Workflows."
Create some original workflows (in your test environment; see the next step) that meet specific needs at your company. See "Creating and Using Custom Workflows."
Establish a testing environment and complete test procedure. Test all new workflows! For example, create a routable object and send it through your enabled workflow. In any case, verify that new workflows work correctly, and alter them as necessary. For more information, see:
Although you can create as many workflows as your company needs, you are encouraged to explore the capacities of the ready-to-use default workflows first. Creating too many workflows too quickly could create maintenance issues later.
Agile PLM provides the following status-based workflows:
Default Activities
Default ATOs
Default Audits
Default CAPAs
Default Change Orders
Default Change Requests
Default CTOs
Default Declarations
Default Deviations
Default File Folders
Default Gates
Default Manufacturer Orders
Default Non-Conformance Reports
Default Packages
Default Price Change Orders
Default Problem Reports
Default Site Change Orders
Default Stop Ships
|
Note: Default ATOs and Default File Folders are read-only workflows. They cannot be modified. |
The default workflows can be used without modification. They ensure that all routable objects match criteria for a workflow. You can also tailor the default workflows to your requirements. If modifying the default workflows still does not meet your requirements, you can create custom workflows.
|
Caution: As a best practices approach, it is recommended that you save a set of the default workflows, unmodified and disabled. You can do this easily using Save As (see "Creating New Workflows with Save As.") |
Agile PLM workflows are defined by their list of statuses, and each status is of a particular status type. Workflows are created from five basic status types: Pending, Submit, Review, Released, and Complete. Two special status types, Cancel and Hold, handle routable objects that have failed to advance and must be stored.
The status types have sequence dependencies that determine where and how often you can use them in a workflow. A clear understanding of these dependencies is essential to constructing usable workflows. The following table defines the status types and provides details about these dependencies.
A workflow can have as many statuses as needed. Submit, Review, and Released are the status types that can be used more than once, with differently named and defined statuses. When you define a workflow with multiple Review and Released statuses, routable objects can be sequentially routed to different lists of approvers, acknowledgers, and observers.
You can use the default workflows without modification. It is best to work with the default workflows with no modifications until you are familiar with their uses and capabilities.
Agile recommends using Save As to create "archive" copies of all the default workflows. This ensures that you can always return to an unaltered version if you have customized the default workflows.
Status Types and Definitions
Before a workflow is selected for a routable object:
Unassigned – Unassigned is the default initial status name before a routable object has been matched with a workflow.
Basic Status Types (Active):
Pending – An originator is developing the routable object. A workflow must begin with a Pending status type; it is the first status in every workflow.
Submit – The Submit status type sends the routable object to the specified routing manager, who determines whether or not to promote the routable object to the next status.
Review – The Review status type routes the routable object to CCB members (approvers, acknowledgers, and observers). When all approvers and acknowledgers have signed off, and required fields have been completed, the routable object is automatically promoted to next status in the status list if AutoPromote is on, or it is manually moved by the routing manager if AutoPromote is off.
Released – When a routable object enters the first Released type status, the software performs a series of checks; it also creates new revisions of the affected items (ECOs) with the new BOM, incorporates redlines into a new "rev," or updates the manufacturer part information (MCOs).
Like the Review status type, the Released status type may have approvers, acknowledgers, and observers and be routed for signoff and may be autopromoted.
Only the first Released status actually releases the routable object. Subsequent Released status types—given distinguishing status names—provide additional review/approval cycles for the released routable object.
Returning a released routable object to any of the first three status types unreleases the routable object and removes approvals that were gathered. A Deviation can be unreleased if it does not have affected items.
|
Note: Although Agile PLM permits you to configure Change Order workflows that allow the release of an item without specifying a value for the New Lifecycle Phase, configuration management best-practices require that a New Lifecycle Phase always be specified prior to releasing an item on an ECO or MCO. In order to make sure there is a New Lifecycle Phase, make sure it is a required field in the Workflow Criteria. |
Complete – If Complete status type is used, it must be the last active status in the workflow, and it may be used only once.
Special Status Types (Inactive)
Hold – The Hold status type provides a way to temporarily remove a routable object from the workflow and reinsert it later. It is added to the end of the status list as it is never part of the active sequence of statuses.
Hold unreleases a routable object.
Given appropriate privileges, the user can manually move a routable object to Hold from any other status in the workflow (assuming it is listed as a valid next status under the Manual Valid Next Status property). It stays there until you manually move it back into the workflow. These moves require proper Change Status privileges.
Cancel – The Cancel status provides a way to remove a routable object from the workflow.
Cancel unreleases a routable object.
Cancel resets the workflow.
When a routable object is canceled, any redlines associated with the routable object are discarded.
Given appropriate privileges, the user can manually move a routable object to Cancel from any other status in the workflow (assuming it is listed as a valid next status under the Manual Valid Next Status property).
|
Note: In assigning privileges to move a workflow to the Cancel status, the administrator must recognize the potential for user-error. Canceling a routable object resets the workflow. Because a Canceled routable object that reenters the workflow must, in effect, start over, the fact that it is relatively easy to change a workflow to Cancel must be recognized and allowed for. |
You can create a new workflow from an existing one and give it a new name. This makes it easy to create an archive of the default workflows or to create a custom workflow that starts from the foundation of a proven default workflow.
To create a new (or "archive") workflow from an existing one:
Under Workflow Settings, double-click Workflows. The Workflows window appears.
Double-click the workflow you want to base the new workflow on. That specific workflow's window appears.
Click the Save As button, and enter a descriptive, unique name. Autogenerate the API name
If you are creating an archive copy, use a name that will distinguish it as "off limits," for example, "EXAMPLE Default Chg Orders."
Click OK. The setup window displays the new name in the title bar.
Change the information as necessary, and click Save.
The new workflow is disabled (the Enabled property is No), and can remain so for archived workflows, or will be enabled when you have finished constructing a customized workflow.
|
Note: Workflows created with Save As are disabled. A common mistake after creating a custom workflow is forgetting to enable it. |
Each Change Status privilege mask applies to one status of one specific workflow. You must create Change Status privilege masks for each status of every new workflow you create and enable, including workflows created by Save As. See "Change Status."
Double-clicking the Workflows node opens the Workflows window, which lists the available default workflows and any custom workflows you have created.
The window has the following buttons: New, Delete, Edit Workflow Init Settings, Import, Export, Export All, Enable, and Disable.
The Edit Workflow Init Settings button opens a dialog box with the following fields:
Table 11-2 Edit Workflow Init Settings dialog
| Field | Type | Default |
|---|---|---|
|
Default Initial Status Name |
Text |
Unassigned |
|
Status Stamp Color |
List (of colors) |
Blue |
When you double-click a default workflow in the Workflows window, the General Information tab of the setup window opens. The tab has the Delete, Save As, and Export buttons. It has the following fields:
Table 11-3 General Information Tab fields
| Field | Description |
|---|---|
|
Name |
The name of the workflow. Each workflow name must be unique |
|
API Name |
Unique systemwide identifier for objects and can be autogenerated. You can specify an API name, but internal consistency is enhanced by accepting the system-generated name. |
|
Enabled |
Enables or disables the workflow. An enabled workflow is visible and usable by Agile PLM client users. |
|
Object Type |
The type of routable object for which the workflow applies. Available for the following: changes, CTOs, QCRs, PSRs, projects, packages. Object types are listed in "Agile PLM Class Structure." Object Type is read-only after the workflow is created. |
|
Matching Criteria |
Determines which routable objects can follow the workflow. Can use any reusable criteria, for example, All Change Orders. |
|
Workflow Criteria Matching Type |
Refines how the matching criteria determines which changes can follow the workflow. It defines what happens when a routable object meets one or more reusable criteria that contain information about affected items. Choose Same, All, or Some. See "Workflow Criteria Matching Type." |
The workflow's name and whether or not it is enabled are defined at this level. The default workflows are already enabled. For information about what takes place when a workflow is enabled, see "Status Properties Defined." For information about modifying or fixing problems in active workflows, see "Changing Active Workflows."
When a workflow is created by the administrator, the Object Type field is limited to base class choices. The Matching Criteria property in a workflow selects an object type, and that is what the system picks up when a workflow is selected as the object type of an Event mask. For more information regarding Events and how they relate to Workflows, see "Event Management."
For each workflow, by specifying a list of reusable criteria in the Workflow Criteria Matching Type property, you limit which changes can use that workflow. Some examples of possible reusable criteria applied as matching criteria are:
All MECOs – Finds all the changes that are MECOs (mechanical ECOs).
Scorpio ECOs – Finds all the ECOs that include "Scorpio" in the Product Line(s) field of the routable object.
Libra Project – Finds all the changes that have any items on the Affected Items tab that contain "Libra" in the Product Line(s) field of the item.
For example, you might create a workflow named "General Use," and select the three reusable criteria named above (All MECOs, Scorpio ECOs, and Libra Project) as the matching criteria for that workflow.
Example 1: If an Agile PLM client user creates a change that is a mechanical ECO (MECO), it successfully matches one of the matching criteria of the General Use workflow (All MECOs). The General Use workflow will appear in the Workflow drop-down list on the Cover Page tab of the change (Java Client) or the Cover Page page of the change (Web Client).
Example 2: If the user creates a change that is an ECO that includes "Scorpio" in the Product Line(s) field of the ECO, it successfully matches one of the matching criteria of the General Use workflow (Scorpio ECOs). The General Use workflow appears in the Workflow drop-down list on the Cover Page tab of the change (Java Client) or the Cover Page of the ECO (Web Client).
Example 3: If the user creates a change order and adds items to its Affected Items tab that contain "Libra" in the Product Line(s) field of the item, Agile PLM examines the Product Lines field on the Affected Items tab for every affected item. The General Use workflow will appear in the Workflow drop-down list on the Cover Page tab of the change (Java Client) or the Cover Page of the Change Order (Web Client) depending on the setting of the Criteria Matching Type property for the workflow:
Same – All affected items must match the same affected item-based reusable criteria, in this case, Libra Project.
All – When multiple affected item-based reusable criteria are used as matching criteria, each affected item must match at least one affected item-based reusable criteria; however, each affected item does not have to match the same reusable criteria.
Some – One or more (but not all) affected items must match the affected item-based reusable criteria, in this case, Libra Project.
As the user adds items to the Affected Items tab and completes the fields on the tabs of the routable object, the Workflow drop-down list on the Cover Page tab may vary, depending on which matching criteria apply at the moment.
Because reusable criteria appear on a workflow's Status tab for each discrete status, Status Criteria Matching Type applies to the groups of reusable criteria in each status. The property is applied in Agile PLM clients when a status's criteria-specific properties contain information about affected items that is pertinent to the routable object, for instance, which approvers, acknowledgers, or observers should be assigned to it.
The property values and their behavior are listed below, followed by an example.
Same – All affected items must match the same affected item-based reusable criteria in a given status. If all the affected items do not match the same reusable criteria, the ECO does not satisfy any exit criteria, and the "If No Criteria Apply at Exit, Notify" property is applied.
All – When multiple affected item-based reusable criteria are used as criteria-specific properties in a given status, each affected item must match at least one affected item-based reusable criteria; however, each affected item does not have to match the same reusable criteria. "All" ensures that every affected item has an appropriate approver.
For example, for each reusable criteria in a status that one of the affected items matches, the specified approvers are added to the Workflow tab of the ECO. If each of the affected items does not meet at least one of the reusable criteria, the ECO would not satisfy any exit criteria, and the "If No Criteria Apply at Exit, Notify" property is applied.
Some – One or more (but not all) affected items must match at least one affected item-based reusable criteria in each status's criteria-specific properties. For each reusable criteria in a status that one of the affected items matches, the approvers are added together for the ECO.
The general setting (that is, on a workflow's General Information tab) for Status Criteria Matching Type is validated against both the reusable criteria (the group of criteria in that status's Criteria table on the Status tab) for the present status and the reusable criteria for the next status in the workflow.
For example, Sarah has written a change called "ECO2" with the following affected items (on the Affected Items tab of the change in Java Client):
Affected Item 1 (AI-1): Product Line = Aries, Category = Electrical
Affected Item 2 (AI-2): Product Line = Aries, Category = Mechanical
For ECO2's Submitted status (Submit status type), on the Criteria table on the Status tab, is a reusable criteria that specifies:
Reusable Criteria W (RC-W): Product Line = Aries, Affected Item.Category = Electrical, Required fields = change description
Next, for ECO2's CCB status (Review status type), on the Criteria table on the Status tab, is a reusable criteria that specifies:
Reusable Criteria X (RC-X): Product Line = Aries, Affected Item.Category = Mechanical, Approver = Paul
If Sarah wanted to move the change from Submit to CCB, ECO2's Status Criteria Matching Type (SCMT) is set to All, AI-1 (the Electrical part) now matches RC-W, but AI-2 (the Mechanical part) does not match RC-W. If Sarah put RC-X under Submit as well, AI-2 now matches a criteria for Submit; however, because Criteria Matching Type is set to All, the change still cannot move to CCB because AI-1 does not match RC-X under CCB.
If SCMT is set to Some, Sarah can advance her change in both cases because one of the affected items matches a criteria for each status (a different AI for each status in this case, first Electrical, then Mechanical).
If SCMT is set to Same, even after Sarah adds RC-X to Submit, ECO2 is not able to advance because each affected item does not match each criteria: AI-1 matched RC-W and AI-2 matched RC-X.
You will probably find it is much easier to create a new workflow by saving one of the default workflows with a new name (see "Creating New Workflows with Save As"), and then modifying the status properties and criteria-specific properties to suit your purposes.
The value of creating a custom workflow from scratch is that you go through all the elements of a workflow so that you are more familiar with the entire process, including the point where you will have to troubleshoot a workflow that is not doing what it is supposed to.
When creating a custom workflow, you must specify the following things:
Name of the workflow.
API name of the workflow.
Matching criteria – at least one for any workflow.
Status list – including how many statuses, status names, status types.
Status properties – defined for each status in the workflow.
Criteria-specific properties – defined for each status in the workflow.
It is important to plan as thoroughly as possible before you create an original workflow. To get the most out of this process, you need to do all of the following:
Read this manual and become familiar with workflows documentation.
Enable and use one or more of the default Agile PLM workflows in live situations. See "Default Status-Based Workflows."
Compile specific information and data that define what you need an original workflow to do. This includes a sequence of statuses that differ from those in the default workflows.
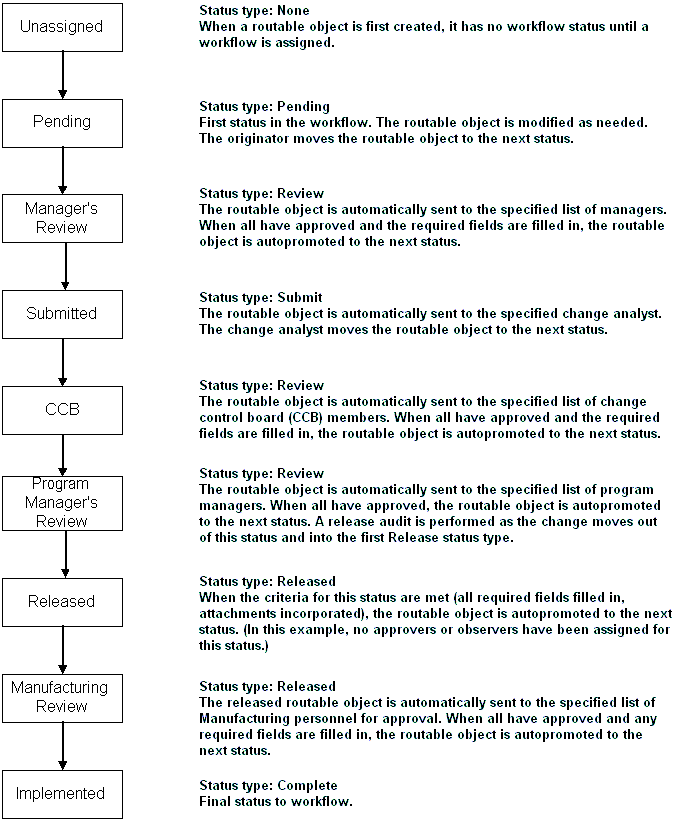
The next several sections describe how to create the workflow in the figure below. This customized workflow demonstrates several departures from the "one status per status type" structure of the default workflows:
The Submit status does not immediately follow the Pending.
There are three Review statuses. The names in the example are less important than the idea that you can have as many Reviews as you need.
Two statuses use the Released status type, but the second status is named Manufacturing Planning, which acts like another Review. Because the Review and Released status types share many attributes—approvers, autopromotion, and so on—this permits additional Review cycles without unreleasing the routable object. If a routable object enters a Review following a Released status type, it is unreleased, which means:
The routable object must qualify again for release (through the release audit: See "Release Audit, or Audit Current Status for Conditions to Release."
Any revisions that were assigned to the affected items are revoked.
The guidelines below describe the steps required to build a custom workflow. The steps are explained in detail in the following sections.
To build a custom workflow:
Define your change control process, including the kinds of routable objects you'll need to process with workflows.
Contact your Agile representative or Agile Consulting Partner for help in defining your workflow processes.
Create all required reusable criteria from the Criteria node first; these are necessary to describe (for the system) the distinguishing characteristics of the workflow. See "Criteria."
Create a new workflow and give it a unique name, but do not enable it. Enabling is the final step. See "Creating a New Workflow."
Select at least one reusable criteria (defined from the Criteria node) for the matching criteria.
Create the Status list for the new workflow.
Modify the properties of each status on the Status tab, understanding that the available status properties are different for each status type.
Add criteria to the Criteria table on the Status tab and define the criteria-specific properties of the statuses, particularly required fields and approvers, acknowledgers, and observers.
Assign appropriate privileges that allow users to refine statuses in a new workflow. The privileges most pertinent to workflows are Add Reviewer, Remove Reviewer, Change Status, Override; Transfer Authority for Self, and Transfer Authority for Others.
See "Privileges and Privilege Masks." To move a routable object through the new workflow, users must have Change Status privileges for that specific workflow; see "Change Status."
Set SmartRules for systemwide workflow functionality. See "SmartRules Defined."
Enable the modified workflow and test it. When it is ready, notify your Agile PLM users that it is available. They will be able to use it the next time they log in to Agile PLM.
It will be helpful to create a list like this table with the statuses of your new workflow defined both by name and by status type.
Table 11-4 Example of a new workflow status list and status types
| Status name | Status type |
|---|---|
|
Originate |
Pending |
|
Review-PM |
Review |
|
Submit-CA |
Submit |
|
Review-CCB |
Review |
|
Review-Sr.PM |
Review |
|
Released |
Released |
|
Review-Mfg.Planning |
Released |
|
Implemented |
Complete |
To create a new workflow:
Under Workflow Settings, double-click Workflows. The Workflows window appears.
Click New. The Create Workflow dialog box opens.
Enter a unique name, such as Taurus ECOs and an API name.
A "best practice" may be to conceptualize a system of naming your original workflows. For some ideas about naming conventions, refer to "Creating a New Criteria" and "Naming Privilege Masks."
The Enabled field on the General Information tab is not available at this point. No new workflow can be enabled until it is complete. When you have completed a new workflow, you must enable it to use it. Agile PLM client users will see the newly enabled workflow the next time they log in to Agile PLM.
In the Workflow Criteria Matching Type and Status Criteria Matching Type drop-down lists, allow (or select) Same.
Matching criteria are used to find which workflows may be used for each routable object. Agile PLM checks all the matching criteria for all the workflows and determines which workflows match the routable object. For example, if a reusable criteria called All Taurus ECOs is a matching criteria for a workflow, then the user can select that workflow for an ECO in the Taurus project.
The factors you need to consider to take full advantage of these three criteria properties are fairly complex. Detailed information is provided in "Using Affected Items Tab Fields in Reusable Criteria."
From the Object Type drop-down list, select the appropriate base class.
In the Matching Criteria drop-down list, scroll down and select All Change Orders.
Click OK. The new workflow is added to the list on the Workflows window.
To complete setting up the new workflow, you need to double-click it in the Workflows window and create statuses with defined status properties and criteria-specific properties.
To create statuses for a new workflow:
Open the workflow, click the Status tab, and click New just above the Status table. The Add Workflow Status dialog box appears.
Type an appropriate name; in our example, it is Originate and API name.
In the Status Type drop-down list, select an appropriate status type, in this case Pending (the required first status for any workflow).
In the Status Stamp Color drop-down list, select a color for the type in the status stamp that will appear for that status in Agile PLM clients.
Click OK. Repeat this process for all statuses you want the workflow to have.
If you scroll to the right in the Statuses table, you see two status properties that need to be given values: If No Criteria Apply At Exit and Notify and Manual Valid Next Status.
Agile recommends creating all the statuses, then filling in the status properties before considering the criteria-specific properties. However, with so many factors to consider, the most important thing is to develop your own method or systematic approach to constructing an error-free workflow.
To designate reusable criteria for a new workflow:
Open the workflow, click the Status tab, select a status (row) in the Status table, then click the New button just above the Criteria table. The Add Workflow Criteria dialog box appears.
The Status Name field is grayed and populated with the name of the status you have selected. Click the down arrow for the Select Criteria field, and select one or more reusable criteria for that status.
When you have finished, click Save.
Repeat this process for all statuses in the new workflow.
When you have completed the construction of your custom workflow, and have verified that it is ready for users to apply routable objects (see "Workflow Functionality Testing," you need to enable it. In the setup window for the workflow, select Yes in the Enabled drop-down list.
|
Note: A new workflow is disabled as you create it. A common mistake after creating a custom workflow is forgetting to enable it.To move a routable object through the new workflow, users must have Change Status privileges for that specific workflow. See "Change Status." |
Agile PLM client users will see the new workflow when they restart their client application after you have enabled the workflow.
When a workflow is enabled, the system checks the following items:
The first status is the status type Pending.
If there is a status of status type Complete, then it must be the final status of the workflow (excluding special statuses Cancel and Hold).
The workflow's matching criteria must contain at least one reusable criteria.
Each status in the workflow must be assigned at least one reusable criteria in the workflow's Criteria table.
If there are Cancel or Hold statuses, they must appear at the end of the status list. If there is a Hold status, it must be the last status on the list.
If any of these requirements are not completed, an error message appears, and the workflow is not enabled.
A user can assign a user group (global group, not a personal group) as an approver, acknowledgers, or observer using valid approvers, acknowledgers, and observers. The administrator or Agile Web Client user who is assigning a user group can select whether one member or all members must sign off the routable object. See "Adding User Groups as Default Reviewers in a Workflow."
This section describes all of the Status Properties found in Agile PLM workflows. When you double-click a default workflow in the Workflows window, then click the Status tab, the status properties are found in the Status table: double-click a status in the table, the Workflow Status: [Status Name] dialog appears.
Answers the question: Who should be notified if the routable object does not match its present criteria (that is, it is stuck)?
General default (in default workflows): $CHANGEANALYST. See "Routing Managers."
This property indicates who is notified by automatic email if the routable object cannot advance to the next status because does not meet the conditions defined by the criteria in the current status' criteria-specific properties. If a routable object cannot be promoted to the next status in the workflow because there are no criteria that permit the promotion, the defined people are notified by automatic email.
Use the Address Book dialog to add users, user groups, Originator, Approvers (all approvers for statuses the routable object has already gone through), Observers (all observers for statuses the routable object has already gone through), and Acknowledgers (all acknowledgers for statuses the routable object has already gone through) to be notified.
Answers the question: Besides the next status in the status list, what are other statuses the routable object could go to from the present one?
General default (in default workflows): (no general default)
For each status, use the Choices-Selected dialog to define additional valid "next statuses" that the routable object can move into from the current status. The system understands that the next status in the workflow's status list is always valid, so that status is not present in the Choices list. (The current status is, of course, never a valid "next status.") The system does not assume validity for Complete (since there is no status after a routable object arrives at Complete), Cancel or Hold (since they are never part of a workflow), so these must be specified.
|
Caution: In assigning privileges to move a workflow to the Cancel status, the administrator must recognize the potential for user-error. Because a Canceled workflow can not be re-activated by any means, the fact that it is relatively easy to change a workflow to Cancel must be recognized and allowed for. |
When the user manually advances a workflow to the next status, the routing slip appears to be filled in. This contains approvers, acknowledgers, observers, "notify" users, and comments, and the user may spend several minutes completing the slip. When user clicks Route, Agile performs an automatic workflow status audit and presents the user with a dialog if a problem is found. The user is asked if he wants to continue: previously, if No was selected, the user was returned to the routable object and lost all the work; this has been fixed so the routing slip content is preserved.
When sending comments from a Review or Released status in a change, the user can specify whether the comments are to be sent to only the current review or released status reviewers—that is, for the workflow's current status—or if comments are to be sent to all reviewers in both current and previous Review and Released statuses. A drop-down box (after the "Notify Reviewers for" check box) contains Current Status and Current and Previous Statuses for selection.
Answers the question: Will the system automatically promote the routable object to the next status?
General default (in default workflows): No
Use the AutoPromote property to permit a routable object to automatically advance to its next status. For each Review and Released status type, you can determine if the workflow can be autopromoted to the next status.
When a routable object enters a status where AutoPromote is enabled, the system immediately attempts to autopromote it; if there are no approvers or acknowledgers and all the required fields are complete, the routable object advances to the next status. Status advance is usually more involved than that scenario: for example, Review statuses will often have one or more approvers and acknowledgers (and at a current status, all approvers must approve the routable object, and all acknowledgers must acknowledge the routable object for it to advance), and required fields can easily block autopromotion to the next status.
Also, the Change Status Approver Rejected Change SmartRule must be set to Allow for an approver's rejection not to hold up autopromotion of the workflow.
|
Note: AutoPromote checks required fields only once when the workflow enters a specific status. However, when the last required field is populated, the system registers this fact and the routable object does autopromote to the next status.AutoPromote does check the workflow every time an approver either approves or rejects, and autopromote does check the workflow every time an acknowledger acknowledges. If there are more approvers who have not yet approved or rejected, or acknowledgers who have not yet acknowledged, then the status is not advanced. When the final required reviewer (either an approver or an acknowledger) has responded (approves or rejects or acknowledges), then the AutoPromote function evaluates according to the above-named SmartRule and promotes the status or not accordingly. |
If any of the required reviewers—approvers or acknowledgers—have not yet approved or acknowledged the routable object, then anyone who has the Override privilege can still manually promote it. If the routable object is rejected by an approver or other participant with appropriate permissions, the routable object goes to the status defined in If Rejected, Set Status To (see "If Rejected, Set Status To"), which is done automatically, whether the AutoPromote feature is on or off.
The AutoPromote feature must be set in relation to the Override privilege and the following two SmartRules:
Change Status Approver Rejected Change
Change Status Observer Rejected Change
|
Caution: When these two SmartRules are set to Warning, and an approver or observer rejects to the routable object, the system still autopromotes the routable object and records the warning on the History tab of the routable object. |
You can define required fields that, when filled in on a routable object, determine if it can be promoted to the next status. See "Entry Required and Exit Required Fields." All required fields for a status must be filled in before it can be autopromoted to the next status. For example, when the last user approves the routable object and all required fields are present, the routable object immediately advances to the next status.
|
Caution: Do not alter any property before the Released status in any workflows for CTOs (content transfer orders). For instance, if you set AutoPromote to Yes, the CTO output files will not be generated. |
Answers the question: Who should be notified if AutoPromote fails?
General default (in default workflows): $CHANGEANALYST (see "Routing Managers.")
For each Review and Released status type, the Agile PLM administrator defines who is notified by automatic email if AutoPromote fails.
When the routable object is approved by all approvers and acknowledged by all acknowledgers, the system attempts to autopromote the routable object. AutoPromote fails if:
Not all the required fields are filled in
SmartRules are not adhered to
AutoPromote checks required fields only once when the workflow enters a specific status. However, when the last required field is populated, the system registers this fact and the routable object does autopromote to the next status.
If the autopromotion fails, this fact is captured and automatically emailed to users and groups identified in the current status's setting for If AutoPromote Fails, Notify.
This feature notifies whomever is specified in the status's If AutoPromote Fails, Notify setting each time a change order fails to autopromote if new approvers were added since the last autopromote failure. Additionally, History is updated. AutoPromote fails when a new approver is added but does not complete all workflow-required fields.
Use the Address Book dialog to add users, user groups, Originators, Approvers (all approvers for statuses the routable object has already gone through), Acknowledgers (all acknowledgers for statuses the routable object has already gone through), and Observers (all observers for statuses the routable object has already gone through) to be notified.
The email regarding failure of autopromotion is sent only when there is a failure after the last required reviewer (approver or acknowledger) designated for that status has approved or acknowledged the routable object. The system sends one email notification of failure to autopromote.
Answers the question: Can "ad hoc" approvers, observers and acknowledgers be added once the routable object has entered the status?
General default (in default workflows): Yes
For each Review and Released status type, the Agile PLM administrator defines whether approvers, observers, and acknowledgers can be added as a routable object actively progresses. When this property is set to Yes, users with Add Reviewer and Remove Reviewer privileges can add or remove approvers, observers, and acknowledgers on the Workflow tab of a routable object in a Review or Released status type. They are also prompted to add reviewers in the Change Status window during the release cycle.
|
Note: A user with the Remove Reviewer privilege may successfully remove an observer from one status and then not be allowed to remove approvers, observers, or acknowledgers on the next status; this indicates the Ad Hoc Reviewers property for the latter status is set to No. |
Answers the question: Should the status be automatically changed if a user rejects the routable object? (If so, enter the appropriate status.)
General default (in default workflows): (none)
For each Review and Released status type, the Agile PLM administrator defines If Rejected, Set Status To. If the routable object is rejected by an approver or other participant with appropriate permissions (this status property does not apply to observers), the routable object goes to the status defined in this setting. This is done automatically, whether the AutoPromote feature is on or off.
|
Note: Although it is possible to set this property so the routable object moves forward despite a rejection, Agile recommends that it be used to prevent the routable object from advancing until the reason it was rejected is examined. Note that if this status property is set to null (no setting), then when a user rejects the change, the workflow will advance to the default status, that is, the next status in the workflow. |
Answers the question: Who should be notified if the routable object is rejected?
General default (in default workflows): $CHANGEANALYST (See "Routing Managers").
For each Review and Released status type, the Agile PLM administrator defines If Rejected, Notify. This property indicates who is notified by automatic email if the routable object is rejected by an approver or observer.
Use the Address Book dialog to add users, user groups, Originators, Approvers (all approvers for statuses the routable object has already gone through), Acknowledgers (all acknowledgers for statuses the routable object has already gone through), and Observers (all observers for statuses the routable object has already gone through) to be notified.
Answers the question: How long after a routable object has been routed for approval should required reviewers (approvers and acknowledgers) be sent email reminders to approve, reject, or acknowledge it (at that status)?
General default (in default workflows): 48 hours
The reminder period is a period of time defined for each Review and Released status type in all workflows. When the reminder period elapses, if an approver has not approved or rejected a routable object, or an acknowledger has not acknowledged a routable object, a reminder email notice is sent to the approver or acknowledger. The routing manager receives a similar email notice, which also includes a list of the approvers and acknowledgers who received reminder email.
If you delete an existing value or attempt to leave the field empty (null), clicking Save results in a 0 being placed by the system. A value of 0 is the same as disabling the property, and no reminder notifications will be sent.
Each Review and Released status type has its own reminder period. The reminder period is set in hours and begins when the routable object enters each Review or Released status type. If a workflow has multiple Review or Released status types, each of these may have reminder periods of different lengths. The reminder periods for the default workflows are all 48 hours.
Answers the question: How long should the system wait before escalating a routable object?
General default (in default workflows): 96 hours
The review escalation period is a period of time defined for each Review and Released status type in all workflows. When the escalation period elapses, if a required reviewer has not responded (an approver has not approved or rejected a routable object, or an acknowledger has not acknowledged a routable object), email is sent to the required reviewer's appropriate designated escalation person. The routing manager receives similar email, notifying her that the routable object has been escalated to the specified designated escalation person. The designated escalation person may approve, reject or acknowledge the routable object in the place of the original approver or acknowledger.
If you delete an existing value or attempt to leave the field empty (null), clicking Save results in a 0 being placed by the system. A value of 0 is the same as disabling the property, and no reminder notifications will be sent.
Each Review and Released status type has its own review escalation period. The review escalation period is set in hours and begins when the routable object enters a Review or Released status type. If a workflow has multiple Review or Released status types, each of these may have review escalation periods of a different length. The review escalation periods for the default workflows are all 96 hours.
Escalation occurs only once per status for any sequence of user (or user group) to the designated escalation person.
You can define a designated escalation person for each user from the Users base node (see "Users"). This is useful for expediting the routable object when a particular user has not reviewed and signed off on the routable object. You can also set a designated escalation person for each global user group from the User Groups node See "User Groups."
All escalation assignments are done from the Administrator nodes. Each user or user group may have multiple designated escalation persons. (Personal groups do not have designated escalation persons.)
If the review escalation period elapses, the approver's or acknowledger's designated escalation persons are notified by email that the approver or acknowledger has not responded to the routable object. Now the designated escalation persons may approve, reject, or acknowledge the routable object in the place of the original approver or acknowledger. The designated escalation person's name is recorded on the Workflow tab and the History tab as the Signoff User.
You determine whether a user's designated escalation persons can sign off a routable object at any time (= Always), or only after the escalation period has elapsed (= After Escalation). (See "User Properties Defined." The escalation person may or may not have appropriate permission to approve or reject the routable object, but the notification still goes through. If, for example, a user's manager is his designated escalation person but is not involved with the routable object approval process, the manager would at least know the routable object had been held up, and could take appropriate action.
|
Note: If the designated escalation person is a group, only one member of the group needs to sign off the routable object. When the routable object has been signed off, the routable object no longer appears in the Inbox of the other members of the group. |
Answers the question: Should comments be required in the Review status of this workflow when it is rejected?
General default (in default workflows): Allowed.
For each Review status, the Agile PLM administrator can define whether approval comments are allowed, required, or prohibited. The default "Allowed" means that comments are allowed, but not required for the workflow in that status. "Required" means that when an Approver approves the workflow at that status, he must enter a comment for the workflow to proceed. "Prohibited" means that when an Approver approves the workflow at that status, he cannot enter a comment for the workflow to proceed.
Answers the question: Should comments be required in the Review status of this workflow when it is rejected?
General default (in default workflows): Allowed.
For each Review status, the Agile PLM administrator can define whether rejection comments are allowed, required, or prohibited. The default "Allowed" means that comments are allowed for rejection, but not required for the workflow. "Required" means that when an Approver rejects the workflow at that status, he must enter a comment for the workflow. "Prohibited" means that when an Approver rejects the workflow at that status, he cannot enter a comment for the workflow.
Answers the question: Should comments be required in the Review status of this workflow when it is acknowledged?
General default (in default workflows): Allowed.
For each Review status, the Agile PLM administrator can define whether acknowledgment comments are allowed, required, or prohibited. The default "Allowed" means that comments are allowed for acknowledgment, but not required for the workflow. "Required" means that when an Acknowledger acknowledges the workflow at that status, he must enter a comment for the workflow. "Prohibited" means that when an Acknowledger acknowledges the workflow at that status, he cannot enter a comment for the workflow.
Answers the question: Should the approver need to identify himself with more than a password?
General default (in default workflows): No
This property for Released statuses of all default and custom workflows, dictates that users are also required to enter their User ID (also called username) and their Login Password.
Answers the question: Should approval passwords be required in the status of this workflow?
General default (in default workflows): Yes
The administrator can decide whether a password is required for approvals or rejections in a workflow of an object. If this property is set to Yes, the Password field appears as a required field for both approvals and rejections. If this property is set to Approve Only, the Password field appears only for approval and acknowledgment actions. If this property is set to No, the Password field does not appear for any approvals, rejections, or acknowledgments. If this property is set to Reject Only, the Password field appears only for rejection actions.
This section describes all of the Criteria-specific Properties found in Agile PLM workflows. When you double-click a default workflow in the Workflows window, then click the Status tab, the criteria-specific properties are found in the Criteria table. First select a status (row) in the Status table, that status appears in the Criteria table; double-click the row in the Criteria table, the Workflow Criteria: [Criteria Name] dialog appears.
Answers the question: Who should approve or reject, who should simply observe, and who should acknowledge the routable object in this status?
General default (in default workflows): (none)
The Agile PLM administrator defines default approvers, observers, and acknowledgers who are selected automatically and then notified by email when the routable object enters the Review or Released status type. The default approvers, observers, and acknowledgers are assigned to a routable object based on the attribute values and the matching criteria of the workflow when it enters the Review or Released status. Approvers, observers, and acknowledgers can be automatically selected by their job functions. See "Administering Approval Matrix."
Answers the question: If a user group is selected as a default approver, observer or acknowledger, should all the users in the user group signoff (All) or should only one user in the user group signoff (Any)?
General default (in default workflows): (All)
The Agile PLM administrator defines default approvers, observers, and acknowledgers who are selected automatically when the routable object enters the Review or Released status type. If a user group is selected, the Group Signoff Expansion property determines how that user group must respond:
All – The user names of the members user group are added to the Workflow tab as individual signoff users. For each user group member, a row is added to the workflow table.
Any – The name of the user group is added to the workflow table. For each user group, a single row is added to the workflow table. Only one member of the group needs to sign off.
Answers the question: What are the criteria-specific properties for this status?
General default (in default workflows): All Change Orders for Default Change Orders workflow
Criteria are the conditions that specify how the reusable criteria work in the specific status. Each status must have at least one reusable criteria in its criteria-specific properties.
Criteria are checked when the routable object is about to exit the particular status. Criteria also define which criteria-specific properties apply. Several criteria-specific properties could be applied to a single routable object.
Because this is a comprehensive topic, for more information about criteria, see:
In Getting Started with Agile PLM, see the chapter "Finding Agile Data with Searches" for information about how to use the Advanced Search process, which is similar to the Create Criteria process.
Answers the question: Who should be the default routing manager on this routable object? (See "Routing Manager Variables.")
General default (in default workflows): Default routing managers can be chosen; for Pending status only.
You can define different default routing managers for each workflow (component engineers for MCOs, price administrator for PCOs, change analysts for the other changes, and so forth). Under the criteria-specific properties in the Pending status, you can select a different default change analyst for each criteria. If there is no default change analyst, the user can enter one. If the Change Analyst field is left blank in Agile Java Client, all change analysts are notified if $CHANGEANALYST (or $COMPONENTENGINEER) is set by the administrator.
Users can edit the Change Analyst field, assuming they have the proper privilege, but the system does not assign the new change analyst until the routable object moves from Pending to the next status. If the change analyst has been selected by the user, but the workflow has been set up with a default change analyst who does not match, the user is warned.
If you define more than one change analyst (that is, if the routable object matches multiple criteria for different change analysts), the user is warned when the routable object moves from Pending to the next status. He sees a dialog box with a list of change analysts and can select one for that workflow.
|
Note: While promoting workflows of any kind of routable object to the Next Status, if no Change Analyst (or Routing Manager type) is assigned, a default Change Analyst is automatically populated to the field. The system assigns the default Change Analyst even if the user does not have the Modify privilege. |
For information about adding approvers, acknowledgers, and observers, see "More about Affected Items: Adding Approvers, Acknowledgers, and Observers."
Answers the question: Who should know that the routable object entered a new status?
General default (in default workflows): (none)
The Notify Upon Entry property indicates which users are notified by email when a routable object enters each status.
Use the Address Book dialog to add users, user groups, Change Analysts, Originators, Approvers (all approvers for statuses the routable object has already gone through), Acknowledgers (all acknowledgers for statuses the routable object has already gone through), and Observers (all observers for statuses the routable object has already gone through) to be notified.
You can set whether the change analyst receives email notification that the routable object has been released. The Notify Upon Entry property is also used to set the Notify defaults for the status transition dialog boxes for manual status transitions. The user can determine who is notified (for example, originator, approvers, acknowledgers, and observers, change analyst).
|
Note: If a user does not have Field-level Read privilege for the Change Analyst field on a routable object, and the default change analyst is specified on the Notify Upon Entry list, the label No Privilege appears in the Notify field of the Change Status dialog box. No Privilege is, of course, not recognized as a valid user, and will generate an error message. |
Answers the question: Should all the release audits (for example, SmartRules, required fields) be addressed before moving to the next status?
General default (in default workflows): No
User-available audits affected by Pass Release Audit: Status Audit and Release Audit
Status Audit answers: Can the routable object advance to the next status?
Release Audit answers: Do conditions (in this status) support releasing the routable object?
Agile PLM performs a complete release audit automatically when a routable object is promoted to its first Released status type.
At any time, an Agile PLM client user can use the Audit Status button or Audit Release button (or menu command) to initiate a status audit or release audit, respectively. These are discussed in "Two Levels of Audit."
For each Pending, Submit, or Review status, the administrator specifies whether a routable object can advance from its present status with or without an audit, as follows:
Yes – A release audit is performed, and the routable object does not advance unless the required fields are completed and the release checks and SmartRule conditions are met.
See "Release Audit, or Audit Current Status for Conditions to Release."
|
Note: If entry required fields defined for the Pending status are not completed, then Agile PLM displays warning messages (instead of errors) when the routable object moves into the Pending status. This exception applies only to entry required fields for the Pending status.This exception for Pending status entry required fields applies regardless of whether the user has Override privilege. See also "Override." |
No – The routable object can advance without being audited.
Warning – During a status audit, you are prompted to choose whether to follow it with a release audit ("OK to perform Release Audit?") or not ("Cancel Release Audit").
This prompt may result in either an Error or Warning. There is an anomaly that causes a Warning to appear when you would expect an Error: when the user does not have Override privilege, and Pass Release Audit = Warning or No, the Status Audit should give an Error (which requires user to fix conditions) instead of a Warning.
|
Note: Setting Pass Release Audit to Yes does, in effect, examine if the conditions in the present status would permit the routable object to be released, but this is not a cumulative process; that is, the audit does not consider the required fields of any previous or future statuses. |
Even with the automatic release audit at the Released status, an advantage to setting up earlier audits (by setting Pass Release Audit to Yes for specific statuses) is to prevent impeding the routable object if it fails the audit at a Released type status. This can happen if the routable object has advanced past a status where a person who has pertinent information might enter it, for instance, the originator of the routable object who reviewed it at the Pending status, or a routing manager who reviewed it at the Submit status. It is better that a release audit reveal that something is missing at the status where the person who has the missing information can provide it.
For example, for ECOs, the release audit checks whether the rev number already exists. If you set Pass Release Audit to Yes at the Pending status of a routable object, this forces the originator to supply the correct rev number.
See the warning about this property in "Use Caution when Assigning Users the Override Privilege."
There are actually two levels of audit available to the user, a status audit and a release audit, which are defined below. Every release audit includes a status audit.
The ability to audit a routable object does not require a privilege. The results of any audit can be copied to the Clipboard, pasted to a new document, and printed.
The status audit can be thought of as "auditing the current status for proper conditions to advance."
The status audit is performed automatically when you use the Change Status function or the workflow attempts to autopromote to the next status. You can perform a status audit at any time by using the Audit Status button or menu selections. It performs the following checks:
Makes sure the Exit Required Fields for the current status are filled in.
If the current status is a Review status type or a Released status type, makes sure that all required reviewers have responded – approvers have approved and acknowledgers have acknowledged.
Checks the workflow settings of the Pass Release Audit property for the current status. If Pass Release Audit is set to either Yes or Warning, Agile PLM also performs a release audit.
The release audit can be thought of as "auditing the current status for proper conditions to release the routable object."
Agile PLM performs a release audit automatically when the routable object is promoted to the first Released type status in the workflow. You can perform a release audit at any time by using the Audit Release button or menu selections.
The release audit performs the status audit for both the current status and the release status.
It performs the following additional checks:
For ECOs, checks if the proposed new revision number on the Affected Items tab already exists.
For ECOs, SCOs, PCOs and MCOs, checks if there are manufacturer redlines that will be lost after the routable object is released.
For ECOs and SCOs, checks if there are BOM redlines that will be lost after the routable object is released.
For ECOs, SCOs, PCOs and MCOs, checks if there are conflicts due to another ECO, SCO, or MCO being released first.
For ECOs, SCOs, and MCOs, if the BOM Multi-level Recursive SmartRule is set to Disallow, checks for recursive BOM structures, that is, when a subassembly includes one of its parent items from an upper level of the BOM tree structure on its own BOM. (A recursive BOM structure, if carried to its logical conclusion, would repeat indefinitely).
The BOM tree is evaluated from top to bottom. The Audit Release error message indicates, for each affected item with a recursive BOM, the first item found in the BOM tree whose first-level BOM table includes an item that appears at a higher level in the BOM tree, thus causing a recursive BOM structure. Although there may be multiple instances of recursive BOM structure in an affected item BOM tree, only the first found instance is displayed in the audit results.
For ECOs, SCOs, and PCOs, depending on SmartRule settings, checks for duplicate items, duplicate find numbers and duplicate reference designators caused by a change rebase. (When there are multiple pending changes for the same item, when one change is released, the remaining pending changes are rebased on the latest released change.)
For ECOs, SCOs, and MCOs, checks for duplication of the same manufacturer part on an item. (MultipleItemsPerManufPart is set to Warning or Disallow.)
(Duplication of the same manufacturer part on an item occurs when an item has multiple pending changes which associate the same manufacturer part to that item and one change is released. The remaining pending changes are rebased on the latest released change. The remaining pending changes now include manufacturer part redline modifications to add a manufacturer part that already exists on the released item's Manufacturers table.)
For ECOs, SCOs, and MCOs, checks for the use of the same manufacturer part on multiple items. (MultipleItemsPerManufPart is set to Warning or Disallow.)
(Duplication of the same manufacturer part on multiple items occurs when multiple changes add the same manufacturer part to two or more item's Manufacturers tables, either by redline addition or redline replacement. When one of the changes is released, the manufacturer part's Where Used table is rebased to refer to the newly released item. The remaining pending changes now include manufacturer part redline modifications that would allow a single manufacturer part to be used by multiple items.)
For ECOs, SCOs, and PCOs, if the Item Release First SmartRule is set to Disallow or Warning, then the routable object is checked to see if the child components have been released.
Checks if any of the attachments of the routable object remain checked out.
For every affected item, checks if any of the attachments remain checked out.
Checks the Effectivity Date Order and Effectivity Gap SmartRule settings.
Checks if items on the Affected Items tab have any other pending routable objects.
For ECOs, validates the affected item's Sites tab Make/Buy setting with the site's Site AML Allowed and AML Required on Buy settings. For more information, see the Agile PLM Product Collaboration User Guide.
Answers the question: What are the required fields on the routable object and its affected items?
General default (in default workflows): (none)
Entry required field are attributes or fields that must be completed for each Pending, Submit, Review, Released, and Complete status type before a routable object can move forward in the workflow to enter that status.
Exit required field are attributes or fields that must be completed for each Pending, Submit, Review, Released, and Complete status type before a routable object can move forward in the workflow to exit that status.
You can specify entry required fields and exit required fields for each status, as necessary.
In the Entry Required Fields list or in the Exit Required Fields list, click the icon next to the field to display the selection dialog that permits you to specify required fields for each object type.
Some required fields are uneditable, or defaults.
|
Caution: Required fields are primary targets for status and release audits (see "Pass Release Audit"). In the default workflows, required fields are concentrated in the Review status type. In your custom workflows, however, you may want to introduce required fields for other statuses. This will help users verify that specific required fields are passing the audits, which will prevent trying to pass a single audit containing many required fields at the first Released status. |
See the warning about this property in "Use Caution when Assigning Users the Override Privilege."
When exit required fields are not filled in by the time the routable object moves from one status to another, the user sees a dialog box listing the fields that are required.
If a user does not have the privilege to modify a required field, the routable object cannot be advanced to the next status until a user with sufficient privileges modifies it.
For Criteria written against Affected Items fields, the required fields are calculated independently for each affected item, based on which Criteria were matched.
|
Note: Entry Required Fields |
It is strongly recommended that you thoroughly test the workflow before releasing it for general use. Depending on the size of your system, this may or may not be safely done within your users' production environment.
This section outlines some aspects of workflows that you will want to validate, within or outside the production environment. You may find reasons to modify a workflow as you test its functionality and understand how it will support your change processes.
When testing workflow functionality, you should validate the following areas:
Reusable criteria applied to the workflow and to each status
Manual Valid Next Status settings for each status
Status properties for each status
Criteria-specific properties for each status
Criteria Matching Type, for Matching Criteria of the workflow and for each status' criteria-specific properties
All entry and exit required fields
Autopromotions
All notifications and approvals
Reminder and escalation periods
SmartRules
Privileges for each role
You must enable the workflow before it will be available in the Agile PLM clients, see "Status Properties Defined."
If you are testing a new workflow (not modifications to one of the default workflows), you will also need to create some basic Change Status privileges so users can move routable objects through the workflow (see "Change Status"). To move a routable object through the new workflow, users must have Change Status privileges for that specific workflow.
Once you enable a workflow, you can make only limited changes to its configuration, see "Modifying Properties in an Enabled Workflow."
To make more extensive modifications, you must disable the workflow, see "Disabling, Changing, and Reactivating Workflows."
Additionally, even if you disable the workflow, you may not make certain modifications if a routable object is in the workflow, including deleting or adding statuses from the status list (see "What You Can Modify If a Workflow Has Any Routable Objects Applied"). You can use Save As on a test workflow to create a new disabled workflow that will allow more extensive modifications.
In addition to functional testing, which determines if you have configured Agile PLM workflows correctly, it is recommended that you validate your business process and data migration systems. Consulting services are available from Oracle Consulting - Agile Practice consultants, who can provide you with guidance and assistance in creating business process and data migration validation plans. During the business process validation, you should use your proposed workflows to accomplish real scenarios and simulate typical usage. These activities will help you refine and confirm your workflow configuration and allow you to document your change processes in the context of the Agile PLM solution for future reference and training purposes.
If you are in the first phase of an Agile PLM implementation, this section may not apply to you, because you do not yet have a separate production environment, and migration of initial Agile PLM configuration is a normal part of your production cutover process.
In the Workflows window, use Export and Export All to export workflows, and use Import to migrate workflows from a test to a production environment, greatly reducing the number of manual steps required (see "Administrator Import and Export").
Once you have validated your workflow configuration, you need to implement the workflows in your production Agile PLM system. The following steps outline the general process of migration.
Complete validation of workflow configuration in a test environment.
Run the following Administrator reports and save them to a local drive. Run additional reports as needed.
Agile Classes Report
Workflows Configuration Report
Criteria Library Configuration Report
Users Configuration Report
User Groups Configuration Report
SmartRules Configuration Report
Ensure that you have your workflow configuration clearly documented.
You may have to change a workflow that has been enabled. Some possible situations and your options are detailed in this section.
|
Note: It is not possible to delete a workflow that has been assigned to a routable object, even if the assignment has been withdrawn and the workflow is not assigned to any other routable object. We recommend either disabling an unwanted workflow, or modifying it so that it is once again usable. |
You can modify a workflow that is enabled and visible to your Agile PLM users, either with or without a routable object moving through it. If the workflow is already in use (a routable object has been assigned the workflow), you cannot add statuses, although you can make other modifications, as described below.
|
Caution: If you add a status to an enabled workflow, you must modify or create appropriate permissions and other Change Status privileges for each role in your Agile PLM system. |
|
Note: When you attempt to add a status to an enabled workflow, the workflow's Enabled property automatically changes to No. |
If no routable object has been applied to a particular workflow, there is no problem with disabling it, modifying it, and re-enabling it. (To save duplicating efforts, you might email people who could be developing or close to originating a new routable object.)
You can alter many properties after a workflow is enabled and a routable object is actively progressing. These properties are listed. You must disable the workflow to alter settings for properties. Also, be aware that a change analyst or an approver may want to react to a progressing routable object while it is disabled.
When you disable a workflow, these two best-practice actions are recommended:
Notify appropriate people that the workflow is going to be disabled, and
Alter the workflow promptly, enable it, and re-notify the affected users.
The workflow properties that you can modify in an active workflow are:
Workflow name — you can modify the name of the workflow.
Status name — you can modify the names of the statuses.
Criteria-specific properties — you can add new criteria-specific properties to any status.
Properties of statuses — you can modify the following status properties and criteria-specific properties of each workflow status:
Status properties of each status that can be modified:
Ad Hoc Reviewers
AutoPromote
If AutoPromote Fails, Notify
If No Criteria Apply At Exit, Notify
If Rejected, Notify
If Rejected, Set Status To
Manual Valid Next Status
Reminder Period
Review Escalation Period
Criteria-specific properties of each status that can be modified:
Approvers
Acknowledgers
Default Change Analyst/ Default Component Engineer
Notify Upon Entry
Observers
Pass Release Audit
Required Fields
|
Note: Depending on the setting being altered, routable objects already in process may or may not use the new setting if they are already in the status. For example, changing the Notify Upon Entry setting does not resend email about a routable object already in the status that is changed. |
Once a routable object has been originated in a default or new workflow, and that object has gone through even a single status transition, you cannot modify certain things:
You cannot add or delete a status to that workflow.
You cannot alter the order of the statuses in that workflow.
If these are the elements of an active workflow that you need to alter, see "Disabling, Changing, and Reactivating Workflows."
Despite best efforts at fully defining your workflow processes and the many elements of a customized workflow, naturally the time will come when an active workflow—with multiple routable objects already applied and moving through it—simply must be fixed.
|
Caution: All modifications to enabled workflows have the potential to cause "ripple effects" that have to be detected, evaluated, and corrected across multiple nodes in Administrator. In particular, alterations to workflow statuses have implications for transfer orders (see Agile PLM Content Service User Guide) and process extensions (see "Process Extensions"). |
To fix an active workflow:
Move each active routable object using that workflow to the Pending status type.
This step is no longer absolutely required, and may not be necessary if you are doing a small and quick modification (see "Modifying Properties in an Enabled Workflow"). This precaution is helpful when the change may take some time and many objects and people may be affected.
Disable the workflow.
Rename the workflow, using the Save As procedure (described in "Creating New Workflows with Save As").
You may now want to rename the old workflow, especially if you decide it can still be useful but has a different purpose.
Modify or fix the new workflow.
When you are confident that the existing problem has been remedied, enable the workflow.
Apply the routable objects from the old to the new workflow.