| Agile Product Lifecycle Management Administrator Guide Release 9.3.4 E52155-02 |
|

 Previous |
 Next |
| Agile Product Lifecycle Management Administrator Guide Release 9.3.4 E52155-02 |
|
Previous |
Next |
The Locations window displays information about the location of the application and various servers in your Agile PLM configuration.
On the General Information tab of the Locations window, you can specify the following properties with appropriate URLs:
Web Server URL
Java Client URL.
Online Help Manuals URL
|
Note: These properties should only be changed by you, the administrator, with previous confirmation from your IT people. |
Properties that are also seen on the General Information tab but are not editable were populated when the Agile PLM system was installed:
Application Server URL
DB Server Hostname
DB Server Username
Name (an informal name of the database server)
Agile PLM users whose Preferred Client property is set to Web Client will receive automatic email notifications that contain a link to the Web Client. You can specify the Web Client location in the Web Server URL setting.
|
Important: Agile's Product Cost Management (PCM), Product Governance & Compliance (PG&C), and Product Portfolio Management (PPM) solutions operate only in Web Client. Users who work primarily in those areas should have their Preferred Client set to Web Client. |
To configure Web Client notification by modifying the Web Server URL:
Under Server Settings, double-click Locations. The Locations window appears.
Enter your Web Server URL in this format: http://WebServer:<port>/Agile/PLMServlet
|
Note: The Web Server URL is case-sensitive.Ports are usually configurable. A port listed herein is either an industry-standard port or a default port. If the Web server uses the standard HTTP port (80), the port is not needed in the URL. |
When you are finished, click Save.
Agile PLM users whose Preferred Client property is set to Java Client will receive automatic email notifications that contain a link to the Java Client. You can specify the Java Client location in the Java Client URL setting.
Although you can access the Java Client through a proxy server, the Java Client URL must be the location where Java Client is deployed on the application server for email notifications to work.
To configure Java Client notification by modifying the Java Client URL:
Under Server Settings, double-click Locations. The Locations window appears.
Enter the Java Client URL appropriate for your application server
Oracle Application Server: http://<appserver>:8888/JavaClient/start.jsp
WebLogic Application Server: http://<appserver>:7001/JavaClient/start.jsp
The Java Client URL is case-sensitive.
When you are finished, click Save.
Administrator settings on the Server Settings > Locations > File Manager tab are important in relation to attachment files and where originals and copies are found. This is documented in "File Management in Agile PLM."
The Checksum internal utility is a security measure against improper handling of files. Reset privilege and Checksum Computation preference are described in "Handle File Checksum."
There are two main components to Agile File Manager (AFM): the file server and the file vault. When a file is added to Agile, it is assigned an internal Agile identifier (ID) number by the file server and added to the file vault. It is not stored in the file vault under its original file name: mapping information is maintained in the Agile PLM database, and the file name is modified per Filename Prefix systemwide preference.
When a user requests a file through an Agile PLM client (which requires privileges such as Get, View, or Checkout), the request is routed to the file server, which looks up the file's ID, retrieves the file from the file vault, and sends it to the user.
The file vault contains all file attachments stored by AFM. It is recommended that a separate server or storage device be designated as the Agile File Vault to store attachments or files. This is particularly useful when taking advantage of application clustering because each server in the cluster needs access to the same file vault.
If the Indexing property is set to Synchronous and a large number of files are added to the File Management file vault using Agile FileLoad, the indexing process can take a long time. It has been found that setting this field to Manual increases the loading speed for a large number of files. Or, if the files being added tend to be large documents, set the Indexing property to Scheduled and set up an indexing schedule for once every 3 or 4 hours. If most of the new files are relatively small, the Indexing property can be set to Synchronous.
Due to the geographically dispersed nature of the global enterprise, multiple AFM servers can be deployed in a distributed configuration for efficient distribution of product content. A Distributed File Management (DFM) setup enables you to manage files efficiently at remote locations. Deploying DFM servers reduce download time by placing Agile PLM files closer to where they are needed, and allowing users configure which file manager to use. Agile PLM supports a large number of DFM servers.
When there are more than two File Managers, this systemwide preference (Preferences node) enables the PLM system to keep track of the File Managers that contain each file. During replication, the requesting FM only contacts other FMs that contain the file, and downloads a given file from the nearest FM (which is determined by shortest 'ping' to all the FM servers). Set to Enabled or Disabled, the latter can be set to troubleshoot problems with the optimizations.
If AutoVue for Agile is used, an AutoVue for Agile Server should be installed locally with each DFM server. The local viewer server can be installed on the same system as the DFM. If local users are accessing Agile PLM from outside the firewall, a proxy is recommended in the DFM configuration.
Agile's file management servers have a peer-to-peer relationship. When a user requests a file, the request is directed to that user's configured file manager. See "Configuring a File Manager." If the file is found, it is served to the user. If the file is not found at that location, the FM sends a request for the file to its peer file servers. The peer file server who has the file sends it back. The local file server saves it to its vault and serves it to the user.
A DFM scenario might be as follows: the AAS is installed in San Jose, California, and a DFM server is installed in Tokyo, Japan. A user from the Tokyo site selects a file attachment to view. The DFM in Tokyo determines that the file is located in San Jose and downloads the file, copies it to the file vault in Tokyo, and serves the file to the user through the View Server. Another user selects the same file attachment. Since the file now resides in the Tokyo DFM vault, it is served directly to the user.
You can install multiple file vaults, or DFM servers. Multiple file vaults are defined on the Server Settings > Locations > File Manager tab. On the Preferences tab for each Agile PLM user, you can specify the preferred file server for that user.
|
Note: If your Agile PLM system is using multiple DFM servers, your users must use the full domain URL when logging in. If a user does not use the full domain URL, she will be asked to provide login information again when she performs a file operation. |
There are two components to file security: server security and client access security. There is also a utility called Handle File Checksum in Java Client that permits users to be warned of problems with improperly accessed files and a means to fix them.
Content in Agile file vaults must be protected from deletion or modification by unauthorized users. Agile recommends allowing access only to Agile PLM administrators. System users who access files through the clients do not need Add and Read privileges to the Agile file vault or file directory because Agile file servers retrieve files for users, this task is not performed by individual users.
Whether you access files from Java or Web Clients, your files are secure. When the client is run behind the firewall, the files are transferred behind the firewall, which secures your files from outside intervention. When clients access files from outside the firewall, Secure Sockets Layer (SSL) communications protocol is supported.
File Checksum is a feature in Agile that warns users when they encounter a file—say, an attachment to a business object—that may have been accessed improperly. In both Java and Web Clients, the Attachments tab of business objects and the Files tab of file folders have a field called Has Checksum Error. When a file on an attachment row has a checksum error, the Has Checksum Error field displays the same symbol.
In support of the Checksum feature, the administrator can manage file validation with a systemwide preference and a privilege mask:
Checksum Computation systemwide preference sets whether to enable or disable checksum computation for attachment files. Note that the default setting is Disabled, which does not allow for this security feature to function. (It is possible that server speed is improved when this preference is set to Disabled, but that may not be as important as enabling the Checksum functionality.)
Reset File Checksum privilege mask, which is built on the Reset privilege. All users who have been assigned this privilege mask will be notified of any file with a checksum problem. (Note that this privilege mask is not included with any ready-to-use Agile role.) You can add the privilege mask to any existing role; at first, however, it may be safest to add it to specific individual's role, or perhaps to your Administrator role and to your User Administrators.
The notification provides such information as the offending file's file name, the file folder(s) to which it is associated, the File Manager that hosts the file, and the file's location.
Besides the Reset File Checksum privilege, you will need to assign Read and Modify privileges for file folders to enable users to resolve checksum errors.
Checksum errors are resolved at the level of the file folder. Use the notification link to open the file folder, then click the red exclamation mark in the offending file's row and use the dialog to resolve the error. You can click one of three options:
Delete the file – Deletes the file attachment itself across the Agile system. Use this option when you believe that the file is corrupted and irrecoverable, even across DFMs.
Delete only invalid files – This option can be used to attempt to fix the checksum issue:
Deletes the file from File Managers where the file status is Invalid.
Resets the checksum flag.
Upload a new file to replace the problematic file in iFS vault – Replaces the current file with a new file and resets the checksum to the value of the new file in the database. The file's ID in the database and the file name in the vault remain unchanged.
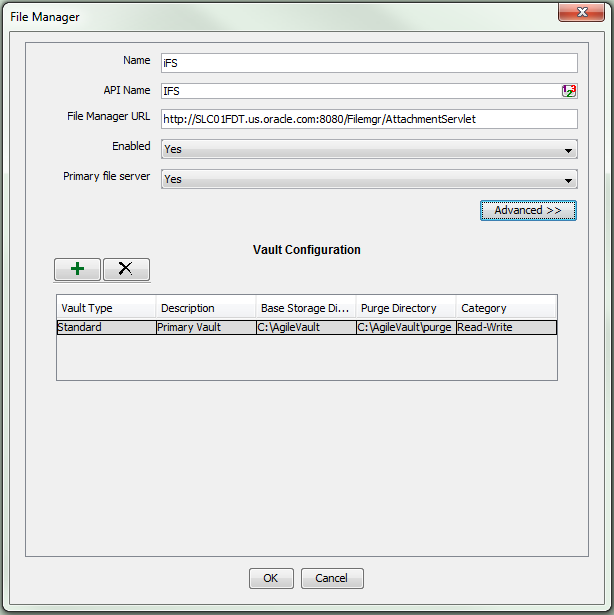
On the Server Settings > Locations > File Manager tab, you can define multiple file managers.
When you click the File Manager tab and either click the New button or double-click one of the property fields, you see the fields in the table below. Click the Advanced button to see the other fields. From the advanced view, you can click the Standard button to return to the standard view.
|
Note: You must restart all the File Servers that have been added when you make changes on the File Manager tab, or change Direct Image File type for Thumbnail, or create a new one, for changes to take effect. |
If a URL is specified in the documentation or release notes, copy the uppercase and lowercase characters exactly, including the full domain name specified.
Fields in Create a File Manager Dialog and File Manager Standard View
Table 31-1 Fields in Create a File Manager dialog and File Manager, standard view
| Field | Description |
|---|---|
|
Name |
The informal name of this instance of File Manager. Use a descriptive name that is easy for you and your user administrators to understand, especially in a DFM (multiple) server configuration. This name will appear in the Preferred File Server drop-down list on each user's Preferences tab. |
|
API Name |
Unique systemwide identifier for objects and can be autogenerated. You can specify an API name, but internal consistency is enhanced by accepting the system-generated name. |
|
File Manager URL |
The file server URL that Agile Web Client will connect to. The format is: http://<proxy/loadbalancer>:<port>/<fileserver_virtual_path>/AttachmentServlet |
|
Enabled |
Enables or disables the file management server. To create the file manager now and enable it later, select No. |
|
Primary File Server |
Select Yes or No from the drop-down list to make this server the primary file server or not. The primary file server should be co-located with the application server, that is, in the same LAN. Setting a different file manager to be "primary"—setting this field to Yes when another file manager is already the primary—will automatically reset this field in the previous primary file server to No. |
Advanced File Manager Fields
Click the Advanced button to view and edit the following advanced fields:
Table 31-2 Advanced Fields, File Manager
| Field | Description |
|---|---|
|
File Manager Internal Locator |
The file application server URL for the File Manager or other component application (such as Agile SDK) to use. The format is: http://<File Manager host>:<port>/<fileserver_virtual_path>/services/FileServer |
|
Viewer Server URL |
The viewer server (jVue server) URL that Agile Web Client will connect to. The format is: http://<proxy/loadbalancer>:<port>/<fileserver_virtual_path>/VueServlet |
|
Viewer Proxy URL |
The viewer proxy URL that the Viewer Server uses to communicate with the File Manager. If local users are accessing Web Client from outside the firewall, a proxy is recommended in the DFM configuration. The format is: http://<File Manager host>:<port>/<fileserver_virtual_path>/VueLink |
|
Viewer Content URL |
The location from where the Viewer Applet is downloaded. The format is: http://<proxy/loadbalancer>:<port>/<appserver_virtual_path>/jVue |
|
Thumbnail and Streaming File Generation |
This area of the File Manager Advanced dialog contains the following settings:
Note: Enabling Thumbnail generation with these settings also enables metafile generation. |
To create a new File Manager:
Under Server Settings, double-click Locations. The Locations window appears.
Click the File Manager tab.
Click New. The Create a File Manager dialog appears.
Fill in the fields for Name, API Name, File Manager URL, and Primary File Server, which are described in the table above.
|
Note: If your company is using AutoVue for Agile, an AutoVue for Agile Server should be installed locally with each DFM server. |
The Enabled field must be set to Yes for that server to be put into active use.
Click the Add New Vault button to add and configure a new file vault.
When you have defined the new file manager, click OK.
Once you have created this new instance of a file manager, you can open it and add other server definitions, as described in the next task.
If you are using Java Client to upload references to files stored in a Custom file vault, you must set up the vault first. A Custom vault is "Read Only" and is not available to users to check out and modify attachments; it is used for uploading files using Agile FileLoad (which is documented in Agile PLM Import & Export Guide).
To set up a Custom file vault:
Under Server Settings, double-click Locations. The Locations window appears.
Click the File Manager tab.
Double-click the entry to display the File Manager dialog box.
Click the + button to add a new vault.
In the Vault Type field, select Custom.
In the Description field, type a description of the vault.
In the Base Storage Directory field, enter the primary location where the files are stored.
In the Purge Directory field, enter the primary location where the purged files are moved to.
Click OK.
Restart the Agile File Manager.
The Base Storage Directory default location is \files. The location can be a shared network storage directory, such as a Storage Area Network (SAN).
|
Note: Do not specify a mapped location. Instead, specify the actual computer name and directory, like this:\\fileserver\files |
The Purge Directory field indicates where purged (deleted) files are automatically moved. The default location is agile_home\files\purge. The location can be a shared network storage directory, such as a Storage Area Network (SAN).
|
Note: Do not specify a mapped location. Instead, specify the actual computer name and directory, like this: |
If the Agile PLM system has multiple Distributed File Managers (DFMs) configured and you are using custom file vaults, then you must configure corresponding custom file vaults for each DFM for each custom file vault in a different DFM, and you must ensure that the custom file vault read-only files from the originating server custom file vault are available in the local custom file vault by one of the following two options:
Copy the IFS server custom file vault read-only files to the local custom file vault.
Configure the base directory of the DFM to have remote access to the corresponding IFS base directory.
See also: "Distributed File Management," "Configuring a File Manager," "Creating a Custom File Vault," and "Base Storage Directory and Purge Directory Fields."
The following example illustrates how to configure custom file vaults for multiple DFMs. The Agile system in our example has three DFMs:
IFS server in the United States
IFS server in the United States has two custom file vaults, configured in Java Client as follows:
IFS_customVault1
Base Storage Directory path is \\ifs\customVault1.
IFS_customVault2
Base Storage Directory path is \\ifs\customVault2
Sydney server in Australia
Tokyo server in Japan
To configure Sydney server:
Under Server Settings, double-click Locations, and then click the File Manager tab. The file managers IFS, Sydney, and Tokyo appear on the File Manger tab.
Double-click the Sydney file manager row to display the Sydney file manager dialog.
Configure two custom file vaults for the Sydney server to correspond with the IFS custom file vaults. See "Creating a Custom File Vault." Use meaningful names. In our example:
Create Sydney_customVault1 to correspond with IFS_customVault1.
Create Sydney_customVault2 to correspond with IFS_customVault2.
Use one of the following methods to define the Base Storage Directory field for each Sydney custom vault:
Define a base storage directory in the Sydney local file system, and then:
Copy all files and subfolders from the base storage directory of IFS_customVault1 to the base storage directory of Sydney_customVault1.
Copy all files and subfolders from the base storage directory of IFS_customVault2 to the base storage directory of Sydney_customVault2.
Configure the Sydney custom vault base directories to have remote access to the corresponding base directory of the IFS server custom vaults:
Set Sydney_customVault1 Base Storage Directory to \\ifs\customVault1.
Set Sydney_customVault2 Base Storage Directory to \\ifs\customVault2.
Copying files from base storage directories is not required if you use this method.
Repeat these steps for each DFM in the Agile system, and for each custom vault. In our example, repeat these steps for Tokyo DFM, creating custom file vaults Tokyo_customVault1 and Tokyo_customVault2, and then configure the Tokyo custom vaults as described in step 4.
Each DFM must be configured for the custom vaults in the other DFMs.
In our example, let us assume that the Tokyo server has three custom vaults (Toyko_cv1, Tokyo_cv2, Tokyo_cv3). Then, in both the IFS server and the Sydney server, you must create corresponding custom vaults and configure those custom vaults as described in step 4 to ensure that the Tokyo server custom file vault read-only files are available in the IFS local server and in the Sydney local server.
To modify a File Manager definition:
Under Server Settings, double-click Locations. The Locations window appears.
Click the File Manager tab.
Double-click the row of the file manager you want to modify. The File Manager dialog appears.
Be sure to navigate to the correct server field; use the Advanced button as needed.
When you have finished your modifications, click OK.
To delete a file manager definition:
Under Server Settings, double-click Locations. The Locations window appears.
Click the File Manager tab.
Double-click the row of the file server you want to modify. The File Manager dialog appears.
Be sure to navigate to the correct server field; use the Advanced button as needed.
You can simply delete the reference to the server in the field—the file server definition.
To remove a configured server, select a row and click the Remove Selected Vault button. If you have rights to that server, it will be removed.
When you are finished, and click OK.
If your Agile PLM system uses Distributed File Management, each user should specify the preferred file manager to use. For best performance, specify a file server in the same location as the user. For example, users in the United States should select a file manager located in the United States and not one located in China.
To set a user's preferred file manager in Java Client:
Under User Settings, double-click Users. The Users window appears.
Double-click the user's name in the list. That user's window appears.
Click the Preferences tab.
For Preferred File Manager, select a local file manager from the list.
Click Save.
To set a user's preferred file manager in Web Client:
Click Tools and Settings > Administration > Users. The Users page appears.
Click the user's name in the list. That user's page appears.
Click the Preferences tab.
Click Edit. The fields become editable.
For Preferred File Manager, select a local file server from the list.
Click Save.
If AutoPurge is enabled for your Agile PLM system (see "Viewer and Files", the Agile File Manager automatically purges old versions of files. Once every day, a background thread starts that determines what files should be purged. (For information about when the task starts, see Attachment Purging Task in "Task Configuration.") If there are such files, a folder named by date and time is created in the purged files location and the files are moved into it. If no files need to be purged, the dated folder is not created. The default interval between purges is 24-hours (1440 minutes), but you can change the length of the interval. This interval is set in Attachment Purging Task; see "Task Monitor and Task Configuration."
|
Note: The Agile File Manager does not permanently remove purged files from the system. Your company's IT personnel must handle that task. |
If there happened to be server failure during the time that was configured for attachment purging, the task would not run that day. For example, if the task runs at 6:00 am every day but the server shut down between 5:00 am and 9:00 am, the task would not run because the Task Lookback Window is set to 120 minutes, and 9:00 am is a greater value of minutes from 6:00 am. The workaround is to temporarily set Task Lookback Window to a value that is larger than 180 minutes (in this case), say, to 200 minutes. Then the task will run when the server is restarted.
In general, the value for Task Lookback Window (Server Settings > Task Configuration > <any task> > General Info page) should always bigger than the value for Task Interval to ensure that no event is skipped.