| Oracle® Agile Product Lifecycle Management Product Portfolio Management User Guide Release 9.3.4 E52152-04 |
|

 Previous |
 Next |
| Oracle® Agile Product Lifecycle Management Product Portfolio Management User Guide Release 9.3.4 E52152-04 |
|
Previous |
Next |
As a PPM user, you need to be familiar with the following:
Using PPM-specific tabs in the Dashboard
Working with PPM Notifications
Working with My Assignments
Working with Timesheets
Accessing project information
Using the Navigator
Working with Gantt Chart
The Agile Home page provides access to Dashboard, Notifications, Workflow Routings, and My Assignments. You can configure the application to view timesheets. You can set the Home page to display one of these tab pages as your preferred start page. For more information, refer to the Getting Started with Agile PLM guide.
If you choose one of the dashboard tabs as your preferred start page, that dashboard tab page displays when you click the Home page icon in the top pane.
To view the Home page while you are working on a project page, click the Home icon.
Quick Links, at the top of the Home page, is a list of up to ten links that you use frequently. You can define and edit your own Quick Links list. Your Quick Links list can include predefined Agile PLM system links, saved searches in your Personal Searches folder, or bookmarks in your My Bookmarks folder.
As information passes through the Agile system, users receive news of status changes, requests, and other notifications through email. Users with different roles and privileges receive different notifications. As soon as you log in to the Web Client, it is a good practice to view the information available for your perusal on the Home Page Inbox tabs.
Dashboard Tab -Enables you to view and manage information across all your projects. For more details on dashboard features, see "Dashboard."
Notifications Tab -Lists notifications that inform you of some action or process that has taken place, or requests that you can accept from the My Assignments tab. In addition, this tab lists the action items or activities for which you can accept or decline ownership from the My Assignments tab. It is a recommended practice to delete the notifications after you have read them.
Workflow Routings Tab -Lists the routable objects that require your review or action. Click the object number in the table to open a routable object.
My Assignments Tab -My Assignments Tab lists project leaf node objects or action items assigned to you which are not yet complete. You can accept or decline a request or ownership. Click the Quick View callout that appears when you position your mouse cursor over an object, to view the details of the object.
Timesheet Tab -Enables timesheet entry by assigned resources on a project. It enables you to track reported time data to ascertain resource utilization and related costs. This tab is visible only if enabled by your Agile administrator.
The Dashboard is a highly configurable set of views that enables users to track and manage the information available in the Agile PLM system.
You can create an unlimited number of dashboard tabs to categorize and display the content you want. Access to these tabs can be restricted through roles and privileges. The data that you want to view can be retrieved from different sources, and rendered in charts, tables, and other forms.
Dashboard tabs must be created and configured in Agile Java Client by an administrator. You can view and personalize the tabs that are made visible in Agile PLM Web Client for your use.
For details on configuring Dashboard views, see the Agile PLM Administrator Guide.
The dashboard enables PPM users to view and manage information across all projects. You can use the dashboard to obtain:
Executive-level view of key information for all your projects based on your roles and privileges
User-level information about your own activities and tasks
Resource utilization reports
All users can use the dashboard to access reports and view consolidated information. See also "Reports."
The dashboard comprises:
Default Tabs that enable you to select the view: Executive, Projects, Resources, Financial, My Stuff, Optional Tab 1, and Optional Tab 2.
User-configured tabs that display customized information in tabular or chart formats, based on preferences set up by an administrator.
To view user-configured tabs, you must have the Dashboard Tab View privilege assigned to you, and this privilege must be applied to these tabs within the Agile Java Client.
Widgets within each tab that present information relevant to that view. For example, in the My Stuff tab, the widgets represent the current user's project activities: My Discussions, My Documents, My Action Items.
The Dashboard Filter icon in every table enables you to filter data within the widgets to create customized views.
The information you can view in the Executive, Projects, and Financial tabs is from root projects for which you have the Read and Discover privilege.
If you are an Executive, you have global privileges. You can view all root-level projects that contain matching values for the dashboard category fields. By default, these fields are labeled Project Type, Region, Division, Customer, Launch Year, Product Line, Category 7 to Category 24, and Program. These are multi-select list fields that can be relabeled and configured within the Administration > General Info tab in the Agile Java Client.
For information on how to configure optional dashboard tabs, see the Agile PLM Administrator Guide.
The Dashboard Filter icon at the top of each widget enables you to filter the data in the widget to show only the information that is most relevant to you.
You can filter the dashboard category fields that display within each tab widget according to your business requirement.
For example, a functional manager who owns several resource pools might want to view only off-track tasks assigned to people in certain pools. An executive might set the dashboard to show all the projects, programs, issues, gates, financial summaries, and resources that apply to a division and region, or view a specified subset. Once the dashboard settings are entered, you only see information that satisfies the specified settings.
You can use the dashboard category fields to rapidly classify tasks and to slice data for reporting purposes. The default Dashboard category fields are Project Type, Region, Product Line, Division, Region, Launch year, Program, Category 7 to Category 24.
The values that you set at the root project level are applied down the hierarchy. For example, if you set a particular value for Division at the root project level, all the tasks within the hierarchy are also set to the same value. These fields are ideally used for Customer, Market and other attributes that are relevant at the top level of the project.
If a root project has a value set to "All," then, by design, it will appear in all views no matter what value is selected in the configuration view for that field.
The Executive tab provides portfolio data for the executive who needs to monitor projects and see information rollups by type of project. It provides a cross-section of information on projects where you can see the major risks in terms of schedule, resources, and cost.
The Executive tab contains data only if you have Executive role, or have Read privilege for root-level projects.
The widgets in the Executive tab are:
Project Status - Provides a graph of all active projects the user has configured to view, showing the overall status of each (that is, On Track, Needs Attention, Off Track). For each type of status displayed, the widget shows the percentage of projects with the specific status.
To display the number of projects that comprise a segment, place the mouse cursor over that segment of the chart.
To display the Projects tab with a particular segment of projects selected in all windows, click that segment.
The data in this window does not include projects that are in the Completed or Canceled states, projects with a Project State field setting of Proposed or Template, or projects that are archived or soft-deleted.
Resource Pool Allocation - Displays a table showing the names of available resource pools and associated data, filtered by the settings in the dashboard filter.
The table displays the following information for each resource pool:
Pool Name- The name of the resource pool.
Overdue - The number of Off Track projects which have a resource pool or pool members assigned.
Allocation - Displays a red square if the pool or any of its members are over-allocated for a project.
Pool members who do not have current assignments are not counted. Resources who are not assigned to any resource pool do not appear on the dashboard.
To view the Resource Pool Utilization Report, click the icon in the last column of the Resource Pool Allocation widget in the dashboard.
The data in this window does not include projects that are in the Completed or Canceled states, projects with a Project State field setting of Proposed or Template, or projects that are archived or soft-deleted.
Financial - Displays a table showing cost rollups for the root projects that you have access to view. The Financial tab in the Executive view also shows the same table that is presented in the Financial View. See "Financial Tab."
The Projects tab displays gate progress, status, and discussions specific to the projects for which you have access as the owner, resource, or team member. The various widgets in the Projects tab are:
Project Status - Displays all projects to which you have access (subject to the table filters). It includes the root project name, status, start date and end date.
To change the sort order, click a column heading.
To open a Project object, click its name. The icon adjacent to the project name indicates the status of the project, such as On Track or Needs Attention.
Gate Status - Displays the gates for each active project, their status and scheduled due date. (The number required is derived from the number of deliverables listed on the Content tab plus the number of dependencies to the gate.)
To open a project or gate, click its name.
Project Discussions - Lists the open discussions, specific to the projects for which you have access rights. The Open Date denotes the date on which the discussion was initiated. Use the Priority drop-down list to filter the discussions by priority.
The Resources tab provides resource pool owners and executives with information about the resources they manage. Pool managers can see the status of activities assigned to their resources, the priority issues related to their resources and the list of off-track activities assigned to their pools. They can also see the current resource loads across the enterprise.
The various widgets in the Resources tab are:
Resource Allocation - Shows each resource pool's projects and status, noting items that are in Pending, Assigned, or Overdue statuses. It also notes resources that are over-allocated.
A pending activity or gate is one that has been delegated to a resource pool, but has not yet been assigned to a user in that pool.
The number of overdue items is a count of all activities or gates that are past the due date, regardless of whether they are assigned to users.
To edit status for a resource pool (add or remove resources, or create a report), click its name.
The data in this window does not include projects that are in the Completed or Canceled states, projects with a Project State field setting of Proposed or Template, or projects that are archived or soft-deleted.
Open Discussions by Resource Pool - Shows the discussions for each resource pool. You can select priorities to display from the Priority list. Click the name of a project to open it. Once the project object is open you can go to its Discussions tab, and view associated issues. (For further information on the Discussions tab, see "Discussions Table."
If there is a discussion thread, only the top level issue is displayed.
The data in this window does not include projects that are in the Completed or Canceled states, projects with a Project State field setting of Proposed or Template, or projects that are archived or soft-deleted.
Resource Pool Activity Status - Shows Off-Track items assigned to pool members of pools that you own, noting Scheduled due date, Project name, and Scheduled End date. To view and update off-track resource pool activities, click the Resource pool name.
The data in this window does not include projects that are in the Completed or Canceled states, projects with a Project State field setting of Proposed, or projects that are archived or soft-deleted.
Resource Pool Utilization - Shows a graph of resource pool utilization by project, enabling a pool manager to see where resources are allocated or over-allocated.
To view project name and percent utilization of resources, place the mouse pointer over each chart segment.
To view team data, click the chart segment of interest. This opens the corresponding project object in the Team tab.
The data in this window does not include projects that are in the Completed or Canceled states, projects with a Project State field setting of Proposed, or projects that are archived or soft-deleted.
The Financial tab shows charts of capital expense, labor cost, and fixed cost for each root project available. The Financial tab also shows the same table that is presented in the 'Financial' widget in the Executive tab.
To configure which reports appear in the Financial tab, use Tools and Settings > Administration > Dashboard Configuration.
To select the projects to be considered for each chart, use the Dashboard filter in the chart.
You can minimize, maximize, or close charts in the tab view. When a chart is closed, the Add Content list appears. Use this list to re-open any chart that you have closed.
The My Stuff tab displays the Documents, Discussions, and Action Items assigned to the logged in user. The widgets in this tab are:
My Action Items - Displays all your Action Items by Status, Creator, and Due Date. The name of the project or discussion to which the Action Item is associated appears as a link in the Belongs To column. Click the link to view the associated object. To view the Action Item, click the corresponding link in the Subject column.
My Documents - Lists all the project-related documents that you own with the name of the Root Project, Project Name, Folder Number, and the File Name. To open a file, click the folder number and then click the Files tab. Alternatively, you can click the file name to view the document.
My Discussions - Lists all the discussions you have created for the selected set of projects, showing the Subject, Most Recent Message, and the Date for each. You can click the Subject link to view and reply to a discussion.
You can configure Optional Tab1 and Optional Tab2 to display reports based on your customized queries in each table. If you have the privilege to configure these tabs, a Configure button appears in the middle of each table in the Optional Tabs page.
The fields that are available for display are configured in Java Client by an administrator. For more information on configuring Optional tabs in Java Client, see the Agile PLM Administrator Guide.
Within Product Portfolio Management, default notifications are triggered and sent to appropriate recipients when you perform various actions on a project object. For example, a notification can inform you of schedule or status changes, an activity assigned to you, or a project that needs your approval, based on your role.
Event-based notifications can also be configured in Java Client according to your requirement. Such notifications can be triggered by event-based subscriptions.
For detailed information on event-based notifications, configuring notifications, and creating custom notifications, see the Agile PLM Administrator Guide.
|
Note: Notifications are generated only when enabled in Java Client. |
Default PPM notifications are related to any of the following:
Ownership, Assignment or Delegation
Schedule Change
Cost
Workflow
Discussions
Subscriptions
Setup
| Notification | Received By | When... |
|---|---|---|
| Task Overbudget Notification | Task Owner | The cost of executing a task exceeds the budget allocation for it. |
| Actual Time exceeds Budgeted time to Object Owner Notification | Project owner | Resource(s) allocated to a task have exceeded the budgeted time to complete the task. |
| Actual Time exceeds Budgeted time to Pool Owner Notification | Resource Pool Owner | Resource(s) from the recipient's resource pool have exceeded the budgeted time to complete the allocated task. |
| Notification | Received By | When... |
|---|---|---|
| Discussion Action Item Assignment Notification | Discussion participant/program resource | An action item associated with a discussion is assigned to the recipient. |
| Discussion Create Notification | Any user added to the Notify list during discussion creation. | A new discussion object is created successfully. |
| Discussion Send | Discussion participant/program resource | A discussion is sent to the recipient. |
| Reply Create Notification | Discussion participants | A user replies to a message within a discussion thread. |
| Reply Update Notification | Discussion participants | A user updates a reply message within a discussion thread. |
| Notification | Received By | When... |
|---|---|---|
| Relationship Promotion Failure Notification | Program Owner | Automatic promotion of a project status fails for any reason, for example, the non-completion of a required field. |
| Relationship Notifications > Subscription Notification | Notification subscriber | Field tags within a subscription notification is changed or updated. |
The following notifications are related to ownership, assignment, or delegation of a project object.
| Notification | Received By | When... |
|---|---|---|
| Project Object Delegation Notification | Delegated user | A Project activity is delegated to the recipient. |
| Action Item Assignment Notification | Assigned user | An action item is assigned to the recipient. |
| Project Owner Assignment Notification | Project owner | The recipient creates a project from a template or is assigned ownership of a project during project creation from a template. |
| Assignment of an activity to a resource. | Assigned user | An activity is assigned to the recipient. |
| Accept activity assignment | Project Owner | The assigned resource accepts the activity assignment. |
| Reject activity assignment | Project Owner | The assigned resource rejects the activity assignment |
| Project Object Delegation Accept Notification | Project Owner | A resource accepts an activity delegation. |
| Project Object Delegation Reject Notification | Project Owner | A resource declines an activity delegation. |
| Notification for Project Object Delegation | Delegated user | A project activity is delegated to the recipient and must be accepted or rejected from the My Assignments tab. |
| Notification for Activity Object Owner Change | New Activity Owner | Ownership of an activity is changed on the General Info tab. |
| Pool Owner Project Delegation Notification | Resource Pool Owner | An activity (with or without child activities) is delegated to a resource pool. |
| Notification for Activity Assignment to a Resource | Resource Pool Member | An activity is assigned to the recipient. |
| Pool Owner Project Delegation Request | Resource Pool Owner | A child activity of a template project is delegated to the recipient's resource pool and must be accepted or rejected from the My Assignments tab. |
| Pool Owner Project Delegation Accept Notification | Project Owner | A resource pool owner accepts an activity assignment. |
| Pool Owner Project Delegation Reject Notification | Project Owner | A resource pool owner rejects an activity assignment. |
| Notification to Resource pool owner- Assignment of Activity | Resource Pool Owner | An activity is assigned to a resource in the recipient's resource pool. For proposed projects, this can be controlled using a SmartRule. |
| Gate Action Item Assignment Notification | Assigned user | An action item associated with a project gate is assigned to the recipient. |
| Gate Object Delegation | Delegated user | A project gate is delegated to the recipient. |
| Gate Object Delegation Accept Notification | Gate Owner | A user accepts a gate object delegation. |
| Gate Object Delegation Reject Notification | Gate Owner | A user rejects a gate object delegation. |
| Notification for Gate Object Delegation | Delegated user | A program gate is delegated to the recipient and must be accepted or rejected from the My Assignments tab. |
| Notification for Gate Object Owner Change | New Gate Owner | Ownership of a Gate is changed on the General Info tab. |
| Notification | Received By | When... |
|---|---|---|
| Parent Project Schedule Change Notification | Parent Program Owner | The scheduled date of a parent activity is changed. Applies only when one or more baselines are created for the tree. |
| Predecessor Project Schedule Change Notification | Successor Program Owner | The scheduled dates of a predecessor activity is changed, resulting in changes to the scheduled dates of the successor activity. |
| Microsoft Project Sync Change Notification | Program Owner | Changes made to a PPM project from Microsoft Project are synchronized, resulting in schedule date changes. Applies only when one or more baselines are created for the tree. |
| Child Activity Reschedule Notification | Activity Owner | The scheduled date of a child activity is changed because of changes to the scheduled date of the parent activity. Applies only when one or more baselines are created for the tree. |
| Notification to Activity Owner for Project Schedule Date Change due to addition of Predecessor | Activity Owner | The Schedule Date of an activity has changed because it is now dependent upon a preceding activity. |
| Project Schedule Change Notification - addition of gate predecessor | Activity Owner | The Schedule Date of an activity has changed because it is now dependent upon a preceding gate. |
| Notifications for Calendar Update | Activity or Gate Owners | A calendar used in the project is updated, affecting the project schedule. |
| Notification | Received By | When... |
|---|---|---|
| Project Creation Notification | Project Creator | Project creation is run as a background process and a new project is created successfully. |
| Activity Send | Any user. | An activity is sent to the recipient. |
| User Disabled Notification | Resource Pool Owner | A user who was assigned as a resource to an activity from the recipient's resource pool has been disabled by the system. |
| Notification | Received By | When... |
|---|---|---|
| Project Status Promotion, Observers/Notifiers | Designated observers or users on the Notify list. | There is a change in activity status. |
| Project Status Promotion, Approvers | Designated approvers. | There is a change in activity status that requires approval. |
| Approve Project, Notifiers | All users on the Notify list for the activity. | The activity has been approved to move forward in the workflow. |
| Project Approve Activity, Add Approver | Designated approver. | The recipient is added as an approver for a project or activity. |
| Project Approve Activity, Add Observer | Designated observer. | The recipient is added as an observer for a project or activity. |
| Project Approve Activity, Remove Approver | Designated Project Approver | The recipient is removed from the list of approvers for a project or activity. |
| Project Activity Comment | Program Owner | A user has added a comment to an activity. |
| Project Activity Promotion Failure, Reject | Program Owner | A required approver rejects a project status promotion request. |
| Project Activity Promotion, Approve | Program Owner | A required approver approves a project status promotion request. |
| Gate Status Promotion Observers/Notifiers | Designated Gate Observers | There is a change in gate status. |
| Gate Status Promotion; Approvers | Project /Gate Approvers | There is a change in gate status that requires approval. |
| Project Approve Gate; Add Approver | Designated Gate Approver | The recipient is added as an approver for a gate. |
| Project Approve Gate; Add Observer | Designated Gate Observer | The recipient is added as an observer for a gate. |
| Project Approver Gate; Remove Approver | Designated Gate Approver | The recipient is removed from the list of approvers for a gate. |
| Project Gate Comment | Program Owner | A user adds a comment to a project gate. |
| Project Gate Promotion Failure Reject | Program Owner | A required approver rejects a gate status promotion request. |
| Project Gate Promotion; Approve | Program Owner | A required approver approves a gate status promotion request. |
The Home page Workflow Routings tab lists routable objects that require your attention. For example, your Workflow Routings table may contain tasks that you can choose to accept.
The workflow routings are a combination of base classes and actions that define the kind of attention on the routed object. In PPM, the routable objects are Activities or Gates in the Project Class.
The workflow routings tab consists of routable objects that require your:
Approval
Acknowledgment
Acceptance or Rejection
Review
Action
This tab includes features that allow you to review your routing objects quickly and efficiently. For detailed information on Workflow Routing tab, see the Getting Started with Agile PLM guide.
The Home page My Assignments tab lists Activities and Action Items for which you are responsible. The My Assignments tab provides a set of tools that allow you to efficiently work with your assignments. You can sort the assignments table rows, or select one or more assignment rows in the table, and then perform an action on the selected assignments. For example, you can accept or decline a project activity assignment, or flag an assignment for easier tracking.
The Home page My Assignments tab table includes:
Activity objects where:
The activity is In Process. The workflow status type is not Complete or Canceled.
The activity's Project State attribute is set to Active. Proposed or Template activities are not included.
You are the owner of the activity and the Delegated Owner field is blank. If you have delegated ownership, the Delegated Owner field contains the name of the delegated owner until the activity is accepted or declined.
You are the delegated owner of the activity.
You are a resource on the Team tab of the activity and your allocation is greater than 0%.
Action Items where:
The action item is assigned to you and it is not Complete or Canceled.
The action item is assigned to you and it has been accepted.
The action item is assigned to you and it has not been declined.
You are the creator of the action item and it has been declined by the assignee.
Projects that display in your My Assignments tab are:
Active root-level projects that have no child objects, for which you are the owner.
Leaf-level projects for which you are the owner.
Projects that you have delegated to a resource from the Actions> Delegate menu.
The project is displayed until the assigned resource accepts the action item. Once the resource accepts the action item, it disappears from your My Assignments list and you receive a notification in the Notifications tab.
Your Agile administrator determines which columns appear in the My Assignments table. The displayed attributes can be enabled or disabled only through the Admin > System Settings > My Assignments node in Agile Java Client Administrator. You can, however, rearrange or filter the defined columns as you want, using the Personalize option. For detailed information on how to manage assignments, see the Getting Started with Agile PLM guide.
The Personalize button enables you to create customized views of the content that is displayed in page tables. Once you create views, these are listed as options for your selection in the Views drop-down list. For details on using the Personalize options, see the Getting Started with Agile PLM guide.
The Timesheet feature helps Agile PPM customers address critical business needs, such as the accurate calculation of resource time and associated labor costs for a project. This feature helps authorized users to do the following:
Record the number of hours worked against each assigned task, on a daily or weekly basis.
View and administer all timesheets recorded in the system.
Derive resource time data for reports and analysis.
|
Note: The timesheet reflects the working or non-working days as defined in the project or activity calendar in use. Non-working days set as exceptions and regular weekends are shown in gray. Users can enter time for all days regardless of whether they are defined as working or non-working days. |
Timesheet entry and management is restricted by certain role, privilege, and SmartRule settings in Java Client. For details, see the Agile PLM Administrator Guide.
| Tool | Description |
|---|---|
| More >Print | Prints the selected timesheets. Click More > Print to print the timesheet. |
| More >Timesheet Search | Enables users with appropriate privileges to search and view all timesheets recorded in the system. Click More > Timesheet Search to search for time sheets. For more information, see "Searching for Timesheets." |
| More > Fill-down | Copy the value from a cell to the corresponding cells in all rows following the selection. |
| More > Fill-down (selected cells) | Copy the value from a cell to all the selected cells. The value of the first cell in the selection is copied into all the selected cells. |
| More > Fill-up | Copy the value from a cell to the corresponding cells in all rows preceding the selection. |
| More > Fill-up (selected cells) | Copy the value from a cell to all the selected cells. The value of the last cell in the selection is copied into all the selected cells. |
| Views | Enables you to select from a list of defined timesheet views. You can create views using the Personalize options. |
| Personalize | Click Personalize to set the Table filters. You can configure the timesheet display to show selected attributes such as the associated activity's Name, Number (manually created or auto-generated activity number), Description, Parent, Parent Number, or Root Parent.
If you have privilege to view timesheets of other users, you can create a View to configure and view other users' time sheets. This filter works the same as in My Assignments. For detailed information about using the filter, see the Getting Started with Agile PLM guide. |
The project page opens when you click any project object. From this page, you can record and update information such as schedule, cost, status, resources, content, and discussions about the project.
From the project page, you can:
View details of a project - see "Viewing Project Details."
View project summary - see "Viewing Project Summary."
View the project as a Gantt Chart-see "Launching Gantt."
Lock or unlock projects - see "Multiple Users Editing the Same Task."
Change the status of a project-see "Changing Workflow Status."
View the project tree - Click the Navigator button to show the project tree instead of the folder structure, in the left pane.
Perform various actions on a project - see "Actions Menu."
Personalize table views - see "Creating Personalized Views," and "Personalizing Views for Content."
The Details View is displayed by default if you click a project object that is at the lowest level in the hierarchy (no sub-activities). If you click an object that has sub-activities, it opens in the Summary view. The Summary view is not available for objects without sub-activities. While viewing a project, you can click the Details View or Summary buttons to toggle between the two views.
You can view and manage project-related objects from the following tabs or pages within the Details View.
| Tab | Tasks |
|---|---|
| General Info | View and edit general information about the project, including activities, status, and other attributes configured in Administration. See "Viewing General Information." |
| Schedule | Manage the schedule of individual activities within the project, create baselines, and analyze the impact of changes. See "Managing Schedules." |
| Dependencies | Create and manage dependencies between various project-related activities. See "Creating and Editing Dependencies in Web Client." |
| Team | Manage resources for a project. See "Managing Resources." |
| Content | View and manage all project-related content, including deliverables. See "Managing Content." |
| Workflow | View workflows and sign off, and assign approvers, observers, and notifiers as necessary. |
| Collaboration | Create or join project-related discussions, view action items, share news and information. See "Managing Discussions." |
| Attachments | View, edit, and manage attachments that are required for project execution. See "Working with Attachments." |
| History | View project history. See "Viewing History.". |
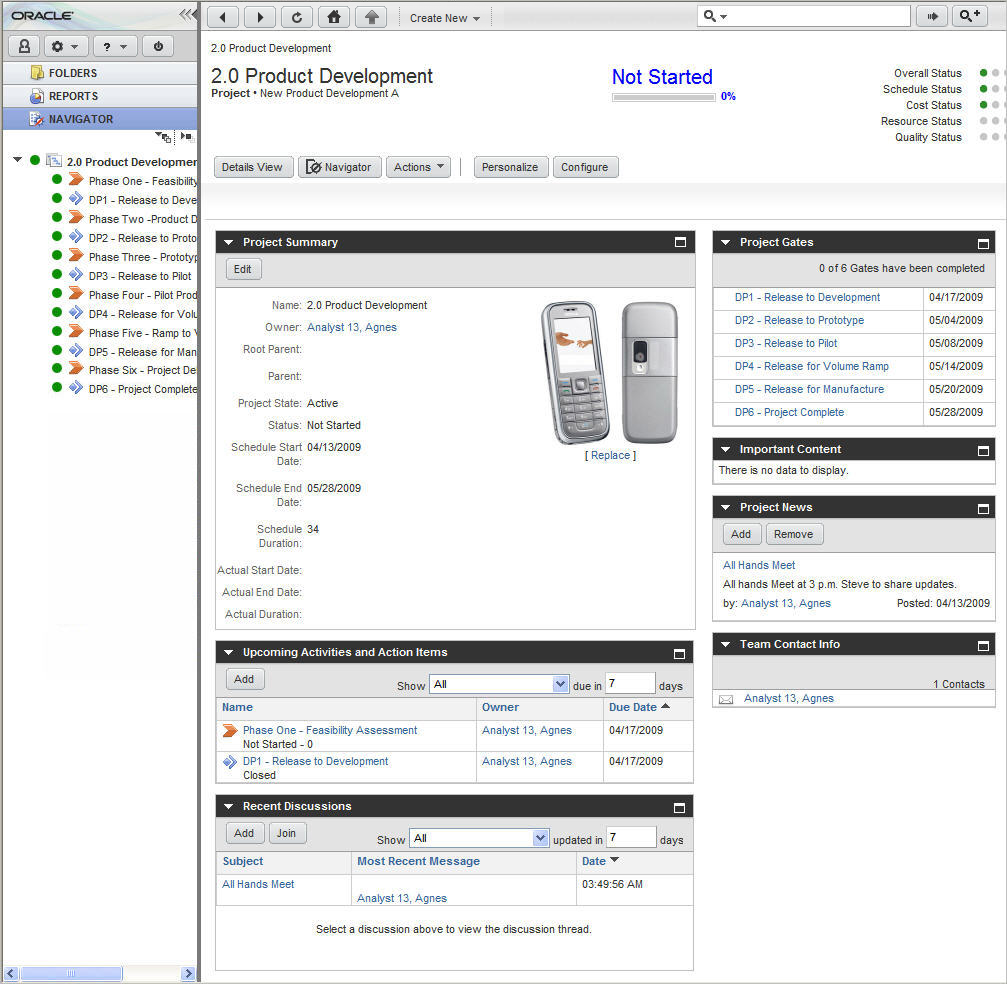
When you first open a project which has sub-activities the Summary view displays. (If the project you open does not have sub-activities, then the Details view appears.) The Summary view is a consolidated view of project information. Executives, task owners and project managers can use this page to quickly review current information, status, and health of a project. This view can comprise all parent-level objects (projects, phases, and tasks) that have child activities. This view is not available on leaf-level activities and gates.
The Summary page contains several 'widgets'. Each widget provides users with customized information and action buttons for a specific aspect of the project, as configured by an administrator. For example, a Project Gates widget may provide users visibility into the status of the project gates (milestones) for that project and deliverables associated with those gates. An Upcoming Activities and Action Items widget may list upcoming activities and provide an Add button that you can use to add an action item to be performed for an activity.
To configure the Summary view, you need appropriate privileges. For details on privileges and summary page configuration steps, see the Agile PLM Administrator Guide.
You can perform the primary actions required on the project directly from the Summary view.
Most widgets contain links to the listed objects. You can use these links to navigate to the appropriate tab of the object and perform necessary actions. For example, in the Project Gates widget, you can click the name of the Gate to modify the details.
The contents of each widget and the actions that you can perform within each are explained in the table below.
| Widget | Description | Actions Available |
|---|---|---|
| Project Summary | A quick overview of the project. Displays data for attributes associated to project activities, as configured by an administrator. Examples of the attributes are Name, Description, Status, Scheduled Start date, and Scheduled End date | Add image - Insert an image file from your local drive. Click Add Image to browse and select an image file from your local drive. The image file is automatically resized if it exceeds the allotted space and resolution.
Replace Image - Replace the current image file with another. Image editing options are available only to root project managers, and only on the root project. Edit - Edit the attribute values displayed within the widget. You must have Modify privilege to edit these values. For details, see the Agile PLM Administrator Guide. |
| Upcoming Activities and Action Items | Helps you keep track of immediate requirements. Lists project activities and action items that are either overdue, or will be due within a specified time frame. You can view leaf-level project objects (including gate sub-classes) that are in Not Started or In Progress states, and Open Action Items associated to the Activity being viewed and its child activities. Table columns are sortable; by default these are sorted by Due Date. | Add Action Item - Create a Action Item for the activity being viewed currently. Click Add Action Item to open a dialog where you can create the new action item.
Show -Filter the list using the options within the Show drop-down list to display upcoming action items and activities, or items that need your immediate attention. For example, you can use the My Activities and Action Items list item to filter the list by items for which you are the assigned owner. After selecting an option, you can additionally narrow down the results by entering a number in the due in - days field. The default value in this field is 7 (days). |
| Recent Discussions | Displays a list of recent, open discussions that occurred within a specified time frame. When you click a row to select a discussion, the discussion thread displays in the bottom pane of the window as a preview. | Add - Create a discussion to be associated with the current Activity. Click Add to open the Add Discussion wizard and enter discussion details. You can select the list of users you want to include in the discussion and notify them.
Join - Join an existing discussion. Select the row of the discussion you want to join and click Join to join the discussion. Reply - Reply to a discussion message. Click Reply on the right-hand side of the selected discussion row to open a dialog where you can enter your response. You can edit the subject of the message if you want. By default, the response will be sent to all users currently included in the discussion. You can edit the Notify List field in the dialog to change the list of users who will receive the response. |
| Project Gates | Displays the list of Gates and their due dates.
If you have created multiple Gate subclasses to establish milestones, you can configure this widget to display the Gate subclasses you want to view. For details, see the Agile PLM Administrator Guide. |
Quick Navigation - Click the name of a listed gate to navigate directly to the General Info tab view of that gate. |
| Important Content | Displays a list of content objects that were added to the Important Content view from the Content tab. See "Working with Project Content." | Quick Navigation - Click the content object name to navigate directly to that General Info tab for that object. |
| Project News | Displays project-related news to keep team members and resources informed about project information. | Add - Click Add to open a dialog where you can create a news item related to the activity currently being viewed. You can add a subject and news text.
Remove - Select a news item and click Remove to remove it from the widget. You can multi-select items in the list to remove them. |
| Team Contact Info. | Displays the team members associated with the selected activity and provides contact information for those team members. | Click the name of the team member to navigate directly to the Team tab of the current activity.
Send Email - Send a notification to a team member whose name appears as an attribute within the widget. Click the Email icon next to the username to open a comments dialog box, where you can enter comments and then send these as a notification to the team member. |
To toggle between the summary view and a detailed view of the project, click Summary or Details View as appropriate.
The General Info tab contains Activity and Status information, and displays information for the fields listed in the table. Fields which contain information that is compiled or rolled up from other fields are not editable.To edit fields, click the Edit button. You can make changes in the editable fields, and click Save to save the changes, or click Cancel to exit without saving.
| Field | Contains... |
|---|---|
| Schedule | Information that enables you to quickly track program progress. Displays the targeted start and finish dates. Also displays the total duration between the targeted start and finish dates.
The default Start time stamp is 08:00:00 A.M and default End time stamp is 05:00:00 P.M. However, you can manually edit the End time stamp, if required. You cannot edit the Start time stamp to a value lesser than 08:00:00.If you create the project at 07:00:00 A.M, the Start time stamp displays 08:00:00A.M. The value of the default time stamp is based on the value set for Working hours configuration in the configuration file (agile.properties) during Agile PLM installation. |
| Estimated | Information that enables you to track when overdue items will be delivered. |
| Actual | Actual varies from schedule if you are ahead of or behind targeted project dates. |
| Variance in Work Days | Start Variance, Finish Variance, and Duration Variance are displayed for Estimated, and Actual dates, compared with Scheduled dates. Variances are displayed in either Work Days or Calendar Days, or both Work and Calendar days.
Your Agile administrator determines which information is displayed in the summary table on the General Info tab. |
| Number | The Autonumber assigned to the project object. |
| Activities Type | Displays whether the activity is a project, program, phase, or task. |
| Owner | The project owner. |
| Name | The name of the activity. |
| Description | Text that describes the project. The maximum length is set by the Agile administrator. |
| Root Parent | A link to the root parent object. |
| Parent | A link to the parent object. |
| Project State | Indicates the type: Active, Proposed, Template. Only an active project can undergo changes in workflow status. |
| Audit Score | The audit score for the activity. See "Audit Values." |
| Weight | Weight assigned to the activity. |
| Weighted Score | A calculated score based on the audit score times the weight. |
| Status | Indicates the workflow status of the project. |
| Rollup Health Status | Indicates whether the health status rollup is selected or not. |
| Cost Status | Denotes the cost status for the activity. This value is a selected value for the leaf object and a rolled-up value for a parent object. |
| Resource Status | Denotes the resource status for the activity. This value is a selected value for the leaf object and a rolled-up value for a parent object. |
| Quality Status | Denotes the quality status for the activity. This value is a selected value for the leaf object and a rolled-up value for a parent object. |
| Lock User | Name of the user who is currently using Gantt Chart or Microsoft® Project to modify the project. When a user launches either Gantt Chart or Microsoft Project, the activity is automatically locked to prevent any other user from editing the project in PPM. |
| Workflow | Identifies the object's assigned workflow. |
| Schedule Status | The schedule status of the activity. |
| Overall Status | An overall status of the activity. This value is calculated based on either selected or rolled up-values for cost, resource, quality, and schedule. It denotes the worst of these status values (cost, resource, quality, and schedule). |
| Project Type | Dashboard field. May be renamed during implementation. |
| Region | Dashboard field. May be renamed during implementation. |
| Division | Dashboard field. May be renamed during implementation. |
| Product Line | Dashboard field. May be renamed during implementation. |
| Customer | Dashboard field. May be renamed during implementation. |
| Launch Year | Dashboard field. May be renamed during implementation. |
| Global | Controls whether the project is available to all executives or not. |
| Actual Labor Cost | The Labor cost incurred on the project as on date, based on the actual work done on the project. |
| Budgeted Labor Cost | The intended Labor cost for the project. |
| Estimated Labor Cost to Completion | The cost of Labor for the entire project which is calculated based on the change in Project cost or plan, as the project progresses. |
| Actual Fixed Cost | The Fixed Cost incurred on the project as on date, based on the actual work done on the project. |
| Budgeted Fixed Cost | The intended Fixed cost for the project. |
| Estimated Fixed Cost to Completion | The fixed cost for the project which is calculated based on the change in the project costing or plan as the project progresses. |
| Actual Capital Expenses | The capital expenses incurred on the project as on date. |
| Budgeted Capital Expenses | The intended capital expense limit on the project. |
| Estimated Capital Expenses to Completion | The estimated capital expenses for the project which varies based on any change in the fixed assets of the project. |
| Actual Time (In Days) | Days Effort is calculated at the rate of 8 hours per day and displayed as Actual Time (In Days). Each day is calculated as a bucket of 8 hours. For example, if actual hours worked is 24, Actual Time (In Days) is calculated as 3 days. If actual hours worked is 25, it is calculated as 4 days. |
| Budgeted Time (In Days) | The preallocated time in days for a project to reach completion. |
| Estimated Time to Completion | The approximate time that is required for the project to reach completion, by the progress in project. |
| Category fields | Fields that are configured by the administrator. There are 25 Category fields. The last category field is assigned to the criteria called 'All Programs', by default. The user can create a project and link it to a specific program. This linking helps to consolidate information from multiple projects associated with the same program.
These Category fields are not available for Users and User Group objects. |
| Schedule Editor | Indicates the source of schedule editing for this project: PPM or MSP (Microsoft® Project). This is automatically set to MSP when you launch a project into Microsoft Project. When set to MSP, the PPM project does not change dates and duration programmatically. This ensures that when the project is published in PPM from Microsoft® Project, the project dates are correct in PPM. |
| Actual Flex Cost | A cost field that is configured by the administrator. Actual cost reflects the cost incurred on the project as on date. |
| Budgeted Flex Cost | A cost field that is configured by the administrator. Budgeted cost reflects the intended cost for the project. |
| Estimated Flex Cost to Completion | A cost field that is configured by the administrator. Estimated cost reflects the cost that keeps varying based on any change in the project cost or plan as the project progresses. |
| Critical | Indicates whether the activity is on the critical path. |
| Total Actual Cost | Sum of all the actual costs. |
| Total Budgeted Cost | Sum of all the budgeted costs. |
| Total Estimated Cost to Completion | Sum of all the estimated costs to completion. |
| Created from Template | Name of the template from which this project is created. |
| PLM Reference | Any object that you want to add as a reference to the project. This object also appears in the Content tab of the project. |
| Project Keywords | Keywords that are associated to the project. You can configure the project summary page to display important content by these project keywords. |
| Functional Team(s) | Lists any functional teams you have associated with the activity for workflow routings. |
| Integration details | (Appears only if RMW is installed.) |
| Scale Factor | Indicates the number by which the BOM quantity should be multiplied for commercial production. |
| Operating Mode | Defaults to Clinical Supply. |
| Integration Message | Provides information about the integration, or reason for failure. |
| Integration Status | Indicates whether the PPM object was successfully synced to RMW. |
| Internal ID | ID of the synced object in the RMW database. |
| Calendar | Calendar assigned to this activity. Calendars that are enabled by an administrator are visible for selection. |
To edit the information in the General Info tab:
Click Edit on the General Info tab of a project object.
Modify the editable fields.
Click Save.
Within Agile PPM, dates are displayed in your preferred date format, but there is no time zone conversion applied for dates such as Schedule Start Date, Schedule End Date, Actual Start Date, Actual End Date, Estimated Start Date and Estimated End Date.
Date values that you enter are stored in Greenwich Mean Time (GMT) and displayed without the time zone. For example, if you enter a date value of 10/10/2009, the system stores the date in the database as 10/10/2009 00:00:00 GMT.
Page Two, Page Three, Workflow, and History dates are displayed in user-preferred time zones.
Objects within a project can have different duration types such as:
Fixed duration - The object takes a defined period, for example, five days. For Fixed duration, the Days Effort is calculated as the Scheduled Duration times the sum of the % Allocation of all resources. You can also create a zero duration activity by selecting Fixed Duration and setting Zero as the Days Effort.
Effort driven - The Days Effort of the object is fixed, but the number of resources assigned affects the Scheduled Duration. For Effort Driven Duration Type, the Scheduled Duration is calculated as the Days Effort divided by the sum of % Allocation of all resources.
If a parent changes to a leaf node object (an activity with no children) then the Duration type changes from 'Calculated' to 'Fixed'. The Duration remains the same as it was when it was the parent. If the parent object had resources, Days Effort is calculated based on the percentage allocation of the Resource/Groups assigned to the Team tab. If there are no resources, the Days Effort is the same as the Scheduled Duration.
The General Info tab of activities contains the following audit values:
Audit Score - The value assigned to each object in a project by an auditor during an audit, based on performance indicators.
Weight - A value that reflects the importance of the individual object compared to other objects in the entire project.
Weighted Score - A value calculated by multiplying the values in the Weight and Audit Score fields.
Attachments to Agile business objects contain pertinent information about the object in addition to the information recorded on the object tabs. Examples of attachment files are:
Drawing files such as CAD drawings or scanned image files in viewable formats
Web-based information in the form of URLs
Project specifications and other documents
Non-viewable files, compressed files, and so on
|
Important: As a best practice, it is recommended that the attachments tab in Agile PPM activities and gates be disabled. Agile PPM provides a unique tab, the Content Tab, that you can use for all project content, including attachments. |
For more information on working with attachments, refer the Getting Started with Agile PLM guide.
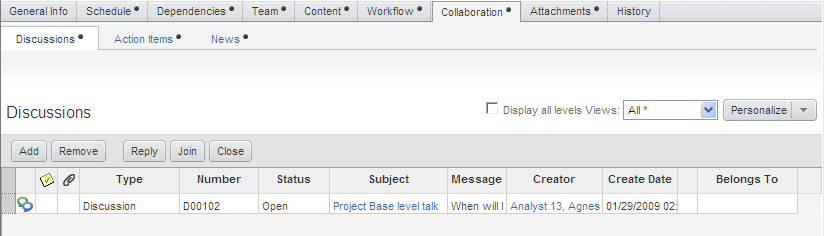
The Collaboration tab enables you to manage project-related discussions, action items that result from the discussions, and news items. You can also add and view these objects in the Project Summary page.
The Collaboration tab has the following views:
Discussions - Enables you to initiate, join, reply to, or remove a discussion. The Notifications tab in your Home page displays all the discussions notified to you. For further information on managing discussions, see "Managing Discussions."
Action Items - Enables you to manage the action items. You can add, remove, accept, or decline an action item. In addition, you can mark the action item 'Complete'. The Action Items which you add in this tab appear in the My Assignments tab of the assignee's Home page. You can view these action items in the Upcoming Activities and Action Items widget of the Project Summary page.
For further information on working with Action items, see "Viewing Action Items."
News - Enables you to add and remove news or announcements specific to the project. You can also add and remove news items on the Project Summary page.
The History tab records all actions taken, such as editing the General Info tab or changing activities or team members.
If you do not have the appropriate read privileges, you cannot view the fields on the History tab. If you have questions about your privileges, see your Agile administrator.
The Actions Menu consists of the following options in addition to the standard PLM menu commands such as Bookmark, Subscribe, Save As and Delete.
| Menu | Description |
| Gantt Chart | Click Gantt Chart to view the Gantt Chart view of the project. For more information on working with Gantt, see "Gantt Chart." |
| Delegate | Click Delegate to delegate the project to a different owner. For more information on delegating ownership, see "Delegating Ownership." |
| Substitute Resource | Click Substitute Resource to replace a resource in the project team. For more information on substituting resources, see "Substituting Resources." |
| Change Parent | Click Change Parent to modify the root parent of the project. |
| Make This a Root Activity | In the project or phase within a project, select Make this a root activity to start a new project. This change modifies the existing dependencies. |
| Compare Baselines | Click Compare Baselines to view a comparison between two project baselines. For more information, see "Comparing Baselines." |
| Microsoft® Project | The entries in this menu enable you to launch the existing PPM project in Microsoft Project. In addition, you can save the existing PPM project as an XML file. For more information, see "Working with Microsoft Project." |
| Complete | Click Complete to modify the status of the project to 'Complete'. |
| Change to Canceled | Click Change to Canceled to modify the status of the Project to 'Canceled'. |
| Accept Calendar Change | Click Accept Calendar Change to manually accept changes to the calendar. You must have privileges to modify schedule dates and duration to perform this action. See also "Using Calendars". |
| Reports and Analytics | The entries in this menu enable you to obtain reports on Project Resource Utilization and Schedule. For more information, see "Reports." |
| PPM Sync to RMW (appears if RMW is installed) | Click PPM Sync to RMW to update the RMW database with projects and work requests created in PPM. |
To search for a user group:
Click to open the address book palette.
Choose User Groups in the address book palette dropdown list.
Type the user group object search criteria that you want to use.
Click the Execute a Quick Search button.
In the palette search results table, double-click the user group row you want. You can also select one or more rows and drag them to the field that you are modifying.
Press the Escape key to close the address book palette.
To search for a user within a user group:
The Search within a User Group option becomes available when the number of user groups in the Agile PLM system exceeds 200.
Click to open the address book palette.
Choose Search within a user group in the address book palette dropdown list.
In the Select a user group to search within dialog, type the name of the user group you want, or click the Search button to search for a group.
When you have selected a user group, click OK.
Agile PLM adds the group name to the address book palette dropdown list. Agile PLM continues to add group names to the palette dropdown list until the number of groups equals twenty. As additional groups are added to the list, Agile PLM removes the oldest entries from the dropdown list. A maximum of twenty groups that you recently selected for the Search within a user group option remain on the dropdown list.
Alternatively, you can use the address book palette dropdown list to select one of the user groups that you have selected recently.
Type the user object search criteria that you want to use.
Click the Execute a Quick Search button. The search is restricted to the members of the selected group.
In the palette search results table, double-click the user group row you want. You can also select one or more rows and drag them to the field that you are modifying.
Press the Escape key to close the address book palette.
To search for users:
Click to open the address book palette.
Choose Users in the address book palette dropdown list.
Type the user object search criteria that you want to use.
Click the Execute a Quick Search button.
In the palette search results table, double-click the user group row you want. You can also select one or more rows and drag them to the field that you are modifying.
Press the Escape key to close the address book palette.
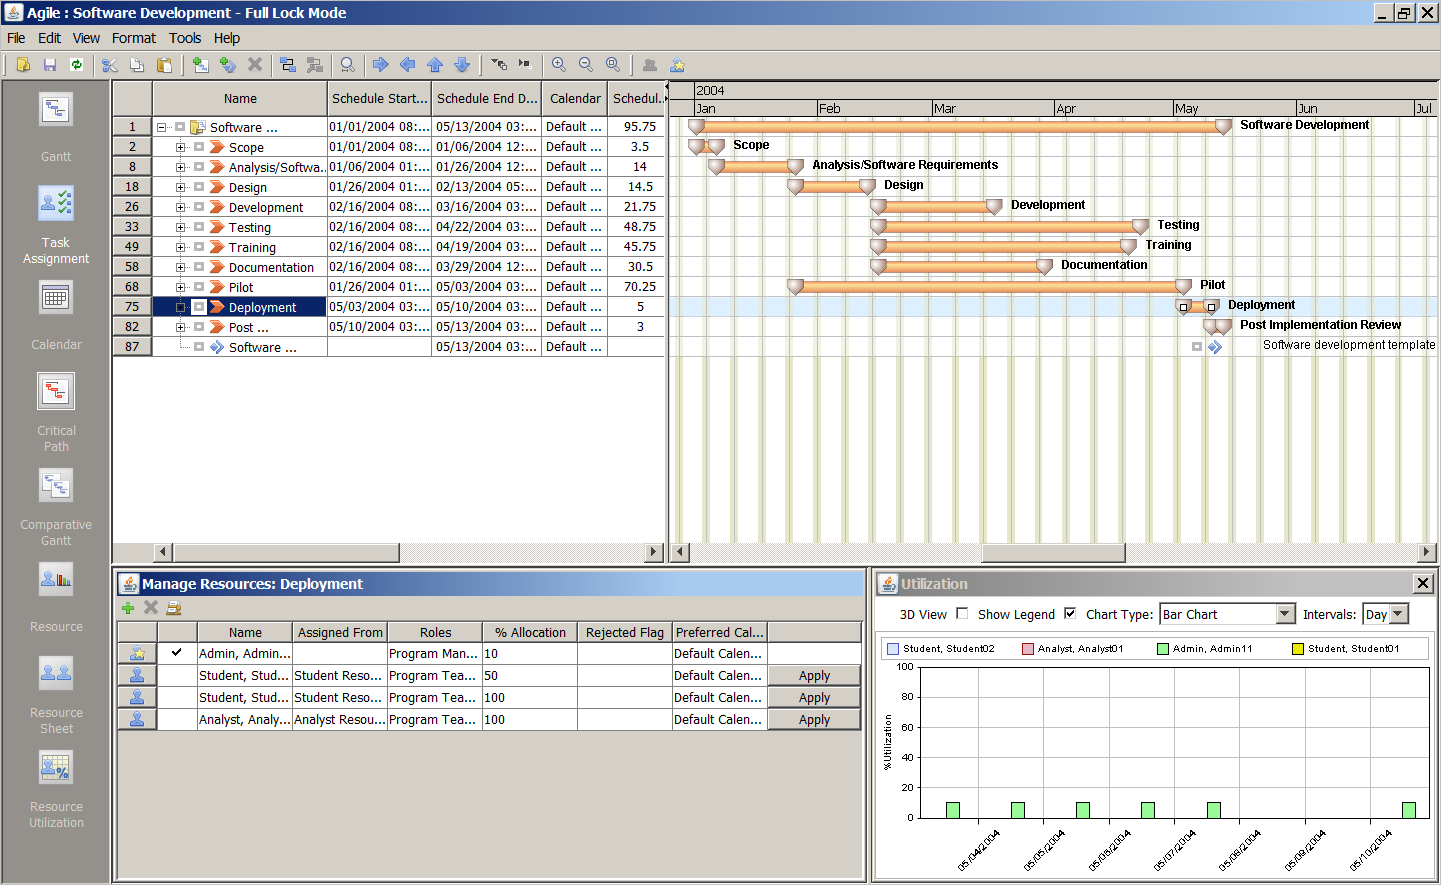
The Gantt Chart feature is a powerful project management tool that helps project managers plan, administer, and track projects from start to finish. With Gantt, you can create a project and then plan the work breakdown structure for this project, which includes defining activities and tasks, creating dependencies between tasks, and performing resource management.
The Gantt Chart offers rich user-friendly features (such as Excel-like data editing) to manipulate and view data in graphical or tabular formats. Multiple view options enable you to focus on discrete project aspects, and right-click menus help you to quickly take actions on selected project objects.
The default Gantt view consists of a menu bar, standard toolbar, a tabular activity pane and a graphical activity pane. The tabular activity pane provides a hierarchical tree structure representation of all activities and the graphical pane provides a graphical representation of activities with color and iconic indicators.
Ensure that you have the appropriate privileges to perform project management activities within the Gantt Chart. You can create or delete activities in Gantt only if you have been assigned the privileges to do so. If you have questions about your assigned roles and privileges, contact your Agile administrator.
The Gantt chart uses Java Web Start technology and requires Java Runtime Environment (JRE) to be installed on your computer. If the recommended JRE does not exist on your system or if you have a lower version installed, you are prompted to install the latest JRE version. For information on the recommended JRE, see Agile PLM Capacity Planning Guide.
If certain firewalls prevent this automatic download, you can download and install the appropriate JRE version.
The Gantt chart operates in three modes:
Connected - Requested data is obtained directly from the server.
Disconnected - Requested data is obtained from the installation folder. If the server is not available, Gantt switches to this mode. Once the server becomes available, it switches back to Connected mode.
Offline - Requested data is retrieved from the installation folder. The server is assumed to be unavailable.
|
Note: The Gantt chart opens in the mode it was set to when you last worked on it. If the Gantt Chart was set to Offline mode in your last session, it opens in Offline mode when you next try to launch a project from Web Client. The requested project cannot be opened as the system assumes server unavailability. Instead, a new default project is launched. To open the project you wanted, change the mode from Offline to Connected, and then launch the project again from Web Client. |
To launch the Gantt Chart for a project, open the project and select Details View > Gantt Chart.
If your project has sub-activities, you can also select Actions > Gantt Chart from the Summary view.
When you start the Gantt Chart, Java JAR files are downloaded into your computer's temporary files folder. Once these are loaded, the Gantt Chart appears.
You can launch the Gantt Chart from Web Client using any of the following options:
Full Lock Mode - Locks the current activity and all its lower-level activities, including dependent activities in other projects. Open in this mode to make overall schedule changes that should overwrite information in related projects.
Internal Lock Mode - Locks the current activity and all its lower-level activities within the project. Dependant activities in other projects remain unlocked and can be edited. Be aware that scheduling changes that you make may affect the schedule of dependent activities in other projects. Open in this mode to perform changes that are not related to schedule.
Read Only mode - Enables you to view but not edit data. Open in this mode to view or monitor projects without making changes.
When you open a project from within the Gantt Chart, it opens in Full Lock Mode.
During Gantt download, you are prompted to confirm whether you want shortcuts to the Gantt application to be installed on your Desktop and Start menu. Click Yes to confirm. These shortcuts are especially useful when you want to work on Gantt offline.
To launch Gantt from the Desktop, double-click the Gantt icon. To launch Gantt from the Start menu, choose Programs > Oracle | Agile PLM and select the Gantt application. Once you have saved a Gantt Chart Exchange (.gcx) file on your system, you can simply double-click the file to launch the Gantt Chart.
Most actions on the Gantt chart can be performed using the icons on the toolbar or corresponding keyboard shortcuts. When you place your mouse pointer over an icon, the shortcut key appears next to the name of the icon.
| Function | Shortcut Keys | Description |
|---|---|---|
| Cut | Ctrl+X | Cuts a selected cell value, activity or gate. |
| Copy | Ctrl+C | Copies a selected cell value, activity or gate. |
| Paste | Ctrl+V | Pastes the cut or copied cell value, activity or gate. If you copy a task that is in Completed status, the status changes to Pending when you paste it. |
| Open | Ctrl+O | Opens Activities or Gates. |
| Save | Ctrl+S | Saves changed information in the Gantt. |
| Refresh from PLM | Ctrl+L | Overwrites current data with the latest data from the server. All unsaved changes are lost. |
| Activity | Insert | Inserts an activity below the selected activity, at the same indent level. |
| Gate | Alt+G | Inserts a gate below the selected activity, at the same indent level. |
| Delete | Delete | Deletes the selected item from the Gantt Chart.
To select an activity for deletion, highlight or select the whole row. |
| Create Dependency | Alt+C | Adds a dependency. |
| Edit Dependency | Alt+D | Opens the Edit Dependency dialog for the selected dependency. |
| Go To Selected Task | Ctrl+G | Brings the corresponding graphic into view. |
| Outdent or Move Left | Alt+Shift+Left | Outdents an item, so that a project element no longer reports to the higher-level element.
Moves the selected item or items to the left. |
| Indent or Move Right | Alt+Shift+Right | Indents an item, making a project element report to another item.
Moves the selected item or items to the right. |
| Move Up | Alt+Shift+Up | Moves an item up to change the order of the listed items at the same level. If project elements report to that item, these move along with it. |
| Move Down | Alt+Shift+Down | Moves an item down to change the order of the listed items at the same level. If project elements report to the item, these move along with it. |
| Expand All | Ctrl+E | Expands the Project tree structure to view all the activities within. |
| Collapse All | Ctrl+Q | Collapses the Project tree structure to hide all the activities in the tree. |
| Zoom In | Ctrl+Plus (NumPad) | Enlarges the graphical pane view. |
| Zoom Out | Ctrl+Minus | Reduces the graphical pane view. |
| Zoom To Fit | Ctrl+0 | Changes the size of the graphical pane to show the entire project within the visible area. |
| Manage Resources | Alt+F10 | Enables you to select and manage resources for the selected activities. |
| Delegate Owner | Alt+F12 | Enables you to delegate the ownership of the selected activities. |
Gantt supports the following views:
Gantt
Task Assignment
Calendar
Critical Path
Comparative Gantt
Resource
Resource Sheet
Resource Utilization
The Gantt view is the default view. This view displays the project activities and schedules in a combination pane. One pane displays a tabular view of activities in a hierarchical tree structure. The other displays a graphical view of activities in a bar graph format.
The Task Assignment view is a combination view of the Gantt Chart in the top pane and the Manage Resources sheet and Resource Utilization chart in the bottom pane. When you select an activity in the Gantt view, resource information about the task appears in the Manage Resource view. You can simultaneously view the resource utilization of each resource in a graph format in the Resource Utilization pane.
The Calendar view enables you to create, edit, and review your project tasks in a calendar format. The Calendar view consists of two tabs, Month and Day. The Month tab displays a monthly view with all the days in the month. The Day tab displays a day view with all the hours in the day.
The Calendar view is helpful to view tasks that are scheduled on a particular day, week or month. It shows tasks schedules for a specific week or range of weeks. You can create a project by entering a task and the duration of a project using the calendar format.
Critical path view helps you plan all activities that directly affect the completion date of a project. Critical Path is determined by identifying all the activities that have slack, below a pre-determined number of days.
Critical path activities act as the basis for creating a schedule and planning resource allocation. It helps you analyze where a remedial action is required to get a project back on track. Critical path can be viewed at activity and sub-activity level. The critical task is the current activity on the critical path.
If a schedule is on a critical path, the schedule bar on the graphical pane appears red.
The Comparative Gantt view helps you compare the current project schedule against estimated or actual schedules, or against a saved baseline. To view a comparison, select an option from the drop-down list in the main toolbar. The default comparison value is Estimated. All saved baselines display in this list for selection.
In the graphical view:
The Current schedule of a parent displays in orange.
The Current schedule of a child activity displays in pink.
The Estimated, Actual, or Baseline schedule of the parent activity displays in white.
The Estimated, Actual, or Baseline schedule of selected child activities displays in gray.
In the tabular view, you can view baseline schedule information (start and end dates) in columns alongside current schedule information.
The Resource view displays a list of all users for a particular project and their task allocation according to the schedule, in a calendar format. If you assign an allocation to a user, you will be able to view a bar graph in the pane below displaying the percentage of allocation. You can also select the topmost row - All Users - to view a bar graph of all resources simultaneously.
In this view, you can also update task assignments to balance resource workload. For instance, if a user has been assigned two tasks in the same time period, causing overloading, one of the tasks can be postponed or reassigned. The Project Manager or Resource Pool Manager can move the task to another time period or to another user using a simple drag-and-drop action. The Gantt data is updated immediately, and synchronized to the server when saved.
The Resource Sheet enables you to view available resources and add selected resources to your project. The Resource Sheet contains a set of users who are associated with the activities within a project. Adding resources to a Resource Sheet reduces duplication and maintenance of resources. You can access the Resource Sheet from View > Resource Sheet.
The Resource Sheet view contains fields with relevant user information such as Title, Business Phone, Email, Status, Assigned from Pool, and so on. You can review, add, or edit information on each resource. You can quickly create a resource list for your project by adding the name of each resource and their related information. A resource can be an individual, a company or department, a piece of equipment, a room, or any other resource that you are using for your project.
|
Note: Simultaneous updates to the Resource Sheet by different users are not supported. Updates to the resource sheet are saved independently of Gantt chart updates. |
The Resource Utilization view displays all the resources and the tasks assigned to each resource. It displays the tasks and task allocations from other projects in PPM as well. You can view the following information for each resource or resource group in this table:
Name
Pool Name
% Allocation
Schedule Start
Schedule End
To format columns in the report:
Choose Format>Preferences.
Within the Preferences dialog that opens, in the Columns tab, select the columns you want to display.
Use the arrow buttons to move selected column names from the Available Columns list to the Selected Columns list.
To rearrange the order in which the columns display, move them up or down in the list using the up and down arrows.
To hide or show gridlines, select the appropriate check boxes for Horizontal and Vertical.
Click OK to apply your changes.
The graphical and tabular display of data within the Gantt Chart can be customized based on your preferences. You can configure the display of columns, grids, bar labels, appearance, and styles using the options in the Format menu.
You can configure the columns to display Page One attributes - the options that are made available in these fields are configured in the Java Client General Info attribute settings.
You can customize column display and set other preferences such as preferred file download location, as described further.
To customize column display:
Choose Format > Preferences.
Within the Preferences dialog that opens, in the Columns tab, select the columns you want to display.
Use the arrow buttons to move selected column names from the Available columns list to the Frozen or Non-Frozen columns list as desired. The Non-Frozen column displays all the visible columns in the tabular activity pane.
Click OK.
To freeze, unfreeze, or hide one or more columns:
Within the tabular view pane, select the column or columns.
In the right-click menu, select Freeze Column, Unfreeze Column or Hide as appropriate.
Within the Columns tab of the Preferences dialog, you can use the and arrow buttons to sort the order of the displayed columns. Alternatively, you can click and drag a column in the tabular view pane to change its location.
To set preferences for offline mode:
Choose Format > Preferences.
Within the Preferences dialog, select the Advanced tab.
In the File Location field, browse and select the folder to which you want your files downloaded for offline access. The default location for file downloads is your My Documents folder.
In the Project Name field, you can enter a default value for activity names. For example, if several of your projects start with the same name, say 'ABC Project V.1', 'ABC Project V.2', 'ABC Project V.3' and so on, you can enter 'ABC Project' in this field so that you only need to change the rest of the name.
Select other options as appropriate:
If you select Yes for the Download Page Two and Page Three field, this information gets downloaded when you are in Online mode, and can be saved for offline activity. If you select No, this information is loaded only if you choose to view the properties of a selected activity.
If you select Yes in the Display Locked Projects on Exit field, a dialog appears when you exit Gantt, where you can view the list of projects that are locked by you. You can then choose to unlock activities that other users may need to access.
Click OK to exit the Preferences dialog.
In the Format menu, click Save Settings to save your preferences. The next time you log in, these settings are maintained.
To customize the appearance of your Gantt Chart, choose Format > Appearance and choose a theme.
To change the graphical view style, choose Format > Styles and choose a style.
You can select the text to be displayed on the bar graphs on the graphical view pane. The information is displayed in relation to the task, project or phase corresponding to the bar graph. Choose Format >Bar Labels and select labels.
You can also customize the display of grids and rows in your graphical view.
Once you have made changes to any of the format settings, select Format>Save Settings from the menu bar to save changes.
The Save Settings command does not save changes to the Grid.
The View Bar is a pane that is displayed on the left of the Gantt Chart and enables you easy access to view the different type of Gantt views. The Gantt view types are displayed as icons and you can click the icon to display the view. The default setting for the View Bar is Enabled. To disable it for a particular session, click View and select View Bar.
A check mark next to the View Bar option indicates that the view bar is enabled.
This section details the various Gantt menu options for File.
The File menu in the Gantt Chart offers the following options:
| Menu Command | Action |
|---|---|
| New | Creates a new root project with default project data.
This option is disabled in multi-project Gantt. |
| Open | Opens a search window where you can locate and open projects from the server. You can search by Root Project, Root Template, Activities, Gates, or All Project. Available only in online mode. The search criteria you last used appears by default in the Find From field.
When you search by Activities or Gates, parametric search options become available if corresponding attributes have been enabled in Java Client. Click Options to view parametric search fields and specify criteria. This option is disabled in multi-project Gantt. |
| Save | Saves the project to the server. Saved data includes: Page One, Page Two, Page Three, Schedule, Dependencies, Team, and Resources.. |
| Save As | Saves the project to the server under a different name. Saved data includes: Page One, Page Two, Page Three, Schedule, Team, and Resource Sheet. Content (from the Content tab) is not saved.
This option is disabled in multi-project Gantt. |
| Open File | Helps you search and locate a saved GCX (Gantt Chart Exchange) file on your hard drive. If you saved a folder location as a preference in the Advanced tab of the Format > Preferences dialog, this folder is opened. If the current project was opened using a GCX file stored in a particular folder, that folder is opened.
This option is disabled in multi-project Gantt. |
| Save File | Saves the project to your hard drive. Saved data includes all activities, dependencies, resource sheet, activity states, and any modifications made after you last saved the project.
This option is disabled in multi-project Gantt. |
| Save As File | Saves the project to your hard drive under a different name. Make sure you change the name of the root project so that you do not update an existing project on the server inadvertently.
This option is disabled in multi-project Gantt. |
| Refresh from Server | Reloads the project with the latest data from the server. Use this feature to update resource information without having to close the project and open it again. Save your changes first, as all unsaved changes are overwritten. If you have configured any views, these are retained. If the project is newly created and not yet saved to the server, you are prompted to save the project. |
| Recent Files | Displays a list of up to 10 files that were recently opened from the hard drive.
This option is disabled in multi-project Gantt. |
| Work Offline | When selected, switches the Gantt to offline mode, regardless of server availability. To return to online mode, select this option again. Connection status is displayed at the bottom right corner of the window.
This option is disabled in multi-project Gantt. |
The Edit menu in the Gantt Chart offers the following options:
| Menu Command | Action | Notes |
|---|---|---|
| Undo | Undo the action made in Gantt (the latest action only). | |
| Cut | Cut the selected record. | |
| Copy | Copy the selected record. | The Copy menu option is available in all views, except the Resource Sheet and Resource Utilization views.
The Copy menu option is one of only three options available in the Resource view. |
| Paste | Paste the copied record. | |
| Fill > Down | Fill down values among the selected rows from top to bottom. | |
| Fill > Up | Fill up values among the selected rows from bottom to top. | |
| Find | Open the Find window to find a target task. | The Resource view only has the Copy, Find and Find Selected Value options.
The Resource Sheet view only has the Find, Find Selected Value, and Delete options. The Resource Utilization view only has the Find and Find Selected Value options. |
| Find Selected Value | Find the next cell that is the same as the selected cell. | The Resource view only has the Copy, Find and Find Selected Value options.
The Resource Sheet view only has the Find, Find Selected Value, and Delete options. The Resource Utilization view only has the Find and Find Selected Value options. |
| Go To Selected Task | Locate the selected task in Gantt Bar. | |
| Custom Filter | Open Custom Filter. | |
| Insert > Activity | Insert a new activity.
Action cannot be performed on a root project. |
|
| Insert > Gate | Insert a new gate.
Action cannot be performed on a root project. |
|
| Create Dependency | Switch to dependency-creation mode. | |
| Edit Dependency | Edit the selected dependency. | |
| Delete | Delete the selected activity/gate/dependency. | |
| Move Activity > Indent | Indent an activity/gate one level.
Action cannot be performed on a root project. |
|
| Move Activity > Outdent | Outdent an activity/gate one level.
Action cannot be performed on a root project. |
|
| Move Activity > Move Up | Move an activity/gate up one row.
Action cannot be performed on a root project. |
|
| Move Activity > Move Down | Move an activity/gate down one row.
Action cannot be performed on a root project. |
|
| Reschedule > Move Back/Forward | Open the Move Back/Forward window to reschedule the project. | |
| Reschedule > Remove Slack | Remove all the slack in the project(s) and adjust project dates to give you a 'best fit' schedule. |
The View menu in the Gantt Chart offers the following options:
| Menu Command | Action | Notes |
|---|---|---|
| Gantt | Switch to Gantt View. | |
| Task Assignment View | Switch to Task Assignment View. | |
| Calendar | Switch to Calendar View. | |
| Critical Path | Switch to Critical Path View. | |
| Comparative View | Switch to Comparative Gantt View. | |
| Resource | Switch to Resource View. | |
| Resource Sheet | Switch to Resource Sheet View. | |
| Resource Utilization | Switch to Resource Utilization View. | |
| Expand All | Expand all projects to leaf level. | Not available in Resource Sheet view. |
| Collapse All | Collapse all projects to root level. | Not available in Resource Sheet view. |
| View Bar | Hide/unhide View Bar in the left. | |
| Zoom In | Zoom in Gantt Bar. | Not available in Resource Sheet view. |
| Zoom Out | Zoom out Gantt Bar. | Not available in Resource Sheet view. |
| Zoom to Fit | Zoom the Gantt Bar to fit the window size to display the whole project. | Not available in Resource Sheet view. |
The Format menu in the Gantt Chart offers the following options:
| Menu Command | Action | Notes |
|---|---|---|
| Preference | Open the preference window to configure displayed attributes, etc. | The Resource Sheet view and Resource Utilization view only have the Preference and Save Settings Format menu options
. In the Resource Utilization view, the user can add the Root Parent column. |
| Grid > Show Vertical Grid | Control to show vertical grid or not. | |
| Grid > Vertical Grid Color | Configure vertical grid color. | |
| Grid > Show Weekends | Control to show weekend color or not. | |
| Grid > Weekend Color | Configure weekend color. | |
| Grid . Show Non Working Hours | Control to show non-working hours or not. | |
| Grid > Show Non Working Hours Color | Configure non-working hours color. | |
| Grid > Show Horizontal Grid | Control to show horizontal grid or not. | |
| Grid > Horizontal Grid Color | Configure horizontal grid color. | |
| Grid > Color Rows | Control to show colorful rows or not. | |
| Grid > Even Row Color | Configure even row color. | |
| Grid > Odd Row Color | Configure odd row color. | |
| Bar Labels > Name | Show activity name of the activity/gate in the Gantt bar. | |
| Bar Labels > Start Date | Show scheduled start date of the activity in Gantt bar. | |
| Bar Labels > End Date | Show scheduled end date of the activity in Gantt bar. | |
| Bar Labels > Status | Show complete percentage of the activity/gate in the Gantt bar. | |
| Bar Labels > % Complete | Show status of status of the activity/gate in the Gantt bar. | |
| Bar Labels > None | Show nothing in the Gantt bar. | |
| Appearances > Metal | Change the appearance to Metal. | |
| Appearances > Nimbus | Change the appearance to Nimbus. | |
| Appearances > CDE/Motif | Change the appearance to CDE/Motif. | |
| Appearances > Windows | Change the appearance to Windows. | |
| Appearances > Windows Classic | Change the appearance to Windows Classic. | |
| Appearances > Kunststoff | Change the appearance to Kunststoff. | |
| Appearances > Office | Change the appearance to Office. | |
| Styles > Agile | Change the style to Agile. | |
| Styles > Activity Completion | Change the style to Activity Completion. | |
| Styles > Critical Path | Change the style to Critical Path. | |
| Styles > Custom Time Scale | Change the style to Custom Time Scale. | |
| Styles > Level Coloring | Change the style to Level Coloring. | |
| Styles > Standard | Change the style to Standard. | |
| Save Settings | Save all the format settings. | The Resource Sheet view and Resource Utilization view only have the Preference and Save Settings Format menu options. |
The Tools menu in the Gantt Chart offers the following options:
|
Note: All options, unless otherwise noted, are unavailable in Resource-related views. |
| Menu Command | Action | Notes |
|---|---|---|
| Manage Resources | Open the Manage Resources window. | |
| Delegate Ownership | Open the Delegation window. | |
| Show Changes | Open the comparison report in browser.
This option is disabled in multi-project Gantt. |
|
| Show in Browser | Show the project in Web Client. | |
| Unlock Projects | Open the Unlock Projects window. | |
| Add Resource | Add a new resource to resource sheet | This is only available in the Resource Sheet view and it is the only Tools menu option available in this view. |
The Help menu in the Gantt Chart offers the following options:
| Menu Command | Action |
|---|---|
| Manual | Open the Manual link. |
| About | Show information about Gantt. |
The Context menu in the Gantt Chart offers the following options:
|
Note: All options, unless otherwise noted, are unavailable in Resource-related views. |
| Menu Command | Action | Notes |
|---|---|---|
| Cut Activity | See the Menu Options. | |
| Copy Activity | See the Menu Options. | |
| Paste | See the Menu Options. | |
| Expand/Collapse | See the Menu Options. | |
| Fill Ups | See the Menu Options. | |
| Fill Down | See the Menu Options. | |
| Indent | See the Menu Options.
Action cannot be performed on a root project. |
|
| Outdent | See the Menu Options.
Action cannot be performed on a root project. |
|
| Move Up | See the Menu Options.
Action cannot be performed on a root project. |
|
| Move Down | See the Menu Options.
Action cannot be performed on a root project. |
|
| Insert Activity | See the Menu Options.
Action cannot be performed on a root project. |
|
| Insert Gate | See the Menu Options.
Action cannot be performed on a root project. |
|
| Delete | See the Menu Options. | |
| Manage Resources | See the Menu Options. | |
| Move Back/Forward | See the Menu Options. | |
| Go to Selected Task | See the Menu Options. | |
| Show in Browser | See the Menu Options. | |
| Properties | Open the property window to view/edit P2/P3 attributes of the selected activity/gate | |
| Copy | Copy the selected resource/resource pool. | This menu option is only available in the Resource View.
The Resource View context menu has the following options: Copy, Expand/Collapse, Move Resource (Up/Down). |
| Expand/Collapse | Expand/Collapse the selected resource pool. | This menu option is only available in the Resource View.
The Resource View context menu has the following options: Copy, Expand/Collapse, Move Resource (Up/Down). |
| Move Resource Up | Move the selected resource up for one row. | This menu option is only available in the Resource View.
The Resource View context menu has the following options: Copy, Expand/Collapse, Move Resource (Up/Down). |
| Move Resource Down | Move the selected resource down for one row. | This menu option is only available in the Resource View.
The Resource View context menu has the following options: Copy, Expand/Collapse, Move Resource (Up/Down). |
You can use the Gantt client as a standalone application on your computer and continue working on the Gantt chart even when you are not logged into Agile PLM. This feature enables you to do the following:
Continue working on a project while traveling or during server downtime.
Create a preliminary draft of a project and make it available online only when you want other users to see it.
Email a saved project to others for opinions and updates.
The first time you launch a Gantt chart from Web Client, you are provided the option to save a shortcut to the Gantt chart on your desktop. Once you save the shortcut, you can use it to launch Gantt and work on it offline.
When you close the Gantt Chart after working on it in Offline or Disconnected mode, the projects that you opened from Gantt remain locked. To ensure that projects used by others are unlocked for their use, you are prompted to unlock projects before you exit. Within the Unlock Projects dialog that appears, select the projects that you want to unlock for the use of others and click OK.
While you are working on the Gantt Chart, you can switch to the Web Client view if required. This option is available in all modes of the Gantt Chart and is highlighted only when at least one row from the project Tree is selected.
To switch to the Web Client view of the current project:
Select one or more activity rows in the Gantt chart.
In the Tools menu, or in the right-click menu, select Show In Browser. If you are not connected to the server, the Agile PLM login screen appears.
Log in to Agile. A new browser window opens for each activity row that you selected.
You can print any view of the Gantt Chart using the Print option in the File menu.
Within the Print window, or the Print Preview window, you can manually change Page Setup options if necessary. By default, the page margins are set to 0.5 inches, and the page orientation is set to Landscape.