| Oracle® Argus Interchange User's Guide Release 8.0 E54658-01 |
|
|
PDF · Mobi · ePub |
| Oracle® Argus Interchange User's Guide Release 8.0 E54658-01 |
|
|
PDF · Mobi · ePub |
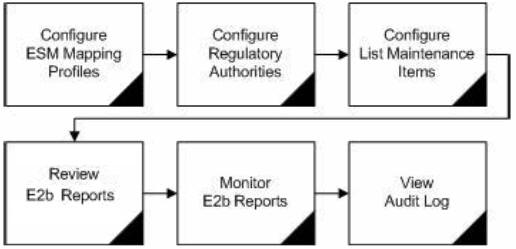
This section is intended for Argus Interchange Administrators. The flowchart shows the steps to follow when configuring, reviewing, and administering Argus Interchange.
The Argus Interchange Mapping Utility enables you to store multiple profiles. This enables companies to transmit E2B reports to multiple agencies. The Argus Interchange Mapping Utility maintains an audit log that tracks every change made to the settings. You can also use this utility to view Trading Partner Configurations. This chapter includes discussions of the following:
This section provides information about a logging in and out of Interchange.
To log on to Interchange:
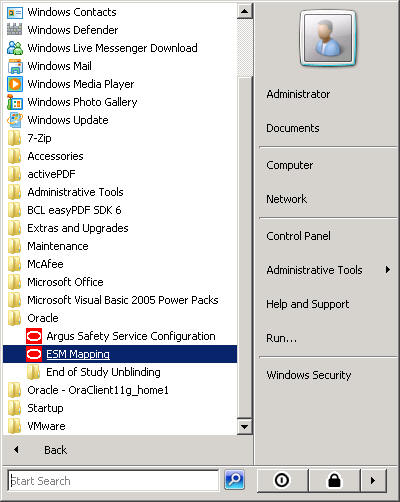
Go to Start-->Programs-->Oracle-->ESM Mapping.
Enter the User Name, Password, and Database in the log on dialog.

Note:
The User Name and Password for the Argus Interchange Mapping Utility are created through User Configuration in Argus Console. This is done by selecting the ESM Admin role from the list of available roles in the User Role listbox.Click Login.
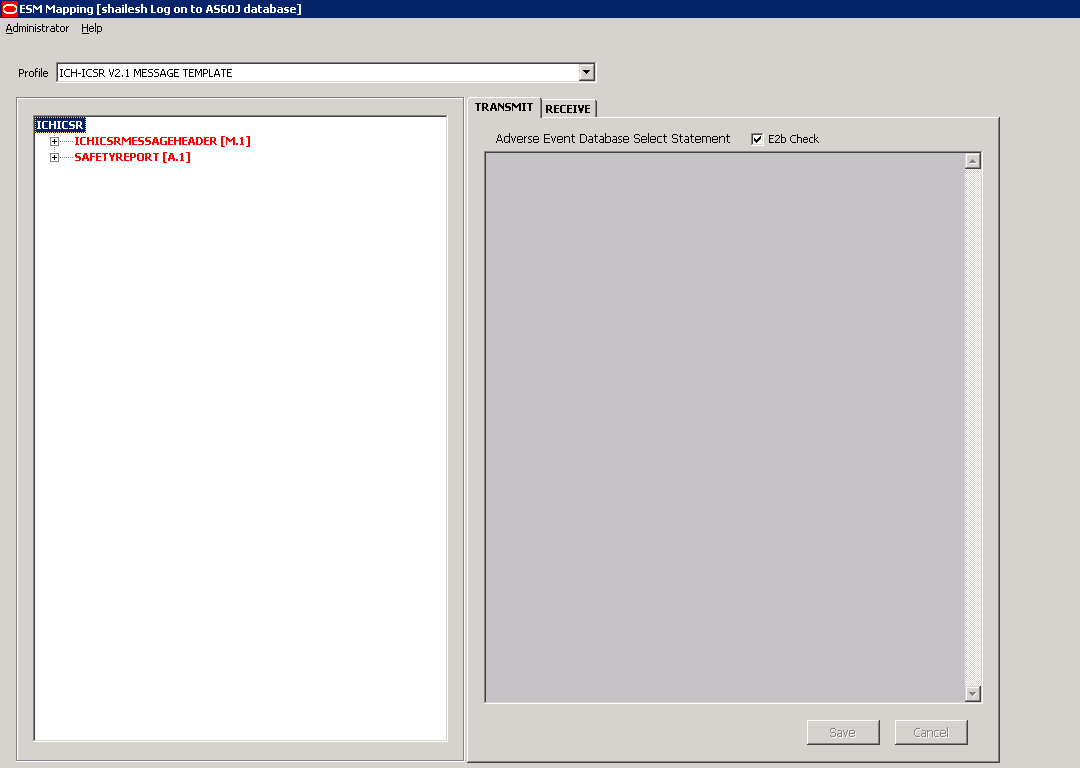
The Argus Interchange Mapping Utility provides the following standard Message and Acknowledgement profiles:
ICH-ICSR V2.1 MESSAGE TEMPLATE
ICH-ICSR V2.1 MESSAGE TEMPLATE - EMA
ICH-ICSR V2.1 MESSAGE TEMPLATE - FDA
ICH-ICSR V3.0 MESSAGE TEMPLATE
ICH-ICSR V1.1 ACKNOWLEDGEMENT TEMPLATE
ICH-ICSR V1.1 ACKNOWLEDGEMENT TEMPLATE - EMA
ICH-ICSR V1.1 ACKNOWLEDGEMENT TEMPLATE - FDA
CBER EVAERS V1.0 MESSAGE TEMPLATE
Beginning Argus 8.0, the following profile template has been added:
ICH-ICSR E2B R3 MESSAGE TEMPLATE
This section provides information about working with profiles and includes discussions of the following:
Defining a Profile
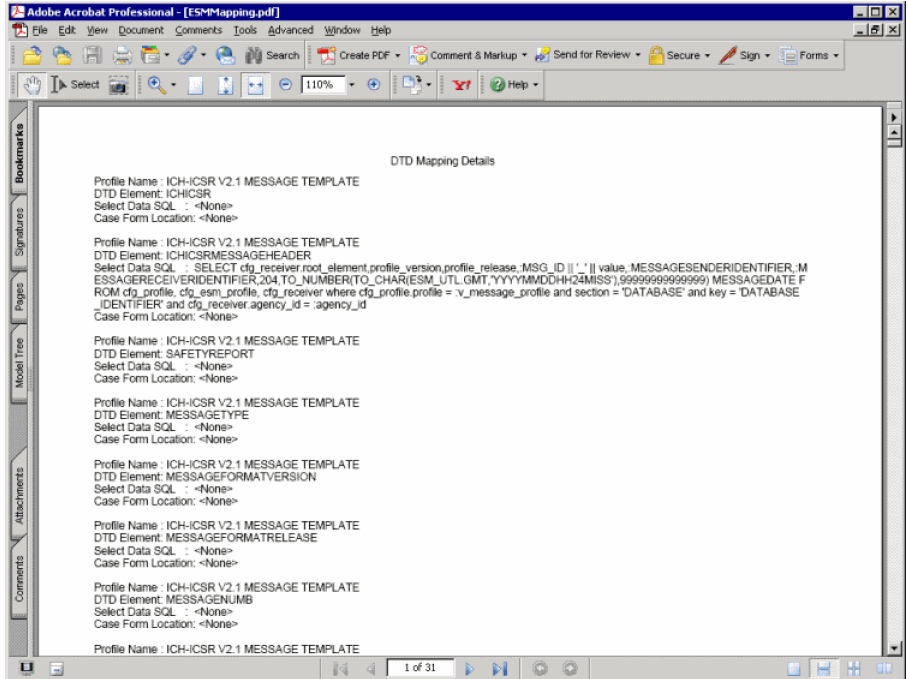
Printing a Profile
Copying a Profile
Deleting a Profile
This section describes how to view or modify the rules of a DTD profile in Argus Interchange Mapping Utility. You can view profile details by selecting a Profile from the Argus Interchange Mapping Utility window.
The following table lists and describes items that are common to each tab of the Argus Interchange Mapping Utility.
The following is an illustration of the Transmit tab:
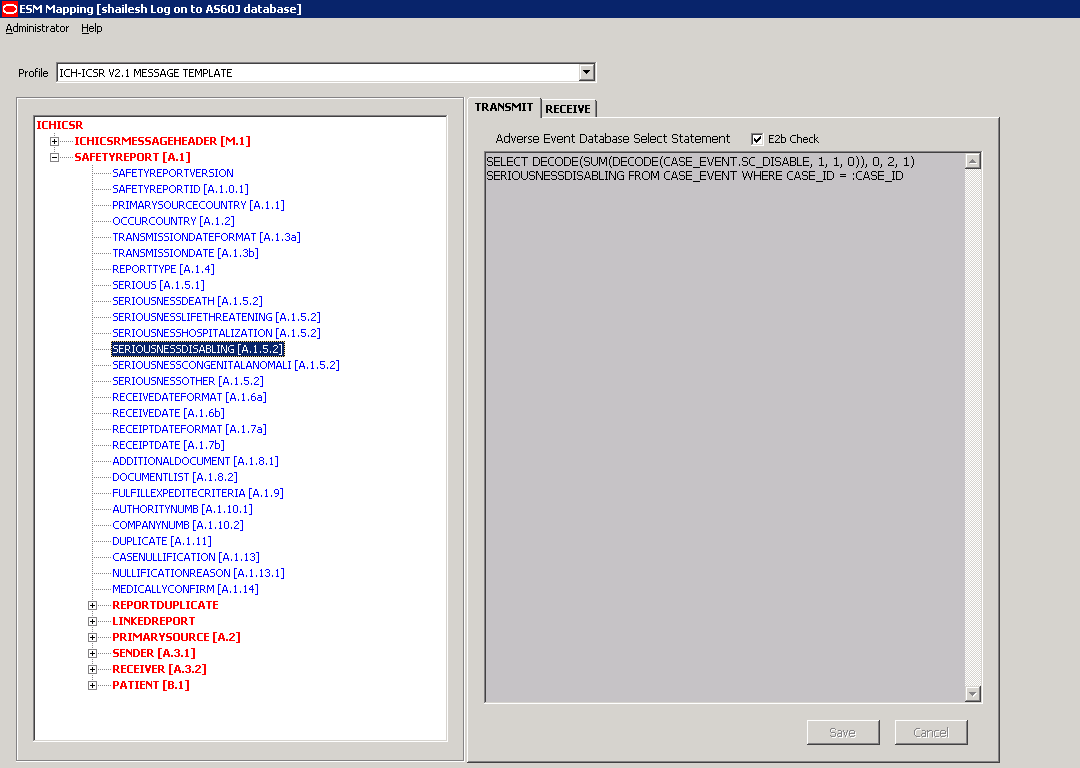
To view details in the Transmit Tab:
Select a profile from the Profile drop-down list.
Click Transmit.
The following tables lists and describes the items on the Transmit tab:
| Item | Description |
|---|---|
| Adverse Event Database Select Statement | Enables you to enter and view the SQL logic used to extract the value of the selected element of the DTD profile from AE database. |
| E2B Check checkbox | Indicates whether the selected profile is used in the E2B check functionality in Argus.
The E2B check function is used to validate E2B reports based on the validation rules defined for the DTD profiles. Only the profiles that have the E2B check selected are used for validation. |
This section describes how to setup your printer and print the profile.
Note:
The Copy Profile option can be used to create custom E2B profiles with customized Export / Import mapping logic for any E2B element. However, any new changes / fixes applied to factory E2B profiles are not automatically applied on the custom E2B profiles. Hence, the custom profile logic may get obsolete by any Argus Safety version upgrade which has changes / fixes applied to factory E2B profiles. In such a scenario, customers should re-create their custom E2B profile again, by copying the new factory E2B profile and applying their custom Export / Import mapping logic manually.Use the following procedure to copy a profile.
In the Profile list, select the profile to copy.
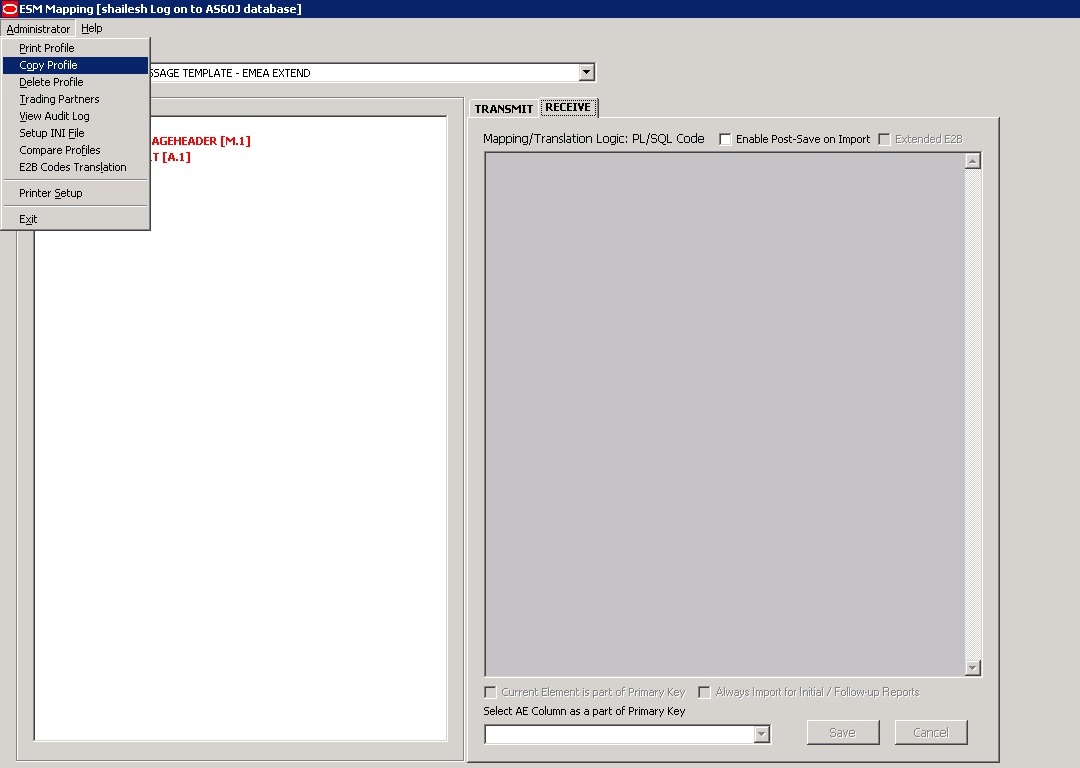
Select Administrator -> Copy Profile, to open the Copy Profile dialog box.
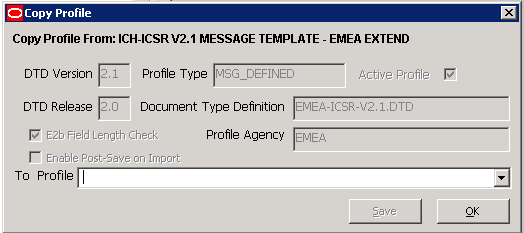
Type the profile name in the To Profile field, click Save, and click OK.
You can only delete profiles created or modified in the Interchange Mapping Utility interface. You cannot delete the pre-installed Argus Interchange profiles.
To delete a profile
Select the profile to delete from the Profile list.
Select Administrator -> Delete Profile.
Click Yes to confirm the deletion of the profile.
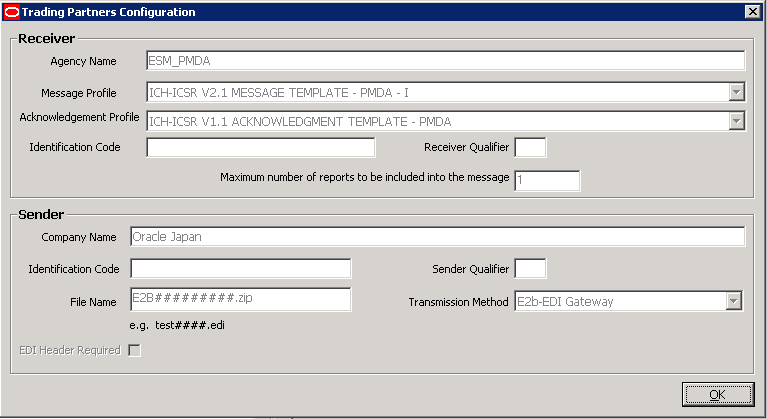
Use the following procedure to view regulatory authorities/trading partners.
Select Administrator->Trading Partners to open the Agency List dialog box.
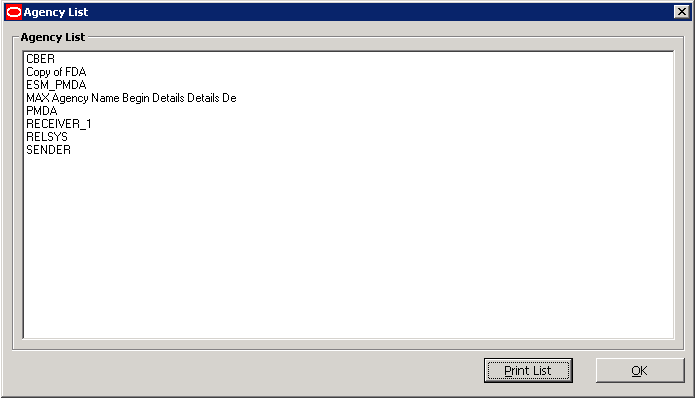
Double-click the required Regulatory Authority or Trading Partner to view its details.
The system opens the Trading Partner Configuration dialog box. You cannot modify the information in the dialog box.
Note:
To modify or create new Regulatory Authorities/Trading Partners, choose Reporting Destination in the Code List in Argus Console.You can configure the Argus Interchange Service by updating the initialization (INI) file from the Argus Interchange Mapping interface.
To configure Argus Interchange Service:
Select Administrator -> Setup INI File menu in the Interchange Mapping Utility to open the Service INI File Setup dialog box.
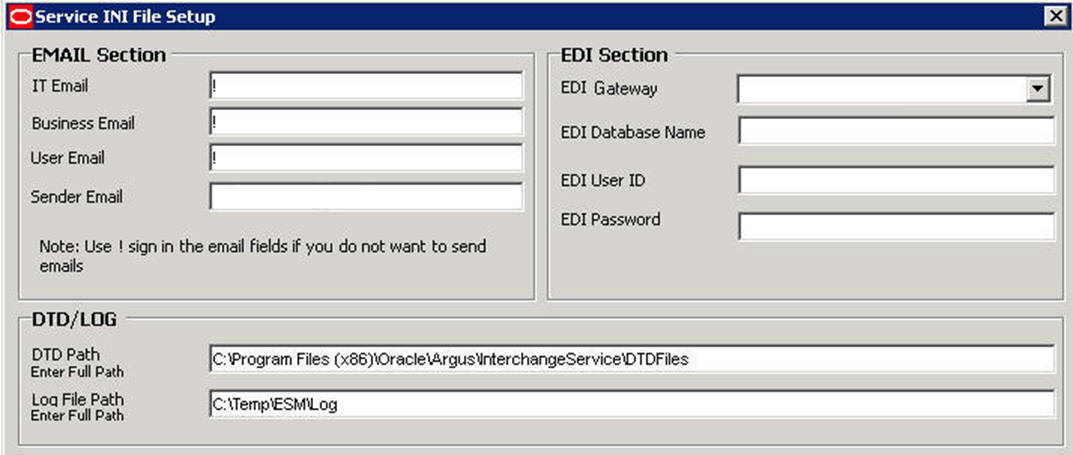
Use the items in the Service INI File Setup dialog to configure the Argus Interchange Service INI file.
Enter the data for each field as required.
The following tables lists and describes the fields in the Service INI File Setup dialog box.
| Item | Description |
|---|---|
| IT E-mail | Enter the e-mail address that Argus Interchange Service should use to send e-mails, if the transmit time out occurs for Physical Media or EDI Gateway. |
| Business E-mail | Enter the e-mail address that Argus Interchange Service should use to send e-mails, if the Receive ACK time-out value is reached. |
| User E-mail | Enter the e-mail address that Argus Interchange Service should use to send e-mails, when the user does not process the E2B Report within the time-out value. The Argus Interchange Service uses SMTP as its mail system. |
| Sender E-mail | Enter the e-mail address that Argus Interchange Service should display, as the 'From' address in the e-mails that it sends. |
| EDI Gateway | Select the name for the EDI Gateway - from either Axway Cyclone or Oracle B2B. |
| EDI Database Name | Enter the database name for the EDI software. |
| EDI User ID | Enter the user name for EDI database. |
| EDI Password | Enter the password for the user name associated with the EDI database. |
| DTD Path | Enter the path for the DTD file. |
| Log File Path | Enter the path where the Argus Interchange Service will write the log files. |
| Multiple Database Section | Displays all the configured databases for ESM Service. |
| Delete Button | Click Delete to remove the entire Database Configuration from ESM Service INI File. |
You can configure the Argus Interchange Service to support multiple database.
To configure a database:
In the Setup INI File dialog box, double click Add New Process to open the Service DB Setup dialog.
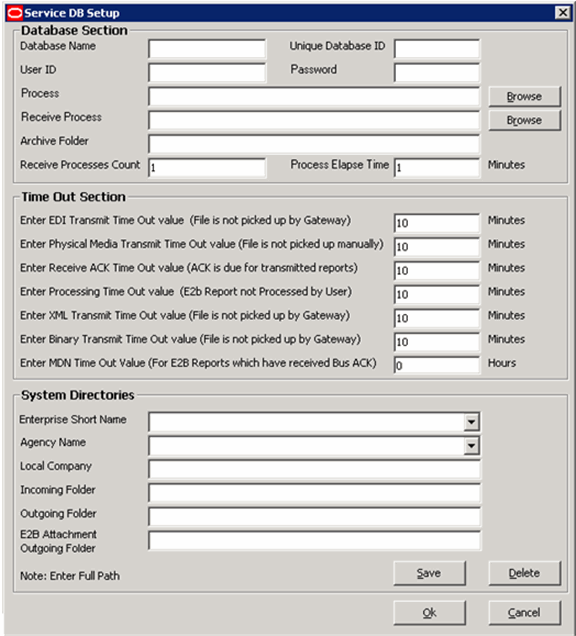
Use the items in the Service DB Setup dialog to configure the ESM Service INI file.
Enter the data in the fields as required.
Note:
ESM Service.ini can be configured for MAX_FILES_IMPORT_PER_RUN at database level under the Database section. This should be set to a number. This determines how many files are read from incoming folder so as to allocate to Receive Process(es). This includes both ICSR reports and Acknowledgments. If it is not defined, an internal limit of 1000 is assumed.The following table lists and describes the fields in the Service DB Setup dialog box.
| Item | Description |
|---|---|
| Database Name | Enter the name of the Adverse Event database. |
| Unique Database ID | Identifies each database uniquely. In the case of multiple databases, the value of this field should be unique. |
| User ID | Enter the user name for the Service. |
| Password | Enter the password associated with the User Name entered in the USER ID field. |
| Process | Enter the full path of the ESMProc.exe file. The system uses this path to locate the ESMProc.exe file. |
| Receive Process | Enter the full path of the E2BReceive.exe file. The system uses this to locate the E2BReceive.exe file. |
| Archive Folder | Enter the full path where the system places the file processed by Argus Interchange. |
| Receive Processes Count | Enables you to specify multiple E2B receive processes
You can specify from 1 to 5 E2B receive processes The default is 1. |
| Process Elapse Time | Enter the time interval for the Argus Interchange Process to run. |
| Enter EDI Transmit Time out Value | The amount of time, in minutes, that must pass before the system sends an e-mail message when an E2B Report has not been transmitted within a specified time period.
Note: The minimum value for the time-out is 10 minutes. |
| Enter Physical Media Transmit Time out Value | Enter amount of time, in minutes, that must pass before the system can send an e-mail message when an E2B Report has not been sent manually by a specified person within a specified time period.
Note: The minimum value for the time-out is 10 minutes. |
| Enter Receive ACK Time Out Value | Enter the amount of time, in minutes, that must pass before the system can send an e-mail message when an ACK message has not been received within a specified time period.
Note: The minimum value for the time-out is 10 minutes. |
| Enter Processing Time Out Value | Enter the amount of time, in minutes, that must pass before the system can send an e-mail message when an Incoming Report has not been processed within a specified time period.
Note: The minimum value for the time-out is 10 minutes. |
| Enter XML Transmit Time Out Value | Enter the amount of time, in minutes, that must pass before the system can send an e-mail message when an XML file is not picked up by the Gateway.
Note: The minimum value for the time-out is 10 minutes. |
| Enter Binary Transmit Time Out Value | Enter the amount of time, in minutes, that must pass before the system can send an e-mail message when a binary file is not picked up by the Gateway.
Note: The minimum value for the time-out is 10 minutes. |
| Enter MDN Time Out Value | Enter the amount of time, in hours, that must pass before the system stops polling the MDN information from the EDI server after receiving the Business ACK for a transmitted report. |
| Enterprise Short Name | Select the relevant enterprise short name, from the alphabetically-sorted list, containing all the enterprise short names. When an enterprise is selected, it loads the list of agencies for that enterprise in the Agency Name drop-down list. |
| Agency Name | Select the Agency from the drop-down list. This list contains all the agencies of the enterprise which had been selected in the Enterprise Short Name drop-down list.
Note: If you change an agency name and also change the Incoming/Outgoing folders for the agency, the application prompts you to save the changes made. |
| Local Company | The system automatically populates this field when Agency is selected. |
| Incoming Folder | Enter the path to the folder where incoming files are stored. |
| Outgoing Folder | Enter the path to the folder where outgoing files are stored. |
| E2B Attachment Outgoing Folder | Enter the path to the folder where outgoing E2B attachments are processed. |
| Save Button | Click Save to set the Folder Paths configured for the Agency as Default. When selecting another agency to configure from the Drop Down, all the Paths will remain. |
| Delete Button | Click Delete to delete the entire configuration for the Agency selected only. |
The audit log stores changes made to the system from the application in the audit log. You can also view and filter individual changes.
To view the audit log:
Select Administrator -> Audit Log.
When the system opens the Audit Log dialog box, enter the appropriate data in each field and click Search.
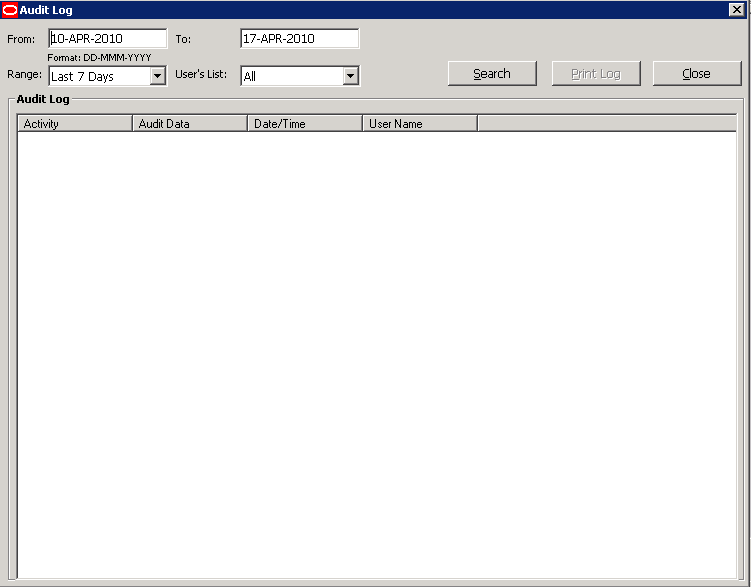
When the system displays the search results, double-click a row to view detailed information about the changes made in the Audit Log Detail dialog box.
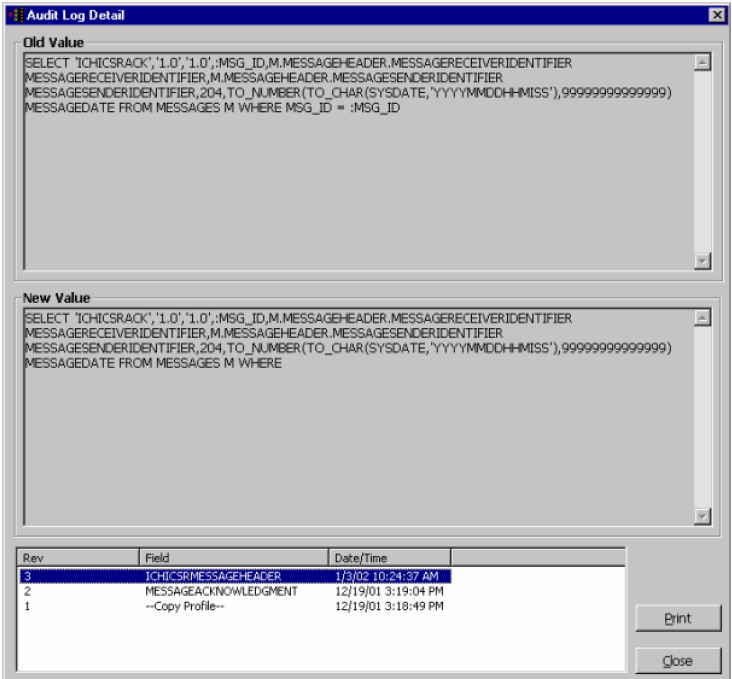
Select an item in the list at the bottom of the Audit Log Details dialog to view details of the old value and the new value of the selected item.
The following table lists and describes the fields in the Audit Log dialog box.
| Item | Description |
|---|---|
| From | Enter the search start date. |
| To | Enter the search end date. |
| Range | Select a pre-configured date range on for the search.
Note: When the Argus Interchange Audit log is invoked, it shows the default range of the last 7 days. |
| User's List | Select a user from the list of users. |
| Print Log | Prints the current view. |
| Search | Performs the search. |
| Close | Closes the dialog. |
You can compare two DTD profiles to find element-level differences. Select a source profile in the left pane and a target profile in right pane and run the Compare Profiles utility to generate the differences. The Compare Profiles utility also enables you to update the SQL statements (at the element level) of the Destination Profile elements with those of the Source Profile.
To compare DTD profiles:
On the Argus Interchange Mapping Utility menu bar, click Administrator -> Compare Profiles.
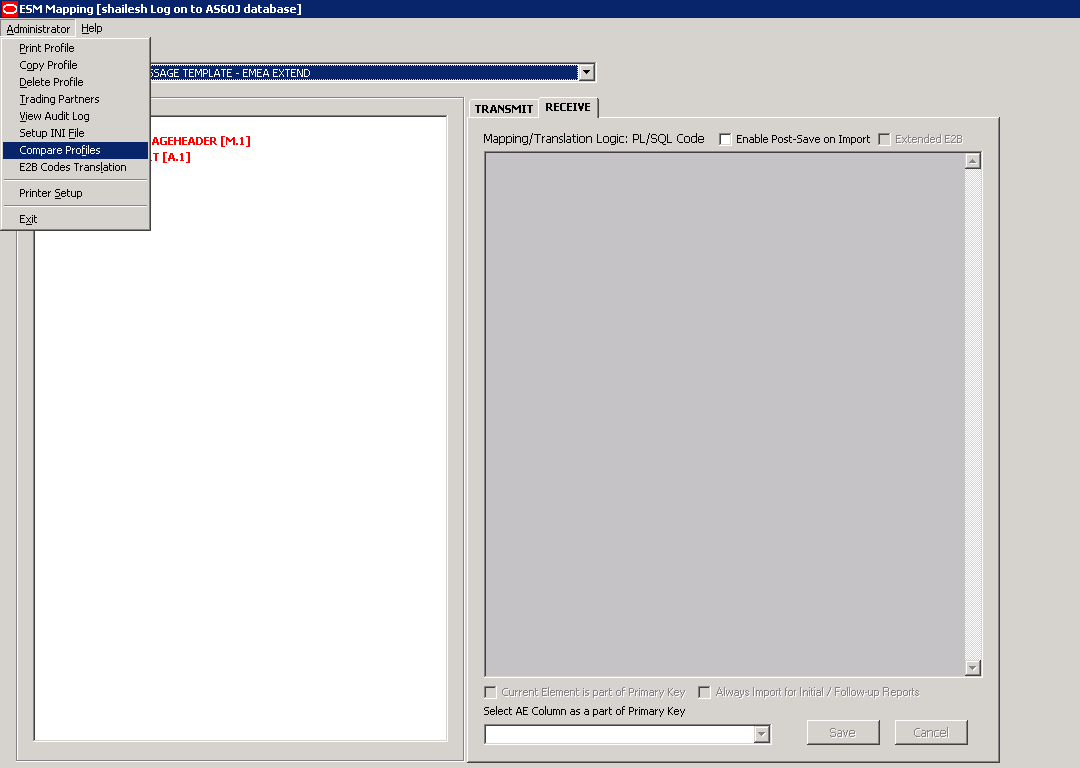
When the system opens the Compare Profiles dialog box, use the items in the Compare Profiles dialog to compare profiles.
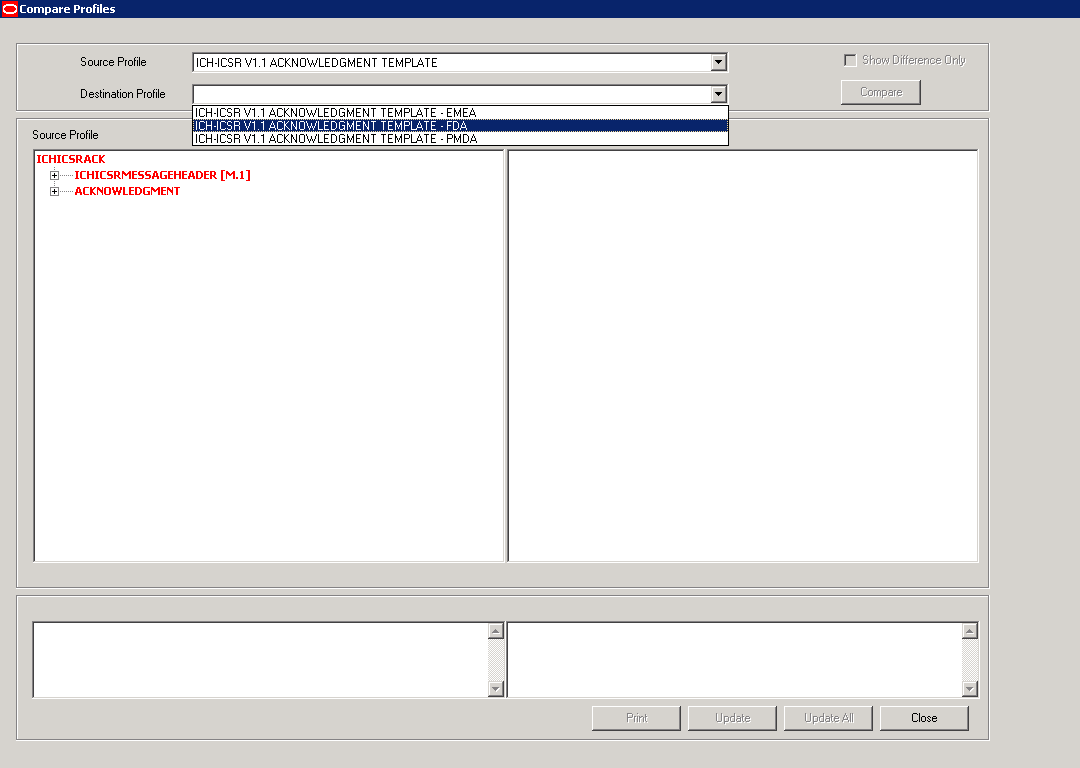
Enter the data in the files as required.
The following table lists and describes the fields in the Compare Profile dialog box.
| Item | Description |
|---|---|
| Source Profile drop-down | Is used for selecting a source profile from the available profiles configured in the system. |
| Destination Profile drop-down | Displays the profiles with the same DTD version and type (message/acknowledgement) as the ones in the Source profile.
Note: The source profile is to be selected before selecting the destination profile. The destination profile is disabled if you have not selected the source profile. |
| Show Difference Only | Displays those nodes that contain different SQL statements between the source and destination profiles when this checkbox is checked. |
| Compare | Compares the differences between the source and destination profiles when this button is clicked.
Note: The elements that are different in the Source and Destination profiles are displayed in a light gray background color. |
| Source Profile pane | Displays the source profile and its elements in a tree structure. When you click on any of the elements, the corresponding SQL statements are displayed on the source profile textbox, which is on the left-corner below the Source Profile pane. |
| Destination Profile pane | Displays the destination profile and its elements in a tree structure. When you click on any of the elements, the corresponding SQL statements will be displayed on the Destination profile textbox, which is on the right-corner below the Destination Profile pane. |
| Prints all the SQL statements of the source and the destination profile with differences highlighted.
Note: If there are no differences between the source and destination profiles, the following pop-up message is displayed: "No differences found' and no report shall be printed." |
|
| Update | Updates the individual SQL statements related to each element. Clicking the Update button also updates SQL statements in the destination profile.
Note: The Update button is enabled when the nodes with different SQL statements are clicked. |
| Update All | Updates all the differences in SQL statements across all the elements between the source and destination profiles.
Note: When a user clicks the Update All button, the following pop-up message is displayed: "Are you sure you want to update all the SQL statements in Destination Profile with Source Profile?" Clicking Yes updates all the SQL statements whereas clicking No does not update. |
| Close | Closes the Compare Profiles window. |
Note:
The Update and Update All buttons are never enabled when the profile selected from the Destination Profile is of the type template.E2B Codes Translation enables you to configure rules to translate the E2B codes and values in the incoming E2B reports, which come from different trading partners to preferred values in the AE system during case creation.
In the Interchange Mapping Utility, click Administrator -> E2B Translation Codes to open the E2B Code Translation screen.
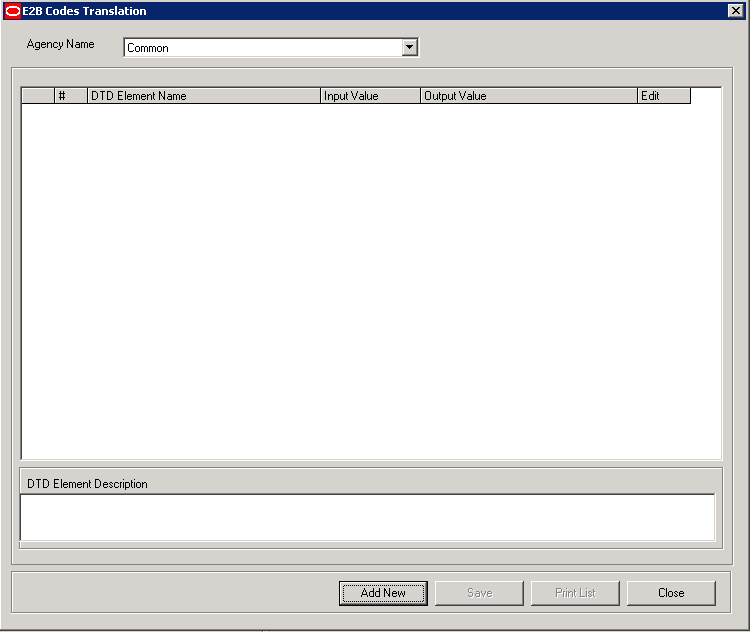
The following table lists and describes the fields on the E2B Codes Translation screen.
| Item | Description |
|---|---|
| Agency Name | Enables the user to select an agency name from the drop-down list box. |
| # | Displays the serial number. |
| DTD Element Name | Displays the DTD element name. |
| Input Value | Displays the type of input value |
| Output Value | Displays the type of output value. |
| Edit | Enables you to edit the information |
Use the following procedure to configure E2B Codes Translation.
Select the Agency Name from the drop-down list box to displays the DTD Elements and their descriptions.
Click Edit to edit the DTD Element Name, Input Value, Output Value, and DTD Element Description.
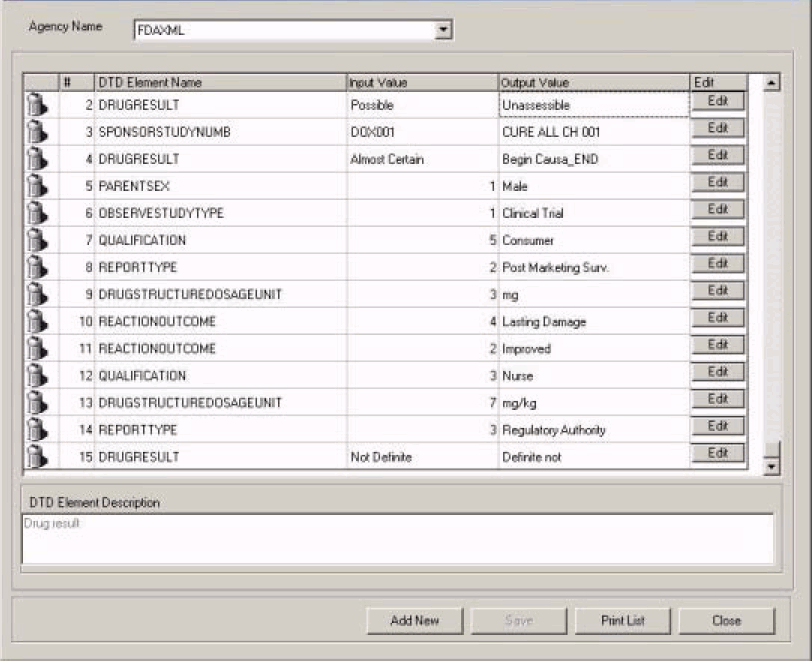
Click Save to save your changes.
You can use the existing reporting destination configuration to choose an extended E2B profile. The system uses the agency and company identifier to identify the profile to use and sends the information in the following XML elements:
<messagesenderidentifier>Company X</messagesenderidentifier>
<messagereceiveridentifier>Agency Y</messagereceiveridentifier>
The Interchange mapping utility also supports the defined extended E2B elements as follows:
A switch in the Interchange mapping tool identifies a profile as either a standard profile or an extended E2B profile but only for the Receive tab. The additional fields are formatted as follows:
<XXX>_EXTENSION []
where:
XXX is the tag name followed by _EXTENSION to indicate that this is an extended E2B tag element
When using this switch:
Do not enter any blank spaces or underscore characters ( _ ) in the XXX naming convention.
In the extended E2B tags, the element number in the brackets ( [ ] ) is always empty. For example, Patient Ethnicity, Event Hospitalized Start Date / Stop Date.
This switch is enabled only for profiles copied from the Factory profiles (default unchecked). This flag is disabled for all factory profiles.
During configuration, GPS updates the DTD profile with this information before it adds any additional E2B elements.
The extended E2B fields are mapped to existing Argus fields or to user-defined fields, as appropriate. For example, the system maps the following extended E2B fields to the following Argus tables.
| E2B + Field | Argus Case Form UI Field Name | Argus Field Label Description |
|---|---|---|
| patientethnicity_extension | PATIENT | Patient Ethnicity | Patient Ethnicity |
| reactionintensity_extension | EVENTS | Event Intensity | Event Intensity |
| reactionhospstartdateformat_extension | Argus Date entry format YYYYMMDD or YYYYMM or YYYY | Hospitalized Start Date Format |
| reactionhospstartdate_extension | EVENTS | Hospitalized Start Date | Hospitalized Start Date |
| reactionhospstopdateformat_extension | Argus Date entry format YYYYMMDD or YYYYMM or YYYY | Hospitalized Stop Date Format |
| reactionhospstopdate_extension | EVENTS | Hospitalized Stop Date | Hospitalized Stop Date |
The system sends an acknowledgement when the report is accepted or rejected by the user.
You can view the extended elements for the following:
ICSR Viewer
No updates to the CIOMS / MedWatch Reports
The Decoded View / SGML View displays the additional elements added as a part of the Extended E2B
E2B Selective Intake for Initial and E2B Difference Report for Follow-up E2B Reports
You can selectively import the additional fields the system adds to the Extended E2B in the Argus case.
The PDF reports display the additional fields added to the Extended E2B.
The E2B Warnings/Errors display the warnings/errors if warnings or errors defined for the fields added to the Extended E2B.
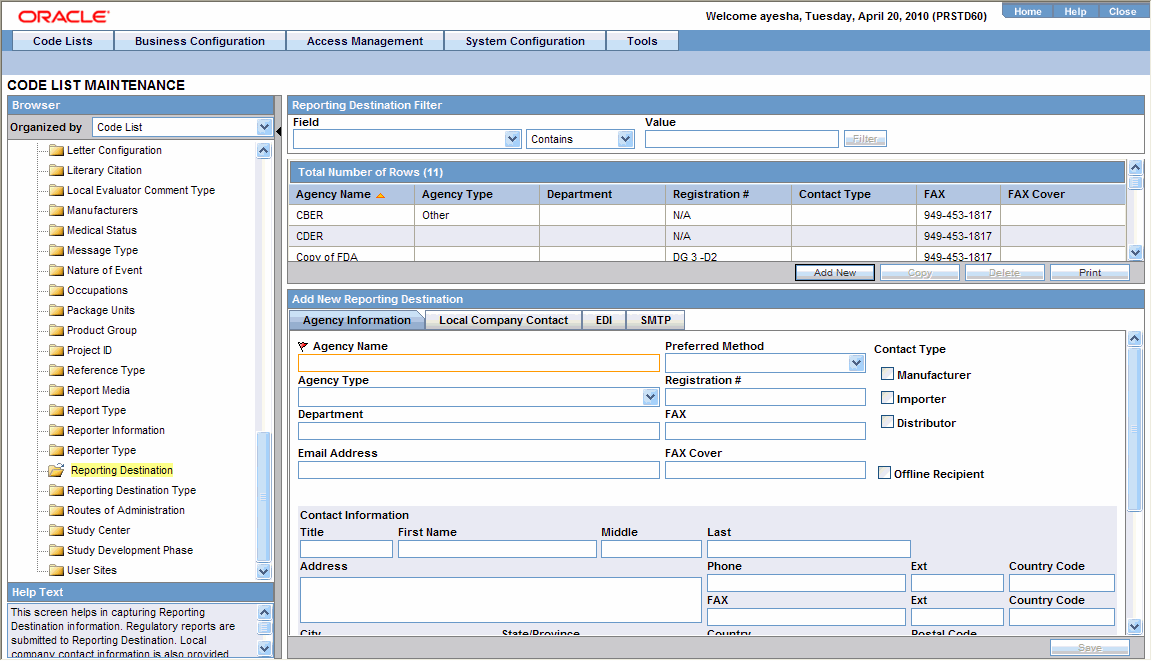
The Argus Console enables you to configure the Regulatory Authorities to which E2B Reports need to be submitted. In accordance with ICH Guidelines, you can configure additional Code List items with new E2B codes.
This section includes discussions of the following:
Configuring Regulatory Authorities
Configuring SMTP
Configuring Code List Items
Transmitting E2B reports to an Agency/Trading Partner, requires you to create a regulatory authority entry in the Code List. After creating the regulatory authority, you can transmit regulatory reports to it.
To configure a regulatory authority:
On the Argus Console, Click Code Lists -> Argus.
When the system opens the Code List Maintenance screen, select Reporting Destination from the list.
Note:
If a report is already scheduled for a Reporting Destination, then clicking on the Delete button displays an error message that this item is already being used, and hence, cannot be deleted.Refer to the Argus Safety Guide for information on using the first three tabs of the Reporting Destination.
Click the EDI tab, select the appropriate data for each item, and enter the data in the fields as required.
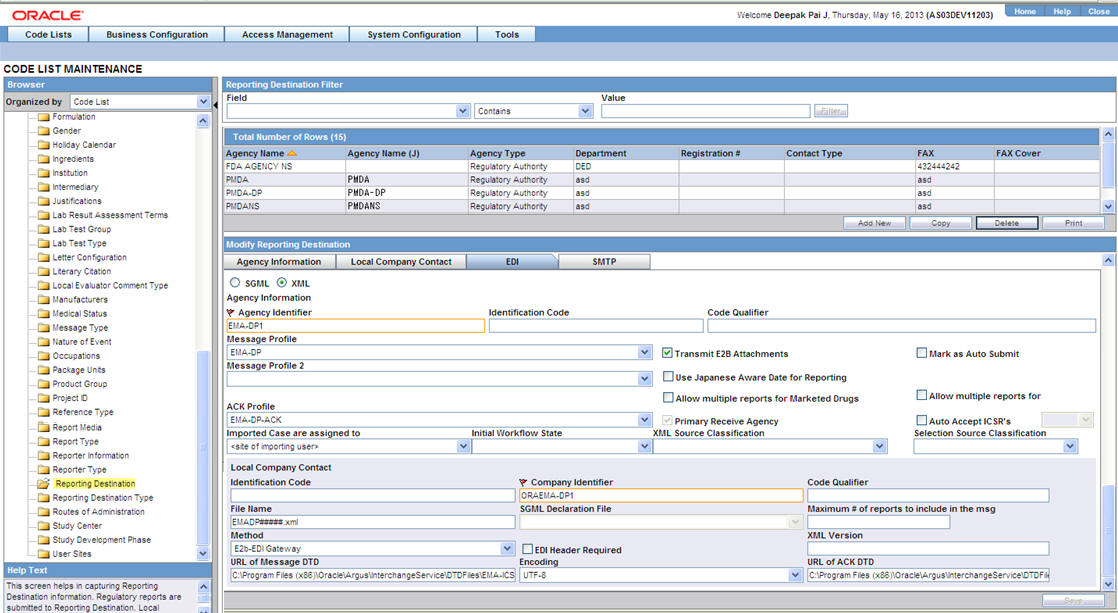
The following table lists and describes the fields on the EDI tab.
For Argus J users, an additional field called "Message Profile 2" shows up for the configuration of the PMDA - J profile. This field is required for PMDA agency to specify PMDA J profile.
| Field/Control Name | Description |
|---|---|
| SGML/XML | Enables the user to select whether to send the report in SGML or XML format. |
| Agency Identifier | Enables the user to enter the routing ID configured in Cyclone for the sender community. |
| Identification Code | Enables the user to enter the agency Duns code, a unique identification code that identifies the trading partner.
This field is disabled for the E2B (R3) profile. |
| Code Qualifier | Enables the user to enter the code qualifier here. The code qualifier is used to interpret the identification code.
This field is disabled for the E2B (R3) profile. |
| Message Profile | Enables the user to select a message profile. |
| Mark as Auto Submit | Enables the user to mark the report for auto submission. |
| Auto Accept ICSR's | Click this checkbox to auto accept ICSR's. This checkbox is visible only when case numbering is set to Automatic. |
| ACK Profile | Enables the user to select the acknowledgement profile. |
| Primary Receive Agency | Enables the user to select the primary receiving agency. |
| Imported Cases are assigned to | Enables the user to select the country, where the imported cases need to be assigned.
Note: This list comprises the configured Argus sites. The default value is the site of the importing user. |
| Initial Workflow State | Enables the user to configure the initial workflow state of the case.
Note: This list comprises Argus workflow states, with the default value being blank. If you select blank as the workflow state, it is treated as a new case being booked-in. |
| XML Source Classification | The system enables the user to configure the XML Source Classification and the PDF Source Classifications used for classifications defined while the Source E2B File / PDF for Initial Intake or E2B Differences report is classified.
When a case is accepted as an initial or follow-up case, the system attaches the source XML and the Initial Selection PDF to the case on the Additional Info tab. |
| Selection Source Classification | Enables the user to select the source classification from the drop-down. |
| Transmit E2B Attachments | Click this checkbox to transmit E2B attachments. If this checkbox is checked in the Reporting Destination Code List, case form attachments are sent to the specified reporting destination. |
| Attachment Classification | Enables the user to select the attachment classification. |
| Identification Code | Enables the user to enter the company Duns code, a unique identification code that identifies the trading partner. |
| Company Identifier | Enables the user to enter the company identifier |
| Code Qualifier | Enables the user to enter the code qualifier here. The code qualifier is used to interpret the identification code. |
| File Name | Enables the user to enter the file name |
| SGML Declaration File | Enables the user to enter the SGML Declaration File. |
| Maximum # of reports to include in the msg | Enables the user to enter the maximum number of reports that will be transmitted in one message. |
| Method | Enables the user to select a method here. This field contains E2B ESTRI Gateway and E2b Media values. |
| EDI Header Required | Enables the user to generate the EDI Header |
| XML Version | Enables the user to enter the XML Version. |
| URL of Message DTD | Enables the user to enter the path where the message DTD resides on the internet or enter full path if it is located on the disk. |
| Encoding | Enables the user to select the character set encoding used in XML |
| URL of ACK DTD | Enables the user to enter the path where the ACK DTD resides on the internet or enter the full path if it is located on the disk. |
Argus Interchange Mapping Utility can be configured to send emails to notify the appropriate people on the occurrence of some incidents or errors while processing E2B reports. These emails are sent using Argus Safety Service. You can use Argus Console if you need to configure these emails to be sent using SMTP.
To enable Argus Safety Service to use the SMTP protocol to send e-mail to the e-mail server, use the SMTP Configuration Utility in the following way.
To configure SMTP:
Open Argus Console.
When the system opens the Code List Maintenance screen, click System Configuration -> SMTP Configuration.
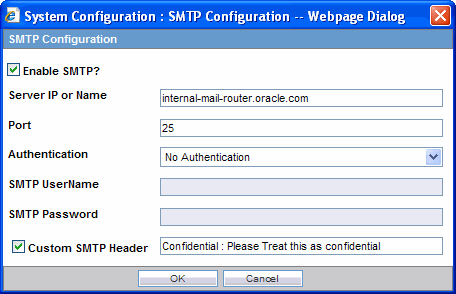
When the system opens the SMTP Configuration dialog box, enter the appropriate data in each field.
The following tables lists and describes the fields in the SMTP Configuration dialog box.
| Item | Description |
| Server IP or Name | The SMTP server IP address or name. |
| Port | The port number. The default port number is 25. |
| Authentication | The authentication type to use.
Basic Authentication -- The user must enter a user name and password in the Username and Password fields. No Authentication -- The Username and Password fields are disabled. NTLM Authentication, the authentication of the OS user logged into the system is automatically passed. Additionally, the Username and Password fields are disabled in this authentication. |
| SMTP Username | The SMTP username. |
| SMTP Password | The SMTP password. |
| Enable SMTP? | Select this check box to ensure that AG Service uses SMTP to send e-mail. |
|
Copyright © 2015, Oracle and/or its affiliates. All rights reserved. Legal Notices |
|