5 Reconfiguring a TapePlex
"Configuring HSC" explained how to configure HSC, which includes performing a LIBGEN, which is how you initially define hardware to HSC. This chapter is for existing customers who want to add hardware to their systems either on release boundaries or between release boundaries.
The idea is that adding hardware to an existing system is usually easier, because you do not have to redefine each and every piece of hardware, and also because adding hardware is an easier path.
For example, to add transports, you do not have to stop HSC, recreate your entire LIBGEN, and so forth. You can just use SET SLIDRIVS and dynamic reconfiguration (using MODIFY CONFIG) to make it happen.
When Do You Need to Reconfigure Your TapePlex?
Whenever the hardware components that make up your tapeplex change, you need to perform a reconfiguration task to synchronize the HSC CDS with the physical tape hardware. Some reasons for reconfiguring a tapeplex include:
-
Consolidating two data centers
-
Splitting a single data center into two tapeplexes
-
Adding, changing or removing physical tape hardware, including drives, LSMs, and ACSs.
-
Adding, changing or removing VTSSs.
-
Adding, changing or removing VAULT information.
Depending on the existing configuration and the type of change being done, you will need to use one of the following tools/procedures:
-
HSC MERGEcds utility
-
HSC dynamic reconfiguration process
-
VTCS CONFIG utility
-
HSC SET VOLPARM utility
-
HSC SET VAULT and/or SET VAULTVOL utility
-
HSC AUDIT utility
-
HSC SET CDKLOCK utility
The MERGEcds Utility
The MERGEcds utility is used to migrate information from an existing CDS into a new, formatted CDS. The MERGEcds utility is normally used for the following types of changes:
-
Consolidating or splitting data centers
-
Adding LSMs or ACSs to a configuration when FUTRLSM or FUTRACS was not specified or was insufficient for the new configuration.
-
Deleting LSMs or ACSs from a configuration
-
Changing panel types in a non-Streamline library
-
Deleting or renaming VTSSs
-
Changing the number of vaulted volumes in a CDS where the reserved number of vaulted volumes is too small (or, when the number of vaulted volumes is larger than needed and you want to decrease the size of the CDS)
-
Changing the size of the CDKLOCK subfile. The MERGEcds utility does not copy the content of the old CDKLOCK subfile to the new CDS.
Basic MERGEcds Procedure
The following sections describe how to use the MERGEcds utility to add an ACS to an existing HSC. This procedure is the basis for using MERGEcds for the examples in the other section, such as merging data centers.
Create a New, Empty CDS
Note:
This procedure can be run at any time before the actual MERGEcds operation.To create a new, empty CDS:
-
Run the HSC LIBGEN utility to create LIBGEN macros that reflect your current real hardware configuration (and, optionally, your VOLPARM and vaulted volume data). For example:
//SLSLIBGN JOB (ACCT),'LIBGEN',NOTIFY=&SYSUID //SLSLIBGN EXEC PGM=SLUADMIN,PARM='MIXED' //STEPLIB DD DSN=hlq.SEALINK,DISP=SHR //* NOTE: CDS DD STATEMENTS NOT NEEDED IF HSC ACTIVE //SLSPRINT DD SYSOUT=* //* NOTE: SET VOLPARM, SET VAULTVOL, SET VAULT ARE //* OUTPUT IN THE DATASET BELOW //SLSSET DD DSN=hlq.SLSSET,DISP=(NEW,CATLG,DELETE), // SPACE=(CYL,1) //* NOTE: SET VOLPARM POOLPARM/VOLPARM CONTROL STATEMENTS //* ARE IN THE DATA SET BELOW. //SLSPARM DD DSN=hlq.SLSPARM,DISP=(NEW,CATLG,DELETE), // SPACE=(CYL,1) //* NOTE: LIBGEN MACROS ARE OUTPUT IN THE DATA SET //* BELOW //SLSLIBGN DD DSN=hlq.SLSLIBGN,DISP=(NEW,CATLG,DELETE), SPACE=(CYL,1) //SLSIN DD * LIBGEN // -
Update the SLSLIBGN output file to add the new ACS to your configuration.
See "Configuring HSC" and samples in "LIBGEN Macro Samples" for more information on updating LIBGEN macros.
-
If necessary, update your VOLPARM and POOLPARM statements to reflect new volume ranges.
-
If necessary, update the SET VAULTVOL, SET VAULT, and SET CDKLOCK statements to reflect your desired new configuration.
-
Assemble the updated LIBGEN module. For example:
//SLSASSML JOB (ACCT),'ASSM LIBGEN',NOTIFY=&SYSUID
//ASM      EXEC PGM=ASMA90,
//         PARM='XREF(SHORT),TERM,TEST,RENT'
//SYSLIB   DD DSN=hlq.SEAMAC,DISP=SHR
//         DD DSN=SYS1.MACLIB,DISP=SHR
//SYSPRINT DD SYSOUT=*
//SYSTERM  DD SYSOUT=*
//*   NOTE: UPDATED LIBGEN MACROS ARE IN THE DATA SET
//*   BELOW
//SYSIN    DD DSN=hlq.LIBGEN,DISP=SHR
//SYSLIN   DD DSN=&&TMPOBJ,DISP=(,PASS,DELETE),
//         UNIT=SYSDA,SPACE=(CYL,(1,1)),
//         DCB=(LRECL=80,BLKSIZE=3040,RECFM=FB)
//SYSUT1   DD DSN=&SYSUT1,UNIT=VIO,SPACE=(CYL,(1,1))
//*
//LKED     EXEC PGM=IEWL,COND=(0,LT,ASM),REGION=6M,
//         PARM='LIST,LET,XREF,TEST,RENT'
//SYSLIN   DD DSN=&&TMPOBJ,DISP=(OLD,DELETE)
//SYSPRINT DD SYSOUT=*
//SYSLMOD  DD DSN=hlq.LIBGNLIB(LGYYMMDD),DISP=SHR
//SYSUT1   DD UNIT=VIO,SPACE=(CYL,(1,1))
//
-
If your configuration includes VSM data, run the VTCS DECOMP utility to create the current source for your VSM configuration. For example:
//SLSDECOM JOB (ACCT),'VTCS DECOMP',NOTIFY=&SYSUID
//SLSDECOM EXEC PGM=SLUADMIN,PARM='MIXED'
//STEPLIB  DD DSN=hlq.SEALINK,DISP=SHR
//*   NOTE: CDS DD STATEMENTS NOT NEEDED IF HSC ACTIVE
//SLSPRINT DD SYSOUT=*
//*   NOTE: CONFIG CONTROL CARDS ARE OUTPUT IN THE DATA SET
//*   BELOW
//CONFIG   DD DSN=hlq.CONFIG,DISP=(NEW,CATLG,DELETE),
//         SPACE=(CYL,1)
//SLSIN    DD *
 DECOMP FLATDD(CONFIG)
//
-
Run the SLICREAT utility to determine the number of blocks needed for real tape processing, using the output of the LIBGEN assembly. For example:
//SLICREA1 JOB (ACCT),'SLICREAT SIZE',NOTIFY=&SYSUID
//SLICREA1 EXEC PGM=SLICREAT,PARM=LGYYMMDD,REGION=6M
//STEPLIB  DD DSN=hlq.SEALINK,DISP=SHR
//         DD DSN=hlq.LIBGNLIB,DISP=SHR
//SYSPRINT DD SYSOUT=*
//
-
If your configuration includes VSM data, vaulted volume data, and/or VOLPARM control statements, see "CDS DASD Space Requirements" to calculate the additional space needed.
-
Run the SLICREAT utility to create the new CDS, using the your block calculation for the new CDS size. For example:
//SLICREA2 JOB (ACCT),'SLICREAT CDS',NOTIFY=&SYSUID
//SLICREA1 EXEC PGM=SLICREAT,PARM=LGYYMMDD,REGION=6M
//STEPLIB  DD DSN=hlq.SEALINK,DISP=SHR
//         DD DSN=hlq.LIBGNLIB,DISP=SHR
//SLSCNTL  DD DSN=hlq.DBASEPRM.NEW,DISP=(NEW,CATLG,DELETE),
//         UNIT=SYSDA,SPACE=(4096,xxxx,,CONTIG)
//SLSCNTL2 DD DSN=hlq.DBASESEC.NEW,DISP=(NEW,CATLG,DELETE),
//         UNIT=SYSDA,SPACE=(4096,xxxx,,CONTIG)
//SLSSTBY  DD DSN=hlq.DBASESBY.NEW,DISP=(NEW,CATLG,DELETE),
//         UNIT=SYSDA,SPACE=(4096,xxxx,,CONTIG)
//SYSPRINT DD SYSOUT=*
//
-
Run the SLUADMIN SET utility to add the VOLPARM definitions, vaulted volume count, and vault information and and CDKLOCK to the new CDS. For example:
//SLSSETCD JOB (ACCT),'SET CDS',NOTIFY=&SYSUID
//SLSLIBGN EXEC PGM=SLUADMIN,PARM='MIXED'
//STEPLIB  DD DSN=hlq.SEALINK,DISP=SHR
//SLSCNTL  DD DSN=hlq.DBASEPRM.NEW,DISP=SHR
//SLSCNTL2 DD DSN=hlq.DBASESEC.NEW,DISP=SHR
//SLSSTBY  DD DSN=hlq.DBASESBY.NEW,DISP=SHR
//SLSPRINT DD SYSOUT=*
//*   NOTE: ORIGINAL OR MODIFIED POOLPARM/VOLPARM CONTROL
//*   STATEMENTS ARE IN THE DATA SET BELOW
//SLSPARM  DD DSN=hlq.SLSPARM,DISP=SHR
//*   NOTE: ORIGINAL OR MODIFIED SET COMMANDS FOR
//*   VOLPARM, VAULTVOL, AND VAULT ARE IN THE DATA SET
//*   BELOW
//SLSIN    DD DSN=hlq.SLSSET,DISP=SHR
//
-
Run the VTCS CONFIG utility to create the CDS VSM data areas. For example:
//SLSCONFG JOB (ACCT),'VTCS CONFIG',NOTIFY=&SYSUID
//SLSCONFG EXEC PGM=SLUADMIN,PARM='MIXED'
//STEPLIB  DD DSN=hlq.SEALINK,DISP=SHR
//SLSCNTL  DD DSN=hlq.DBASEPRM.NEW,DISP=SHR
//SLSCNTL2 DD DSN=hlq.DBASESEC.NEW,DISP=SHR
//SLSSTBY  DD DSN=hlq.DBASESBY.NEW,DISP=SHR
//SLSPRINT DD SYSOUT=*
//*   NOTE: ORIGINAL OR MODIFIED VTCS CONFIG CONTROL
//*   STATEMENTS ARE IN THE DATA SET BELOW
//SLSIN    DD DSN=hlq.CONFIG,DISP=SHR
//
Prepare to Run MERGEcds
To prepare to run MERGEcds:
-
Issue the Display CDS command to determine the primary CDS.
-
Quiesce tape activity on all HSC and client hosts.
-
Stop HSC on all active hosts.
-
Run the SLUADMIN BACKUP utility to back up your current production CDS. For example:
//SLSBKUP  JOB (ACCT),'CDS BKUP',NOTIFY=&SYSUID
//SLSBKUP  EXEC PGM=SLUADMIN,PARM='MIXED'
//STEPLIB  DD DSN=hlq.SEALINK,DISP=SHR
//SLSCNTL  DD DSN=hlq.DBASEPRM,DISP=SHR
//SLSCNTL2 DD DSN=hlq.DBASESEC,DISP=SHR
//SLSSTBY  DD DSN=hlq.DBASESBY,DISP=SHR
//SLSBKUP  DD DSN=hlq.CDSBKUP,
//         DISP=(NEW,CATLG,DELETE),
//         UNIT=SYSDA,SPACE=(CYL,xxx),
//         DCB=(LRECL=4096,BLKSIZE=4096,RECFM=F)
//SLSPRINT DD SYSOUT=*
//SLSIN    DD *
 BACKUP
//
-
Run the SLUADMIN RESTORE utility to restore your production CDS to a new name. For example:
//SLSRESTR JOB (ACCT),'CDS RESTORE',NOTIFY=&SYSUID
//SLSRESTR EXEC PGM=SLUADMIN,PARM='MIXED'
//STEPLIB  DD DSN=hlq.SEALINK,DISP=SHR
//SLSCNTL  DD DSN=hlq.DBASEPRM.OLD,DISP=SHR
//SLSCNTL2 DD DSN=hlq.DBASESEC.OLD,DISP=SHR
//SLSSTBY  DD DSN=hlq.DBASESBY.OLD,DISP=SHR
//SLSBKUP  DD DSN=hlq.CDSBKUP,DISP=SHR
//SLSPRINT DD SYSOUT=*
//SLSIN    DD *
RESTORE
//
Note:
Instead of backing up and restoring the production CDS, you can rename the primary CDS (from your Display CDS command) to a new name, and use that CDS as input to the MERGEcds. -
Rename your new CDS(s) to the production names.
Using the names in the above JCL samples, rename hlq.DBASEPRM.NEW to hlq.DBASEPRM, rename hlq.DBASESEC.NEW to hlq.DBASESEC, and rename hlq.DBASESBY.NEW to hlq.DBASESBY.
-
Modify your HSC PARMLIB CAPPREF statement to reflect CAPs in the new ACS.
For example, to set priority to 9 (highest), mode to automatic to CAP 00, LSM 00 in new ACS 01:
CAPP 9,01:00:00,AUTO
Run the MERGEcds Utility
To run the MERGEcds utility:
-
Start HSC at BASE level, specifying the new CDS(s) in the CDSDEF statement.
-
Run the SLUADMIN MERGECDS utility.
For example, MERGEcds VALIDATE:
//SLSMERGV JOB (ACCT),'CDS MERGE VALIDATE',NOTIFY=&SYSUID
//SLSMERGV EXEC PGM=SLUADMIN,PARM='MIXED'
//STEPLIB  DD DSN=hlq.SEALINK,DISP=SHR
//SLSFCNTL DD DSN=hlq.DBASEPRM.OLD,DISP=SHR
//SLSPRINT DD SYSOUT=*
//SLSIN    DD *
 MERGECDS ALL VALIDATE
//
For example, actual merge:
//SLSMERGE JOB (ACCT),'CDS MERGE',NOTIFY=&SYSUID
//SLSMERGE EXEC PGM=SLUADMIN,PARM='MIXED'
//STEPLIB  DD DSN=hlq.SEALINK,DISP=SHR
//SLSFCNTL DD DSN=hlq.DBASEPRM.OLD,DISP=SHR
//SLSPRINT DD SYSOUT=*
//SLSIN    DD *
 MERGECDS ALL
//
Ensure the Merge was Successful
To ensure that the merge was successful:
-
Review the merge output to ensure that all the CDS pieces were successfully merged.
-
Run the SLUADMIN BACKUP utility to back up the new CDS.
-
Bring HSC to FULL service level, issuing the command:
SRVLEV FULL
-
Connect the new ACS to the HSC, issuing the command:
Vary ACS acs-id Online -
Modify the new LSMs online, issuing the command:
F LSM acs-id:lsm-id Online
-
Resume normal tape activity.
-
If the merge output showed duplicate volumes or errant or in-transit volumes, use the SLUADMIN AUDIT utility to audit the home cells of these cartridges.
In the following examples, the basic steps for executing the MERGEcds procedure are identical to the process described above. These examples illustrate additional steps and MERGE control cards that are needed for other scenarios.
Consolidating Two Data Centers
In consolidating two data centers, you assume that each data center has its own CDS.
To merge the two CDSs:
-
Create a new CDS that reflects the library, virtual, and vaulted volume sections of both input CDSs as described in "Create a New, Empty CDS."
-
Next, put data from the first CDS into the new CDS as described in "Prepare to Run MERGEcds" and "Run the MERGEcds Utility."
-
To merge data from the second CDS, you need to run an additional MERGEcds step. For example, actual merge:
//SLSMERG2 JOB (ACCT),'CDS MERGE 2',NOTIFY=&SYSUID
//SLSMERG2 EXEC PGM=SLUADMIN,PARM='MIXED'
//STEPLIB  DD DSN=hlq.SEALINK,DISP=SHR
//SLSFCNTL DD DSN=hlq.DBASEPRM.CDS2,DISP=SHR
//SLSFCTL2 DD DSN=hlq.DBASESEC.CDS2,DISP=SHR
//SLSFSBY  DD DSN=hlq.DBASESBY.CDS2,DISP=SHR
//SLSPRINT DD SYSOUT=*
//SLSIN    DD *
MERGECDS
//*   NOTE: In THE FOLLOWING EXAMPLE, DATA CENTER 1
//*   HAD 4 ACSS AND DATA CENTER 2 HAD 2 ACSS
//*   DATA CENTER 1 HAD A VAULT NAMED VAULT1, AND
//*   DATA CENTER 2 ALSO HAD A VAULT NAMED VAULT1.
//SLSMERGE DD *
  MERGE FACS(00) TACS(04)
  MERGE FACS(01) TACS(05)
  ALLVIRT    /* NO VTSS NAME CONFLICT */
  MERGE FVALT(VAULT1) TVALT(VAULT5)
//
-
Ensure that the merge was successful as described in "Ensure the Merge was Successful."
Combining Two Separate ACSs into One ACS
The process of combining two ACSs into a single ACS requires a MERGEcds to change the definition of LSMs in the ACS being merged.
To combine two separate ACSs into one:
-
Create a new CDS that reflects the existing library hardware plus the new combined ACS, and the virtual and vaulted volume data as described in "Create a New, Empty CDS."
-
Next, put data into the new CDS as described in "Prepare to Run MERGEcds" and "Prepare to Run MERGEcds," using the following sample JCL.
Merging two ACSs:
//SLSMERG3 JOB (ACCT),'CDS MERGE 3',NOTIFY=&SYSUID
//SLSMERG3 EXEC PGM=SLUADMIN,PARM='MIXED'
//STEPLIB  DD DSN=hlq.SEALINK,DISP=SHR
//SLSFCNTL DD DSN=hlq.DBASEPRM.OLD,DISP=SHR
//SLSPRINT DD SYSOUT=*
//SLSIN    DD *
MERGECDS
//*   NOTE: In THE FOLLOWING EXAMPLE, ACSS 02 (4 LSMS)
//*   AND 03 (4 LSMS) ARE COMBINED INTO A SINGLE ACS.
//SLSMERGE DD *
  MERGE FLSM(03:00) TLSM(02:04)
  MERGE FSLM(03:01) TLSM(02:05)
  MERGE FLSM(03:02) TLSM(02:06)
  MERGE FLSM(03:03) TLSM(02:07)
ALLVIRT
ALLVALT
//
-
Check for warning messages if panel types in either ACS have changed.
If any panel types are changed, run the SLUADMIN AUDIT utility to audit the contents of the changed panels.
-
Ensure that the merge was successful as described in "Ensure the Merge was Successful."
Combining Two Separate Streamline Libraries
SL8500 PTP support allows multiple, separate SL8500s to be combined into a single ACS by running the MERGEcds utility. To minimize losing information about cartridges and to reduce operational downtime, follow the procedures described in this section.
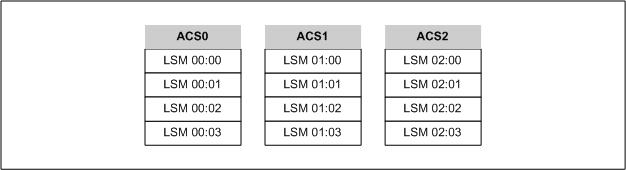
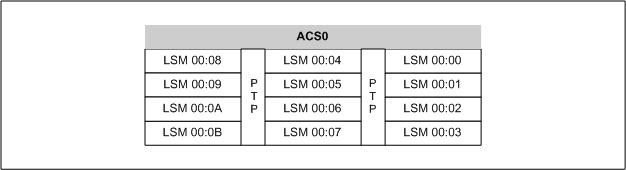
Two configurations are shown below. In the first configuration (see Figure 5-1 and Figure 5-2), the ACSs to be merged are numbered from right to left (as you face them from the CAP side). In the second, they are numbered from left to right.
It is assumed that the resulting ACS uses the lower or lowest ACSid, which is ACS0. The placement and numbering of the pre-merge ACSs determines how volume data is mapped from the original ACSs' LSMs into the merged ACSs LSMs.
In an ACS with multiple SL8500s, the LSMs are always numbered from right to left, so volumes in the left most SL8500 must be in the four highest numbered LSMs. Conversely volumes in the right most LSM must be in the four lowest numbered LSMs.
Once the individual ACSs are physically merged into a single ACS, the MERGEcds utility is used to map each LSM of the pre-merge ACSs into an LSM in the merged, single ACS. The physical location of the volumes within the merged ACS is identical to what it was prior to the merge but their location designator, their LSMid, has probably changed.
Configurations for ACSs Numbered Right to Left
Figure 5-1 and Figure 5-2 illustrate merging three ACSs numbered right to left, as you face them from the CAP side.

Configurations for ACSs Numbered Left to Right
Figure 5-3 and Figure 5-4 illustrate merging three ACSs numbered left to right, as you face them from the CAP side.
To combine two Separate Streamline libraries:
-
Create a new CDS for the two libraries as described in "Create a New, Empty CDS."
-
Enter data into the new CDS as described in "Prepare to Run MERGEcds" and "Run the MERGEcds Utility." The following JCL examples show control cards for this example, first using right to left numbering of ACSs and next using left to right numbering of ACSs.
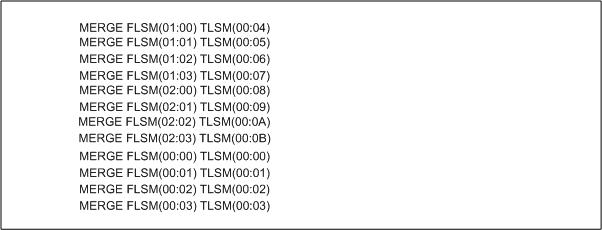
SLSMERGE Statements - ACSs Numbered Right to Left
When you merge LSMs numbered right to left, the LSM numbers of the "from" LSM and the "to" LSM in the MERGE statements both increase regularly as you move from right to left merging individual LSMs. Figure 5-5 shows SLSMERGE statements with ACSs numbered right to left.
SLSMERGE Statements - ACSs Numbered Left to Right
When you merge LSMs numbered left to right, the LSM numbers of the original ACSs are increasing in the opposite direction from those in the merged ACS, where LSMs are number right to left. Therefore, as you merge LSMs moving right to left, the LSM numbers of the "to" LSMs increase regularly but the LSM numbers of the "from" LSMs decrease (in blocks of four increasing numbers). Figure 5-6 shows SLSMERGE statements with ACSs numbered left to right.

Note:
When you merge LSMs numbered from left to right, the order the SLSMERGE statements are processed is important. In the example below, the "to" LSMs for the pre-existing ACS 2 (02:00-02:03) become the "from" LSMs 00:00-00:03. You must first update ACS 0, LSMs 00:00-00:03 to be "from" LSMs 00:08-00:0B. Otherwise, the volumes from both "from" LSMs 00:00-00:03 and 02:00-02:03 will be assigned to 00:08-00:0B.Ensure that the merge was successful as described in "Ensure the Merge was Successful."
Removing PTPs and Splitting an ACS Using MERGEcds
Oracle recommends you locate the new ACS to the left side of the split, which ensures that HSC assigns higher-numbered LSMs to the new ACS and avoids renumbering the LSMs that remain in the existing LSM.
If you create a new ACS to the right side of the split, all volume addresses must be remapped using MERGEcds. The procedures below do not discuss creating the new ACS to the right of the split.
To remove PTPs and split an ACS using MERGEcds:
-
Create a new CDS as described in "Create a New, Empty CDS."
-
Enter data into the new CDS as described in "Prepare to Run MERGEcds" and "Run the MERGEcds Utility" using the following sample JCL.
//SLSMERG7 JOB (ACCT),'CDS MERGE 7',NOTIFY=&SYSUID
//SLSMERG7 EXEC PGM=SLUADMIN,PARM='MIXED'
//STEPLIB  DD DSN=hlq.SEALINK,DISP=SHR
//SLSFCNTL DD DSN=hlq.DBASEPRM.OLD,DISP=SHR
//SLSPRINT DD SYSOUT=*
//SLSIN    DD *
MERGECDS
//*   NOTE: SLSMERGE STATEMENTS, ACS NUMBERED RIGHT
//*   TO LEFT
//SLSMERGE DD *
 MERGE FLSM(00:08) TLSM(01:00)
 MERGE FLSM(00:09) TLSM(01:01)
 MERGE FLSM(00:0A) TLSM(01:02)
 MERGE FLSM(00:0B) TLSM(01:03)
 MERGE FLSM(00:0C) TLSM(01:04)
 MERGE FLSM(00:0D) TLSM(01:05)
 MERGE FLSM(00:0E) TLSM(01:06)
 MERGE FLSM(00:0F) TLSM(01:07)
//
-
Ensure that the merge was successful as described in "Ensure the Merge was Successful."
Renaming a VTSS
A VTSS rename can be done only by using the MERGEcds utility, which allows VTV and MVC data in the CDS to reflect the new VTSS name.
To rename a VTSS using MERGEcds:
-
Create a new CDS as described in "Create a New, Empty CDS."
-
Next, put data into the new CDS as described in "Prepare to Run MERGEcds" and "Run the MERGEcds Utility," using the following sample JCL:
//SLSMERG4 JOB (ACCT),'CDS MERGE 4',NOTIFY=&SYSUID
//SLSMERG4 EXEC PGM=SLUADMIN,PARM='MIXED'
//STEPLIB  DD DSN=hlq.SEALINK,DISP=SHR
//SLSFCNTL DD DSN=hlq.DBASEPRM.OLD,DISP=SHR
//SLSPRINT DD SYSOUT=*
//SLSIN    DD *
MERGECDS
//SLSMERGE DD *
  ALLREAL
  MERGE FVTSS(VTSS1) TVTSS(VTSSA)
  ALLVALT
//
-
Ensure that the merge was successful as described in "Ensure the Merge was Successful."
Removing Vaulted Volume Information
To remove vaulted volume information from the CDS, you must run the Merge process:
-
Create a new CDS, removing the SET VAULTVOL and SET VAULT control cards from the LIBGEN SLSSET output file as described in "Create a New, Empty CDS."
-
Enter data into the new CDS as described in "Prepare to Run MERGEcds" and "Run the MERGEcds Utility," using the following sample JCL:
//SLSMERG5 JOB (ACCT),'CDS MERGE 5',NOTIFY=&SYSUID
//SLSMERG5 EXEC PGM=SLUADMIN,PARM='MIXED'
//STEPLIB  DD DSN=hlq.SEALINK,DISP=SHR
//SLSFCNTL DD DSN=hlq.DBASEPRM.OLD,DISP=SHR
//SLSPRINT DD SYSOUT=*
//SLSIN    DD *
MERGECDS
//SLSMERGE DD *
  ALLREAL
  ALLVIRT
  NOVALT
//
-
Ensure that the merge was successful as described in "Ensure the Merge was Successful."
Reconfiguring a Tapeplex Without MERGEcds
The following topics address tapeplex reconfiguration without using MERGEcds.
Using Dynamic Reconfiguration
Dynamic reconfiguration, which you do using MODIFY CONFIG, is a key tool for NCO, the idea being that MODIFY CONFIG lets you change your hardware configuration without having to recycle HSC. Specifically, MODIFY CONFIG does the following:
-
Modifies a CAP or an LSM online or offline to all hosts, independent of the issuing host.
-
Starts dynamic hardware reconfiguration for a SL3000 or a SL8500 library.
-
Adds, deletes, or updates an SL3000 or SL8500 ACS definition in the CDS that was preallocated using the SLILIBRY FUTRACS parameter.
There are some guidelines for dynamic reconfiguration, however, see below.
Caution:
-
Do not run any CDS-related commands or utilities while making NCO changes.
-
Back up the CDS before and after you perform a hardware reconfiguration.
-
For any active HSC that accesses the CDS being modified by dynamic reconfiguration, all ACSs and LSMs must be varied online to maintain configuration integrity across hosts. An inactive HSC can be started after dynamic reconfiguration has completed on another host but once an HSC becomes active, it must be at the full service level, and all ACSs and LSMs must be varied online.
-
In a multi-host environment, Oracle recommends that all active hosts run HSC 6.2-level or above software. Any hosts not at 6.2 level or above must be brought down before initiating dynamic hardware reconfiguration and brought back up after the hardware reconfiguration is complete. The non-6.2 hosts recognize the hardware changes at this time.
Adding LSMs
Adding LSMs without FUTRLSM defined requires running the MERGEcds utility as described in "Basic MERGEcds Procedure." If you have defined FUTRLSM, you can use Dynamic Reconfiguration to add a new LSM as follows:
-
Use dynamic reconfiguration to bring the new LSM online:
MODIFY CONFIG
-
If necessary, add transports and volumes. For more information, see:
-
If necessary, populate LSM by any of the following:
-
Entering volumes through CAPs.
-
Opening the access door, manually populating storage cells, then doing an audit of all cells.
-
Let PTPs move volumes from attached LSMs.
-
Adding Transports
Note:
-
If you enter new cartridges into the library, update your SET VOLPARM definitions to include the new volumes. Then review SMC POLICY statements to determine if you want to add or modify policies if you are adding a new type of transport to your environment.
-
If your new transports will be RTDs, then update your VTCS CONFIG.
-
If you are adding a new RTD device type, update the STORCLAS definitions for the storage classes that will be directed to the new device type.
This section provides a procedure to add drives to an Streamline Library and HSC configuration. In this case, the Streamline Library panel already contains operational transports, and the HSC remains active during this time, so NCO is used to add the transports.
To dynamically add transports to a Streamline Library:
-
Install the new transports and power them on.
-
Use the SET SLIDRIVS utility to add the MVS drive address and drive location to the CDS. For example:
//DRVADD EXEC PGM=SLUADMIN
//*
//STEPLIB DD DSN=SYS1.SEALINK
//*
//SLSCNTL DD DISP=SHR,DSN=SYS1.DBASEPRM
//SLSCNTL2 DD DISP=SHR,DSN=SYS1.DBASESEC
//SLSPRINT DD SYSOUT=*
//SLSIN DD *
  SET SLIDRIVS(A00,A01,A02,A03,A04,A05,A06,A07,A08,A09,+
    A10,A11,A12,A13,A14,A15),FORLSMID(00:00),FORPANEL(01)
/*
In this example, you are adding two transports to fill the 16-drive panel for LSM 00 (rail 01). A14 and A15 represent the new drives being added; A00-A13 are the existing operational drives.
-
For each ACS affected, use dynamic reconfiguration to bring the new transports online:
MODIFY CONFIG UPD ACS(xx)) NOCELL
Note:
If there is more than one ACS to update, wait for the first update to complete before issuing the command to update the next ACS.The changes cascade to all other hosts.
-
Back up the CDS.
Removing Transports
This section provides a procedure to remove transports from a Streamline Library and HSC configuration. In this case, the Streamline Library panel already contains operational transports, and the HSC remains active during this time, so NCO is used to remove the transports.
To dynamically remove transports from a Streamline Library:
-
Power off the transports and deinstall them.
-
Use the SET SLIDRIVS utility to remove the MVS drive address and drive location to the CDS. For example:
//DRVREM EXEC PGM=SLUADMIN
//*
//STEPLIB DD DSN=SYS1.SEALINK
//*
//SLSCNTL DD DISP=SHR,DSN=SYS1.DBASEPRM
//SLSCNTL2 DD DISP=SHR,DSN=SYS1.DBASESEC
//SLSPRINT DD SYSOUT=*
//SLSIN DD *
  SET SLIDRIVS(B00,B01,B02,B03,B04,B05,B06,B07,B08,B09,+
      B10,B11,B12,B13,,),FORLSMID(00:01),FORPANEL(01)
/*
In this example, you are removing two drives and specifying a primary and secondary CDS. B14 and B15 represent the drives being removed; B00-B13 represent the remaining operational drives.
-
For each ACS affected, use dynamic reconfiguration to remove the transports:
MODIFY CONFIG UPD ACS(xx)) NOCELL
Note:
If there is more than one ACS to update, wait for the first update to complete before issuing the command to update the next ACS.The changes cascade to all other hosts.
-
Back up the CDS.
Replacing Transports
The following procedure tells how to replace transports on a Streamline Library panel, while retaining the same unit addresses. The HSC remains active during this time, so NCO is used to replace the transports.
To dynamically replace transports in a Streamline Library:
-
Vary the RTDs that are to be replaced offline, then deinstall them.
-
Install and power on the new transports.
-
Enter MODify CONFIG to replace the transports.
-
Vary the new transports online.
-
Back up the CDS.
Changing Transport Unit Addresses
The following procedure tells how to change the unit addresses for transports on a Streamline Library panel that contains operational drives. The HSC remains active during this time, so NCO is used to change the transport unit addresses.
To dynamically change transport addresses in a Streamline Library:
-
Use the SET SLIDRIVS utility to change the MVS unit address and drive location in the CDS. For example:
//UNITADDR EXEC PGM=SLUADMIN
//*
//STEPLIB DD DSN=SYS1.SEALINK
//*
//SLSCNTL DD DISP=SHR,DSN=SYS1.DBASEPRM
//SLSCNTL2 DD DISP=SHR,DSN=SYS1.DBASESEC
//SLSPRINT DD SYSOUT=*
//SYSOUT DD SYSOUT=*
//SYSUDUMP DD SYSOUT=*
//SLSIN DD *
  SET SLIDRIVS(F00,F01,F02,F03,F04,F05,F06,F07,F08,F09,+
      F10,F11,F12,F13,F14,F15),FORLSMID(00:02),FORPANEL(01)
/*
In this example, you are changing unit addresses on all transports on a 16-drive panel and specifying a primary and secondary CDS.
-
For each ACS affected, use dynamic reconfiguration to activate the new transport unit addresses:
MODIFY CONFIG UPD ACS(xx)) NOCELL
Note:
If there is more than one ACS to update, wait for the first update to complete before issuing the command to update the next ACS.The changes cascade to all other hosts.
-
Back up the CDS.
Adding SL8500 or SL3000 ACSs
Dynamic hardware reconfiguration for the SL3000 and SL8500 libraries also allows you to dynamically add up to 9 ACSs.
To dynamically add SL8500 or SL3000 ACSs:
-
Run a backup of the CDS.
-
Issue the HSC MODify CONFIG ADD ACSType command.
MODIFY CONFIG ADD ACSTYPE(SL3000)
or
MODIFY CONFIG ADD ACSTYPE(SL8500)
-
Add a new LMUPATH statement for the ACS.
LMUPATH ACS(acs_id) LMUADDR(ip_address)
-
Issue the LMUPDEF command on all hosts to activate the new LMUPATH statement.
LMUPDEF DATASET(dataset_name) -
Run the SET SLIDRIVS utility or issue the SET SLIDRIVS command to add drives to the new ACS.
SET SLIDRIVS(drv1,drv2,drv3,...) FORLSMID (lsm_id), +
FORPANEL(panel_id) -
Vary the new ACS online to all hosts:
VARY ACS aa ONLINE -
Vary the LSMs online.
MODIFY LSM lsm_id ONLINE
Deleting an SL8500 or SL3000 ACS
Dynamic hardware reconfiguration for the SL3000 and SL8500 libraries also allows you to dynamically delete an entire ACS.
To dynamically delete an SL8500 or SL3000 ACS:
-
Run a backup of the CDS.
-
Vary the LSMs offline.
MODIFY LSM lsm_id OFFLINE -
Vary the ACS offline to all hosts.
-
Issue the HSC MODify CONFIG DELete ACSid(acs-id) command.
-
Remove the LMUPATH statement defined for the deleted ACS.
-
Issue the LMUPDEF command on all hosts to remove the LMUPATH statement.
Adding and Removing SL8500 or SL3000 Expansion Modules
Adding and removing expansion modules is a hardware-disruptive process. However, HSC can dynamically recognize changes and continue to support other libraries without the need to recycle the HSC.
The following procedure describes how to add or remove expansion modules. The HSC remains active during this time, so NCO is used to make the changes.
To dynamically add or remove SL8500 or SL3000 expansion modules:
-
Enter the MODify LSM OFFline command to modify all Streamline Libraries offline to all HSC hosts in the affected library.
All drives and cartridges in the Streamline Libraries are now unavailable.
-
Physically add or remove the expansion modules.
-
Enter the MODify LSM ONline command to modify the Streamline Libraries online to the HSC.
During the modify online process, HSC automatically discovers the panel configuration changes. A WTOR is issued to the operator describing the change and requesting confirmation to make the changes permanent to the CDS.
-
Replying "NO" aborts the configuration change. The CDS is not updated and the old configuration is preserved.This means you could attempt to access a cell that's been removed and any new cell will not be recognized by the HSC.
-
Replying "YES" causes the CDS to be updated with the new configuration and also propagates the changes to all other active hosts in the complex. The HSC updates its in-memory control blocks.
-
-
Back up the CDS.
-
Use dynamic reconfiguration to add the expansion modules:
MODIFY CONFIG
For SL8500s, continue with Step 6. There are no special issues with the SL3000. Run the normal HSC audit, then back up the CDS.
-
Determine the highest panel number in the expanded SL8500.
In an SL8500 library without expansion modules, the highest panel number is 10. Each additional expansion module adds eight panels, so for an SL8500 with one expansion module, the highest panel number is 18; for two expansion modules the highest panel number is 26; and so forth.The three highest panel numbers are in the CEM, so in an SL8500 containing one expansion module, panels 16, 17, and 18 are located in the CEM.
-
Audit the three panels containing the highest panel numbers in each LSM (rail) in the expanded SL8500.
-
Audit any panel that includes cartridges that may have been moved during installation of the Storage Expansion Module.
-
Audit each LSM in the expanded SL8500.
-
Back up the CDS again.
Changing SL8500 CAP Types - HSC Down
The following procedure describes how to change CAP types from SL8500 standard rotational CAPs to a Bulk CAP while the HSC is down.
-
Replace the CAPs in the library and verify they are operational.
-
Start HSC and wait for initialization to complete. See "Starting and Stopping HSC."
During startup, reconfiguration starts. Wait for reconfiguration to complete.
-
If the LSMs affected are offline:
-
Enter
MODify LSM (lsm-range) ONline.where lsm-range is a range of LSMs where the CAP changes are being made.
-
Enter
Display Capto verify the CAP changes to the library.
-
-
If the LSMs affected are online, enter
Display Capto verify the CAP changes to the library. -
Start HSC activity.
Changing SL8500 CAP Types - HSC Up
The following procedure describes how to change CAP types from SL8500 standard rotational CAPs to a Bulk CAP while the HSC is up.
-
Enter
MODify LSM (lsm-range) OFFlinewhere lsm-range is the range of LSMs where the CAP changes are being made.
-
Enter
Vary ACS(acs-id) OFFlinewhere acs-id is the ACS where the CAP changes are to be made.
-
Replace the CAPs in the library and verify they are operational.
-
Stop all HSC activity.
-
Enter
Vary ACS(acs-id) ONlinewhere acs-id is the ACS where the CAP changes are to be made.
During the vary ACS process, reconfiguration starts. Wait for reconfiguration to complete.
-
Enter
MODify LSM (lsm-range) ONlinewhere lsm-range is the range of LSMs where the CAP changes are being made.
-
Enter Display Cap to verify the CAP changes to the library.
-
Start HSC activity.
Using Audit Instead of MERGEcds for Streamline Libraries
If your environment contains only Streamline Libraries and no virtual or vaulted volume data, you can elect to use the SLUADMIN AUDIT utility to populate the CDS when combining or splitting ACSs instead of using the MERGEcds utility.
The following procedure explains how to use the AUDIt utility to add volumes to a new CDS:
-
Create a new CDS as described in "Create a New, Empty CDS." Place all LSMs in a single ACS.
-
Enter data into the new CDS as described in "Prepare to Run MERGEcds" and "Run the MERGEcds Utility."
-
Ensure that the merge was successful as described in "Ensure the Merge was Successful."
-
Start HSC with the new CDS on only one host.
Keep the drives offline to MVS, since there is no reason to support automated mounts until AUDIt has added the volumes to the new CDS.
-
Run the AUDIt utility to audit the newly configured LSMs. The order in which the LSMs are audited does not matter, and the entire ACS or all LSMs can be audited at the same time. AUDIt adds the volumes to the new CDS.
-
Run the BACKup utility to back up the CDS after the audits.
-
Restart HSC on all hosts. Vary the drives online to MVS.
-
Run the Database Decompile (LIBGEN) utility to generate LIBGEN macro statements from a modified CDS.
-
You should then perform a scratch synchronization using either the LCM scratch synchronization function or the SLUCONDB utility.
Note:
If your environment includes virtual or vaulted volume data, you must use the MERGEcds utility to put this data into the new CDS. You can, however, elect to bypass merging the real volumes by using the NOREAL control statement in the SLSMERGE input, and use the SLUADMIN AUDIT utility to populate the real volume data. Using this procedure will result in loss of volume metadata.
Adding a New VTSS
To add VTSSs:
-
Install the new VTSS.
-
Run the DECOMP utility to decompile your CONFIG deck. For more information, refer to the ELS Command, Control Statement, and Utility Reference.
-
Update the CONFIG deck with the appropriate VTSS and VTD statements. For more information, refer to the ELS Command, Control Statement, and Utility Reference and "Configuring VTCS."
-
Run the CONFIG utility.
-
If necessary, add volumes.
VTVs and MVCs can be dynamically added or deleted from your configuration by using the SET VOLPARM utility.
HSC SET VAULTVOL and SET VAULT Utilities
The HSC SET VAULTVOL utility can be used to reserve a section of an existing HSC CDS for vaulted volumes. You must ensure that your existing CDS is large enough to hold the projected vault data, using the following formula: The HSC SET VAULT utility can be used to dynamically add, rename, or delete vaults.
If your CDS contains VAULT information, you must specify whether or not this data is to be merged into the new CDS during a CDS merge process.
HSC SET CDKLOCK Utility
The HSC SET CDKLOCK utility can be used to reserve a section of an existing HSC CDS for Open Systems resource lock information. This command can also be used to manage the status of the subfile and change the default expiration of active locks.
Note:
The CDS merge process does not copy CDKLOCK information from the old CDS to the new CDS. Resource lock information is transient and may not be valid during the merge process.Partitioning Streamline Libraries
There are many businesses uses for partitioning your Streamline libraries, for example:
-
Enabling service centers to keep a client from accessing another client's tapes,
-
Keeping various departments within the same company separate, and
-
Dividing a library between production and test environments.
The SL3000 and SL8500 Libraries can be configured with one to eight partitions as ACSs with cell, drive, and CAP assignments. Both Libraries use the StreamLine Library Console (SLC) to perform partition and resource assignment functions.
The following procedures describe how to configure HSC partitioning on the SL3000 or SL8500 library.
-
starting from scratch – LIBGEN, SLICREAT
-
converting a non-partitioned ACS to a partitioned ACS
-
converting a partitioned ACS to a non-partitioned ACS
-
adding a library to the HSC Complex
-
removing a library from the HSC Complex
-
adding a partition to the library
-
removing a partition from the library
-
moving a partition from one host group to another host group
-
adding resources to the library
-
removing resources from the library
Partitioning Requirements and Prerequisites
-
Read the SL8500 Best Practices Guide or SL3000 User's Guide.
-
Call Oracle Software Support to schedule a CSE to configure the Streamline Library. This is required.
-
For SL3000s: Make sure you have installed firmware Version 2.00 or higher and SLConsole version FRS 4.00 or higher.
-
For SL8500 enhanced partitioning support (dynamically adding and removing library resources of partitions and so forth), ensure that you have the following prerequisites:
-
SL8500 firmware Compatibility 23 level –Release 7.0x.
-
SLC release level 5.55 or higher
Note:
Customers MUST be current on maintenance. -
HSC 6.2 (MVS) – L1H16EN and subsequent PTFs
-
HSC 6.2 (VM) – L1H16EM and subsequent PTFs
-
ELS 7.0 (MVS) – L1H16EO and subsequent PTFs
-
ELS 7.1 (MVS) – L1H16EP and subsequent PTFs
-
LibraryStation 6.2 - L1S1076
-
MVS-CSC 6.2 - 1C109C
-
Restrictions
-
Hosts prior to HSC 6.1, or hosts without the partitioning PTF, cannot bring the partitioned ACS online.
-
If the Library being partitioned is not part of the CDS (either as a real or future library), it cannot be dynamically added to the CDS. A LIBGEN/SLICREAT/MergeCDS process must be performed. For more information, see "Creating the HSC CDS."
-
Volumes remaining in a partition being removed from one host group will be deleted from that CDS when the ACS is deleted using the HSC command Modify Config Delete acs-id.
-
Volumes located in a partition that is added to a host group will be available to that CDS after an AUDIt or MERGEcds.
-
Volume history will only be preserved if MERGEcds is run.
-
When converting a partitioned library to non-partitioned library, a MERGEcds is possible to retain volume history from previously defined partitions.
-
If a volume is mounted on a drive in a partition that is removed before the drive goes OFFLINE, the volume will be deleted from the CDS, and any future MOUNT activity to that drive will end in an error.
-
When moving volumes from one partition to another, neither the HSC CDS nor the library support duplicate volumes.
-
Prior to backing up the CDS described in the procedures below, NCS and VTCS systems must be in an idle state. This means draining all batch tape initiators, varying all automated MVS tape devices offline (real and virtual) and varying all RTDs defined in the VTCS configuration offline to VTCS.
-
When a VTCS CONFIG RESET is required, all host systems must be down.
-
If an HSC group owns multiple partitions within a Streamline library, anything done to that partition is considered disruptive and will affect all partitions connected to an HSC group. For any changes that involve adding or removing partitions or adding or removing partition resources, all activity (i.e., drive(s), cap(s), etc.) must be stopped for all ACSs connected to the library. All ACSs connected to the library must be varied offline. Perform the specific activity and then vary the ACSs online. Activity can now be started for all ACSs.
CAP Considerations
Partitioning affects CAP usage. Consider two situations that can be a common occurrence:
-
AUTO CAP – In partitioning mode, AUTO CAP is disabled. If you are using AUTO CAP prior to partitioning the library, change it to manual. If it is not changed, HSC changes it.
-
Release CAP – A CAP can only be released from the owning host.
-
Overriding a CAP Reservation – Refer to the SL8500 Best Practices Guide or SL3000 User's Guide.
LibraryStation Considerations
LibraryStation must be recycled to pick up the new drive configuration for the following conditions:
-
adding ACSs
-
deleting ACSs
-
adding LSMs
-
deleting LSMs
-
adding drives
-
deleting drives.
Caution:
LibraryStation does not support Near Continuous Operation (NCO). If LibraryStation is running during NCO, results will be unpredictable.
LibraryStation should not be running when NCO is started or is anticipated to start, for example, when you are varying a newly reconfigured library online. This includes changes to drives that are configured to LibraryStation.
Definitions
The following terms are defined here:
-
Host Group
-
SL8500 Enhanced Partition
-
SL3000 Partition
Host Group
A set of hosts connected to an ACS and sharing one CDS. For HSC, there can be up to 16 hosts in a host group.
SL8500 Enhanced Partition
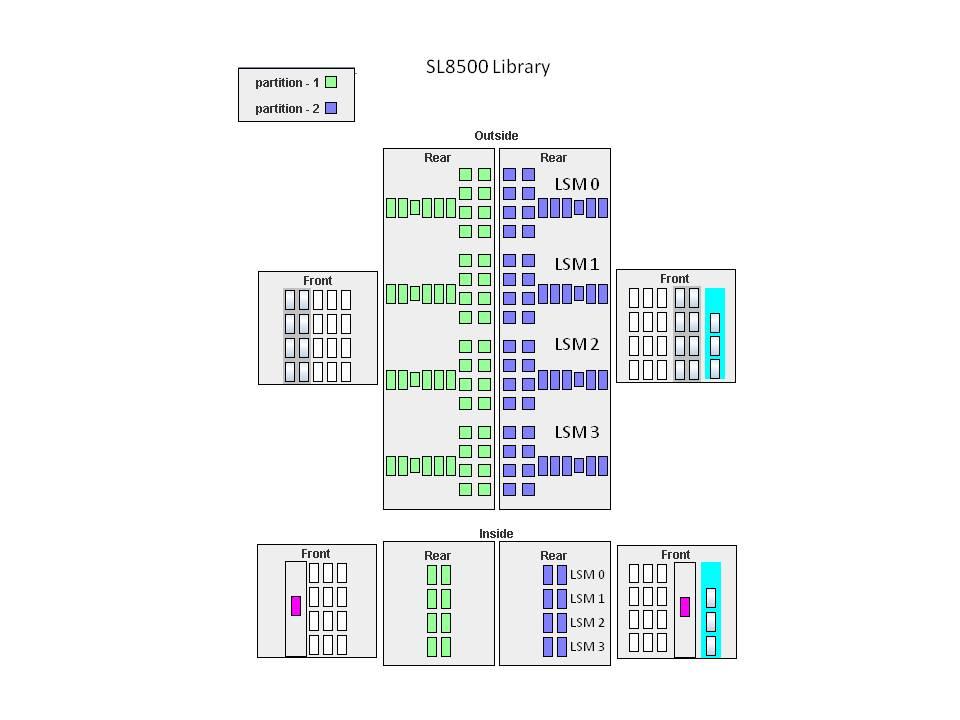
For an SL8500 library, a partition is a segment of one SL8500 unit consisting of cells with a minimum of 1 to n magazines (13 or 14 cells to a magazine), maximum of 2 shared CAPs, and 1 to n drives for a maximum of 8 partitions. A partition is an ACS. A partition has exclusive control of cells and drives. Installed CAPs are shared amongst all defined partitions. Figure 5-7 shows an SL8500 divided into 2 partitions.
SL3000 Partition
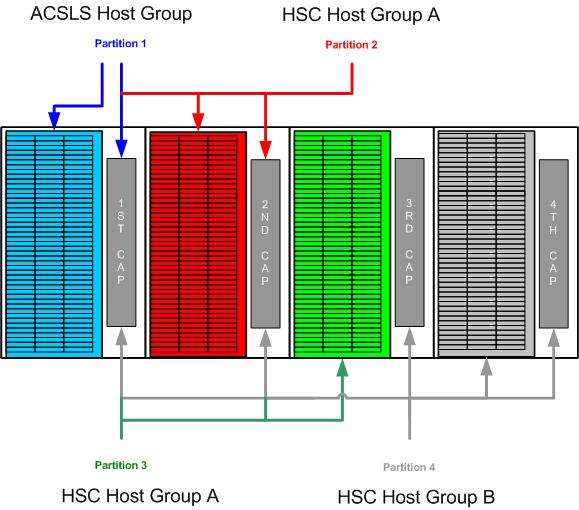
For an SL3000 library, a partition is a segment of one SL3000 unit consisting of cells with a minimum of 1 to n in increments of 100, CAPs, and drives for a maximum of 8 partitions. A partition is an ACS. A partition has exclusive control of cells and drives. Installed CAPs may be assigned to one partition (exclusive), assigned to multiple partitions (shared), or unassigned.
Figure 5-8 and Figure 5-9 illustrate an SL3000 divided into 4 partitions:
-
Partition 1 assigned to ACSLS:
-
200 cells
-
1st and 2nd CAPs shared
-
24 drives
-
-
Partitions 2 and 3 assigned to HSC Host Group A:
-
200 cells each
-
1st and 2nd CAPs shared for each
-
6 drives each
-
-
Partition 4 assigned to HSC Host Group B:
-
200 cells
-
1st and 2nd CAPs shared, 3rd and 4th CAPs exclusively assigned
-
12 drives
-

Partitioning Procedures
The following partitioning procedures are discussed:
-
"Converting a Non-partitioned Library to a Partitioned Library"
-
"Converting a Partitioned Library to a Non-partitioned Library"
-
"Moving a Partition from One Host Group to another Host Group"
Starting from Scratch – LIBGEN, SLICREAT
This procedure creates a partitioned Streamline library from scratch. No LIBGEN changes are required.
Note:
It is important that all SL8500 LSMs are online even if they are not defined/allocated to the partition. If the LSMs are not online, CAPs may not be operational.-
Run an HSC 7.0 or later LIBGEN assemble and the SLICREAT program.
Create a new CDS using the procedures in "Creating the HSC CDS." HSC must use HSC 7.0 or later SMP/E libraries. After running the SLICREAT program, a standard CDS is created.
-
If virtual tape is being implemented, VTCS CONFIG must be run to define the configuration to VTCS.
-
If you plan to add SL3000 or SL8500 ACSs (partitions) in the HSC Complex, it is important to add FUTRACS to the SLILIBRY LIBGEN macro. The first example shows a LIBGEN example for an SL3000 library while the second example shows a LIBGEN example for an SL8500 library.
*
LIBGEN   SLIRCVRY TCHNIQE=SHADOW
*
SLILIBRY SMF=245,                                            X
     ACSLIST=ACSLIST,                                        X�
     HOSTID=(HST1,HST2),                                     X
     DELDISP=SCRTCH,                                         X
     MAJNAME=STKASBADD,                                      X
     CLNPRFX=CLN,                                            X
     COMPRFX=/,                                              X
     FUTRACS=(2),                                            X
     SCRLABL=SL                                              X
*
ACSLIST  SLIALIST ACS00
*
ACS00    SLIACS LSM=(LSM0000)
*
LSM0000  SLILSM TYPE=3000
*
*
SLIENDGN ,
* LIBGEN SLIRCVRY TCHNIQE=SHADOW * SLILIBRY SMF=245, X ACSLIST=ACSLIST, X HOSTID=(HST1,HST2), X DELDISP=SCRTCH, X MAJNAME=STKASBADD, X CLNPRFX=CLN, X COMPRFX=/, X FUTRACS=(2), X SCRLABL=SL X * ACSLIST SLIALIST ACS00 * ACS00 SLIACS LSM=(LSM0000,LSM0001,LSM0002, X LSM0003,LSM0004,LSM0005,LSM0006,LSM0007) * LSM0000 SLILSM TYPE=8500 LSM0001 SLILSM TYPE=8500 LSM0002 SLILSM TYPE=8500 LSM0003 SLILSM TYPE=8500 LSM0004 SLILSM TYPE=8500 LSM0005 SLILSM TYPE=8500 LSM0006 SLILSM TYPE=8500 LSM0007 SLILSM TYPE=8500 * SLIENDGN ,
-
-
Run the "Converting a Non-partitioned Library to a Partitioned Library" to partition the library.
Note:
After the HSC starts for the first time for a newly added SL8500 library, modify all LSMs online even though a partition may not have all the LSMs allocated/defined. For example:MODIFY LSM lsm-id ONLINE
The Streamline library is now partitioned and is available for use. Start HSC as usual.
Converting a Non-partitioned Library to a Partitioned Library
This procedure converts an existing non-partitioned Library to a partitioned Library. For SL8500s, the ACS must contain only one SL8500.
After completing the following steps, you will create a partitioned Streamline library.
-
Stop activity for the ACS connected to the library.
In preparation for reconfiguring the partition, stop all CAP and tape activity (both real and virtual) from all active hosts in that library, including RTD tape processing. Failure to do this will result in lost cartridges and errors on dismount.
Vary drives offline to ALL MVS hosts that will no longer have access to the drives. From the MVS console, issue the following command to see if the drives in the affected LSM are offline to MVS:
D U,,,xxx-yyywhere xxx-yyy is the drive ID or UCB range. If the drives are not offline to MVS, vary the drives offline with the MVS command:
VARY xxx-yyy OFFLINEAdditionally, any RTDs that reside on the affected LSM will need to be varied offline. To do this, issue the VTCS command:
V RTD(rtd_id) OFF -
Issue the Display Cap command.
Issue the Display Cap command to verify the CAP is in manual status since this procedure does not go through the NCO process. If the CAP status is AUTOMATIC, issue the CAP Preference command to change the CAP to MANUAL:
CAPP prefval cap-id MANUAL -
Vary the affected ACS offline to all hosts. The ACS to be partitioned must be offline to all hosts. Issue the HSC command:
VARY ACS acs-id OFFLINE -
Back up the CDS.
Before making changes to the CDS, it is best practice to create a backup copy for recovery purposes. This backup copy can be restored, if problems are encountered, to recover to a known CDS state using documented HSC recovery procedures.
Use the HSC BACKup utility to create the backup CDS copy.
Note:
If VTCS is involved, all tape activity (real and virtual) must be stopped. All VTDs must be varied offline to MVS. All RTDs defined in the VTCS configuration must be varied offline to VTCS. It is highly recommended that all initiators be drained that feed both real and VTD processing. NCS and VTCS must be in an idle state prior to creating the backup copy of the CDS to avoid possibility of data loss. -
Change the Streamline library configuration file to partition the ACS.
The internal configuration file in the Streamline library must be changed must be changed to partition the LSM, assign cell, drive, and CAP resources to that partition. This change is made through the SLConsole.
-
Run the SET SLIDRIVS utility on the host group (optional).
If not all the drives need to be configured to the partitioned ACS, modify drives to the LSM of the ACS by running the SLUADMIN utility for SET SLIDRIVS.
SET SLIDRIVS(drv1,drv2,drv3,,,,,,,,,,,,,) + FORLSMID(lsm-id),FORPANEL(12)
-
Modify the HSC LMUPATH parameter in PARMLIB.
Add the PARTID(00n) keyword to the LMUPATH HSC parameter in PARMLIB. The ID(n) is obtained from the SLConsole. For example:
LMUPATH ACS(acs-id) LMUADDR(ip-address) PARTID(00n)
-
Issue the HSC LMUPDEF command on all hosts.
To activate the modified LMUPATH statement, issue the HSC command:
LMUPDEF DATASET(dataset.name) -
Vary the affected ACS online to all hosts. Issue the HSC command:
Vary ACS acs-id OnlineHSC retains the online/offline status of each pre-existing LSM. If the LSMs do not modify online when the ACS is varied online, issue the HSC command:
MODIFY LSM lsm-id ONLINENo additional mounts occur to the ACS until the ACS is varied online.
Note:
Virtual tape environments are required to vary any RTDs online to VTCS. Additionally, any VTDs varied offline need to be varied online to MVS. -
Vary drives ONLINE to MVS (if necessary). From the MVS console, issue:
D U,,,xxx-yyywhere xxx-yyy is the drive ID range (both real and virtual), to see if the new drives are online to MVS. If they are not, bring the real drives online with the MVS command:
VARY xxx-yyy ONLINE -
Vary RTDs ONLINE to VTCS (if necessary). From the MVS console, issue:
V RTD(rtd_id) ONfor the RTDs that reside on the LSMs being allocated.
-
Re-establish connections to all defined libraries (if necessary).
Re-establish connections to all defined libraries to acquire drive configuration information from these libraries. To re-drive any outstanding mounts that may have been lost due to hardware or communication errors, issue the SMC RESYNCHRONIZE command.
The ACS is now partitioned and available for use with all four LSMs in a single partition. If you are running multiple HSC hosts, the new configuration is propagated automatically to all hosts.
Converting a Partitioned Library to a Non-partitioned Library
This procedure converts an existing partitioned Library to a non-partitioned Library. For SL8500s, the ACS must contain only one SL8500.
-
Stop activity for the ACS connected to the library.
Caution:
In preparation for reconfiguring the partition, stop all CAP and tape activity (both real and virtual) from all active hosts in that library, including RTD tape processing. Failure to do this will result in lost cartridges and errors on dismount.Vary drives offline to ALL MVS hosts that will no longer have access to the drives. From the MVS console, issue the following command to see if the drives in the affected LSM are offline to MVS:
D U,,,xxx-yyywhere xxx-yyy is the drive ID or UCB range. If the drives are not offline to MVS, vary the drives offline with the MVS command:
VARY xxx-yyy OFFLINEAdditionally, any RTDs that reside on the affected LSM will need to be varied offline. To do this, issue the VTCS command:
V RTD(rtd_id) OFFCaution:
Failure to perform this step may result in the devices being removed becoming allocated. This may cause severe operational consequences including loss of access for any cartridge mounted at the time of the non-partitioning.If VTCS is involved, any RTDs moving out of the CDS of the host groups affected will require a VTCS CONFIG RESET to be run to remove the specific RTDs from the VTCS configuration.
-
Run the Volume Report utility.
Run a volume report on the affected ACS(s) and keep the output. This data can be used later to verify where volumes were in the ACS(s) before it was removed.
Systems with VTCS should run an MVC report for cross reference purposes.
-
Back up the CDS.
Before making changes to the CDS, it is best practice to create a backup copy for recovery purposes. This backup copy can be restored, if problems are encountered, to recover to a known CDS state using documented HSC recovery procedures.
Use the HSC BACKUP utility to create the backup CDS copy.
Note:
If VTCS is involved, all tape activity (real and virtual) must be stopped. All VTDs must be varied offline to MVS. All RTDs defined in the VTCS configuration must be varied offline to VTCS. It is highly recommended that all initiators be drained that feed both real and VTD processing. NCS and VTCS must be in an idle state prior to creating the backup copy of the CDS to avoid the possibility of data loss. -
Vary all ACSs connected to the library OFFLINE to all host groups.
The ACS(s) to be un-partitioned must be offline to all hosts. Issue the HSC command:
VARY ACS acs-id OFFLINE -
Change the Streamline library configuration file to unpartition the ACS.
The internal configuration file in must be changed to delete all partitions. This change is made through the SLConsole.
-
Issue the HSC F CONFIG DELete ACS command.
To delete an ACS from an HSC host group, issue the HSC command as in the examples below:
-
F CONFIG DELETE ACS(03)
F CONFIG DELETE ACS(04)
F CONFIG DELETE ACS(05)
Note:
-
If running multiple HSC hosts, the new configuration will be propagated automatically to all hosts.
-
Deleting an ACS deletes its volumes from the CDS.
-
If this is the last ACS in the HSC host group, the following steps may apply. At this time, the HSC can be stopped.
-
Run a volume report on the affected ACS and keep the output. This data can be used later to verify where volumes were in the ACS before it was removed.
-
Eject all cartridges from the affected ACS.
-
-
-
Run the SET SLIDRIVS utility on the remaining host group.
Add drives to the new LSM of the ACS by running the SLUADMIN utility or command for SET SLIDRIVS.
SET SLIDRIVS(drv1,drv2,drv3,,,,,,,,,,,,,) +
FORLSMID(lsm-id),FORPANEL(12)
-
Modify LMUPDEF in PARMLIB for all host groups.
Remove all the LMUPATH statements referencing the ACSs previously defined to all LMUPDEF HSC parameter files of all affected host groups. If a particular host group will have ownership of the library after it becomes un-partitioned, add or change the LMUPATH statement using the following example:
LMUPATH ACS(03) LMUADDR(ip-address) -
Issue the HSC LMUPDEF command on all host groups. To activate the modified HSC LMUPATH statement, issue the HSC command:
LMUPDEF DATASET(dataset.name) -
Vary the ACS ONLINE to the remaining host group. Issue the HSC command for the host group taking ownership of library:
Vary ACS acs-id OnlineThe HSC retains the online/offline status of each pre-existing LSM. If the LSM does not modify online when the ACS is varied online, issue the HSC command:
MODIFY LSM lsm-id ONLINENo additional mounts will occur to the ACS until the ACS is varied online. All other hosts will complete their configuration process when the ACS is varied online.
Virtual tape environments will be required to vary any RTDs online to VTCS.
Note:
When an ACS is varied online, the panels are discovered to complete the configuration process. During this time, if any cartridges are discovered, an SLS4416E message will be displayed. It is important to follow the user response section of this message before proceeding to the next step. This section will instruct the user to perform the following step in the order listed:-
Run the HSC SLUADMIN Audit utility with APPLY(NO) for the panels indicated to discover and resolve issues.
-
Run the HSC SLUADMIN Volume Report utility if necessary to gather volume information.
-
Run the HSC SLUADMIN Audit utility with APPLY(YES) to apply updates to the CDS.
-
Run the HSC SLUADMIN SET Utility specifying FREEZE OFF for any panels in the frozen state.
Refer to "Varying the ACS Online After a Configuration Change" for further details of this process.
-
-
Vary drives ONLINE to MVS (if necessary). From the MVS console, issue the following command to see if the new drives are online to MVS:
D U,,,xxx-yyywhere xxx-yyy is the drive ID range (both real and virtual). If they are not, bring the real drives online with the MVS command:
VARY xxx-yyy ONLINE -
Vary RTDs ONLINE to VTCS (if necessary). From the MVS console, issue
V RTD(rtd_id) ONfor the RTDs that reside on the LSMs being allocated.
-
Run the HSC Scratch Update utility (if necessary).
This step can be bypassed if no volumes have been added, deleted, or moved. It must be run if new LSMs have been added to the configuration.
-
Re-establish connections to all defined libraries (if necessary) to acquire drive configuration information from these libraries. To re-drive any outstanding mounts that may have been lost due to hardware or communication errors, issue the SMC RESYNCHRONIZE command.
The ACS is now unpartitioned and available for use. If you are running multiple HSC hosts, the new configuration is propagated automatically to all hosts.
Adding a Library to the HSC Complex
This procedure adds a SL3000 or SL8500 Library for either an existing or new configuration. After completion of the following steps, a SL3000 or SL8500 library is ready for use.
Io add a library to the HSC Complex:
-
Back up the CDS (if necessary).
Before making changes to the CDS, it is best practice to create a backup copy for recovery purposes. This backup copy can be restored if problems are encountered to recover to a known CDS state using documented HSC recovery procedures.
Use the HSC BACKUP utility to create the backup CDS copy.
Note:
-
This step is necessary if you are adding partitions other than the first time.
-
If VTCS is involved, ALL tape activity (real and virtual) must be stopped. All virtual tape drives must be varied offline to MVS. All RTDs defined in the VTCS configuration must be varied offline to VTCS. It is highly recommended that all initiators be drained that feed both real and virtual tape drive processing. NCS and VTCS must be in an idle state prior to creating the backup copy of the CDS to avoid possibility of data loss.
-
-
Before continuing with Step 3, ensure that sufficient future ACSs have been defined. Check the value for the FUTRACS parameter on the LIBGEN SLILIBRY macro. If you need to increase the FUTRACS value, see "Creating the HSC CDS."
-
Enter the MODify CONFIG ADD ACSTYPE (type, n) command, where:
-
type is SL3000 or SL8500
-
n is the number of ACSs (1 to 9)
-
-
Add the HSC LMUPATH statement in PARMLIB. For a new ACS, add an HSC LMUPATH statement in LMUPDEF in PARMLIB. For example:
LMUPATH ACS(acs-id) LMUADDR(ip-address)
Refer to the LMUPATH Control Statement in ELS Command, Control Statement, and Utility Reference.
-
Issue the HSC LMUPDEF command on all hosts. To activate the modified HSC LMUPATH statement, issue the HSC command:
LMUPDEF DATASET(dataset.name) -
Run the SET SLIDRIVS utility (match CDS drive configuration to the library).
Add drives to an LSM of an added ACS by running the SLUADMIN utility or command for SET SLIDRIVS.
SET SLIDRIVS(drv1,drv2,drv3,,,,,,,,,,,,,) +
FORLSMID(lsm_id),FORPANEL(12)
Note:
If VTCS is involved any RTDs moving into the CDS will require a VTCS CONFIG RESET to be run to add the specific RTDs to the VTCS configuration. -
Vary the new Library (ACS) ONLINE to all hosts. Issue the HSC command:
Vary ACS acs-id OnlineIssue the following command to modify the LSM online:
MODIFY LSM lsm-id ONLINEAll other hosts will complete their configuration process when the ACS is varied online.
-
Audit LSM of ACS (optional).
From Step 7, when an SLS4416E message is displayed, some panels are populated with cartridges that are not cataloged to HSC. These panels must be audited for HSC to be aware of these cartridges. To audit the panel, run the HSC SLUADMIN AUDIT utility as follows:
AUDIT ACS(xx) LSM(yy) PANEL(zz)
-
Unfreeze panels/LSM (optional).
If the panels were audited in Step 8, the panels can now be unfrozen. To unfreeze the panels/LSM, run the HSC SLUADMIN utility for SET FREEZE as follows:
SET FREEZE (OFF) FORLSMID(lsm-id) FORPANEL(panel-id)
-
Run the HSC SCRATCH Update utility (if necessary).
This step can be bypassed if no volumes have been added, deleted, or moved. It must be run if new LSMs have been added to the configuration.
-
Vary drives ONLINE to MVS (if necessary). From the MVS console, issue:
D U,,,xxx-yyywhere xxx-yyy is the drive id range (both real and virtual), to see if the new drives are online to MVS. If they are not, bring the real drives online with the MVS command:
VARY xxx-yyy ONLINE -
Vary RTDs ONLINE to VTCS (if necessary). From the MVS console, issue:
V RTD(rtd_id) ONfor the RTDs that reside on the LSMs being allocated.
Note:
-
Virtual tape environments will be required to vary any RTDs online to VTCS. Additionally, any virtual tape drives varied offline will need to be varied online to MVS.
-
Prior to performing this step, ensure that SET SLIDRIVS (Step 6) is performed so that the CDS drive configuration matches EXACTLY to the new drive configuration on the SL3000 Library.
-
-
Re-synchronize SMC. To add drives for SMC, issue the SMC RESYNCHRONIZE command.
The Library is now added to the HSC complex and is available for use to all HSC hosts. If running multiple HSC hosts, the new configuration will be propagated automatically to all hosts.
Removing a Library from the HSC Complex
This procedure removes a Library from the HSC Complex.
Note:
If this is the last ACS in the HSC host group, only Steps 1 through 6 may apply. At this time, HSC can be stopped.To remove a library from the HSC Complex:
-
Stop activity for affected ACS connected to HSC.
In preparation for removing a Library from HSC, stop all affected ACS CAP and tape activity (both real and virtual) from all active hosts, including RTD tape processing, in that ACS. Failure to do so will result in lost cartridges and errors on dismount.
Vary drives (both real and virtual) offline to all MVS hosts that will no longer have access to the drives. From the MVS console, issue:
D U,,,xxx-yyywhere xxx-yyy is the drive ID or UCB range, to see if the drives in the affected ACS are offline to MVS. If not, vary the drives offline with the MVS command:
VARY xxx-yyy OFFLINEAdditionally, any RTDs that reside on the affected ACS will need to be varied offline. To do this, issue the VTCS command:
V RTD(rtd_id) OFFCaution:
Failure to perform this step may result in the devices being removed becoming allocated. This may cause severe operational consequences including loss of access for any cartridge mounted at the time of the partitioning.If VTCS is involved any RTDs moving out of the CDS will require a VTCS CONFIG RESET to be run to remove the specific RTDs from the VTCS configuration.
-
Run the SET Freeze utility to freeze affected LSM.
To stop cartridges from migrating to the LSM of the partition being removed, run the HSC SLUADMIN SET FREEZE utility:
SET FREEZE(ON) FORLSMID(lsm-id)Note:
-
When an LSM is frozen, no new cell allocations will occur, however, any cartridge from the LSM that is currently mounted on a drive will return to its home cell.
-
Since there is one LSM to an SL3000 Library, freezing the LSM is freezing the ACS.
-
-
Run the Volume Report utility.
Run a volume report on the affected ACS and keep the output. This data can be used later to verify where volumes were in the ACS before it was removed.
Note:
Systems with VTCS should run an MVC report for cross reference purposes. -
Eject cartridges out of the affected ACS (optional). Eject all cartridges from the affected ACS.
-
Vary affected ACS connected to HSC OFFLINE to all hosts.
The affected ACS connected to HSC must be offline to all hosts. Issue the HSC command:
VARY ACS acs-id OFFLINE -
Back up the CDS.
Before making changes to the CDS, it is best practice to create a backup copy for recovery purposes. This backup copy can be restored if problems are encountered to recover to a known CDS state using documented HSC recovery procedures.
Use the HSC BACKUP utility to create the backup CDS copy.
Note:
If VTCS is involved, ALL tape activity (real and virtual) must be stopped. All virtual tape drives must be varied offline to MVS. All RTDs defined in the VTCS configuration must be varied offline to VTCS. It is highly recommended that all initiators be drained that feed both real and virtual tape drive processing. NCS and VTCS must be in an idle state prior to creating the backup copy of the CDS to avoid possibility of data loss. -
Issue the HSC F CONFIG DELete ACS command.
To delete a partition(s) in an HSC Host Group, issue the HSC command as the examples below show:
F CONFIG DELETE ACS(03)
F CONFIG DELETE ACS(04)
F CONFIG DELETE ACS(05)
Note:
-
If running multiple HSC hosts, the new configuration will be propagated automatically to all hosts.
-
Deleting an ACS deletes its volumes from the CDS. Remove the HSC LMUPATH parameter in PARMLIB.
-
-
Remove the LMUPATH statements referencing the ACS previously defined to the LMUPDEF HSC parameter file of the affected host group.
-
Issue the HSC LMUPDEF command on all hosts.
To refresh the modified HSC LMUPDEF HSC parameter file within a host group, issue the HSC command to all hosts:
LMUPDEF DATASET(dataset.name) -
Re-synchronize SMC. Issue the SMC RESYNCHRONIZE command.
The Library is removed from the HSC Complex.
Adding a Partition to the Library
This procedure adds a partition to the library for either an existing or new configuration.
After completing the following steps, a partitioned SL3000 or SL8500 with up to eight partitions may be created. At a later time, remove any partitions from this library using "Removing a Partition from the Library."
If you are adding more partitions to an ACS than what currently exist, the FUTRACS parameter in the SLILIBRY macro must be coded in the LIBGEN with enough ACSs to accommodate the total number of partitions being accessed within a SL3000 or SL8500 library.
-
Stop activity for all ACSs connected to the library.
In preparation for adding a partition to the library, stop all CAP and tape activity (both real and virtual) from all active hosts, including RTD tape processing, in that ACS. Failure to do so will result in lost cartridges and errors on dismount.
Vary drives (both real and virtual) offline to all MVS hosts that will no longer have access to the drives. From the MVS console, issue:
D U,,,xxx-yyywhere xxx-yyy is the drive ID or UCB range, to see if the drives in the affected ACS are offline to MVS. If not, vary the drives offline with the MVS command:
VARY xxx-yyy OFFLINEAdditionally, any RTDs that reside on the affected ACS will need to be varied offline. To do this, issue the VTCS command:
V RTD(rtd_id) OFFNote:
-
This step is necessary if you are adding partitions other than the first time.
-
If VTCS is involved, any RTDs moving out of the CDS will require a VTCS CONFIG RESET to be run to remove the specific RTDs from the VTCS configuration.
-
-
Vary all ACSs connected to the library OFFLINE to all hosts. ALL ACSs connected to the library must be offline to all hosts. Issue the HSC command:
VARY ACS acs-id OFFLINE -
Back up the CDS (if necessary).
Before making changes to the CDS, it is best practice to create a backup copy for recovery purposes. This backup copy can be restored if problems are encountered to recover to a known CDS state using documented HSC recovery procedures.
Use the HSC BACKUP utility to create the backup CDS copy.
Note:
-
This step is necessary if you are adding partitions other than the first time.
-
If VTCS is involved, ALL tape activity (real and virtual) must be stopped. All virtual tape drives must be varied offline to MVS. All RTDs defined in the VTCS configuration must be varied offline to VTCS. It is highly recommended that all initiators be drained that feed both real and virtual tape drive processing. NCS and VTCS must be in an idle state prior to creating the backup copy of the CDS to avoid possibility of data loss.
-
-
Change the SL3000 or SL8500 configuration to add the partition and assign resources to the partition.
The internal configuration file in the SL3000 or SL8500 must be changed to show the newly added partition(s) to a library. This change is made through the SLConsole.
Note:
If scratch volumes exist, update and reload SCRPDEF, VOLDEF, and TAPEREQ PARMLIB members accordingly. This must be done prior to executing Step 5. -
Issue the HSC F CONFIG ADD ACSType command (optional).
If you are adding more partitions to an ACS than currently exist, issue the HSC command as in the examples below:
F CONFIG ADD ACST(SL3000)
F CONFIG ADD ACST(SL8500)
-
Change or add the HSC LMUPATH statement in PARMLIB.
If an LMUPATH statement was defined for an SL3000 or SL8500 using "Starting from Scratch – LIBGEN, SLICREAT," change the HSC LMUPATH statement to add the PARTID keyword in LMUPDEF in PARMLIB. Verify the partition ID defined from the SLConsole is the same as the PARTID in the HSC LMUPDEF. For a new partition, add an HSC LMUPATH statement in LMUPDEF in PARMLIB.
For example:
LMUPATH ACS(acs-id) LMUADDR(ip-address) PARTID(nnn)
-
Issue the HSC LMUPDEF command on all hosts. To activate the modified HSC LMUPATH statement, issue the HSC command:
LMUPDEF DATASET(dataset.name) -
Run the SET SLIDRIVS utility (match CDS drive configuration to the library). Add drives to an LSM of an added ACS by running the SLUADMIN utility or command for SET SLIDRIVS.
SET SLIDRIVS(drv1,drv2,drv3,,,,,,,,,,,,,) +
FORLSMID(lsm-id),FORPANEL(12)
Note:
If VTCS is involved, any RTDs moving into the CDS will require a VTCS CONFIG RESET to be run to add the specific RTDs to the VTCS configuration. -
Vary all ACSs connected to the library ONLINE to all hosts. Issue the HSC command:
Vary ACS acs-id OnlineThe HSC retains the online/offline status of each pre-existing LSM. If the LSM is not modified online when the ACS is varied online, issue the HSC command:
MODIFY LSM lsm-id ONLINENo additional mounts will occur to the ACS until the ACS is varied online. All other hosts will complete their configuration process when the ACS is varied online.
-
Audit LSM of ACS (optional).
From Step 9, when an SLS4416E message is displayed, some panels are populated with cartridges that are not cataloged to HSC. These panels must be audited for the HSC to be aware of these cartridges. To audit the panel, run the HSC AUDIt utility as follows:
AUDIT ACS(xx) LSM(yy) PANEL(zz)
-
Unfreeze panels/LSM (optional).
If the panels were audited in Step 10, the panels can now be unfrozen. To unfreeze the panels/LSM, run the HSC SLUADMIN SET FREEZE utility as follows:
SET FREEZE (OFF) FORLSMID(lsm-id) FORPANEL(panel-id)
-
Run the HSC Scratch Update utility (if necessary). Run an HSC Scratch Update utility.
This step may be bypassed if no volumes have been added, deleted, or moved. It must be run if new LSMs have been added to the configuration.
-
Vary drives ONLINE to MVS (if necessary).
From the MVS console, issue the following command to see if the new drives are online to MVS:
D U,,,xxx-yyywhere xxx-yyy is the drive ID range (both real and virtual). If they are not, bring the real drives online with the MVS command:
VARY xxx-yyy ONLINE -
Vary RTDs ONLINE to VTCS (if necessary). From the MVS console, issue:
V RTD(rtd_id) ONfor the RTDs that reside on the LSMs being allocated.
Note:
-
Virtual tape environments will be required to vary any RTDs online to VTCS. Additionally, any virtual tape drives varied offline will need to be varied online to MVS.
-
Prior to performing this step, ensure that SET SLIDRIVS (Step 8) is performed so that the CDS drive configuration matches EXACTLY to the new drive configuration on the SL3000 library.
-
-
Re-synchronize the SMC. To add drives for the SMC, issue the SMC RESYNCHRONIZE command.
The partition is now added to the library and is available for use. If running multiple HSC hosts, the new configuration will be propagated automatically to all hosts.
Removing a Partition from the Library
Note:
If this is the last ACS in the HSC host group, only Steps 1 through 6 may apply. At this time, the HSC can be stopped.This procedure removes a partition from an existing library.
-
Stop activity for affected ACSs being deleted.
In preparation for removing a partition from the library, stop all CAP and tape activity (both real and virtual) from all active hosts, including RTD tape processing, in that ACS. Failure to do so will result in lost cartridges and errors on dismount.
Vary drives (both real and virtual) offline to all MVS hosts that will no longer have access to the drives. From the MVS console, issue the following command to see if the drives in the affected ACS are offline to MVS:
D U,,,xxx-yyywhere xxx-yyy is the drive ID or UCB range. If not, vary the drives offline with the MVS command:
VARY xxx-yyy OFFLINEAdditionally, any RTDs that reside on the affected ACS will need to be varied offline. To do this, issue the VTCS command:
V RTD(rtd_id) OFFCaution:
Failure to perform this step may result in the devices being removed becoming allocated. This may cause severe operational consequences including loss of access for any cartridge mounted at the time of the partitioning.If VTCS is involved, any RTDs moving out of the CDS will require a VTCS CONFIG RESET to be run to remove the specific RTDs from the VTCS configuration.
-
Run the SET Freeze utility to freeze affected LSM.
To stop cartridges from migrating to the LSM of the partition being removed, run the HSC SLUADMIN SET FREEZE utility:
SET FREEZE(ON) FORLSMID(lsm-id)Note:
-
When an LSM is frozen, no new cell allocations will occur, however, any cartridge from the LSM that is currently mounted on a drive will return to its home cell.
-
Since there is one LSM in an SL3000 library, freezing the LSM is freezing the ACS.
-
-
Run the Volume Report utility.
Run a volume report on the affected ACS and keep the output. This data can be used later to verify where volumes were in the ACS before it was removed.
Systems with VTCS should run an MVC report for cross-reference purposes.
-
Eject all cartridges from the affected ACS (optional).
-
Vary the affected ACS OFFLINE to all hosts. ACSs being deleted must be offline to all hosts. Issue the HSC command:
VARY ACS acs-id OFFLINE -
Back up the CDS.
Before making changes to the CDS, it is best practice to create a backup copy for recovery purposes. This backup copy can be restored if problems are encountered to recover to a known CDS state using documented HSC recovery procedures.
Use the HSC BACKUP utility to create the backup CDS copy.
Note:
If VTCS is involved, ALL tape activity (real and virtual) must be stopped. All virtual tape drives must be varied offline to MVS. All RTDs defined in the VTCS configuration must be varied offline to VTCS. It is highly recommended that all initiators be drained that feed both real and virtual tape drive processing. HSC and VTCS must be in an idle state prior to creating the backup copy of the CDS to avoid possibility of data loss. -
Issue the HSC F CONFIG DELete ACS command.
To delete a partition(s) in an HSC Host Group, issue the HSC command as the examples below show:
F CONFIG DELETE ACS(03)
F CONFIG DELETE ACS(04)
F CONFIG DELETE ACS(05)
Note:
-
If running multiple HSC hosts, the new configuration will be propagated automatically to all hosts.
-
Deleting an ACS deletes its volumes from the CDS.
-
If the last allocated ACS is deleted, the HSC no longer has connections to any library and can be stopped. Steps 8 through 10 can be ignored.
-
-
Remove the HSC LMUPATH parameter in PARMLIB.
Remove the LMUPATH statements referencing the ACS previously defined to the LMUPDEF HSC parameter file of the affected host group.
-
Issue the HSC LMUPDEF command on all hosts.
To refresh the modified HSC LMUPDEF HSC parameter file within a host group, issue the HSC command to all hosts:
LMUPDEF DATASET(dataset.name) -
Change the SL3000 configuration to remove the affected partition from the library (optional).
The internal configuration file in the SL3000 may be changed to remove the partition. This change happens through the SLConsole.
-
Vary all ACSs connected to the library ONLINE to all hosts. Issue the HSC command:
Vary ACS acs-id OnlineThe HSC retains the online/offline status of each pre-existing LSM. If the LSM is not modified online when the ACS is varied online, issue the HSC command:
MODIFY LSM lsm-id ONLINENo additional mounts will occur to the ACS until the ACS is varied online. All other hosts will complete their configuration process when the ACS is varied online.
-
Vary drives ONLINE to MVS (if necessary). From the MVS console, issue the following command to see if the new drives are online to MVS:
D U,,,xxx-yyywhere xxx-yyy is the drive ID range (both real and virtual). If they are not, bring the real drives online with the MVS command:
VARY xxx-yyy ONLINE -
Vary RTDs ONLINE to VTCS (if necessary). From the MVS console, issue:
V RTD(rtd_id) ONfor the RTDs that reside on the LSMs being allocated.
Note:
Virtual tape environments will be required to vary any RTDs online to VTCS. Additionally, any virtual tape drives varied offline will need to be varied online to MVS. -
Re-synchronize the SMC. Issue the SMC RESYNCHRONIZE command.
The partition is removed from the library, and the remaining library resources are available for use.
Moving a Partition from One Host Group to another Host Group
This procedure moves a partition from one host group to another and preserves the history of the partition volumes being allocated.
Note:
If this is the last ACS in the "from" HSC host group, only steps 1 through 4 may apply. At this time, the "from" HSC can be stopped. Proceed with Steps 9 through 20."From" Host Group:
-
Stop activity for all ACSs connected to the library.
In preparation for moving the partition, you must stop all CAP and tape activity (both real and virtual), from all active hosts, including virtual tape processing, in that ACS of the host group of where the partition is moving from. Failure to do this will result in lost cartridges and errors on dismount.
Vary drives offline to all MVS hosts that will no longer have access to the drives. From the MVS console, issue the following command to see if the drives in the affected LSM are offline to MVS.
D U,,,xxx-yyywhere xxx-yyy is the drive ID or UCB range. If they are not, bring them offline with the MVS command:
VARY xxx-yyy OFFLINEAdditionally, any RTDs that reside on the affected LSM will need to be varied offline. To do this issue the VTCS command:
V RTD(rtd_id) OFFCaution:
Failure to perform this step to vary these drives offline from MVS will result in these devices becoming allocated while removing the LSM from the partition. This may cause severe operational consequences including loss of access for any cartridge that was mounted at the time of the partitioning.If VTCS is involved, any RTDs moving out of the CDS of the "from host group" will require a VTCS CONFIG RESET to be run to remove the specific RTDs from the VTCS configuration.
-
Run the Volume Report utility. Run a volume report on the affected ACS and keep the output. This data can be used later to verify where volumes were in the ACS before it was relocated.
Note:
Systems with VTCS should run an MVC report for cross reference purposes. -
Vary the ACS being removed OFFLINE to all hosts. The ACS must be offline to all hosts. Issue the HSC command:
VARY ACS acs-id OFFLINE -
Back up the CDS (CDS01). Use the HSC BACKUP utility to create the backup CDS copy as CDS01.
-
Remove the HSC LMUPATH parameter in PARMLIB. Remove the LMUPATH statements referencing the partition previously defined to the LMUPDEF HSC parameter file.
-
Issue the HSC LMUPDEF command on all hosts. To refresh the modified HSC LMUPDEF HSC parameter file within a host group, issue the HSC command to all hosts:
LMUPDEF DATASET(dataset.name) -
Issue the HSC F CONFIG DELete ACS command.
To delete a partition from a HSC Host Group, issue the HSC command as in the examples below:
F CONFIG DELETE ACS(03)
F CONFIG DELETE ACS(04)
F CONFIG DELETE ACS(05)
Note:
-
If you are running multiple HSC hosts, the new configuration will be propagated automatically to all hosts.
-
Deleting an ACS deletes its volumes from the CDS.
-
-
Re-synchronize the SMC. To add drives for the SMC, issue the SMC RESYNCHRONIZE command.
"To" Host Group:
-
Back up the CDS (CDS02). Use the HSC BACKUP utility to create the backup CDS copy as CDS02.
-
Issue the HSC F CONFIG ADD ACSType command.
To add a partition to an HSC Host Group, issue the HSC command as in the examples below:
F CONFIG ADD ACST(SL3000)
F CONFIG ADD ACST(SL8500)
Note:
If running multiple HSC hosts, the new configuration will be propagated automatically to all hosts. -
Add the HSC LMUPATH statement in PARMLIB. Add an HSC LMUPATH statement in LMUPDEF in PARMLIB.
For example:
LMUPATH ACS(acs-id) LMUADDR(ip-address) PARTID(nnn)
-
Issue the HSC LMUPDEF command on all hosts. To activate the modified HSC LMUPATH statement, issue the HSC command:
LMUPDEF DATASET(dataset.name) -
Set the Service Level to BASE for all hosts.
Set the service level to BASE for the host group to allow a MERGEcds to be started. Issue the HSC command:
SRVLEV BASE
-
Run the MERGEcds utility.
Input will be CDS01. Output will be an updated CDS02. This example will move the ACS volume history from ACS 00 (CDS01) to ACS 04.
Note:
-
If merging a non-VTCS ACS into a VTCS ACS, the REALonly parameter is necessary on the MERGEcds.
-
After MERGEcds, if scratch volumes exist, update and reload the SCRPDEF, VOLDEF, and TAPEREQ PARMLIB members accordingly.
//jobcard
//STEP1    EXEC PGM=SLUADMIN,PARM='MIXED'
//STEPLIB  DD  DISP=SHR,DSN=dataset.name
//*
//SLSPRINT DD  SYSOUT=*
//*
//SLSFCNTL  DD DSN=CDS01.primary,DISP=SHR
//*
//SLSIN    DD  *
  MERGECDS
//SLSMERGE DD  *
  MERGE FACS(00) TACS(04)
/*
//
-
-
Run the SET SLIDRIVS utility.
Add drives to the new ACS of the "to host group" by running the SLUADMIN utility or command for SET SLIDRIVS.
SET SLIDRIVS(drv1,drv2,drv3,,,,,,,,,,,,,) +
FORLSMID(lsm-id),FORPANEL(12)
Note:
If VTCS is involved, any RTDs moving into the CDS will require a VTCS CONFIG RESET to be run to add the specific RTDs to the VTCS configuration. -
Set the Service Level to FULL for all hosts. Set the service level to FULL for the host group after the MERGEcds has completed. Issue the HSC command:
SRVLEV FULL
-
Run the HSC Scratch Update utility (if necessary). Run an HSC Scratch Update utility.
This step may be bypassed if no volumes have been added, deleted, or moved. It must be run if new LSMs have been added to the configuration.
Adding Resources to a Library
This procedure allows resources to be added to an existing library Library or partition within the Library defined as an ACS. Resource additions can consist of cells, drives, drive bays, CAPs, expansion module, and the SL3000 dual Tallbot.
Caution:
-
If you are changing the library configuration, for example, changing UPC labels, the cartridges in the cells being removed must be ejected or moved, and the cells being removed must be unassigned to all partitions using the SLConsole prior to physically adding the library resources.
-
When you are using the SLConsole to add ACS resources, make all necessary changes at the same time and issue one APPLY. The HSC performs a reconfiguration every time an SLConsole partition APPLY occurs.
-
Stop activity for all ACSs connected to the library.
In preparation for adding resources to the library, stop all CAP and tape activity (both real and virtual) from all active hosts in that library, including RTD tape processing. Failure to do this will result in lost cartridges and errors on dismount.
Vary drives offline to ALL MVS hosts that will no longer have access to the drives. From the MVS console, issue the following command to see if the drives in the affected LSM are offline to MVS.
D U,,,xxx-yyywhere xxx-yyy is the drive ID or UCB range. If not, vary the drives offline with the MVS command:
VARY xxx-yyy OFFLINEAdditionally, any RTDs that reside on the affected LSM will need to be varied offline. To do this, issue the VTCS command:
V RTD(rtd_id) OFFCaution:
Failure to perform this step may result in the devices being removed becoming allocated. This may cause severe operational consequences including loss of access for any cartridge mounted at the time of the non-partitioning.If VTCS is involved, any RTDs moving out of the CDS of the host groups affected will require a VTCS CONFIG RESET to be run to remove the specific RTDs from the VTCS configuration.
-
Back up the CDS containing the ACS to be changed. Use the HSC BACKUP utility to create the backup CDS copy.
Note:
If VTCS is involved, all CAP and tape activity (real and virtual) must be stopped. All virtual tape drives must be varied offline to MVS. All RTDs defined in the VTCS configuration must be varied offline to VTCS.It is highly recommended that all initiators be drained that feed both real and virtual tape drive processing. NCS and VTCS must be in an idle state prior to creating the backup copy of the CDS to avoid possibility of data loss.
-
Vary all ACSs connected to the library OFFLINE to all hosts. ALL ACSs connected to the library must be offline to all hosts. Issue the HSC command:
VARY ACS acs-id OFFLINE
-
Change the Library configuration to the affected ACS.
The internal configuration file in the Library is changed to reconfigure the ACS, i.e., adding or deleting cell allocations or changing the exclusivity status of a CAP. This change is accomplished through the SLConsole.
-
CAPs:
-
If assigning a CAP, use the SLConsole to assign the CAP to only one partition (dedicated) or a set of partitions (shared).
-
Only dedicated SL3000 CAPs can be set to auto. All SL8500 CAPs in a partitioned library are shared.
-
Prior to reassigning a CAP, it must be set to manual.
-
If installing a CAP, verify the cells that occupied the CAP space are unassigned to any partition. Assign the CAP as described in the previous bullet.
-
-
Drives – If installing or assigning a drive, use the SLConsole to assign the drive to a partition.
-
Drive Bays – If installing a drive bay, after verifying the cells are unassigned to any partition, use the SLConsole to assign the drive slots to a partition.
-
Cells – If assigning cells, use the SLConsole to assign cells to a partition.
-
SL3000:
-
Dual Tallbots – If installing a second robot, verify the outermost three columns (front and back) of each outermost Cartridge Expansion Module (CEM) are unassigned to any partition.
-
Outermost CEMs must be transformed into Parking Expansion Modules (PEMs) when installing the second robot.
-
Expansion Modules – If installing a Drive Expansion Module (DEM) no additional setup is needed. If installing a CEM to either end, no additional setup is needed
-
Prior to installing a CEM to a location other than to either end of the library (that is, between a PEM and either a CEM, DEM, or Base Drive Module) the volumes in the PEM must be either moved to available space within the partition or ejected if no space is available. After the volumes are removed from the PEM, the partitions need to unassign the cell locations.
-
-
-
Run the SET SLIDRIVS utility if adding drives (optional). Add drives to the changed ACS by running the SLUADMIN utility or command for SET SLIDRIVS.
SET SLIDRIVS(drv1,drv2,drv3,,,,,,,,,,,,,) + FORLSMID(lsm-id),FORPANEL(12)
If VTCS is involved, any RTDs moving into the CDS will require a VTCS CONFIG RESET to be run to add the specific RTDs to the VTCS configuration.
-
Vary all ACSs connected to the library ONLINE to all hosts. Issue the HSC command:
Vary ACS acs-id OnlineThe HSC retains the online/offline status of each pre-existing LSM. If the LSMs do not modify online when the ACS is varied online, issue the HSC command:
MODIFY LSM lsm-id ONLINENo additional mounts will occur to the ACS until the ACS is varied online. All other hosts will complete their configuration process when the ACS is varied online.
Note:
When an ACS is varied online, the panels are discovered to complete the configuration process. During this time, if any cartridges are discovered, an SLS4416E message will be displayed. It is important to follow the user response section of this message before proceeding to the next step. This section will instruct the user to perform the following step in the order listed:-
Run the HSC SLUADMIN Audit utility with APPLY(NO) for the panels indicated to discover and resolve issues.
-
Run the HSC SLUADMIN Volume Report utility if necessary to gather volume information.
-
Run the HSC SLUADMIN Audit utility with APPLY(YES) to apply updates to the CDS.
-
Run the HSC SLUADMIN SET Utility specifying FREEZE OFF for any panels in the frozen state. See "Varying the ACS Online After a Configuration Change" for further details of this process.
Virtual tape environments will be required to vary any RTDs online to VTCS. Additionally, any virtual tape drives varied offline will need to be varied online to MVS.
-
-
Modify CAPs ONLINE (optional). Issue the following HSC command to use CAPs that are added to the partition.
MODIFY CAP cap-id ONLINE -
Update the ACS Configuration for drives (optional). From the MVS console, issue the following command to add drives for the affected ACS to HSC.
F CONFIG UPDATE ACS(acs-id)where acs-id is the ID of the affected ACS.
-
Vary drives ONLINE to MVS if adding drives (optional). From the MVS console, issue the following command to see if the new drives are online to MVS.
D U,,,xxx-yyywhere xxx-yyy is the drive ID range (both real and virtual). If they are not, bring the real drives online with the MVS command:
VARY xxx-yyy ONLINE -
Vary drives ONLINE to VTCS if adding RTDs (optional). From the MVS console, issue:
V RTD(rtd_id) ONfor the RTDs that reside on the LSMs being allocated.
-
Re-synchronize the SMC. Issue the SMC RESYNCHRONIZE command.
If you are running multiple HSC hosts, the new configuration will be propagated automatically to all hosts in the affected host group.
Removing Resources from a Library
This procedure allows resources to be removed from an existing Library or partition of a Library defined as an ACS. Resource removal can consist of cells, drives, drive bays, CAPs, expansion modules and SL3000 dual Tallbot.
Note:
When you are using the SLConsole to remove ACS resources, make all necessary changes at the same time and issue one APPLY. The HSC performs a reconfiguration every time an SLConsole partition APPLY occurs.-
Back up the CDS containing the ACS to be changed. Use the HSC BACKUP utility to create the backup CDS copy.
Note:
If VTCS is involved, ALL CAP and tape activity (real and virtual) must be stopped. All virtual tape drives must be varied offline to MVS. All RTDs defined in the VTCS configuration must be varied offline to VTCS. It is highly recommended that all initiators be drained that feed both real and virtual tape drive processing. HSC and VTCS must be in an idle state prior to creating the backup copy of the CDS to avoid possibility of data loss. -
Stop activity for all ACSs connected to the library.
In preparation for removing resources from the library, stop all CAP and tape activity (both real and virtual) from all active hosts in that ACS, including RTD tape processing. Failure to do this will result in lost cartridges and errors on dismount.
Vary drives offline to ALL MVS hosts that will no longer have access to the drives. From the MVS console, issue the following command to see if the drives in the affected LSM are offline to MVS.
D U,,,xxx-yyywhere xxx-yyy is the drive ID or UCB range. If not, vary the drives offline with the MVS command:
VARY xxx-yyy OFFLINEAdditionally, any RTDs that reside on the affected LSM will need to be varied offline. To do this, issue the VTCS command:
V RTD(rtd_id) OFFCaution:
Failure to perform this step may result in the devices being removed becoming allocated. This may cause severe operational consequences including loss of access for any cartridge mounted at the time of the partitioning.If VTCS is involved, any RTDs moving out of the CDS will require a VTCS CONFIG RESET to be run to add the specific RTDs from the VTCS configuration.
-
Eject cartridges out of the affected cells to be removed (optional). If cells to be removed contain cartridges, optionally eject all cartridges from the affected ACS.
-
Vary drives OFFLINE to MVS if removing drives (optional). From the MVS console, issue the following command to see if the new drives are offline to MVS.
D U,,,xxx-yyywhere xxx-yyy is the drive ID range (both real and virtual). If they are not, vary the real drives offline with the MVS command:
VARY xxx-yyy OFFLINE -
Vary drives OFFLINE to VTCS if removing RTDs (optional). From the MVS console, issue:
V RTD(rtd_id) OFFfor the RTDs that reside in the LSMs being unallocated.
-
Modify affected CAPs OFFLINE (optional). Issue the following HSC command to no longer use CAPs that are removed from the partition.
MODIFY CAP cap-id OFFLINE -
Vary all ACSs connected to the library OFFLINE to all hosts. All ACSs must be offline to all hosts. Issue the HSC command:
VARY ACS acs-id OFFLINE -
Run the SET SLIDRIVS utility if deleting drives (optional).
Delete drives to the changed partition (ACS) by running the SLUADMIN utility or command for SET SLIDRIVS.
SET SLIDRIVS(,,,,,,,,,,,,,,,,) +
FORLSMID(lsm-id),FORPANEL(12)
Note:
If VTCS is involved, any RTDs moving out of the CDS will require a VTCS CONFIG RESET to be run to remove the specific RTDs from the VTCS configuration. -
Change the Library configuration.
The internal configuration file in the SL3000 must be changed to reconfigure the ACS. This change is made through the SLConsole.
-
CAPs:
-
If removing a CAP, use the SLConsole to unassign the CAP from all partitions.
-
If unassigning a CAP,verify the CAP is in manual mode. Use the SLConsole to unassign the CAP from one or more partitions.
-
-
Drives – If removing or unassigning a drive, use the SLConsole to unassign the drive from the partition.
-
Drive Bays – If removing a drive bay, use the SLConsole to unassign the drive slots from their partition.
-
Cells – If unassigning cells, use the SLConsole to unassign cells from the partition.
-
Cartridges left in unassigned cells will become orphaned.
-
SL3000:
-
Dual Tallbots:
If removing a second robot, no additional setup is needed.
Outermost PEMs must be transformed into CEMs when removing the second robot.
Outermost PEMs must be transformed into CEMs when removing the second robot.
-
Expansion Modules:
ATTENTION: Prior to removing a DEM, cartridges must be either moved to available space or ejected if space is not available. After the volumes are removed from the DEM, the partitions need to unassign the cell locations.
ATTENTION: Prior to removing a CEM from the library, cartridges must be either moved to available space or ejected if space is not available. After the volumes are removed from the CEM, the partitions need to unassign the cell locations.
ATTENTION: Prior to removing a CEM from a location other than from either end of the library (i.e., between a PEM and either a CEM, DEM or Base Drive Module) the volumes in the PEM must be either moved to available space within the partition or ejected if no space is available. After the volumes are removed from the PEM, the partitions need to unassign the cell locations.
-
-
-
Vary all ACSs connected to the library ONLINE to all hosts. Issue the HSC command:
Vary ACS acs-id OnlineThe HSC retains the online/offline status of each pre-existing LSM. If the LSMs do not modify online when the ACS is varied online, issue the HSC command:
MODIFY LSM lsm-id ONLINENo additional mounts will occur to the ACS until the ACS is varied online. All other hosts will complete their configuration process when the ACS is varied online.
Note:
-
Virtual tape environments will be required to vary any RTDs online to VTCS. Additionally, any virtual tape drives varied offline will need to be varied online to MVS.
-
Refer to "Varying the ACS Online After a Configuration Change" for further details of this process.
-
-
Re-synchronize the SMC. Issue the SMC RESYNCHRONIZE command.
If you are running multiple HSC hosts, the new configuration will be propagated automatically to all hosts.
Changing the CAP State for Bulk CAP - HSC Down
This procedure details how you can add a Bulk CAP to a partition or remove a Bulk CAP from a partition while the HSC is down.
-
Using the SLC, add the CAP(s) to the partition(s) or remove the CAP(s) from the partition(s) and then apply the changes. See the SL8500 User's Guide for information.
-
Start HSC and wait for initialization to complete. See "Starting and Stopping HSC."
During startup, reconfiguration starts. Wait for reconfiguration to complete.
-
If the LSMs affected are offline:
-
Enter
MODify LSM (lsm-range)ONlinewhere lsm-range is a range of LSMs where the CAP changes are being made.
-
Enter Display Cap to verify the CAP changes to the library.
-
Start HSC activity.
-
-
If the LSMs affected are online:
-
Enter Display Cap to verify the CAP changes to the library.
-
Start HSC activity.
-
Changing the CAP State for Bulk CAP - HSC Up
This procedure details how you can add a Bulk CAP to a partition or remove a Bulk CAP from a partition while the HSC is up.
-
Enter
MODify LSM (lsm-range) OFFlinewhere lsm-range is the range of LSMs where the CAP changes are being made.
-
Stop all HSC activity.
-
Using the SLC, add the CAP(s) to the partition(s) or remove the CAP(s) from the partition(s) and then apply the changes. See the SL8500 User's Guide for information.
Reconfiguration starts. Wait for reconfiguration to complete.
-
Enter
MODify LSM (lsm-range) ONlinewhere lsm-range is the range of LSMs where the CAP changes are being made.
-
Enter
Display Capto verify the CAP changes to the library. -
Start HSC activity.
Varying the ACS Online After a Configuration Change
In several partitioning procedures, there is a ”vary ACS online” step that needs to be performed when a hardware configuration change is completed for an SL3000 library. When this step is executed, the HSC will run a reconfiguration for the ACS that is affected. During Reconfiguration of an ACS, the following occurs:
-
The ACS configuration containing details of the LSM is read from the library.
-
CAP and drive configuration information are read from the library.
-
Library configuration information (LSM, CAP, and drive) is then synchronized with the equivalent information in the HSC database.
-
LSM cell geography is discovered and updated in the HSC database.
Below is an HSC log example of an SL3000 ACS that change from a library with a Basic Expansion Module (BEM) to a library with a BEM, a DEM, and 2 CEMs:
/SLS0000I V ACS 00 ONLINE
/SLS4459I Library configuration changes started
/SLS4400I HSC dynamic reconfiguration initiated
/SLS0668I LSM 00:00 READY; TEMP OUTAGE QUEUE WILL BE RE-DRIVEN.
/SLS0054I ACS 00 now ONLINE
/SLS4415I Configuration change for LSM 00:00, total cells increased by
   1,148, free cells increased by 748
/SLS4419I CAP 00:00:04 status changed from UNALLOCATED to OFFLINE
/SLS4419I CAP 00:00:05 status changed from UNALLOCATED to OFFLINE
/SLS4419I CAP 00:00:07 status changed from UNALLOCATED to OFFLINE
/SLS1969I User exit 06 module SLSUX06 INACTIVE
/SLS4407I HSC dynamic reconfiguration processing has ended.
/SLS4460I Library configuration changes complete on ECCL