| Oracle® Retail Xstore Point of Service Manager's Guide Release 18.0 F12255-02 |
|

 Previous |
 Next |
| Oracle® Retail Xstore Point of Service Manager's Guide Release 18.0 F12255-02 |
|
Previous |
Next |
A store can function 24 hours a day and seven days a week.
If your system is configured to support a 24 hour store environment, the store will perform a rolling close on registers. Each register will be rolled over to the next retail period (business day) one by one; always keeping at least one register available for use.
A retail period is the period in which the retailer defines as their store hours (for example, 12:00 am - 11:59 pm).
A retail session is defined as the time in which a register is opened until it's closed. Multiple retail sessions can occur within a retail period.
The 24 hour store environment is supported for both register accountability and till accountability. Register accountability is where a till is assigned to a register and can be used by any cashier that uses the register. Till accountability is where a till is assigned to a specific cashier. The assigned till can be attached to any register the cashier may work on during the day.
Deferred cash management allows the retailer to open a store on the next business day without reconciling, closing the store, or ending the retail period. These processes have been separated so they can be completed at a later date.
This chapter covers the following topics:
Full store opening is usually only done with the first initial opening of the store. It is performed on only one register. The store open procedure signals that the store is open to all registers. See Opening the Store for more information.
Once the store is open, sales cannot be rung until the register is opened and a till is counted for the register.
For systems using 24/7 trading, the register open process must be performed on each register every day. Depending upon the configuration of your system and the time that the register is opened, the system may prompt you to open the register for the previous day or the next day.
You have different options to configure the system about the desired process in the 24 hour environment. During the 24 hour flow, the system may ask the cashier to re-open the register during the close register process automatically. Alternatively, the register is not opened automatically, which would require the cashier to log in to open the register.
Depending on your system's configuration, the float can be configured so:
the cashier is prompted to enter the float amount
the cashier starts with the pre-defined float
the remaining cash balance on the register being carried over as the new float amount
the remaining cash currencies being adjusted to the approximate default, known as the Float Balance
Once the float has been defined, the register is open and the new retail session has begun.
After an open register is approaching the end of a retail period, Warning Messages are displayed to encourage the closing of the register and to move to the next retail period. You can continue to perform transactions on the register until the end of a configurable grace period. At the end of the grace period, you must close the register. This ensures that all the registers are moved forward to the next retail period.
The rolling close process is separated from the register reconciliation process in a register accountability configuration. This means that register reconciliation is not required before closing a register or retail period.
If the register is configured to open automatically after the Register/Till Close process without user interaction, you may be prompted to enter a new amount or a new till is inserted into the drawer with a pre-determined float amount.
Use the following steps to complete a full daily cycle:
To open a register that is configured for 24/7 trading, follow these steps:
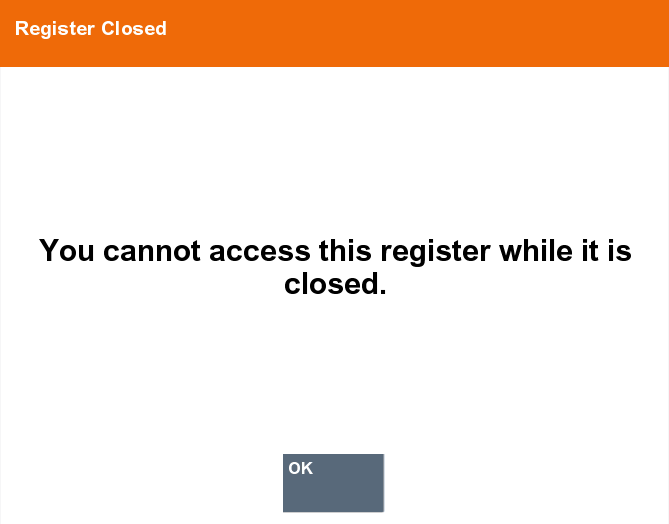
When you attempt to log in to the system, Oracle Retail Xstore Point-of- Service determines the status of the register and store. If the register status is closed, a Register Closed message displays if configured to do so. Press OK to close the message.
The red register indicator on the status bar also shows that the register is closed.
|
Note: If you are using a touch-screen, tap the red register status bar to open the register. The focus bar prompts for your employee ID and password. Enter the information when prompted. Proceed to step 7. |
Select the Back Office option on the Register menu to open the register from the Back Office Main Menu.
|
Note: Access to the back office functions is controlled by security levels. You must have the correct security privileges to access the Back Office. |
Oracle Retail Xstore Point-of-Service prompts for your employee ID to log in to the back office. Enter your employee ID and then press Enter.
|
Note: If your system is set up to use a Biometric Fingerprint device, an Employee ID Login prompt displays. Use the device to scan your fingerprint rather than entering your user ID and password.Scanned and keyed entry is also supported at this prompt.  |
Oracle Retail Xstore Point-of-Service prompts for your employee password to complete the login process. Enter your employee password and then press Enter.
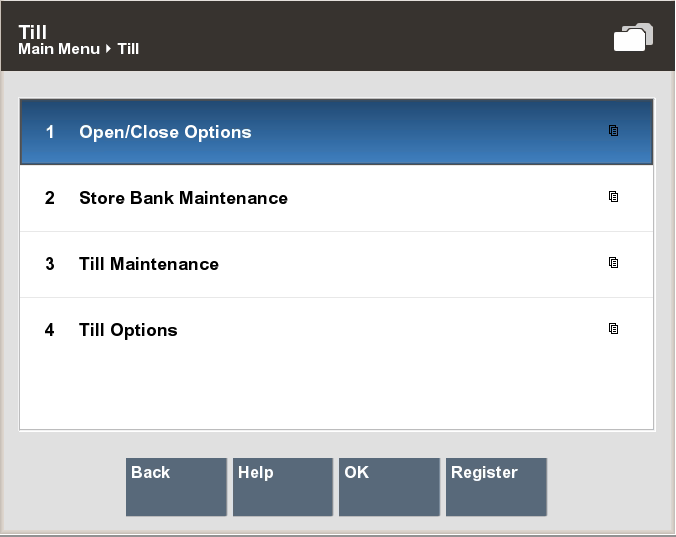
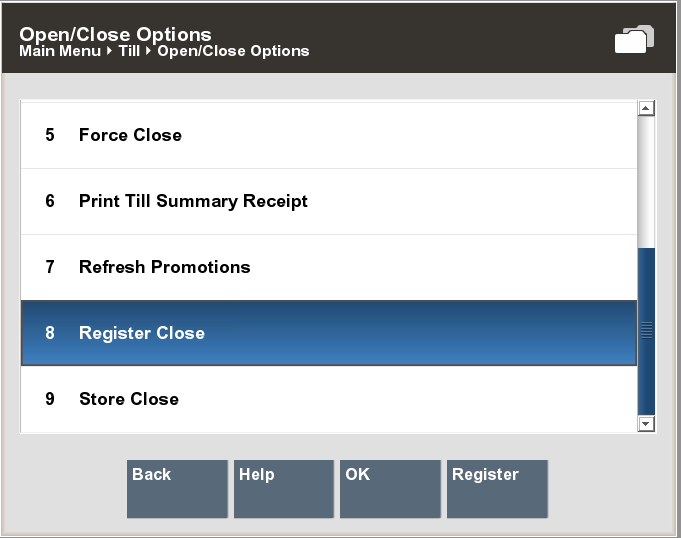
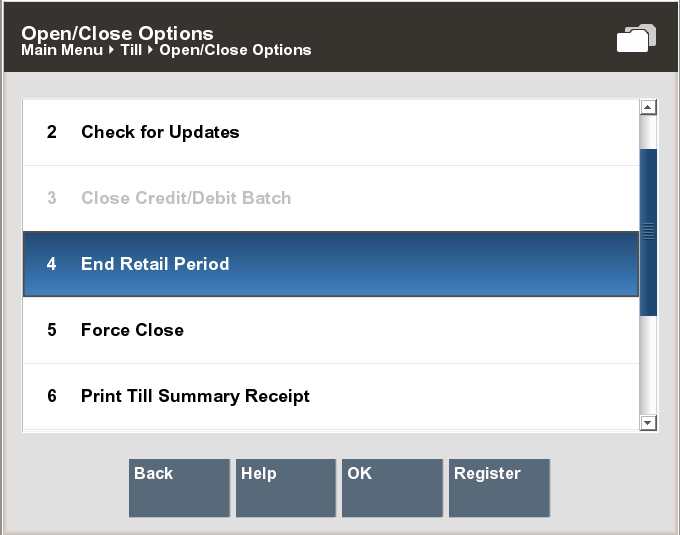
At the Back Office Main Menu, select Till and then the Open/Close Options option and press Enter, or press the number associated with the menu option on the keyboard to display the Open/Close Options menu.
At the Open/Close Options menu, select the Register Open option and press Enter, or press the number associated with the menu option on the keyboard.
|
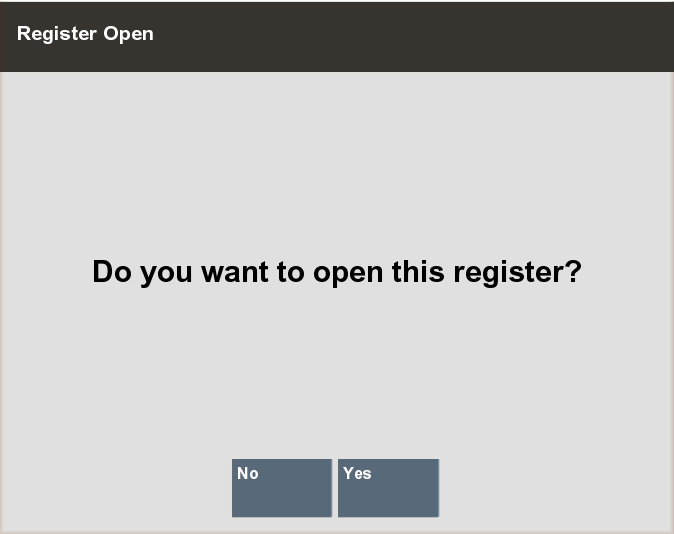
Note: The Register menu option toggles between Open and Close. If the available menu option is Register Close, the register is currently open. If the available menu option is Register Open, the register is currently closed. |
Xstore prompts: Do you want to open this register? Press Yes to confirm that you want to open this register.
|
Note: The following prompts are optional depending on your configuration:
|
Depending upon your system configuration, there are different float options when opening the till:
For example, if Prompt for Float is configured, all money is removed during close. A new till is inserted and counted during open. You are required to enter the float value.
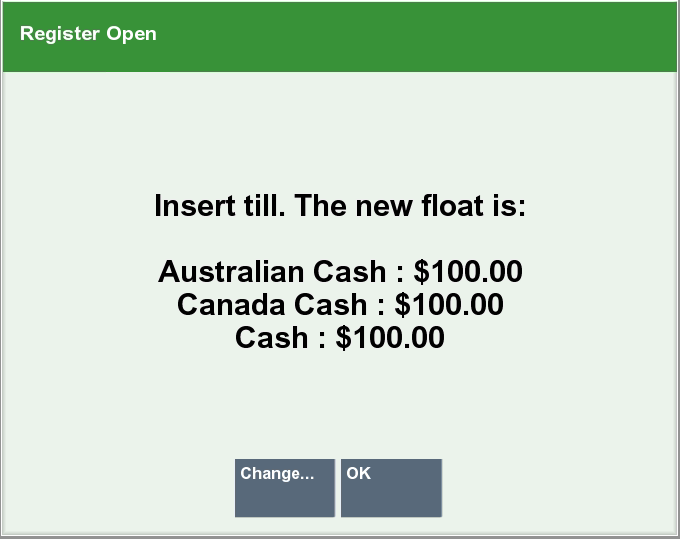
If Pre-defined Float is configured, all money is removed during close. A new till is inserted during open but not counted. You are prompted to insert the till. The float amount of the till is displayed.
Press OK to confirm the float amount.
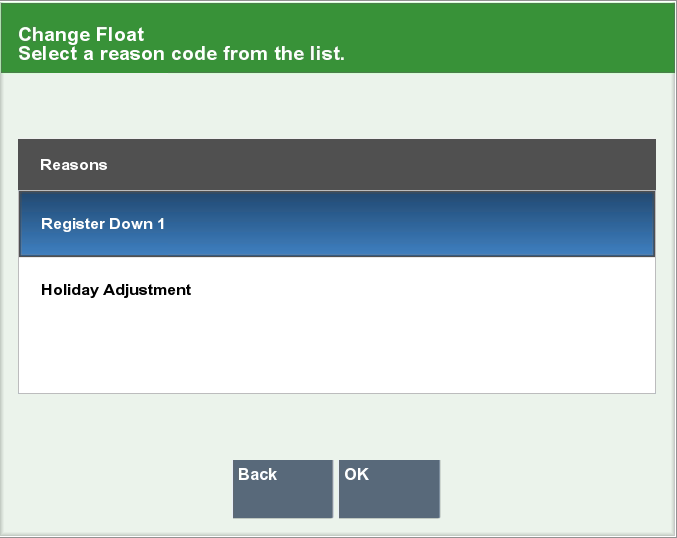
Press Change Float to enter a new float amount for the till.
You are prompted for a reason.
Select the reason and press OK.
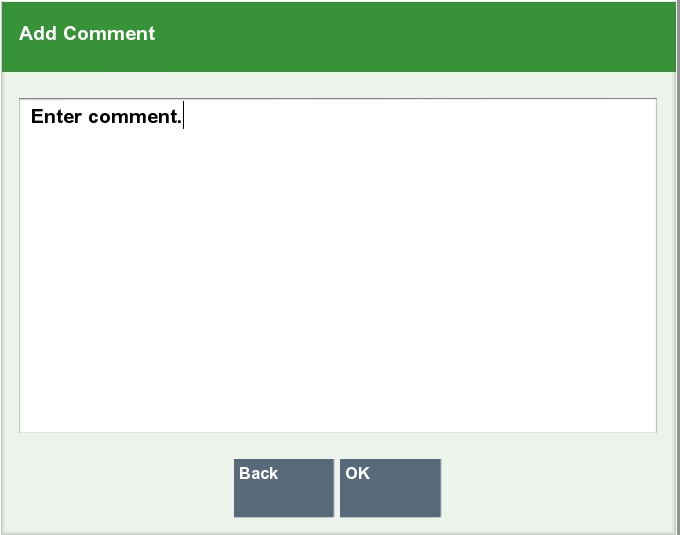
You are prompted to enter a comment.
If necessary, enter additional comments and press OK.
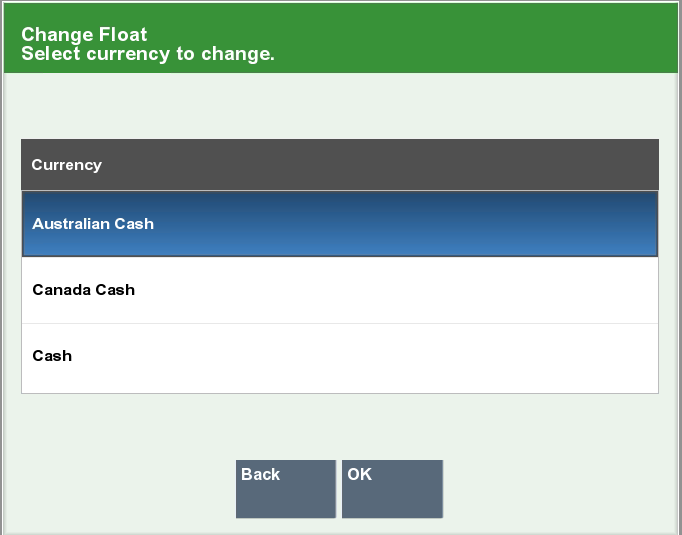
Select a currency to change.
Enter the new amount in the Change Float Amount field.
Press the Enter button.
Click Yes to confirm the new amount. Return to the Insert Till screen.
If necessary, click Change to repeat theses steps for a different currency.
If the Carried Over Float Amount is configured, all cash is left in the drawer and you are prompted to remove all non-cash tenders (that is, checks, traveler's checks and so on). During the register open process, the end balance of the register during the register close process is carried over to the next retail period as the new float amount. You are not prompted to count the drawer at register open.
If Float Balance is configured, during the register close process, you are prompted to perform a cash pickup to skim the till to match the approximate float amount. You are also prompted to remove all non-cash tenders (that is, checks, traveler's checks and so on).
If there are suspended transactions from the previous retail period, the transactions are displayed. Press OK to cancel these transactions.
|
Note: You can configure the time period to look back when searching for suspended transactions. By default all suspended transactions older than 12 hours are cancelled. |
You can start your sales transactions as the new retail session has begun.
Register/Till reconciliation is performed separately from the Register/Till Close process and is used to count drawers after the register is closed. It is not necessary to reconcile before the register is opened again and can be performed at a later date.
Reconcile Register is used when in Register Accountability mode and Reconcile Till when in Till Accountability mode.
In a register accountability configuration, it is not mandatory to complete register reconciliation before closing a register or business period. To begin the register reconciliation process, at least one register must be closed.
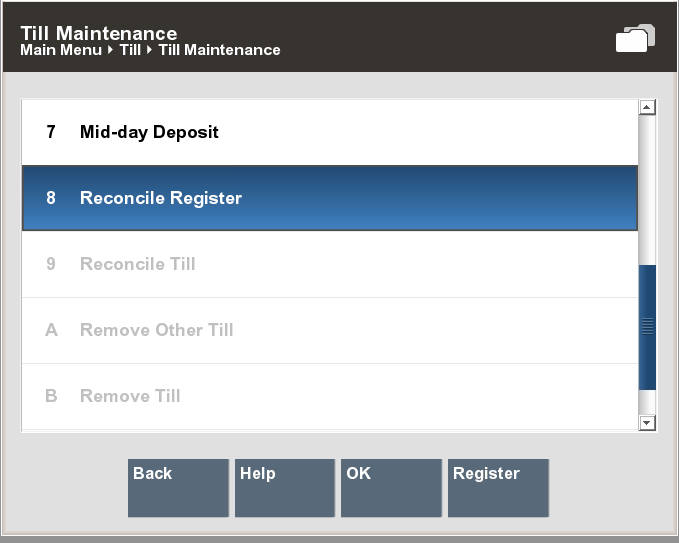
At the Back Office Main Menu, select Till Maintenance and press Reconcile Register/Till.
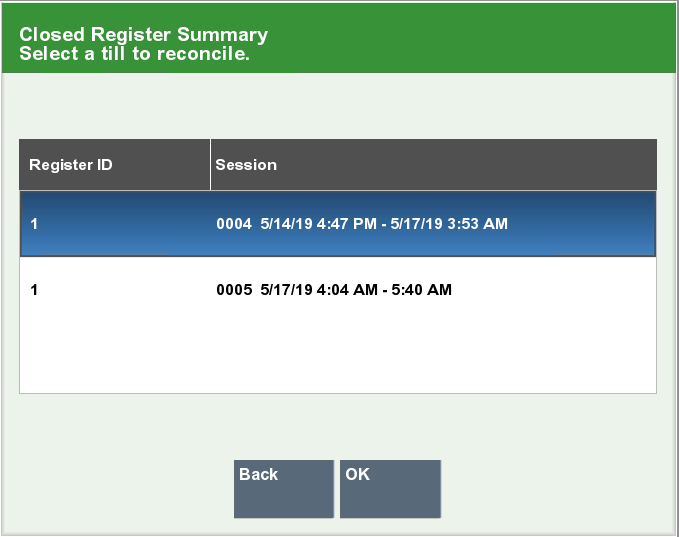
The Closed Register Summary list displays.
Select a till to reconcile. Each one is counted individually.
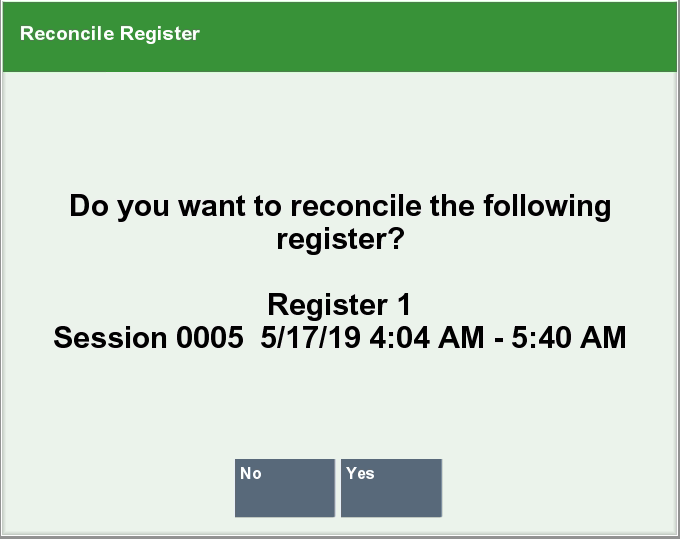
Select Yes to confirm the correct register is selected.
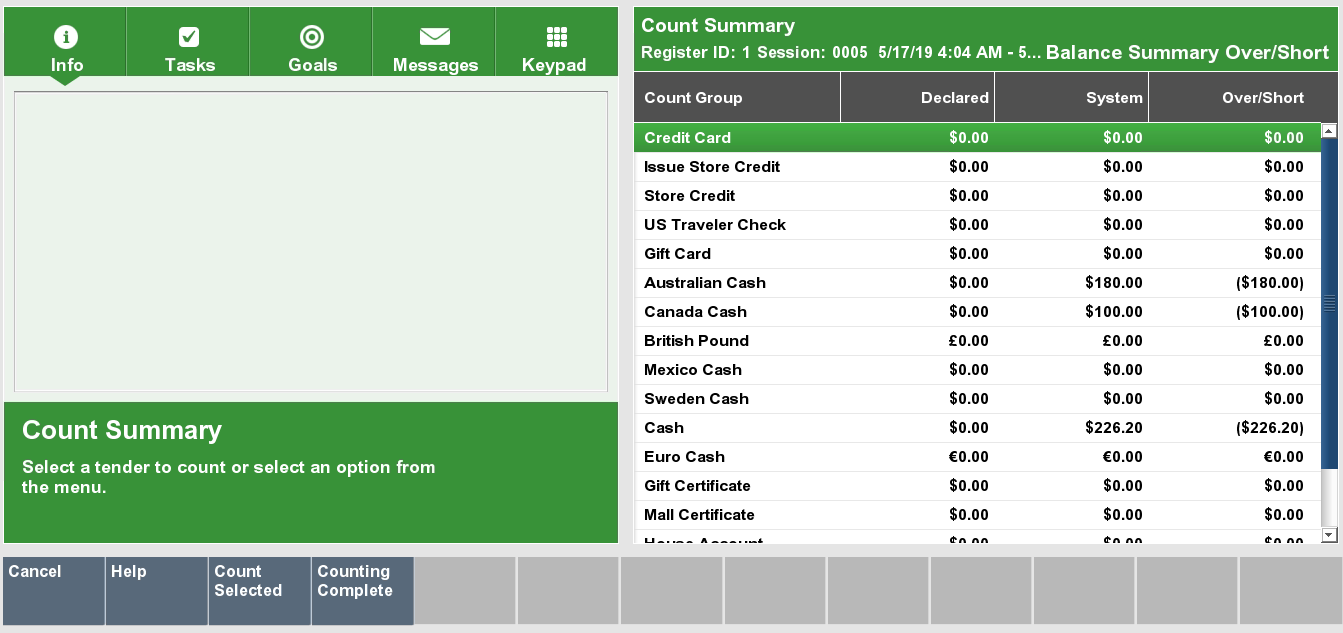
All available tender types are displayed in the Count Summary screen, with the following amounts.
Declared Amount: The declared amount is the amount you enter in the Denomination Count screen.
System Amount: The system amount is the expected amount from the system.
Over/Short Amount: The over/short amount shows the difference between system and declared amount.
You are prompted to select a tender type for the till reconcile.
Select a tender type and press Select Count.
Depending on the configuration of the selected tender type, the displayed screens vary.
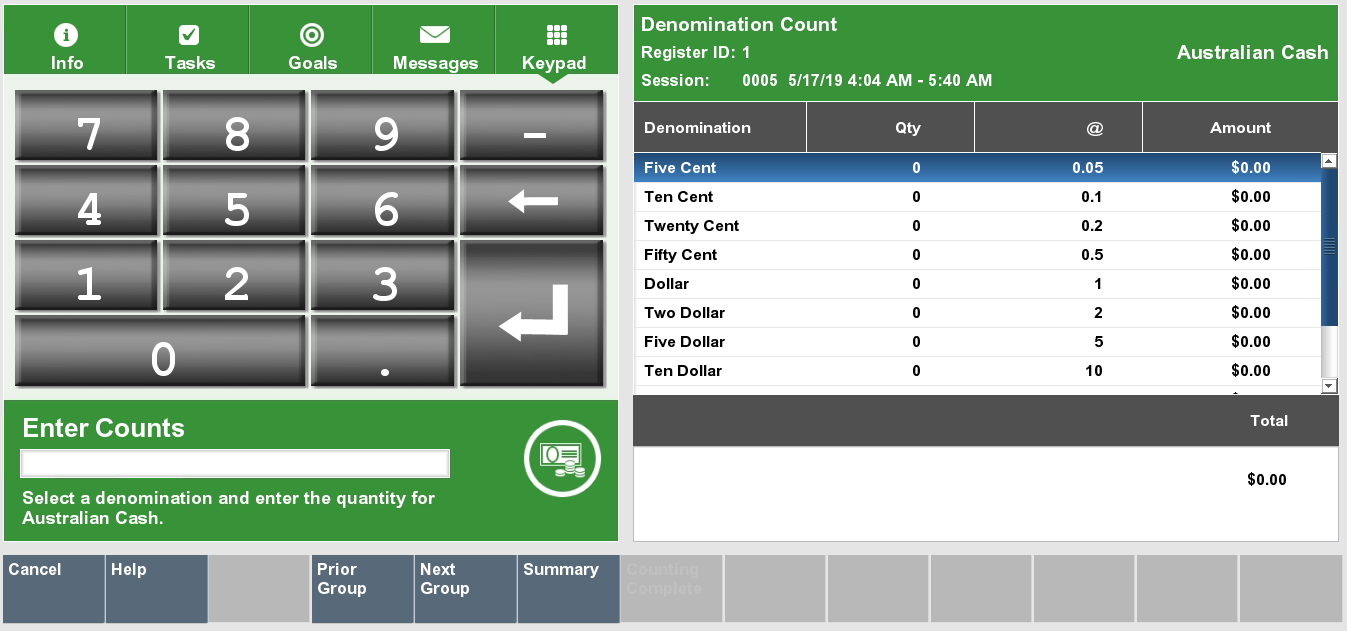
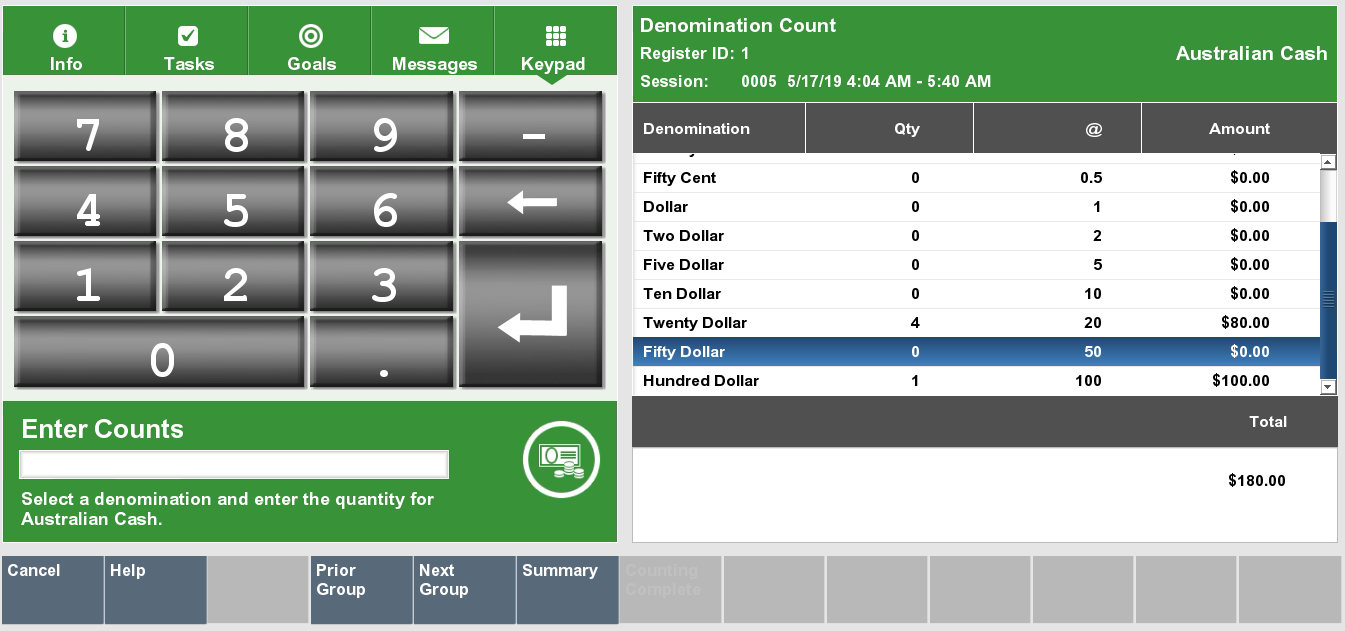
The Denomination Count screen appears.
You are prompted to select a denomination and enter the quantity.
Select a denomination. Enter the quantity and press Confirm Entry. The amount for the denomination and the total amount are displayed on the Sales Display Panel.
Repeat this process for all available denominations.
After you have entered all denominations for the tender type, press Complete. The system returns to the Count Summary.
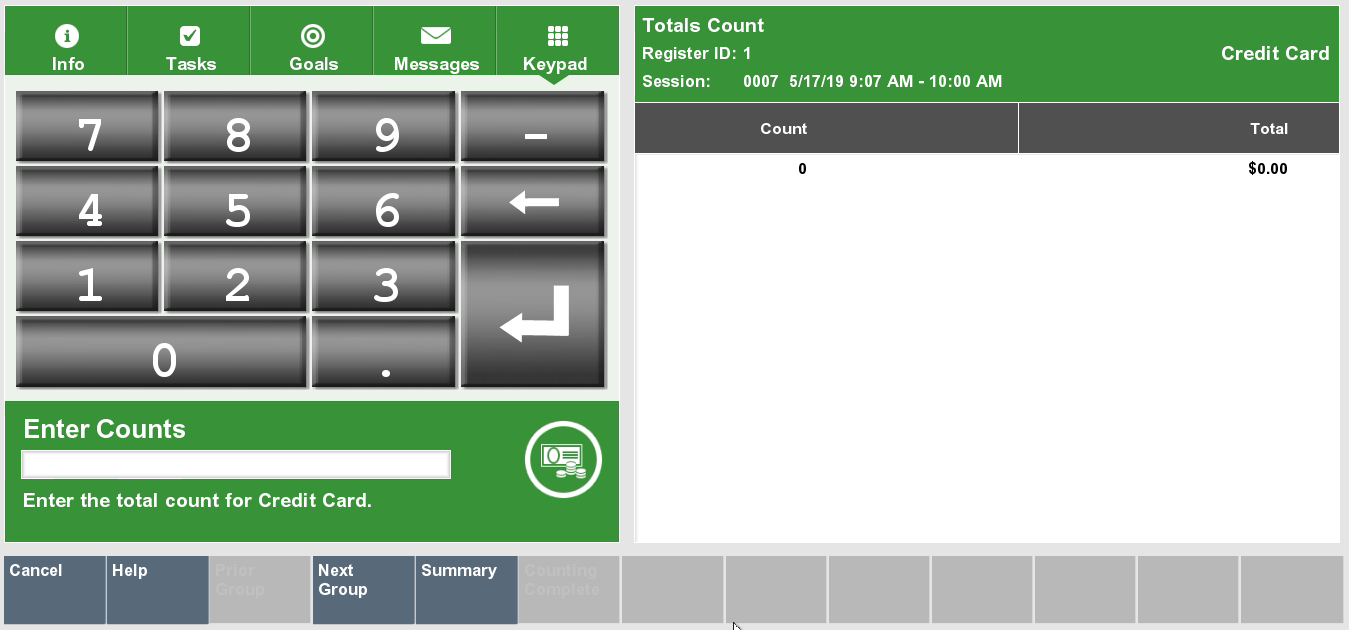
If no denominations are configured, the Total Count screen appears.
You are prompted to enter the total count for the selected tender type.
Enter the total count and press Confirm Entry. The count is displayed on the Sales Display Panel.
You are prompted for the total amount of the selected tender type.
Enter the total amount and press Confirm Amount. The total amount is displayed on the Sales Display Panel.
Then select Complete. The system returns to the Count Summary.
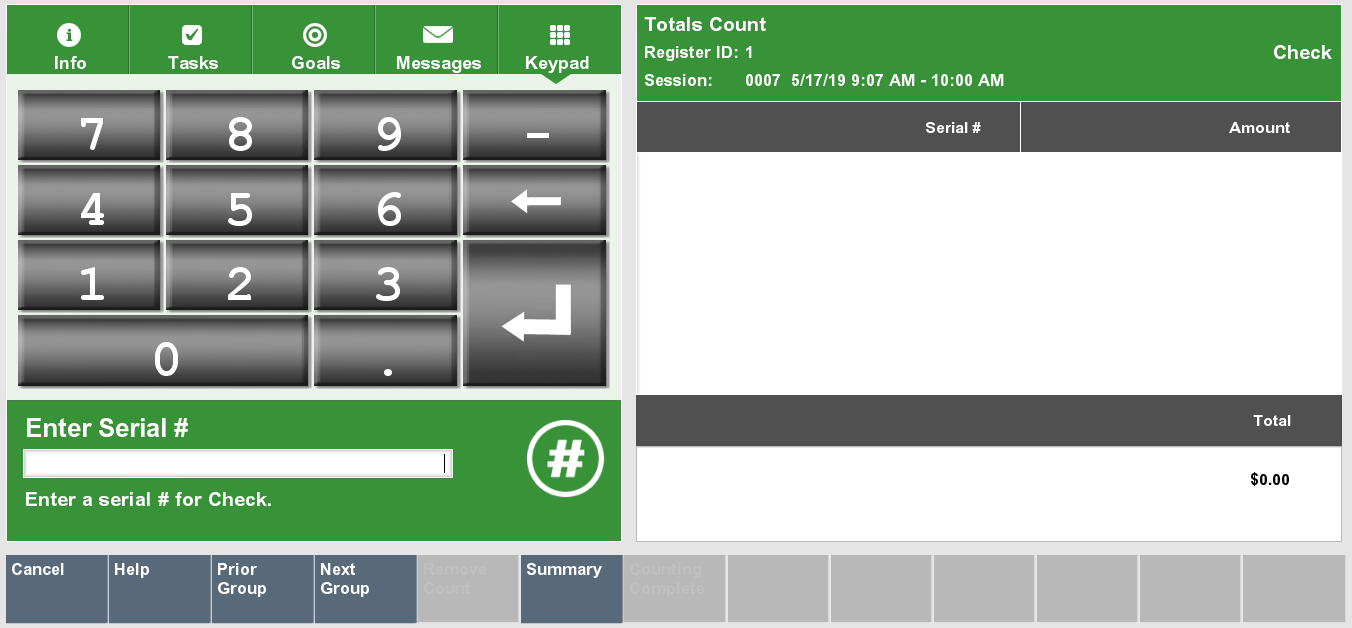
If the Check tender type is selected to count, the Totals Count screen is displayed.
You are prompted to enter the serial number for the tender type.
Enter the serial number and press Confirm Entry.
You are prompted for the amount of the selected tender type.
Enter the amount and press Confirm Amount. The serial number and the entered amount are displayed on the Sales Display Panel.
Then press Complete. The system returns to the Count Summary.
|
Note: Use the Remove Count button to remove an entered count from the Sales Display Panel. |
Depending whether or not your till is out of balance the displayed message varies.
Out of balance: If tender types are out of balance, you are prompted to accept the difference.
Yes - accept the difference and close register.
You are prompted for the reason. Select the reason and press OK.
You can also add additional comments. Enter a comment and press OK.
No - repeat till count again.
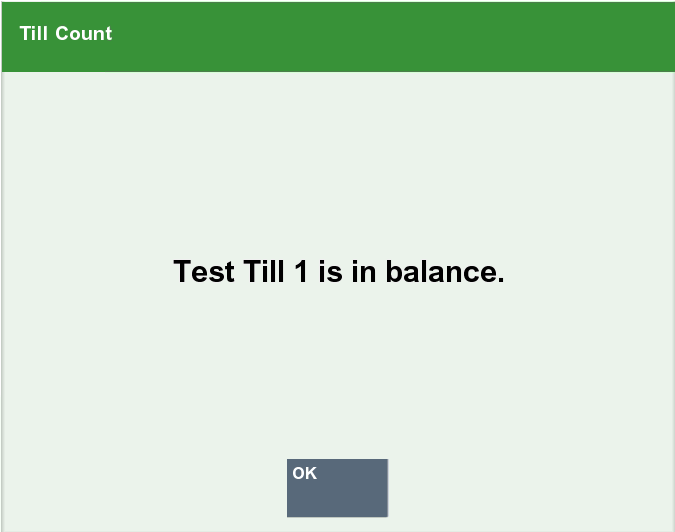
In balance: If all entered tender types are in balance, an Information prompt "Till is in balance" is shown.
Press OK to close the Information prompt.
The register/till is reconciled.
Once all the registers are reconciled within a retail period, you can perform End Retail Period.
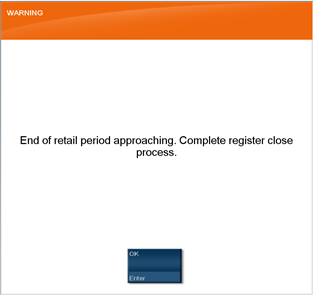
Warning messages inform you that the end of retail period is approaching and you should start the Register/Till Close process. The default time frame for the 24/7 rolling close functionality is 24 hours (but this can be configured). A grace period allows you to close the register within a configurable gap. Once the grace period has ended, you must close the register and move to the next retail period. The following messages are displayed.
By default, a warning message is displayed one hour before the end of the retail period. This message appears at the beginning of a transaction, every 10 minutes until the register close process has been started.
|
Note: The time frame for the warning messages is configurable. |
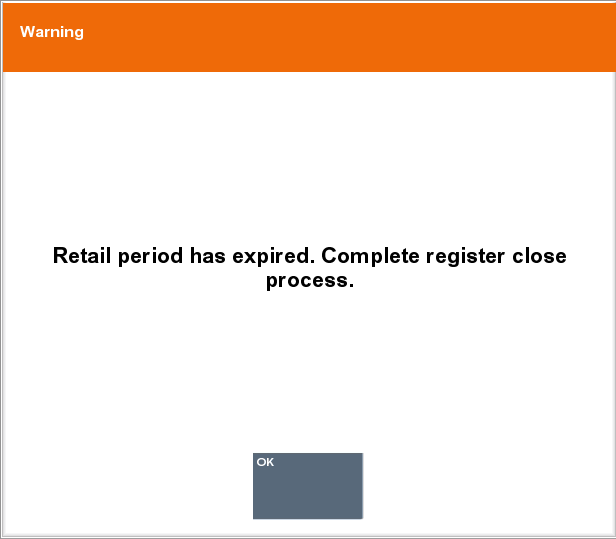
When the configured end of retail period time has passed, another message is displayed on each register. The message informs you that the retail period has expired and that you have to close the register.
If you try to open a register within the warning or grace period (two hours by default), you are prompted if you want to change to the next retail period, or if you want to open the register within the current retail period.
Select Next to open the register in the next available retail period.
|
Note: The register is closed and moved to the next retail period. You cannot re-open the previous retail period. |
Select Current to open the register within the current retail period.
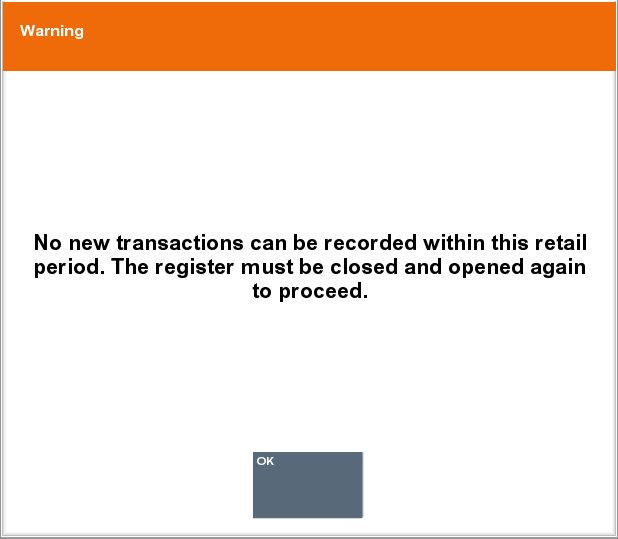
After the configured store hours time frame and the grace period have passed, all registers that have not been moved to the next retail period are locked. You cannot start new transactions.
You receive a warning message that you cannot start new transactions within the current retail period. You have to close and open the register again to start a new transaction.
Rolling Close must be configured in order to remove the Count Process from the Register Close. Close each individual register one at a time manually without the need for till reconciliation. Count the drawer, denominations, and if required open the register again.
The register close process must be performed on each opened register for it to be rolled over into the next day.
|
Note: Near the end of day, (that is, close to or after the required close time), warning messages will appear on remaining open registers. If a register continues to stay open past the required close time, the register will eventually prevent the user from utilizing the register until it is closed and reopened for the next day. See Warning Messages. |
To close a register for the retail session:
From the register to be closed, select the Back Office option on the menu. Follow any prompts to log in to the Back Office as required.
At the Till menu, use the up and down arrow keys to select Open/ Close Options and press Enter, or press the number associated with the menu option on the keyboard.
Oracle Retail Xstore Point-of-Service displays the Open/Close Options menu. Select the Register Close option and press Enter, or press the number associated with the menu option on the keyboard.
|
Important: Note that the Register option toggles between Open and Close. If the option is Register Close, the register is currently open. If the option is Register Open, the register is currently closed. |
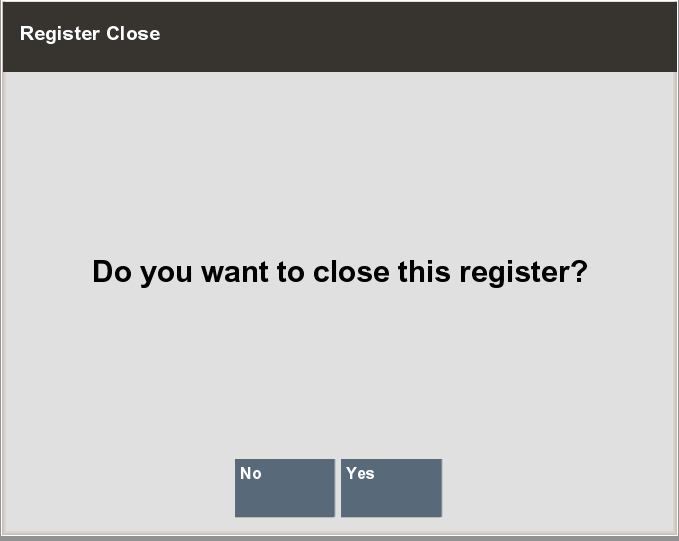
Oracle Retail Xstore Point-of-Service displays a confirmation prompt: Do you want to close this register? Press Yes to close the register. If the message is not configured, continue with step 5.
|
Note: You will need sufficient security privileges to close the register. |
|
Note: Pressing No at the Register Close confirmation prompt cancels the register close process and returns you to the Open/Close Options menu. |
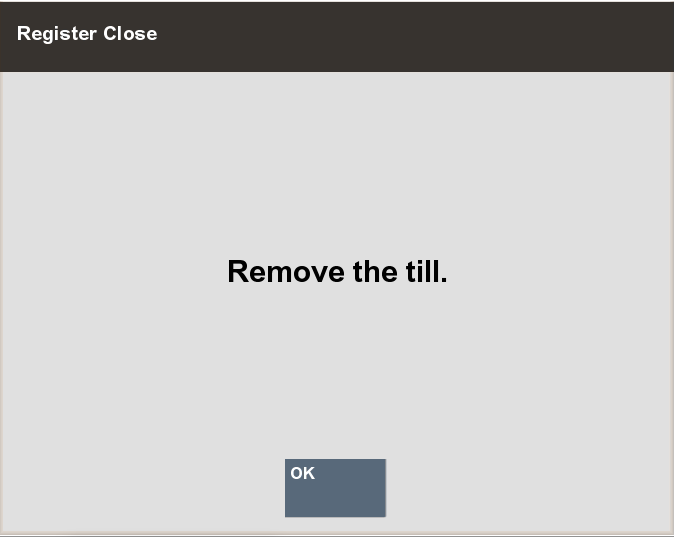
The cash drawer opens.
Depending upon the configuration of your system, you may be prompted to either remove all non-cash tenders from the till, or remove all the till contents. Follow the instructions on the screen, then click OK to continue.
For example, if Prompt for Float or Pre-defined Float is configured, all money is removed during close.
If Carried Over Float Amount is configured, all cash is left in the drawer. You are prompted to remove all tenders, except for the default cash tenders (that is, checks, traveler's checks and so on). You are informed that the remaining balance will be the new float amount for the next retail period. You are not prompted to count the drawer.
Remove the corresponding tenders. Press OK to close the message.
If Float Balance is configured, during the register close process, you are prompted to perform a cash pickup to bring the float down to match the approximate default float amount.
You are prompted to remove all non-cash tenders from the cash drawer (that is, checks, traveler's checks, and so on), and the excess amount above the configured threshold float. You are informed that the remaining tenders are adjusted to the approximate default float amount.
Remove all necessary tenders. Press OK to close the message.
Change the suggested amount or confirm the suggested amount with Enter.
Move the money to the cash deposit bag or safe.
|
Note: If the till amount needed to be picked up, is less than or equal to the configured float amount, no cash pickup is needed and this step is omitted.If multiple currencies are configured, this step is repeated until all float currencies have been completed. |
The system may be configured to print a Closed Count receipt and a Register Closed receipt.
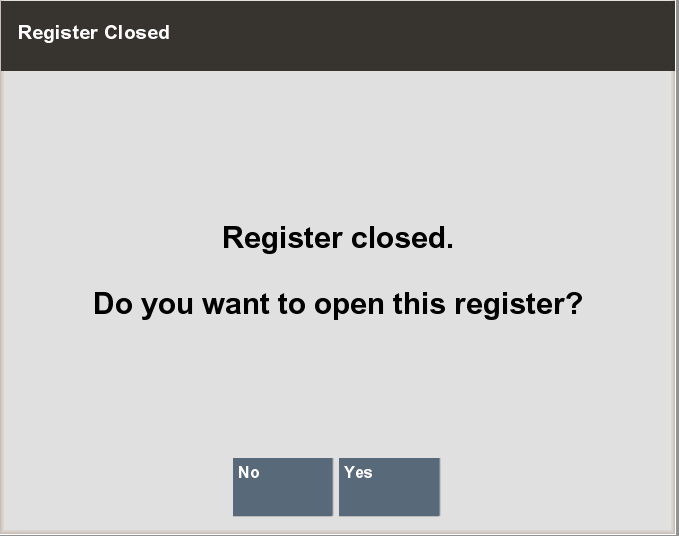
Close the cash drawer and the system closes the register.
After the register close is complete, you may be prompted whether to re-open the register.
Click No to keep the register closed.
Click Yes to re-open the register.
The processes that typically happen behind the scenes during a traditional store close process happens when the first register is opened in a new retail period.
How the float is handled when opening/closing a register can be configured in one of the following ways:
If the function Prompt for Float is enabled, all money is removed during close. A new till is inserted and counted during the register open process. The value of the float is entered.
At the register close you are prompted to remove the till but no counting of the drawer is done at this time.
All money is removed during close but you are not prompted to count the drawer. A new till is inserted during open, but not counted.
During the register open process, you are prompted to insert a new till into the drawer which includes a pre-configured till amount. There is the option to Change Float if required.
All cash is left in the drawer but you are prompted to remove all non-cash tenders such as checks. The balance of the register amount during register close will carry over to the next business period as the new float amount.
During the register open process, the end balance of the register during the register close process is carried over to the next retail period as the new float amount. You are not prompted to count the drawer.
During the register close process, you are prompted to perform a pickup of the excess money above the configured float amount. During close, enough money is removed to bring the float down to the approximate default float. The prompt 'Remaining currencies will be adjusted to the approximate default float' is shown.
You are not prompted to count the drawer at register open.
The register close process must be performed on each opened register for it to be rolled over into the next day.
Close each individual register one at a time manually without the need for till reconciliation. See Register/Till Close.
All registers and tills have to be closed for the business period(s) in order to complete End Retail Period process.
End Retail Period is a Back Office menu option that is required for 24 hour trading. It is initiated after all of the tills have been counted using the Reconcile Register or Reconcile Till menu options. See Reconcile Register/Till. The store bank is counted during this process and the deposits confirmed. The End of Retail Period can be deferred to a later date.
The end of retail period process is needed to close a business date after the business period has closed and till reconciliation has completed. The End Retail Period process closes the books on the business date.
To end a retail period:
Select End Retail Period from the Open/Close Options Back Office screen.
The business periods are listed in chronological order by date.
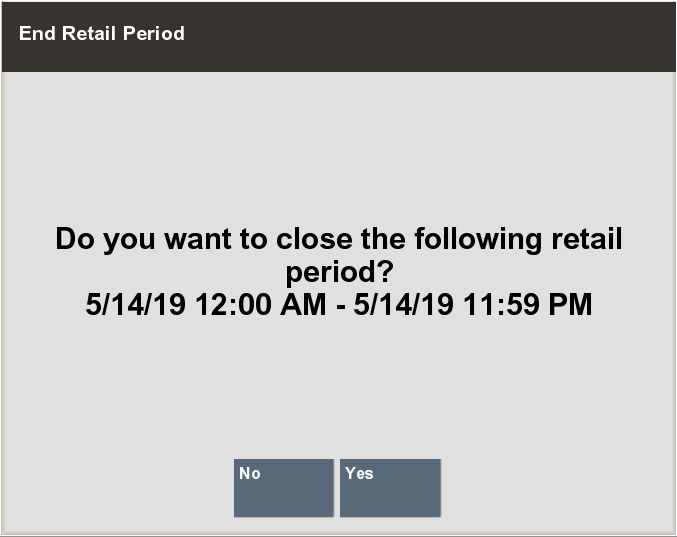
Select the business period from a list of reconciled business periods and click OK.
The prompt "Do you want to close the following retail period? is displayed.
Select Yes.
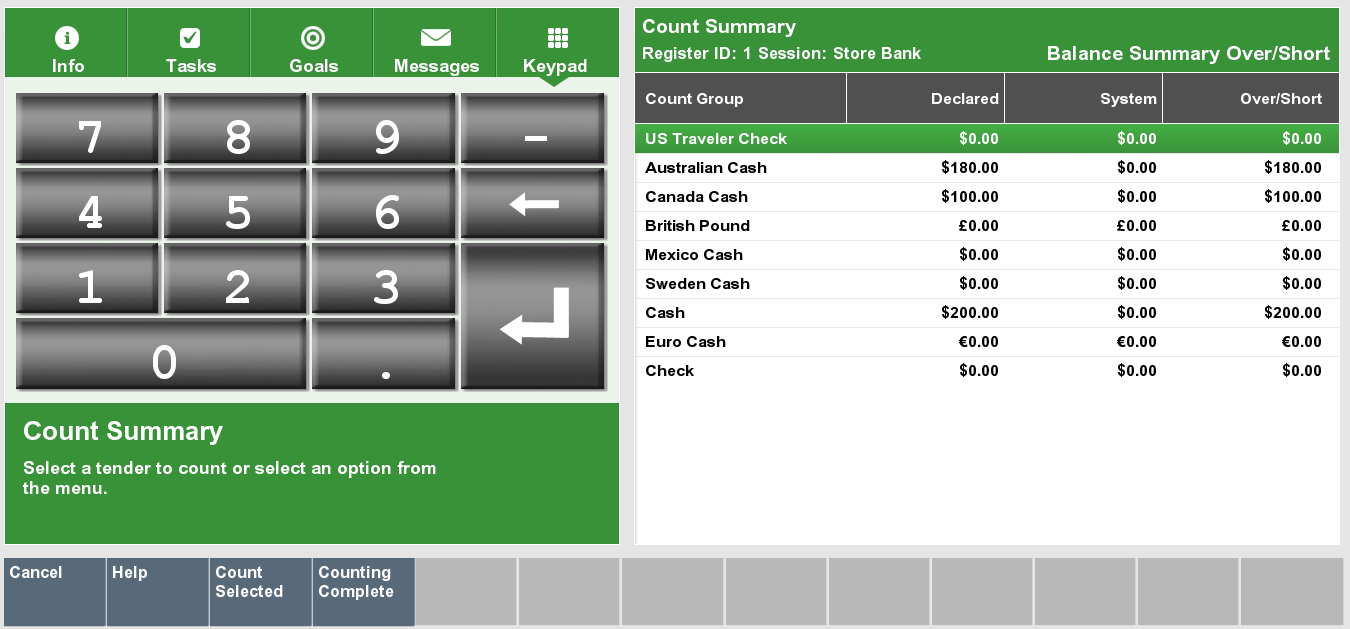
The Store Bank Deposit Count Summary and Count Denomination screens follow. Select a tender and enter the amount by denomination.
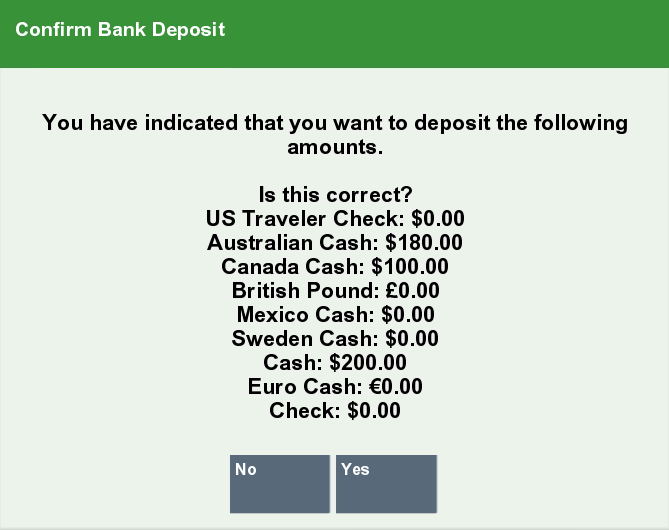
When all amounts have been entered for the required tenders, select Counting Complete. The Confirm Bank Deposit screen confirms the bank deposit amounts.
An End Retail Period message is displayed: "Retail period has ended. <date/time> - <date/time>". Select OK to continue.
Once the business period is closed, the user is returned to the Xstore Home screen.
Once the end of retail period has been processed, the period cannot be re-opened, and no further action can be performed.
Full store closure is usually only done when closing/shutting down a store.
See Closing the Store for more information.
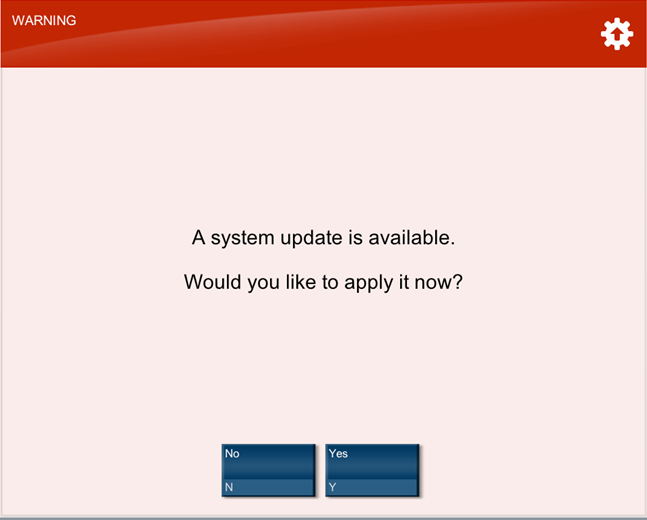
Data updates are run automatically in the background while the system is running. When system updates require the application to be temporarily shut down, you are prompted when entering the Back Office at the end of a transaction.
You can delay the system updates for a configurable grace period so you are not forced to perform the updates immediately if you need time to prepare for them.
At the end of the grace period, there is a configurable time frame in which no new transactions can be started, but existing transactions will be completed. Then, the system updates are applied automatically.