| Oracle® Retail Xstore Point-of-Service Mobile User Guide Release 18.0 F12257-04 |
|

 Previous |
 Next |
| Oracle® Retail Xstore Point-of-Service Mobile User Guide Release 18.0 F12257-04 |
|
Previous |
Next |
Oracle Retail Order Broker Cloud Service (formerly known as MICROS Retail Locate) is an optional module that can be interfaced with Xstore to provide information about inventory availability across all sales channels.
Using this order functionality, you can sell an item that is not in stock at your store and the Order Broker Cloud Service module automatically selects the best location to fulfill the customer's order across the enterprise.
There are multiple purchasing options available, such as same-store pickup, different store pickup, and delivery to a customer-specified address. You can track and maintain the orders using the Back Office Customer Maintenance function.
This chapter contains the following sections:
Orders can have the following status values:
Open: At least one item in the order has a status of: New, Polled, Accepted, or In Transit.
Ready for Pick Up: All items are in reserved or received status (can also include canceled item).
Ready to Ship: This is applicable only for customer delivery, transfer pickup, or delayed pickup (pickup from this store). All items must be reserved, or some items are reserved and some canceled.
Complete: The order has been completed and the customer is in possession of their items.
Canceled: All items are canceled.
Unfulfillable: All items are unfulfillable or a mix of unfulfillable and canceled. Unfulfillable items are those that have been rejected by the store assigned as the source for the item and Order Broker cannot find another source store.
Order items can have the following statuses:
New: Indicates the item has been added to the order.
Polled: Indicates the source/fulfilling location got the item request.
Accepted: Indicates the source location has confirmed it can satisfy the order request.
Reserved: Indicates the item has been put aside for the customer at the source/fulfilling location.
Pending Reservation: Only shown if Enable Pick Slip Scanning configuration is enabled. After an Order is Accepted, the item is moved to Pending Reservation where it will remain until the item is scanned in the Virtual Pick Slip.
|
Note: When a store sets up all registers to Enable Pick Slip Scanning, the Automatically Pick Order Inventory setting should be set to Yes. When an order is accepted, the order is automatically marked as Pending Reservation.The Automatically Pick Order Inventory setting should be set to No for stores that include both registers that enable and registers that do not enable the Enable Pick Slip Scanning setting. |
In Transit: Indicates the item has been shipped.
In Transit Polled: Indicates the store in which the customer is to pick up the product has acknowledged that the items are in transit and is expecting the order.
Received: Indicates the item has been received in the store.
Fulfilled: Indicates the item has been picked up/delivered.
Canceled: Indicates the item has been canceled.
Rejected: Indicates the source location has rejected the order and the item is sourced from another location. The status of the order becomes unfulfillable.
Unfulfillable: Indicates the item has been rejected and an alternative location could not be determined.
Xstore provides different options for fulfilling an order:
If an item is not available in your store, use this option to have the item shipped to your store for pickup at a later time. In this scenario, order creation and order fulfillment are both handled by the same Xstore store location. Inventory is sourced out of another location and shipped to the Xstore location. In Xstore, this order type is defined as Transfer Pickup.
The process for picking up items at another store depends upon whether legacy order types are enabled or disabled.
If the inventory exists in the store where the customer wants to pick up, then that store is used and the order type is defined as a pickup. However, if the inventory does not exist in the store where the customer wants to pick it up, then Order Broker will find another location from which to fulfill the order. The order will be shipped from that location to the pickup. In this case, Xstore considers it a Transfer Pickup.
If an item is not available in your store, use this option to find another store location where the item is currently available. The customer can pick up the item from that store once it is in a status of Ready for Pick Up. In this scenario, both order creation and order fulfillment is being done by the Xstore system. Inventory comes out of the fulfilling store if that store has inventory available; if the store does not have inventory available, Order Broker finds the required inventory. In Xstore, this order type is defined as Pickup.
If an item is not available in your store, use this option to have the item shipped directly to the customer's home (or another specified address). Order creation is done by the Xstore system. In this scenario, order fulfillment may be done by another store or a distribution center. Inventory comes out of the fulfilling location. In Xstore, this order type is defined as Delivery.
A customer name and address is required to create an Order Broker order. You must assign a customer to the transaction prior to order creation if you did not do so at the beginning of the transaction. Refer to Associating a Customer with a Transaction for more information about setting up a customer
To create an Order Broker order:
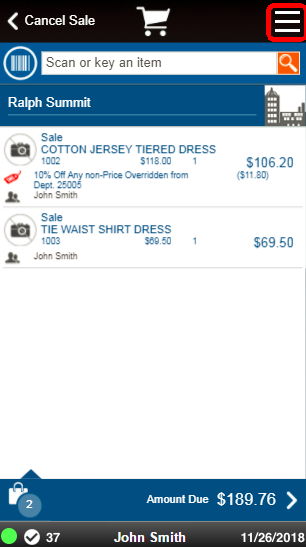
At the Sale screen, select the Context Menu button.
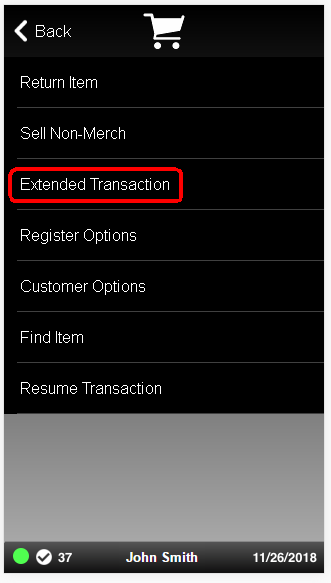
Select Extended Transaction in the Context Menu.
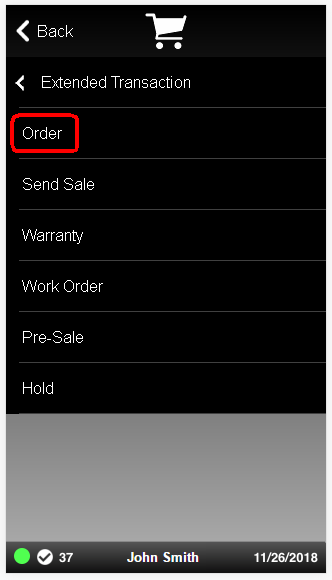
Select Order in the Extended Transaction Menu.
If a customer is associated with the transaction:
If the customer has one or more open orders, Xstore displays a list of the open orders.
If the customer has no open orders, Xstore prompts for order search criteria.
If no customer is associated with the transaction, Xstore prompts for order search criteria.
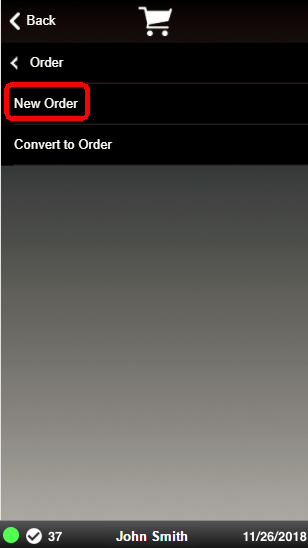
Click New Order.
If no customer is associated with the transaction, continue with Step 5.
If a customer is associated with the transaction, Xstore displays an order search window. Continue with Step 6.
Associate a customer with the transaction. See Associating a Customer with a Transaction.
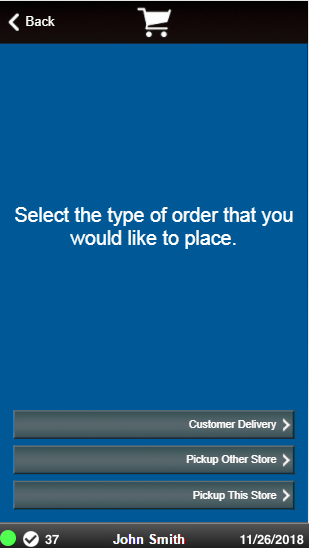
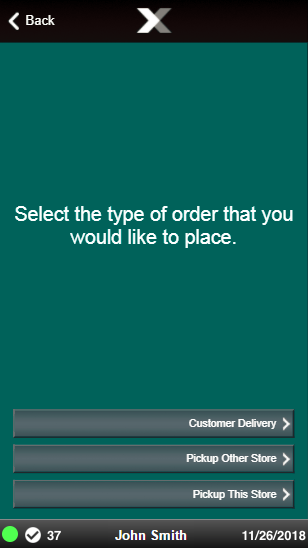
Select the type or order:
Customer Delivery: If an item is not available in your store, use this option to have the item shipped directly to the customer's home (or specified address). This order type is defined as Delivery type in Xstore. Continue with Customer Delivery.
Pickup Other Store: If an item is not available in the store where the customer wishes to pick it up, the item will be sent to the pickup store from another location. The pickup store will then hold the item until the customer picks it up. This order type is defined as a Pickup if the item is in stock at the pickup store, and a Transfer Pickup if the item is sent to the pickup store from another store. Continue with Pickup Other Store.
Pickup This Store: If an item is not available in your store, use this option to have the item shipped to your store for pickup at a later time. This order type is defined as Transfer Pickup type in Xstore. Continue with Pickup This Store.
To create an order for customer delivery:
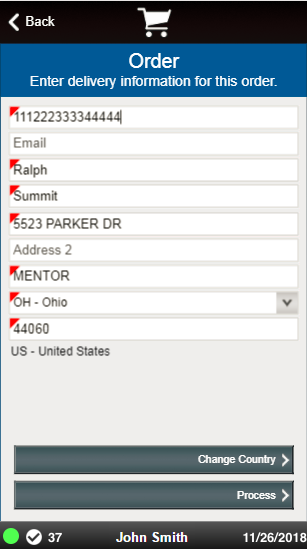
Click Customer Delivery.
Enter the delivery information:
|
Note: If your system is configured to provide Address Lookup functionality, an Address Lookup button will be available to allow you to quickly look up customer addresses using minimal information. |
Phone: Phone number.
Email: E-mail address.
Prefix: Name prefix.
First: First name.
M.I.: Middle initial.
Last: Last name.
Company: Company name.
Address: First and second line of the street address.
Apartment: Apartment number.
State/Zip: Zip Code and state or province.
City/Country: City and country.
|
Note: The country field can only be changed through the Change Country button. See Changing Country. |
Click Process.
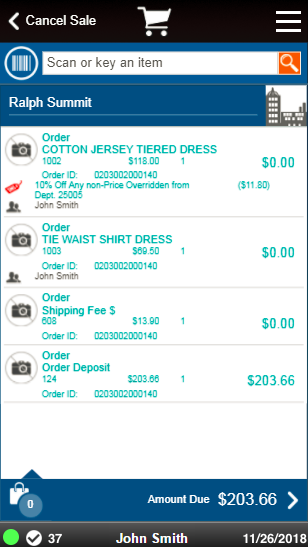
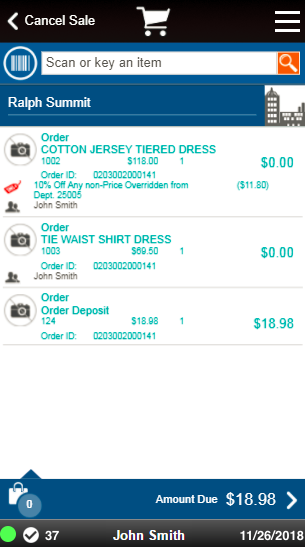
Item entry opens.
Enter an item for the order. See Entering Items.
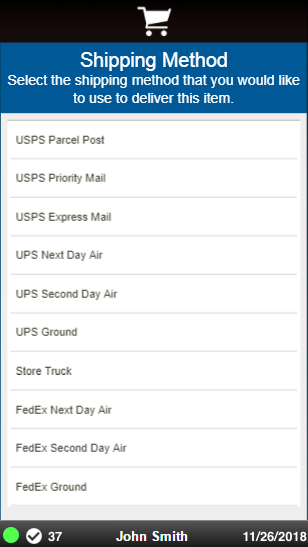
After entering each item, Xstore prompts for a delivery method for the item.
Select the shipping method:
Repeat Steps 4 to 6 for each item to add to the transaction.
When you are finished adding order items:
Click Add Tenders to tender and complete the transaction.
Click Exit Order to exit the order and continue the transaction.
To create an order for pickup at another store:
Click Pickup Other Store.
Enter an item for the order. See Entering Items.
After entering each item, Xstore prompts for the pickup location for the item.
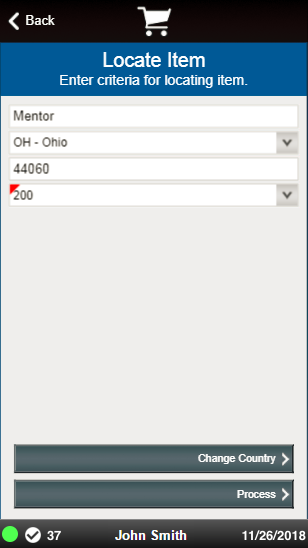
Enter the search criteria for the pickup location:
City: City.
State: State.
Postal Code: Postal or zip code.
Country: Country.
Miles: Radius around the city in which to search for a store.
Click Process.
Xstore displays a list of stores matching the search criteria.
Figure 15-10 Search Location Results List
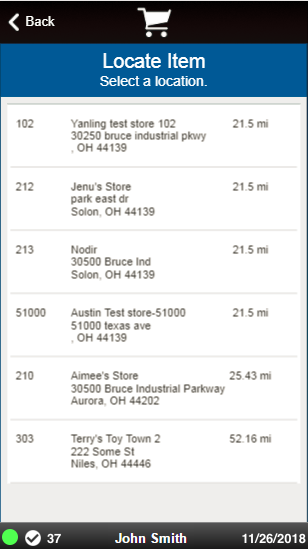
Select the pickup store.
Click OK. The item is added to the transaction.
Repeat steps 2 to 6 for each item to add to the order.
When you are finished adding order items:
Click Add Tenders to tender and complete the transaction.
Click Exit Order to exit the order and continue the transaction.
To create an order for pickup at the current store:
Click Pickup This Store.
Enter the items for the order. See Entering Items.
When you are finished adding order items:
Click Add Tenders to tender and complete the transaction.
Click Exit Order to exit the order and continue the transaction.
To search for an Order Broker order:
Click Extended Transaction in the Context Menu in Register Sale screen.
Click Orders.
If a customer is associated with the transaction:
If the customer has one or more open orders, Xstore displays a list of the open orders. Continue with Step 6.
If the customer has no open orders, Xstore prompts for order search criteria. Continue with Step 3.
If no customer is associated with the transaction, Xstore prompts for order search criteria. Continue with Step 4.
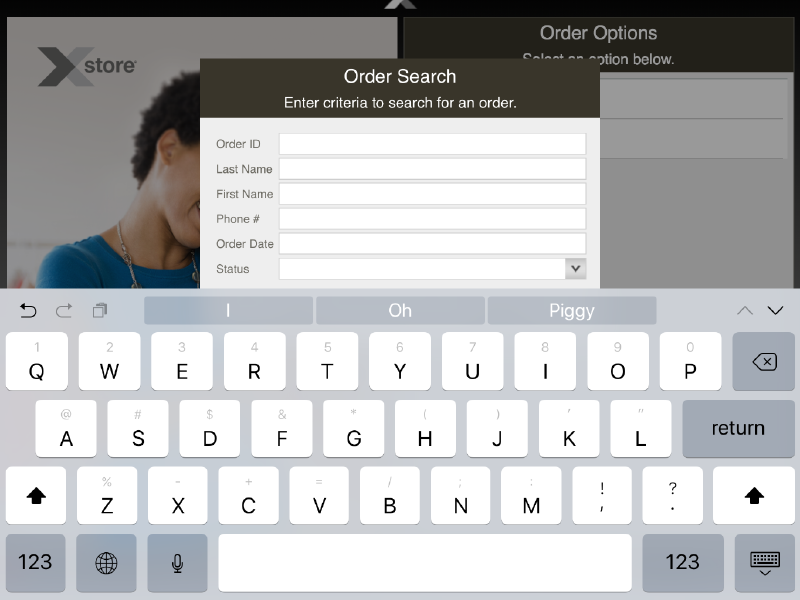
Click Order Search.
Xstore displays a search window.
Enter the search criteria.
Click Process.
If only one order matches the search criteria, Xstore opens the order. The order is opened and the transaction continues.
If more than one order matches the search criteria, Xstore displays a list of orders. Continue with Step 6.
Select the order:
Click the item.
Use the up and down arrows to highlight the correct item and press the Spacebar.
Click OK.
Xstore opens the order. Continue the transaction.
During an order setup transaction you can also perform the following activities before tendering the sale. Order items can only be modified in Order mode.
To make changes to Order Broker order items, perform the appropriate action:
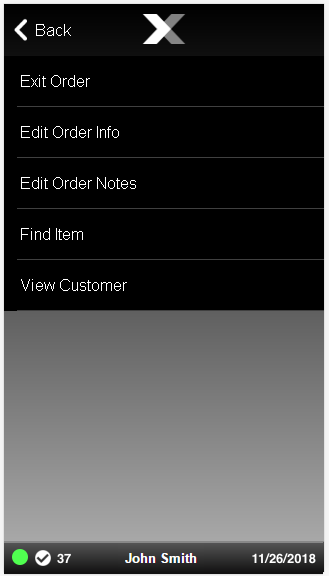
To add or edit comments associated with this order, select the Edit Order Notes option and type a comment about the order.
To edit order information, such as the delivery information or to change the order type, select the Edit Order Info option.
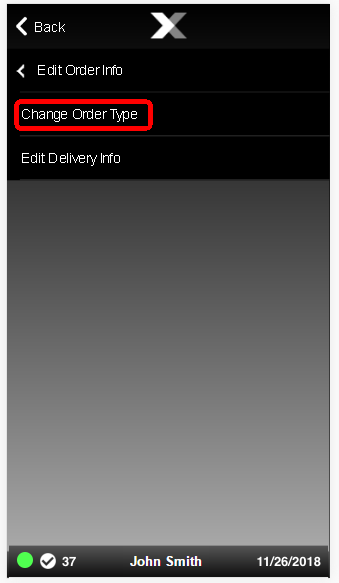
Figure 15-13 Edit Order Info Menu Options
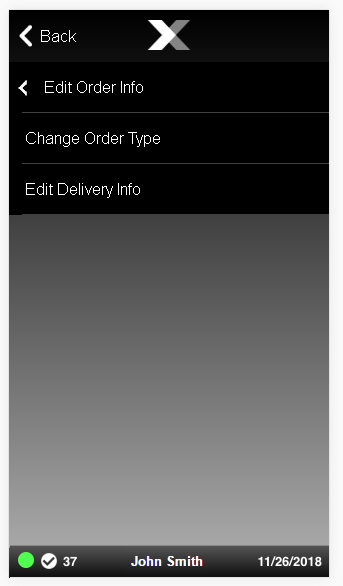
Back Office Customer Maintenance: To change the order type (Customer Delivery, Pickup Other Store, Pickup This Store), select the Change Order Type option.
Edit Delivery Information. Note that this can only be done for Order Broker orders before tendering. If a delivery address needs to be changed after the order is sent to Order Broker, the order must be canceled and a new order created with the correct address.
Make changes to the line items. See Modifying Line Items in a Sale for more information about changing items in a transaction.
To change the delivery information for an order:
|
Note: This can only be done for Order Broker orders before tendering. If a delivery address needs to be changed after the order is sent to Order Broker, the order must be canceled and a new order created with the correct address. |
Open an Order Broker Order, see Open an Order Broker Order.
Click Edit Delivery Info.
Change the delivery information as necessary:
For a Customer Delivery order, enter the customer address. See Step 2 in Customer Delivery for more information.
For a Pickup Other Store order, search for the pickup store. See Steps 3 to 6 in Pickup Other Store for more information.
To change the order type such as Pick Up This Store rather than Customer Delivery:
Open an Order Broker Order, see Open an Order Broker Order.
Click Extended Transaction in the Register Sale screen.
Click Change Order Type.
Select Yes to confirm the change.
Figure 15-16 Change Order Confirmation Prompt

Select the required order type.
The customer must return to the store where an order was created to cancel that order. If an item has been reserved, a message prompt will display indicating that you must un-reserve the item in the Back Office before cancelling the order.
To cancel an order:
Open an Order Broker order, see Open an Order Broker Order.
From the Sale screen, select Extended Transaction from the Context Menu.
At the Extended Transaction menu, select the Order option.
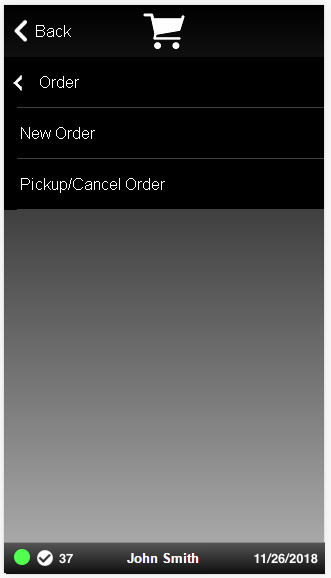
The Order menu appears:
Click Pickup/Cancel Order. Xstore displays a list of items in the order.
Select the Cancel Order option.
Select the items you wish to cancel. If cancelling the entire order, use the Select All button.
When prompted, select Yes to confirm you want to cancel the order.
Select a reason for the cancellation and press Enter.
Process the transaction as required, returning any refund amounts to the customer. See Processing Tenders for more information about processing refund tenders.
The items are removed and any return amount is applied to the transaction.
To perform a pickup of an order:
|
Note: If you enter the customer's information at the beginning of a sale and the customer's order item has been received at the store, a message may display indicating the order has been received and is ready for pickup. Press Enter to acknowledge the message and continue with Step 1 below. |
Open an Order Broker Order, see Open an Order Broker Order.
Select Pickup/Cancel Order.
Xstore displays a list of orders for that customer.
Select an oder from the list.
Select Pickup Items.
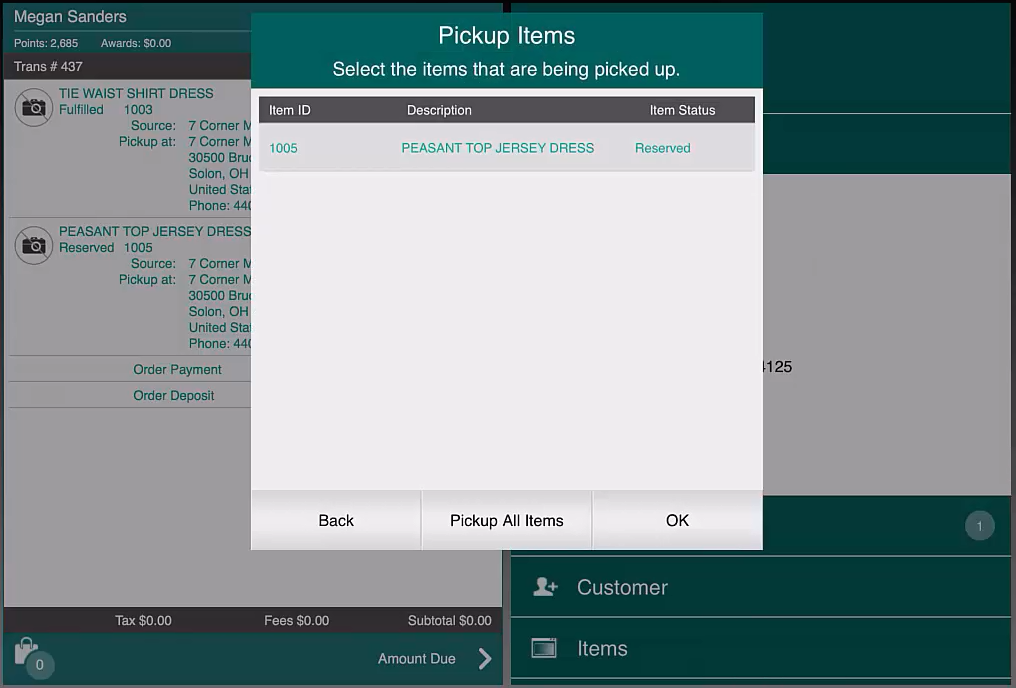
Xstore Point of Service displays a list of items in the order that are ready to be picked up.
Select the items to pick up:
Click the items.
Use the up and down arrows to highlight the correct items and press the Spacebar.
Click Pickup All Items to pick up the entire order.
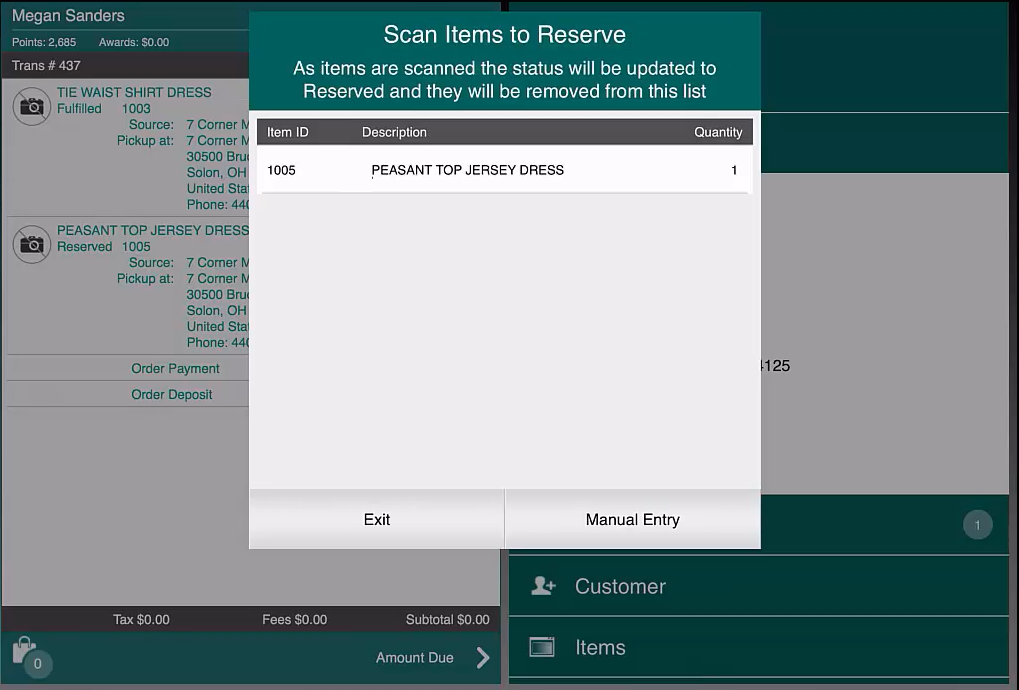
If your system has the Scan Items Prior to Adding to Transaction setting configured, the items display in a list to scan from to confirm they are the correct items.
If your system does not have the Scan Items Prior to Adding to Transaction setting configured, no scanning is required. Continue at step 9.
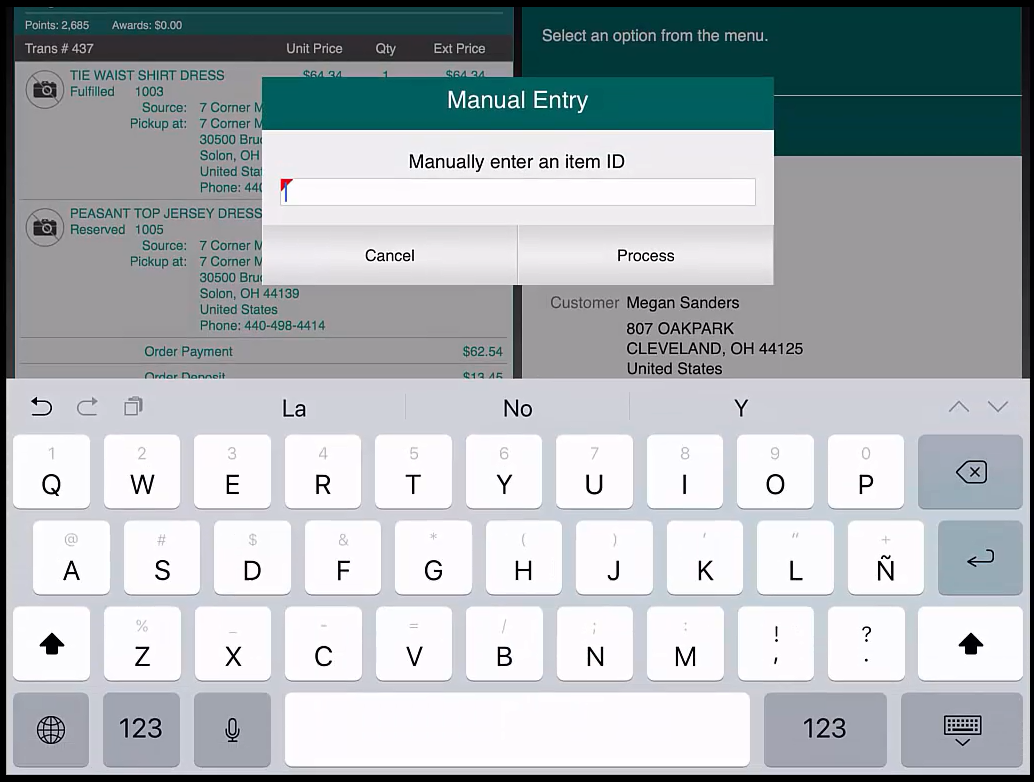
Scan the items from the list. The items will be marked Reserved and removed from the list.
If the item does not scan, select Manual Entry and enter the ID of the item.
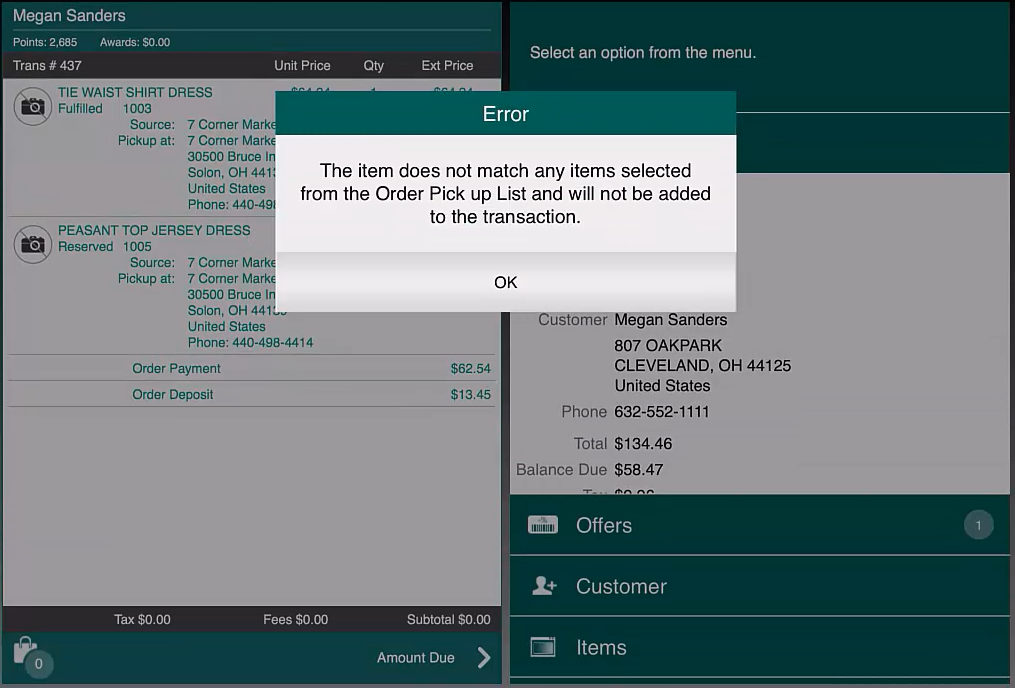
If an item is scanned or entered that does not match any items selected from the order pickup list, a warning message is shown and the item is not added to the transaction. Select OK to continue.
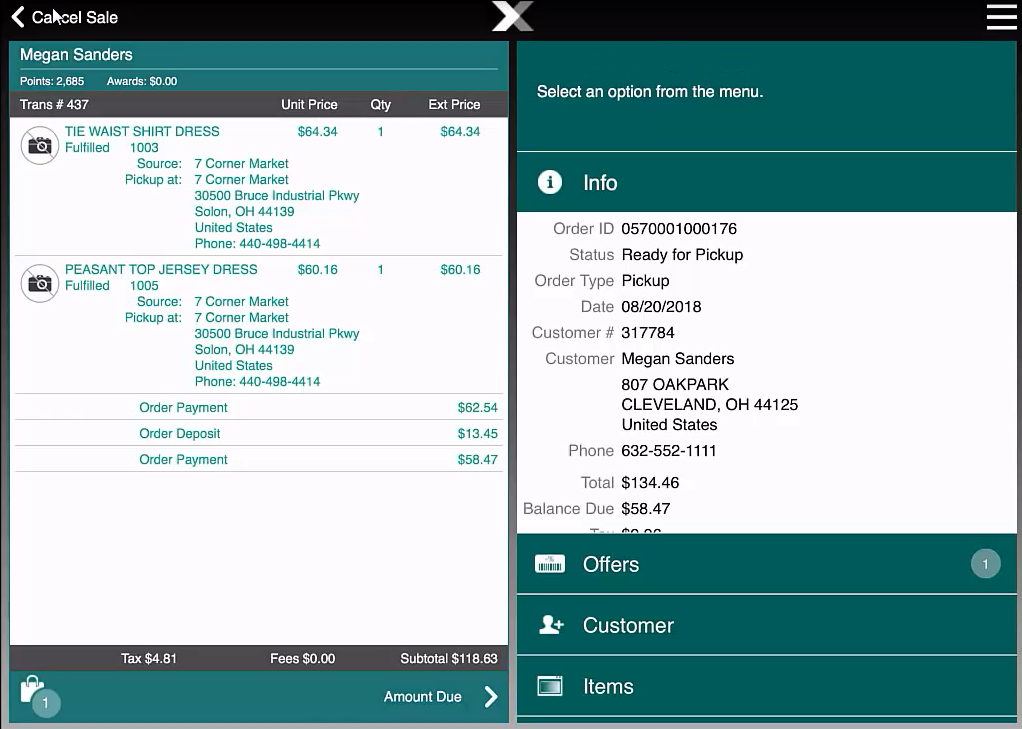
After an items has been scanned or manually entered, it is added to the transaction. The item status changes from Reserved to Fulfilled.
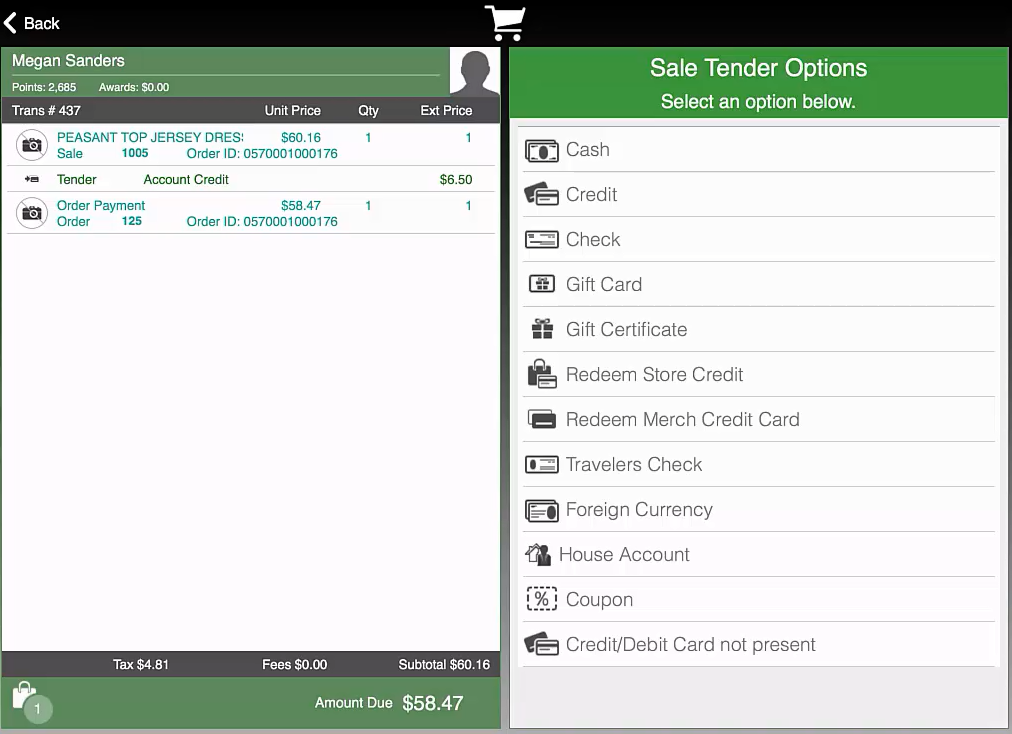
Continue the transaction:
Click Amount Due to tender and complete the transaction.
Click Exit Order to exit the order and continue the transaction.
Select Customer from the Main Menu.
Figure 15-25 Mobile Tablet Customer Menu
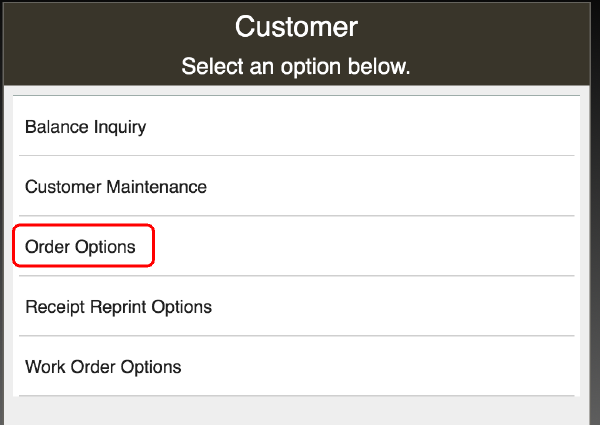
Select the Order Options option from the Customer menu.
Figure 15-26 Mobile Tablet Order Options Menu
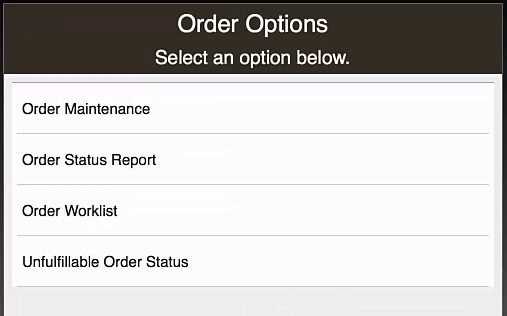
After Order Broker is configured for your store, use the Order options to maintain the order. A store can only see orders initiated in the store and orders downloaded to the store for sourcing or pick up.
If your store has been assigned as the source to fulfill an Order Broker order, you need, to ship the items to the customer. If the Order Broker order was created in your store, you can use these options to track the progress of the order as it is processed.
Select the Order Maintenance option from the Order Options menu.
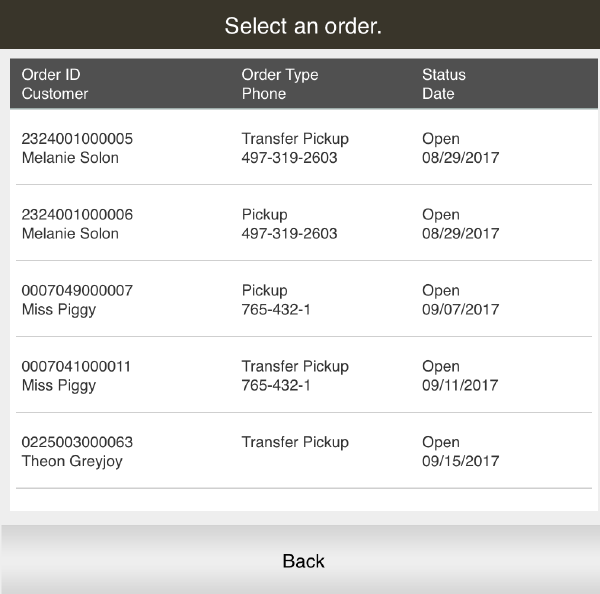
Enter criteria to locate the order.
Figure 15-28 Order Search Example Return List
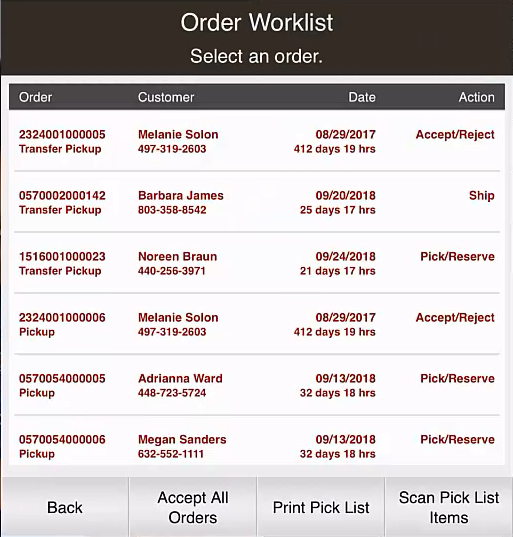
The Order Worklist shows orders that require action: either fulfillment, or rejection if you cannot fulfill the request.
Select the Order Worklist option from the Order Options menu to display a list of orders to be fulfilled by this store.
|
Note: The orders shown in the Order Worklist are the orders that require action: either fulfillment, or rejection if you cannot fulfill the request.Depending on your store configuration (set in SystemConfig.xml), delivery orders may be listed before customer pickup orders. |
Figure 15-29 Order Worklist with Scan Pick List Items Enabled
Select an order from the Order Worklist and then select one of the following:
Table 15-1 Order Worklist Options
| Option | Description |
|---|---|
|
View |
View additional information (see View Order). |
|
Accept Order |
Accept the order and go to the Accept Order step. See Accept Order |
|
Accept All Orders |
Accept all orders. See Accept Order. |
|
Print Pick List |
Prints a single pick list for all accepted orders |
|
Scan Pick List Items |
Only shown if Enable Pick Slip Scanning configuration is enabled. This option displays a scannable pick list rather than printing a paper pick slip. Items to pick/reserve can be scanned or entered manually. |
|
Note: The Action column may indicate "Under Review." When the order is under review, you cannot accept or reject items. The customer can, however, cancel the order.If you select Accept All Orders a prompt displays indicating orders under review will not be changed. |
|
Note: Orders that are still pending beyond a specified age threshold are shown in red text in the list. In the example shown above, any orders that have been pending for 4 days or more are flagged. |
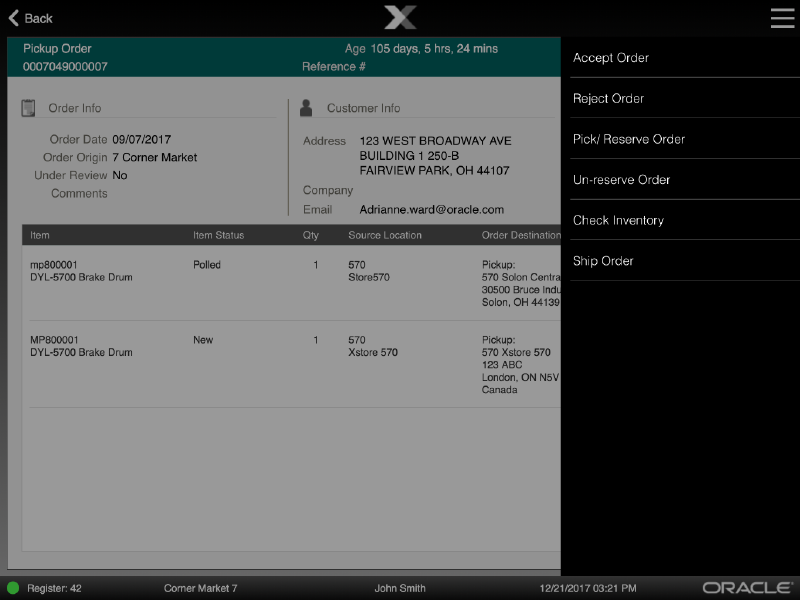
View Order displays the Order maintenance screen.
The following information is displayed on this screen:
Table 15-2 Order Maintenance Screen
| Component | Description |
|---|---|
|
1. Static Area |
Contains the type of order, Customer Name, order number, age information, and reference number. The order number is the number provided by the system that requested/originated the order. The reference number is an optional value that identifies the order. It is the order ID appended with last order line sequence number. The status displays on the far right. See Order Status for status definitions. Order Type values include the following:
|
|
2. Order Information |
|
|
3. Customer Information |
|
|
4. Order Totals |
|
|
5. Item Information |
|
Select an option from the Context Menu to process the order: Check Inventory, Accept Order, Pick/Reserve Order or Reject Order.
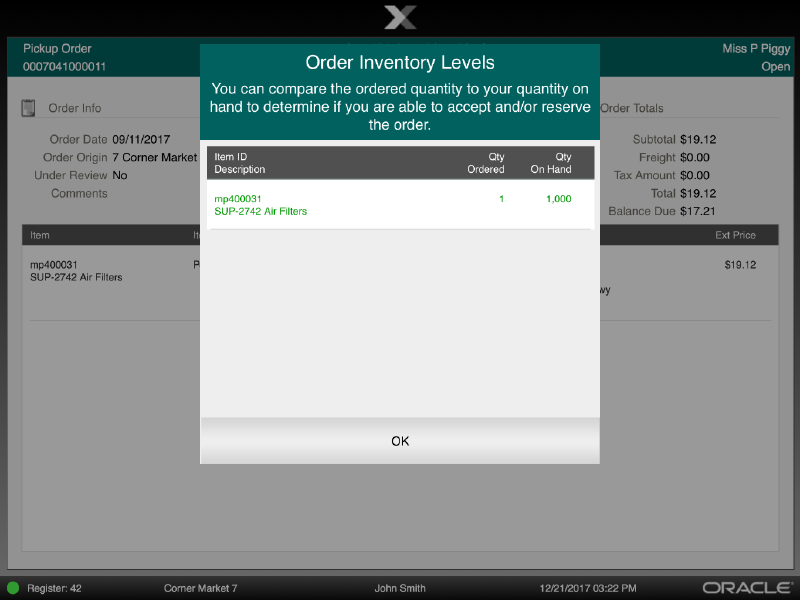
To verify you have enough stock on hand to fulfill an order, select the Check Inventory menu option. The Order Inventory Levels form shows the item quantity ordered and the current quantity on hand.
Figure 15-32 Order Inventory Levels Form
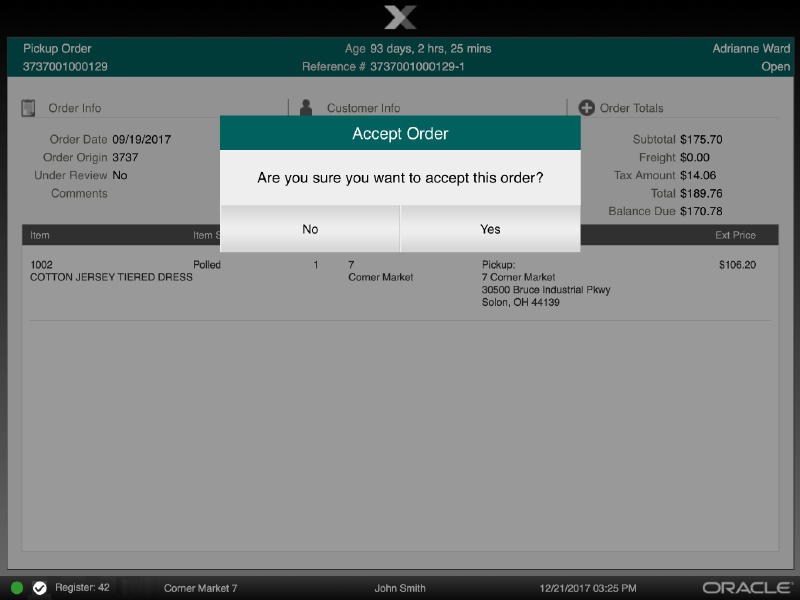
To Accept an order or specific items on an order:
At the Order Maintenance screen, select the specific items or for the entire order, select the Accept Order menu option. See Figure 15-23.
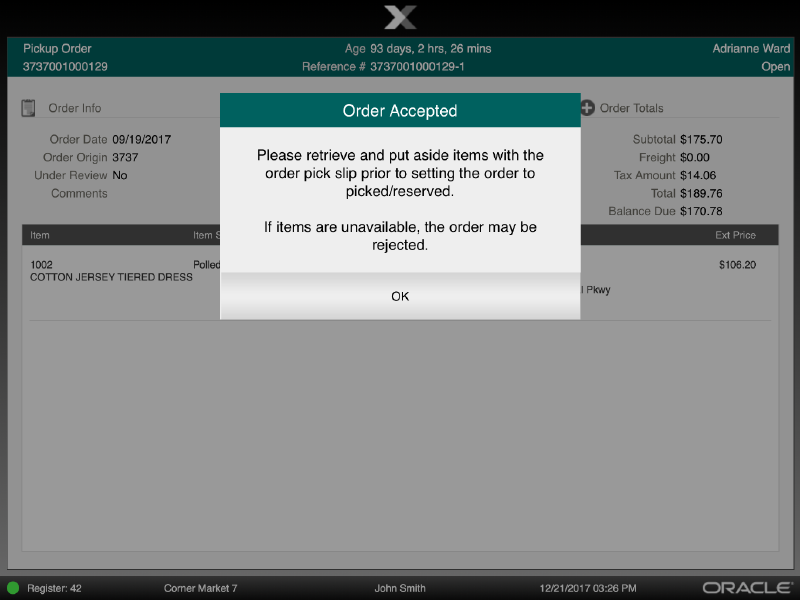
At the confirmation prompt, select Yes to accept the order.
At the Order Accepted prompt, select OK to continue.
After accepting an order, the items need to be retrieved and put aside. When picking/reserving items for an order, the screens shown are dependant on your stores configuration.
To display a scannable pick list rather than printing a paper pick slip, Enable Pick Slip Scanning must be enabled and the Scan Pick List Items option is shown at the bottom of the Order Worklist screen. Continue with Scan Pick Slip Items.
If the Enable Pick Slip Scanning setting is not enabled, the pick slip is printable from the Order Worklist screen or automatically printed when the order is accepted. Continue with Picking/Reserving an Order.
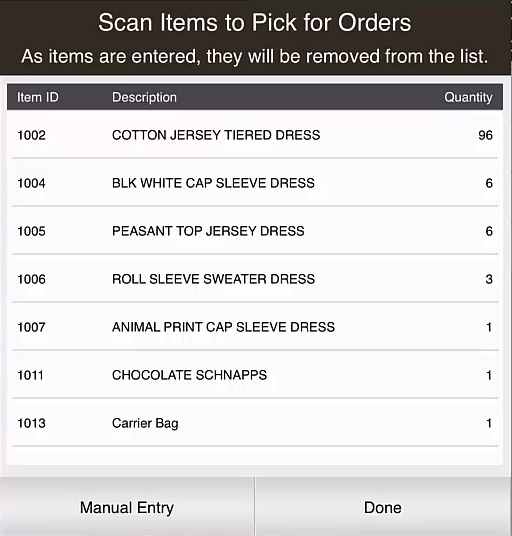
Using the virtual pick list, items to pick are scanned from a list on a mobile device. If needed, the items can be entered manually if the barcode is unreadable. Scanning items ensures the items being set aside, for order fulfillment, are the exact items required. This functionality replaces the printed pick list from automatically printing upon Order Acceptance. The option to print a pick list is still available if desired by selecting the Print Pick List option from the Order Worklist.
At the Order Worklist, select the order and select Scan Pick List Items.
If your store is configured to disallow the splitting of an order line where there are multiple quantities into multiple order lines, a warning message that their store does not allow fulfilment of partial line orders. Confirm you have the quantities required for line items before scanning.
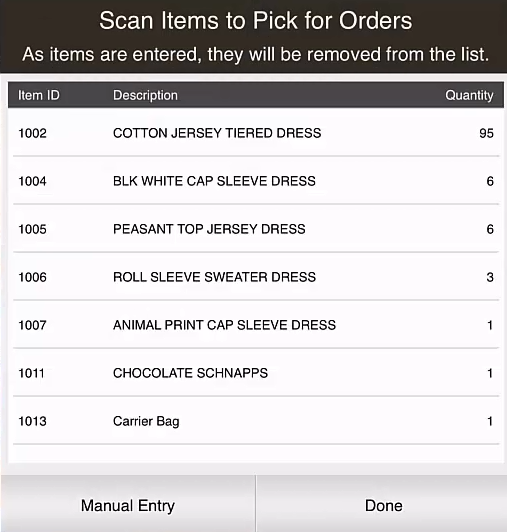
On the mobile device scan each item as it is picked. As items are scanned, the Quantity of that item goes down.
Continue scanning each item until all items have been scanned. When the required quantity of the item has been scanned, the item is removed from the list.
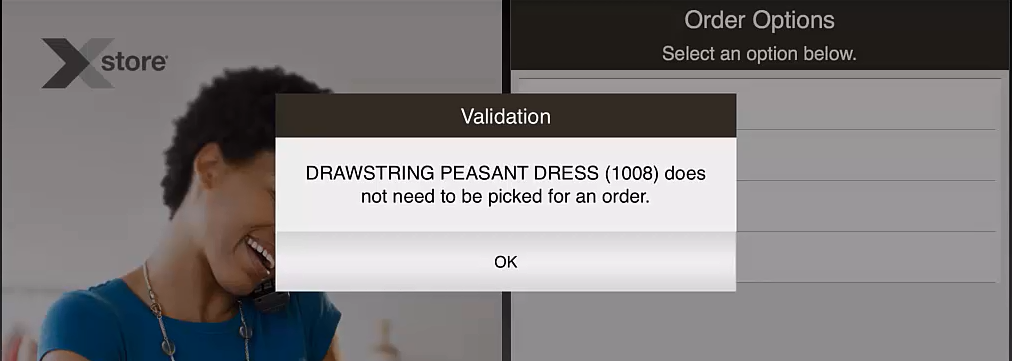
If the item does not scan, select Manual Entry and enter the ID of the item.
If an item is scanned or entered that does not belong to an order, a warning message is shown. Select OK to continue.
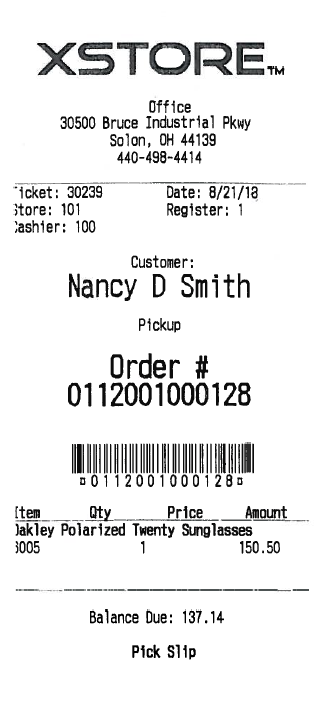
The pick slip is printable from the Order Worklist screen (see Figure 15-29) or automatically printed when the order is accepted.
To Pick/Reserve items on an order:
At the Order Worklist screen, select the order to pick/reserve.
At the Order Maintenance screen, select the specific items or for the entire order, select Pick/Reserve Order. If you cannot fulfill the order for some reason, you can reject the order at this point. See Reject Order for more information about rejecting an order.
|
Note: The Pick/Reserve Order menu option is only available after you accept the order.If the Under Review field indicates yes, the Accept Order, Reject Order and Pick/Reserve Order buttons are grayed out. |
If your system has the Scan Items Prior to Adding to Transaction setting configured, the items display in a list to scan from to confirm they are the correct items.
If your system does not have the Scan Items Prior to Adding to Transaction setting configured, collect the items and continue at step 5.
Scan the items from the list. The items will be marked Reserved and can be shipped or ready for customer pickup.
If the item does not scan, select Manual Entry and enter the ID of the item.
If an item is scanned or entered that does not belong to an order, a warning message is shown. Select OK to continue.
After all items for the order have been scanned or manually entered, select OK at the prompt.
The items will be marked Reserved and can be shipped or ready for customer pickup.
For Delivery type orders, use the Ship Order function to complete the order delivery process. See Shipping an Order.
For other Order types, the Order status is updated to Ready for Pickup.
To un-reserve an order:
Since the order has been accepted it will no longer appear in the Order Worklist. From the Back Office main menu, select Customer - Order Options - Order Maintenance.
Enter the search criteria and select Process.
If more than one order is returned, select the order you wish to modify and press Enter.
Select Un-reserve Order.
Figure 15-44 Un-reserve Order Menu Option

The order status changes to Open and the Item Status changes to Accepted.
When you reject an order or specific item in the order, it changes the order status to open sends it back to the Order Broker where another source/fulfillment location is determined.
At the Order Maintenance screen, select specific items or for the entire order, select the Reject Order menu option.
At the Reject Order confirmation prompt, select Yes to reject the order.
Figure 15-45 Reject Order Confirmation Prompt
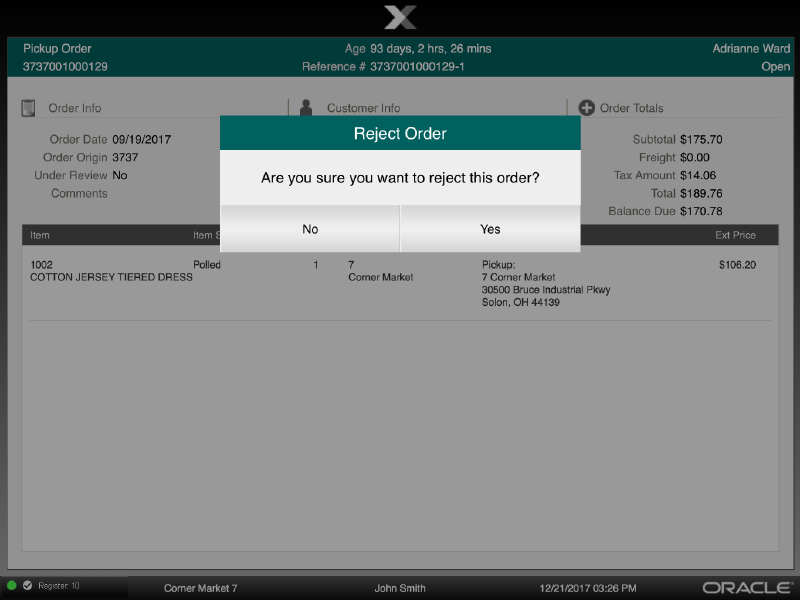
If prompted, select a reject reason code.
For Delivery type orders, select the Ship Order menu option to ship the items. Xstore Mobile creates the Shipping Document for this order. This option is only available at the order sourcing location when the status of the items on the order is Reserved.
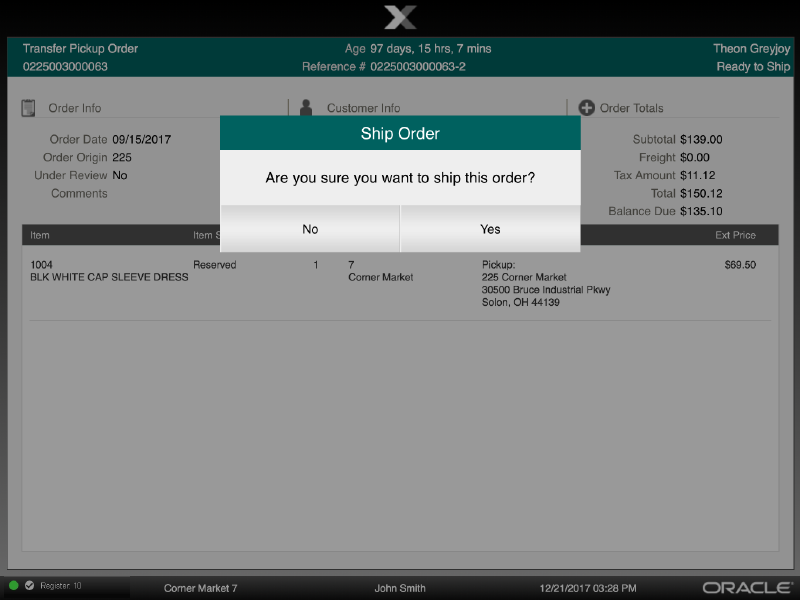
At the Order Maintenance screen, select the Ship Order menu option.
When prompted, select Yes to confirm you want to ship the order.
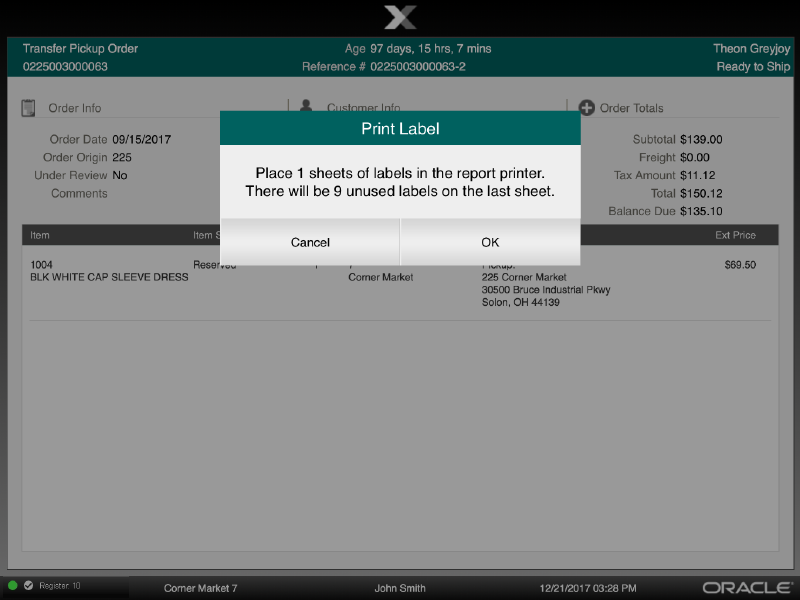
When prompted, select Yes to print a shipping label.
If prompted, enter the total weight for the shipment and select Process.
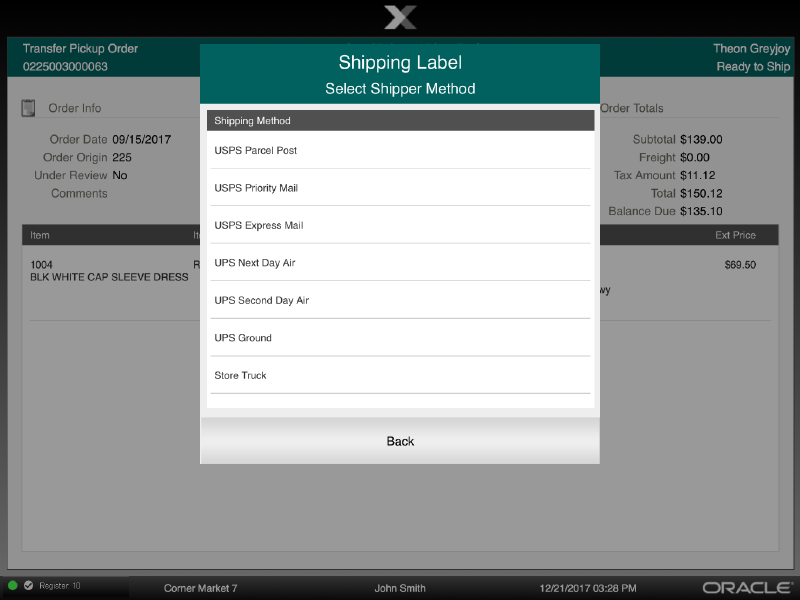
When prompted whether to accept the shipping method chosen when the order was set up, perform one of the following steps:
To accept the shipping method selected during order setup, press Enter and go to step 6.
To change the shipping method selected during order setup, select Override Shipping Method, select a shipping method from the list and press Enter.
|
Note: The Override Shipping Method option is controlled by security.You are prompted for Manager override if you do not have the required level of security to perform this function as indicated by the Security Override icon shown here. |
Print the shipping label. If the shipping carrier's label cannot be printed for any reason, you can print a label manually by following the prompts for label location selection and printing.
If prompted, enter the tracking number for the shipment and select Process.
If prompted, to print a packing slip for the shipment, select Yes to print the packing slip.
Xstore Mobile returns to the Order maintenance screen. The status for each item is updated to either In Transit if the order is being shipped to another store or Fulfilled if the order is being shipped directly to the customer.
If an Order Broker order was created in your store, you can use the following steps to track the progress of the order as it is processed.
To maintain/view an order, select the Customer option from the Back Office Main Menu.
Select the Order Options option from the Customer menu, then select the Order Maintenance option from the Order Options menu. See Figure 15-26.
At the Order Search form, enter the search criteria needed to find an order:
|
Note: To find all pending orders for fulfillment, select the Open Order Status value as the search criterion. |
Order ID: The order identifier number.
Last Name: The customer's last name.
First Name: The customer's first name.
Phone: The customer's phone number.
Order Date: The date the order was set up.
Order Status: See Order Status.
At the Order Search results list, select an order and press Enter.
The system displays the Order maintenance screen. See View Order for details.
If you do not use the Xstore Mobile Back Office receiving module to receive items, select the Allocate Items menu option at the Order maintenance screen to automatically mark the item as received and ready for pickup. This allocation process performs all the Order Broker updates, local status updates, and customer e-mailing rules typically performed by the Xstore Mobile receiving module, and moves ON_HAND inventory to the ORDER bucket for allocation purposes.
The Allocate Items menu option is only be available when the following conditions are true:
Your system is not set up to auto-generate receiving documents
The order type is either Transfer Pickup or Web Pickup
This is the store where the order is to be picked up
The items on the order have a status of In Transit
To allocate items, select the Allocate Items menu option at the Order maintenance screen.
When prompted, select Yes to confirm you want to receive the item(s). The system updates the item status to Received and the order status is updated to Ready for Pick Up.