| Oracle® Retail Xstore Point of Service User Guide Release 18.0 F12254-01 |
|

 Previous |
 Next |
Miscellaneous transactions are those activities that may not be directly related to a specific sale transaction, but offer important and useful functions. Like sale transactions, these activities are also logged by the system for accountability and reporting purposes.
This chapter describes the following miscellaneous transaction processes:
Clock In and Clock Out - Clocking in, clocking out, and changing work codes.
Balance Inquiry - Check the balance of a gift card, gift certificate, or gift receipt.
Change Your Password - Change the password you use to log in.
Post Void - Cancel a previous transaction.
No Sale - Open a cash drawer.
Lock or Unlock a Register - Lock or unlock a register.
Price Inquiry - Look up the price of an item.
Depending upon your store policy, you may be required to clock in before logging in. You may also be required to clock in and out for meal breaks. If meal break clock-out and clock-in is enforced, you cannot clock back in after a meal break until a specified period of time has elapsed.
In order for your timecard to accurately reflect the number of hours worked, you must clock in and out by performing the following procedures:
Clock In - Clocking in at the start of a shift.
Clock Out - Clocking out at the end of a shift.
Change Work Code - Changing the work code onto which you are logging time.
Clocking In and Clocking Out for Meal Breaks - Clocking out to start a meal break.
To clock in:
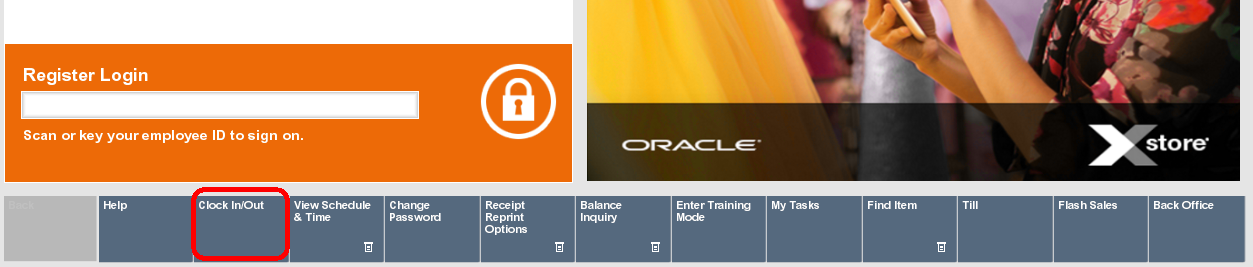
Click Clock In/Clock Out at the Register Login screen.
Xstore Point of Service knows whether you are currently clocked in or clocked out and will perform the appropriate action automatically.
|
Note: Touch-screen users swipe the clock area to clock in or clock out. |
Xstore Point of Service prompts for your user ID.
Scan or enter your employee ID at the Clock In/Out prompt and press Enter.
Xstore Point of Service prompts for your password.
Enter your password and press Enter.
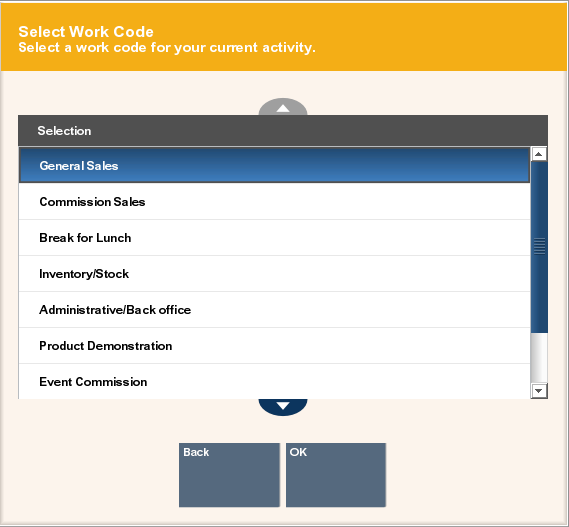
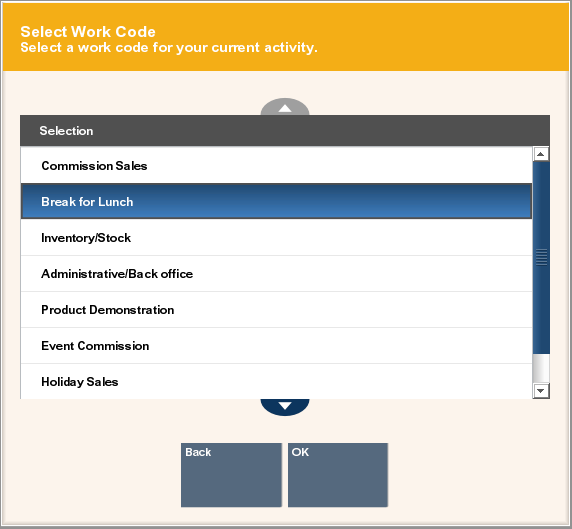
If necessary, select a work code for your current activity:
Click the work code.
Use the up and down arrow keys to highlight the appropriate work code, then press the Spacebar.
Click OK if necessary.
You are now clocked in.
To clock out:
Click Clock In/Clock Out at the Register Login screen. See Figure 21-1
Xstore Point of Service knows whether you are currently clocked in or clocked out and will perform the appropriate action automatically.
|
Note: Touch-screen users swipe the clock area to clock in or clock out. |
Xstore Point of Service prompts for your user ID. See Figure 21-2.
Scan or enter your employee ID at the Clock In/Out prompt and press Enter.
Xstore Point of Service prompts for your password. See Figure 21-3.
Enter your password and press Enter.
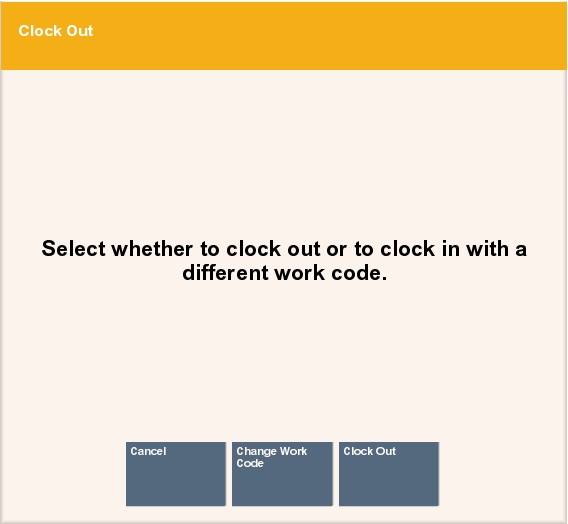
Click Clock Out if you are prompted whether to clock out or clock in under a different work code.
You are clocked out. Xstore Point of Service may print a receipt with your clock-out information.
To change the work code you are using for your clock in:
Click Clock In/Clock Out at the Register Login screen. See Figure 21-1.
Xstore Point of Service knows whether you are currently clocked in or clocked out and will perform the appropriate action automatically.
|
Note: Touch-screen users swipe the clock area to clock in or clock out. |
Xstore Point of Service prompts for your user ID. See Figure 21-2.
Scan or enter your employee ID at the Clock In/Out prompt and press Enter.
Xstore Point of Service prompts for your password. See Figure 21-3.
Enter your password and press Enter.
You are prompted whether to clock out or clock in under a different work code. See Figure 21-5.
Click Change Work Code.
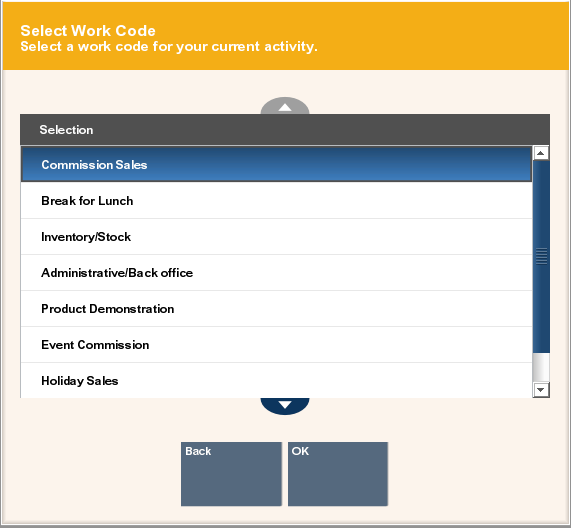
You are prompted for a new work code.
Select a work code for your current activity:
Click the work code.
Use the up and down arrow keys to highlight the appropriate work code, then press the Spacebar.
Click OK if necessary.
You are now clocked in under a new work code.
If your store policy enforces meal break clock-out and clock-in, you cannot clock back in after a meal break until a specified period of time has elapsed.
If a minimum clocked-in time interval is used.
If your store policy requires a minimum clocked-in time interval for a Meal Break work code (for example, 30 minutes), you cannot clock out early from your meal break. An override is allowed with a Manager's permission.
To clock out for a meal break:
Click Clock In/Clock Out at the Register Login screen. See Figure 21-1.
|
Note: Touch-screen users swipe the clock area to clock in or clock out. |
Xstore Point of Service prompts for your user ID. See Figure 21-2.
Scan or enter your employee ID at the Clock In/Out prompt and press Enter.
Xstore Point of Service prompts for your password. See Figure 21-3.
Enter your password and press Enter.
You are prompted whether to clock out or clock in under a different work code. See Figure 21-5.
Click Change Work Code.
You are prompted for a new work code.
Select the meal break option (for example, Break For Lunch or Meal Break:
Click the meal break option.
Use the up and down arrow keys to highlight the meal break option, then press the Spacebar.
Click OK if necessary.
You are now clocked out for a meal.
If your store policy is set up for a minimum clocked-out time interval for a break (for example, 30 minutes), you cannot clock back in early.
This means that once you have clocked out during your shift, you cannot clock back in again for at least 30 minutes.
An override is allowed with a manager's permission.
Gift cards and store credit vouchers may be used as a tender until the total value of the account has been used. Since the amount left on a card or voucher cannot be visibly seen, this function electronically checks the account record and tells you the remaining value on the account. You can also use Balance Inquiry to look up an encoded item's price on a gift receipt.
Use the balance inquiry process to check the amount remaining on a customer's store credit voucher, gift card or gift certificate, and an item's price from a gift receipt.
|
Note: Depending upon the configuration of your system, this option may be available from several different locations. Before logging in, Balance Inquiry is available from the Register Login screen and from the Till Options menu. After logging in, Balance Inquiry is available from both the Register Options menu and the Back Office Main Menu. The procedure that follows describes how to access Balance Inquiry from the Register Login screen |
Click Balance Inquiry at the Register Login screen.
Click the type of balance inquiry:
Gift Card Balance - Remaining balance on a gift card.
Gift Cert. Balance - Remaining balance on a gift certificate.
Store Credit Balance - Remaining store credit balance.
Loyalty Balance - Loyalty point balance.
Gift Receipt Inquiry - Redemption amount of a gift certificate.
Xstore Point of Service prompts for the ID number.
Enter the ID number (for example, the gift card number or gift receipt barcode number) and press Enter.
Xstore Point of Service opens a window displaying the requested information.
When you are finished:
Click OK to close the window.
Indicate whether to print a receipt:
Click Yes to print a receipt and close the window.
Click No to close the window.
The Change Password option is only available from the Register Login screen or the Back Office Login screen before you log in.
To change your password:
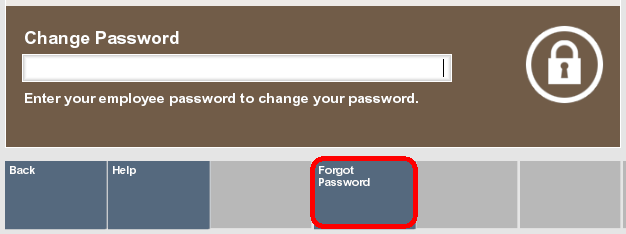
Click Change Password in the Register Login screen or Back Office Login screen.
Xstore Point of Service prompts for your user ID.
Do one of the following, depending upon the configuration of your system:
Enter your current password and press Enter.
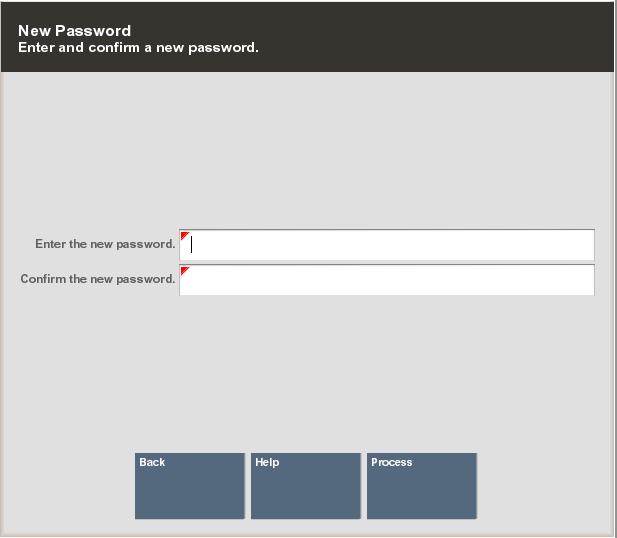
Enter your new password in the Enter the new password and Confirm the new password fields.
Click Process.
The new password is saved.
|
Note: Xstore Point of Service may enforce certain rules regarding passwords, such as the minimum number of characters required or whether you can reuse an old password.If your new password is not valid, press Enter to acknowledge the Validation prompt and try again. |
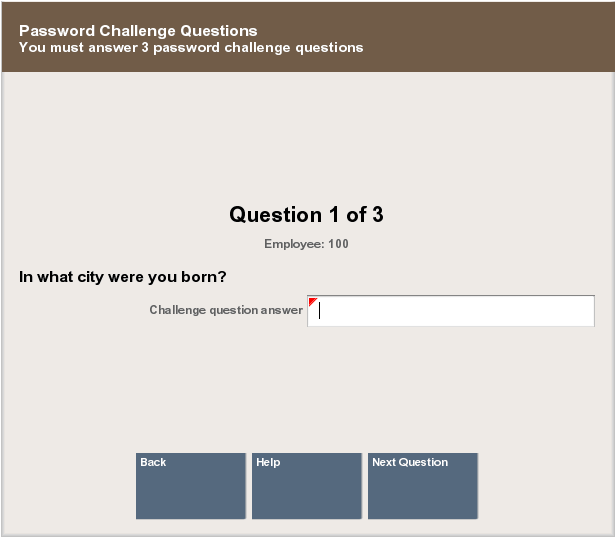
If Xstore Point of Service is configured to use password challenge questions, you can re-set your password without knowing your current password by answering a set of questions whose answers should only be known to you.
To change your password using challenge questions:
Click Change Password in the Register Login screen or Back Office Login screen. See Figure 21-10.
Xstore Point of Service prompts for your user ID. See Figure 21-11.
Enter your user ID and press Enter.
Xstore Point of Service prompts for your password.
Click Forgot Password.
Xstore Point of Service prompts for your last name.
Enter your last name and press Enter.
Xstore Point of Service asks the challenge questions.
Answer each challenge question:
After you have entered the correct answer for each question, Xstore Point of Service prompts for your new password.
Enter your new password in the Enter the new password and Confirm the new password fields.
Click Process.
The new password is saved.
|
Note: Xstore Point of Service may enforce certain rules regarding passwords, such as the minimum number of characters required or whether you can reuse an old password.If your new password is not valid, press Enter to acknowledge the Validation prompt and try again. |
Performing a Post Void transaction changes the status of a sale transaction to Void. All records in the system are reset as if they had never occurred during the original transaction. For example, a post void adjusts the tender totals for the till involved in the transaction.
A transaction may be post voided only on the day it is created. Post Voids may be performed on a different register from the one where the original transaction was executed.
Certain kinds of sale transactions may involve extended transactions that occur outside the system. For example, special orders, work orders and layaways are extended transactions. Although the system checks for such conditions when a post void is executed, some aspects of the transaction may need to be reversed by an additional transaction such as a return. If the system detects an extended transaction, you are prompted about whether or not you want to continue the post void process.
A Post Void transaction may be performed from the Register or from the Back Office, depending upon your system's configuration and store policy. In the Back Office it is available on the Main Menu and also from the Electronic Journal.
To perform a Post Void from the register:
Select Till in the Register Login screen.
Do one of the following, depending upon the configuration of your system:
Enter your password and press Enter.
The Till menu opens.
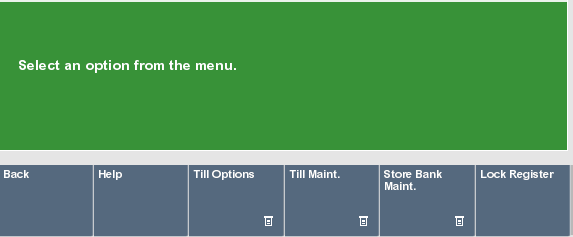
Select Till Options.
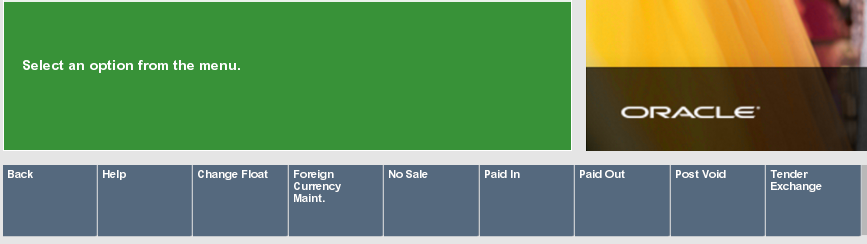
Select Post Void.
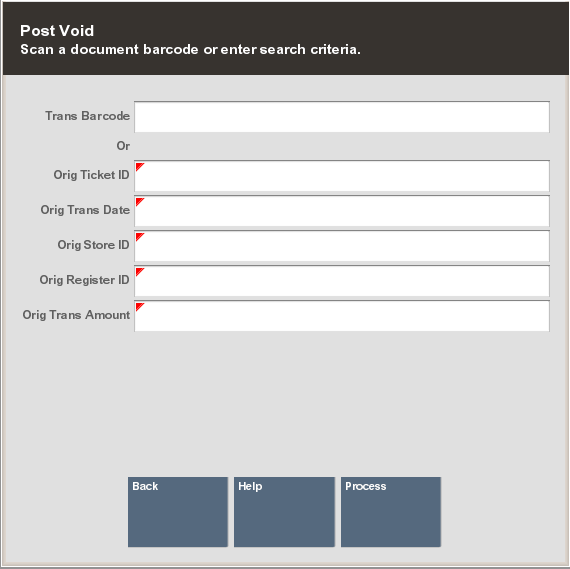
Xstore Point of Service prompts for the transaction information.
Enter the transaction information:
Scan the transaction barcode. Continue with Step 7.
Enter the transaction information:
Trans Barcode - Transaction barcode number.
|
Note: If the transaction barcode is entered, the other field values will be ignored. |
Orig Ticket ID - Ticket ID of the transaction to post void.
Orig Trans Date - Date of the transaction to post void.
Orig Store ID - ID of the store where the transaction was performed.
Orig Register ID - ID of the register where the transaction was performed.
Orig Trans Amount - Amount of the transaction to post void.
Select Process.
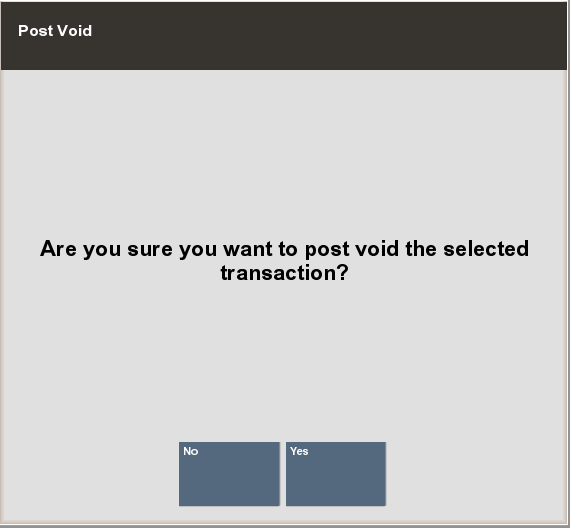
If the transaction is found, Xstore Point of Service prompts for confirmation to post void the transaction.
Indicate whether to post void the transaction:
Click Yes to post void the transaction.
Click No to cancel the post void.
Xstore Point of Service may prompt for a reason for the post void.
Select the reason:
Click the reason.
Use the up and down arrow to highlight the reason, then press the Spacebar.
Select OK.
The following prompts depend upon the configuration of your system.
If necessary, scan the cash drawer with which to perform the post void.
If necessary, enter additional information about the reason for the post void:
Enter the additional information.
Select OK.
Xstore Point of Service voids the transaction, performs any necessary refunds, prints void receipts for your records, and returns to the previous screen.
Use the No Sale option to open the cash drawer for a reason other than a normal sale transaction.
To perform a No Sale:
Select Till in the Register Login screen.
Do one of the following, depending upon the configuration of your system:
Enter your password and press Enter.
The Till menu opens.
Select Till Options.
Select No Sale.
Xstore Point of Service prompts for the reason for the no sale.
Select the reason:
Click the reason.
Use the up and down arrow to highlight the reason, then press the Spacebar.
Select OK.
The following prompts depend upon the configuration of your system.
If necessary, scan the cash drawer with which to perform the no sale.
If necessary, enter additional information about the reason for the no sale:
Enter the additional information.
Click OK.
The cash drawer opens.
Your system may be configured to automatically log out an associate after a specified period of time if there is no system activity. However, you may need to temporarily leave a register before that occurs. In that case, you can lock the register to prevent another person from using the system while you are away.
Registers can be locked from the Register Login screen or the Register Sale screen:
To lock a register:
Click Manage Tills in the Register Login screen.
Do one of the following, depending upon the configuration of your system:
Enter your password and press Enter.
The Manage Tills menu opens.
Click Register Options.
Click Lock Register.
The system displays a message indicating that the system is now locked.
To unlock a register:
Do one of the following, depending upon the configuration of your system:
Enter your user ID in the Register Login field and press Enter.
Xstore Point of Service prompts for your password. Continue with Step 3.
Scan your finger on the fingerprint reader.
The register is unlocked.
Enter your password and press Enter.
The register is unlocked.
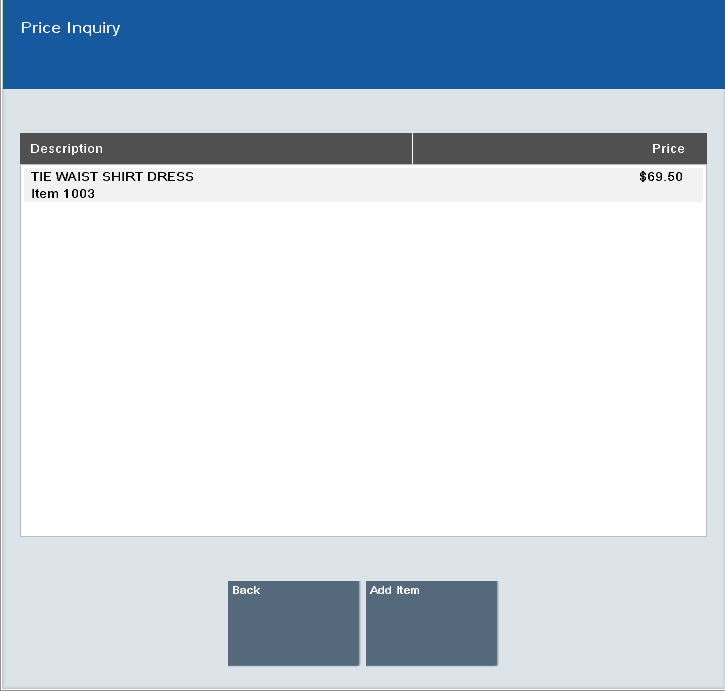
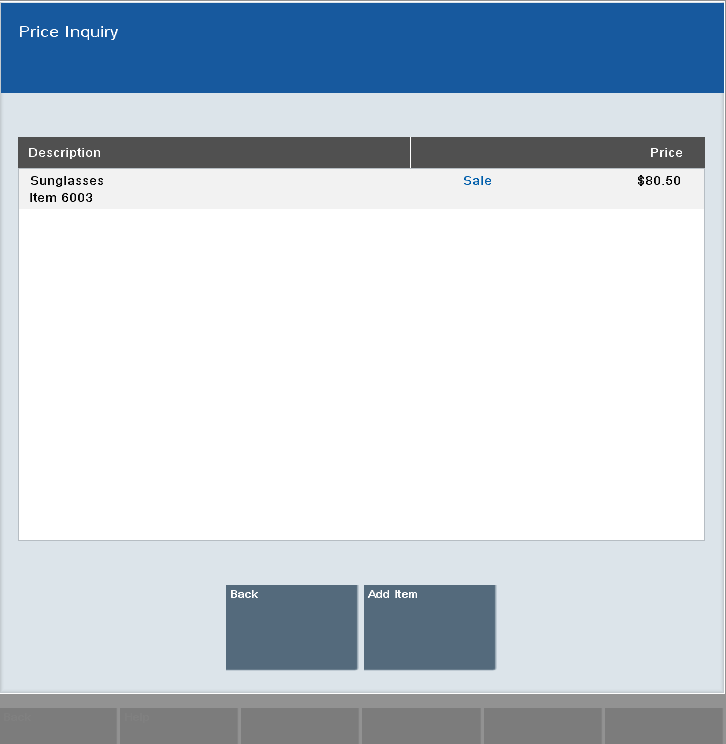
If you want to look up the price of an item, use the function Price Inquiry. You can look up the price for an item when you are logged out as well as when you are logged on to the application. To look up the price of an item, follow the steps below.
Press Find Item.
Press Price Inquiry.
You are prompted for the item. Scan, or enter the item and press Enter.
The item description, item ID and the corresponding price are displayed.
|
Note: If the displayed price is a deal price, the system marks the price with the text Sale. |
If you are logged out of the application, press Back to close the screen.
If you are logged on to the application, choose one of the following options.
Press Back to return to the Sales screen.
Press Add to Item to add the item to the c1urrent sales transaction. The item is shown on the view port.