| Oracle® Retail Xstore Point of Service User Guide Release 18.0 F12254-01 |
|

 Previous |
 Next |
To avoid queues at a manned Xstore POS, Xstore has a Self-Checkout (SCO) mode. In this mode, it will enable customers to use Xstore to scan their own items and pay for the sale.
It uses exactly the same hardware as standard Xstore manned register mode, and this helps reduce costs, since self-checkout registers are far more expensive.
It uses exactly the same Xstore software, but operating with a simplified UI, a reduced set of functions and some SCO specific configurations.
Because of this, each Xstore register can now operate essentially in one of three modes:
As a fixed traditional manned register only
As a fixed Self-Checkout register only
Or as a dual mode manned or SCO register, that can be easily switched between modes:
This can be achieved by allowing the register screen to swivel from cashier facing to customer facing. This allows the sharing of scanners, receipt printers and payment terminals.
These registers allow:
Self-scanning of items by customers
Non-barcoded items to be added to the sale via picture buttons
Manual keying of barcodes and SKUs
Coupon scanning
Loyalty card scanning
Payment by debit, credit and gift card only
Receipt printing
Prompt for the "Number of carrier bags used"
This section describes the following topics:
The process of a sale on the SCO is in two parts - the customer needs to scan their items, and secondly to pay by card. Loyalty or customer ID capture associates the transaction with a customer. Depending on configuration, the number of carrier bags used may be prompted for.
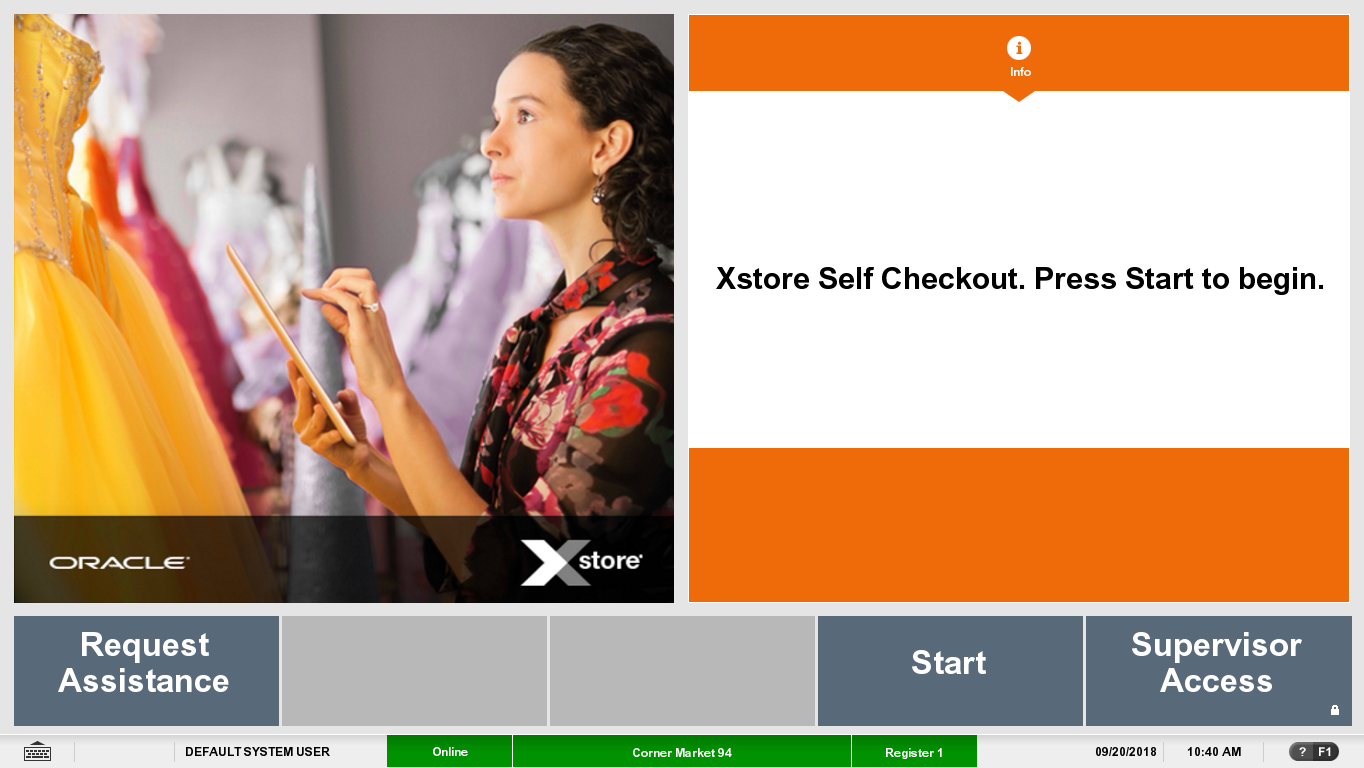
To perform a self check out:
Select the Start button.
If your store has a loyalty program, the customer can scan their loyalty or customer card.
After scanning the loyalty or customer card, the customer's name is displayed.
If no loyalty or customer card is available, select Skip to continue to scan the items.
Scan items (or add items via another method - see Alternate Methods to Add Items).
Scan any Bounceback coupons. The discount is recorded and the Item Panel displays the updated transaction amount.
Select Finish & Pay.
If prompted, enter the number of bags used on the keypad.
The payment terminal (PED) displays the transaction amount and instructs the customer to insert their payment card and enter a PIN or tap their payment card.
Confirm the card payment on the payment terminal (PED).
A customer sale receipt can be requested and the customer is prompted to take their receipt.
The transaction is cleared from the screen and is ready for the next transaction.
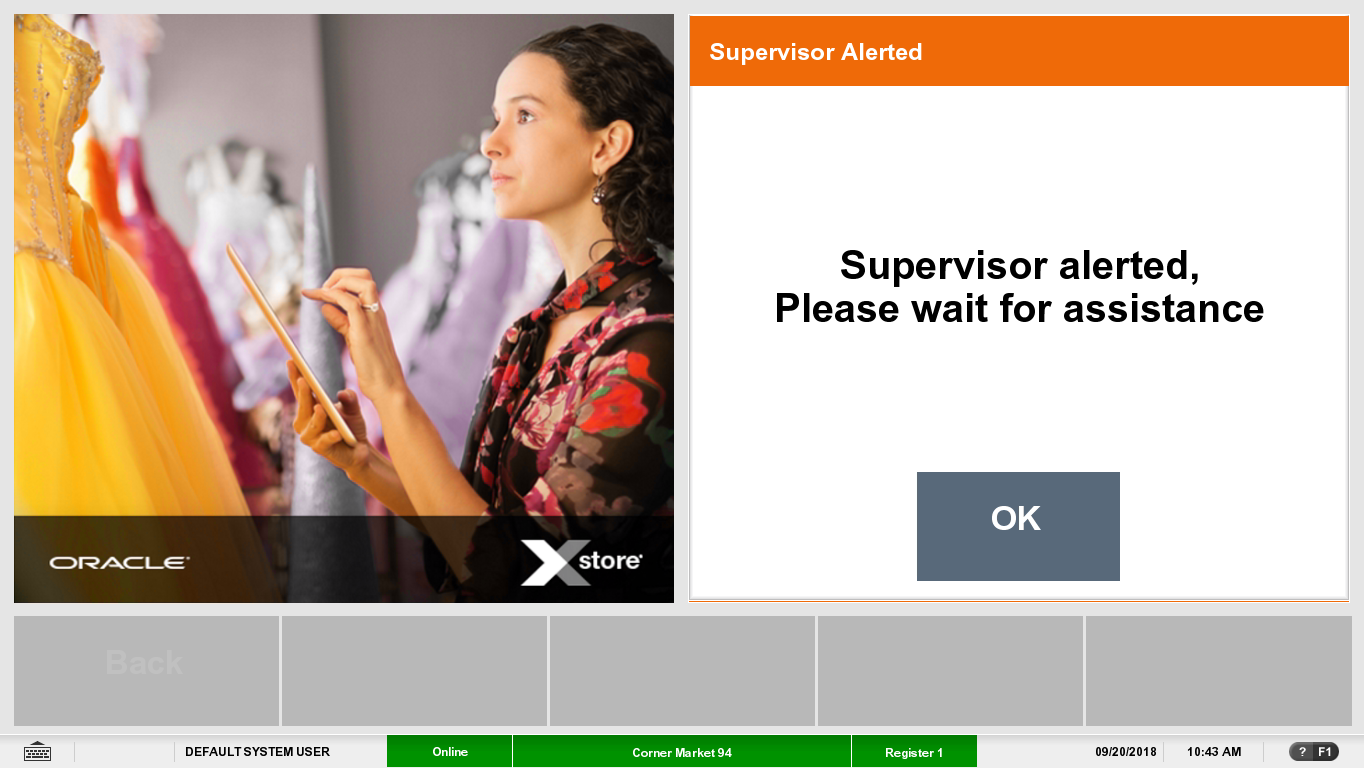
At any time in the transaction help is needed, select Request Assistance and wait for a supervisor. A sound is made by the register requesting assistance.
If a customer payment card is declined for any reason, such as invalid PIN, card expired, insufficient funds on card, and so on, the following options are available:
Try Another Card
Request Assistance
Back to Basket
If items cannot be scanned in because there is no barcode on the item, or the barcode is damaged, the identification of the item can be added by an alternative methods:
Once the item has been added, continue the sale (see Step 3 above), or complete the sale by selecting Finish & Pay. See Step 5 above.
To find items that do not have a barcode, such as bakery items, for example, croissants, or self service hot drinks:
Select the Lookup Items tab. The Quick Items panel displays the configured item images.
Locate and select the required item image. When the item image is selected, the item is added to the basket.
To manually enter the barcode number:
Select the Keypad tab.
Manually key in the barcode by entering the barcode number using the keypad.
Select Enter.
To manually enter the SKU number:
Select the Keypad tab.
Manually enter the SKU number using the keypad.
Select Enter.
Occasionally a customer issue needs resolving at the register during a sale. This may be in order to verify the sale of age restricted items, to cancel an item or sale, or to suspend a sale.
The supervisor access function is also required when reprinting a receipt, locking the SCO register, restarting the SCO register, and switching to a standard register.
The following section describes the functions and options available with supervisor access:
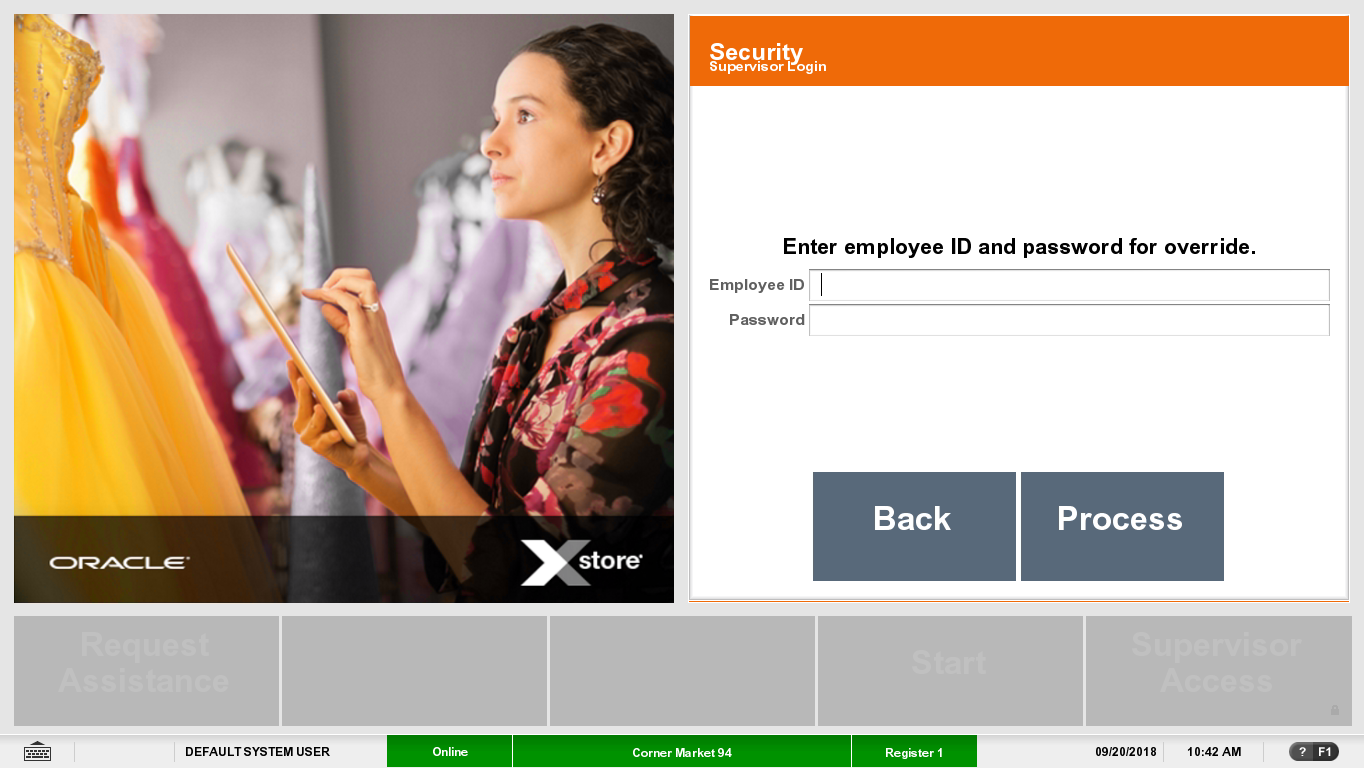
To gain access to the supervisor functions, login is required.
Enter your Employee ID.
Enter your Password.
Select Process.
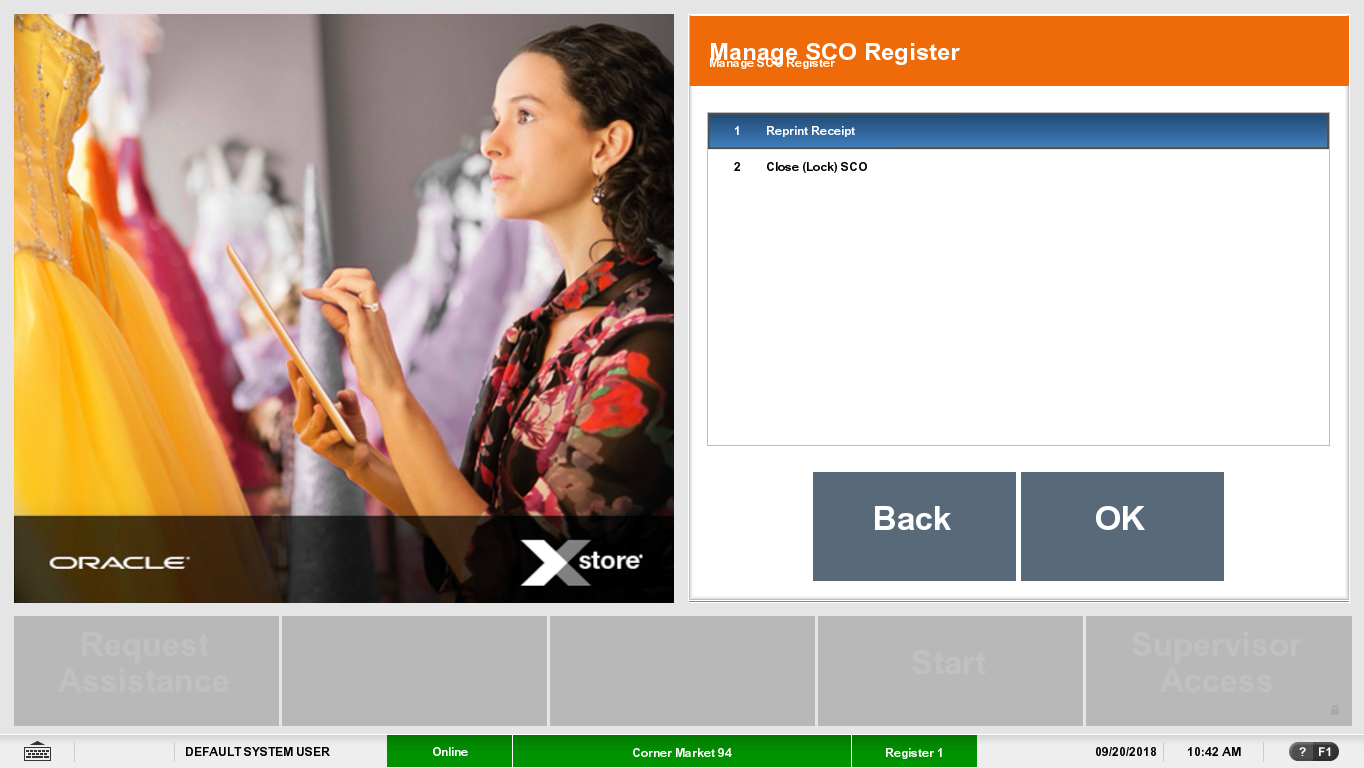
The Manage SCO Register menu is displayed.
The options displayed on the Supervisor Access menu, when logging on, depends on whether the SCO is already in the middle of a transaction.
When the SCO is in sale mode, the following Supervisor Access menu options are available:
Cancel Item From Sale
Barcode Not Found - Enter Item Manually
Cancel Sale
Suspend Sale
Certain items, such as alcohol, medicines, glues and solvents, and so on, that are age restricted cannot be purchased until the age of the customer is verified by a supervisor. When an age restricted item is scanned, a warning message is displayed and the supervisor alerted. The supervisor must log in to verify the date of birth of the customer.
Log in as a supervisor. See Supervisor Login.
A message relating to the age restriction is displayed. If Yes is selected, the item is added to the basket.
Further age restricted items that require same age or less, are automatically added to the basket.
If No is selected, the item is not added to the basket.
Certain items such as medicines are restricted in the quantity permitted to be sold. When a customer tries to exceed the maximum quantity for an item, the supervisor is alerted. The supervisor must log in to clear the message before the customer can continue with the sale without the additional items.
If Xstore detects that the barcode scanned is invalid and does not exist, it displays an error message that the item cannot be found and alerts a supervisor. A supervisor may be able to add the item details (name and price) manually, or cancel the item.
An item may need to be canceled (voided) from a sale in cases of accidental double scanning or change of mind after scanning the item.
To cancel an item:
Log in as a supervisor. See Supervisor Login.
Xstore displays the In Sale menu. Swipe the item left to right to remove the item from the basket.
Enter a reason code if prompted.
The basket total is updated to reflect the canceled item.Xstore removes the item from the sale and item line display.
When done, select Back to return to the SCO sale.
The SCO sale may need to be canceled if a customer abandons a sale and walks away from the store, or if they wish to purchase items that can only be purchased on a standard register and therefore wish to cancel the SCO sale and start again on a standard manned register.
To cancel a sale:
Log in as a supervisor. See Supervisor Login.
Xstore displays the In Sale menu. Select Cancel Sale.
Xstore clears the transaction and returns to the main SCO start screen.
A sale on the SCO register may be suspended and picked up on a manned register when a customer, for example, cannot pay at the SCO or specific items cannot be checked out on the SCO. This may occur when a customer does not have a card, or money on the account, or if additional items, which are not available in SCO mode, (such as cigarettes, gift cards and so on), are to be included in the transaction.
To suspend a sale:
Log in as a supervisor. See Supervisor Login.
Xstore displays the In Sale menu. Select Suspend Sale.
Xstore clears the transaction and returns to the main SCO start screen. The suspended sale can be resumed and completed on a standard Xstore register.
When not in a transaction, the register in SCO mode can be used to:
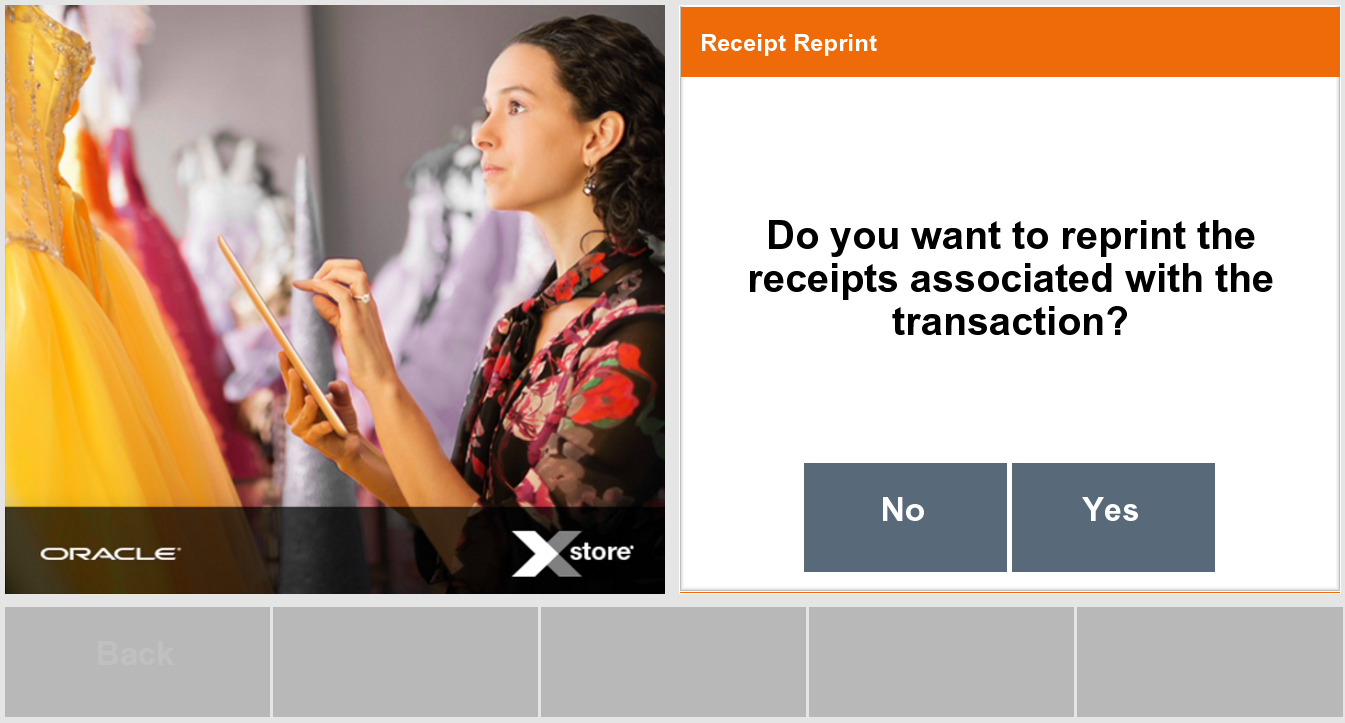
The receipt for the last sale only can be printed again in cases where the receipt failed to print correctly the first time. If a receipt needs reprinting for SCO sales prior to the last SCO sale, then the customer will need to go to a manned register, and the cashier will use the Reprint Receipt option in the Electronic Journal. Refer to the Oracle Retail Xstore Manager's Guide for more details.
To reprint the last receipt:
Log in as a supervisor. See Supervisor Login.
Xstore displays the Manage SCO Register menu. Select Reprint Receipt.
Xstore prints the receipt for the last SCO transaction on that register.
Select OK to clear the message prompt that the receipt has printed and to return to the Manage SCO menu.
Select Back to return to the main SCO start screen.
A SCO register can be closed (locked) so that it is not available for customers to use. This may be due to the self checkout lane not being ready for customers due to requiring cleaning or no bags available, issues with the SCO printer or payment terminal, or the store just wants customers to use manned Xstore registers for a period of time. The register cannot be locked when in a SCO sale.
To close the SCO register:
Log in as a supervisor. See Supervisor Login.
Xstore displays the Manage SCO Register menu. Select Close (Lock) SCO.
Xstore locks the register and displays the Register Locked screen.
A SCO register must be opened by a cashier so that it is available for customers to use.
To open the SCO register:
Enter Employee ID.
Enter Employee Password.
The Xstore POS register can be swapped between SCO mode POS and standard manned POS.
To switch SCO to standard register mode:
Select Alt-tab on the Keypad to switch windows and open Xenvironment on the register.
Select Support (F2) on Xenvironment.
Select Stop SCO.
Enter User ID.
Enter Password.
To restart SCO register mode:
Select Alt-tab on the Keypad to switch windows and open Xenvironment on the register.
Select Support (F2) on Xenvironment.
Select Reboot SCO.
Enter User ID.
Enter Password.