| Oracle® Retail Xstore Point of Service User Guide Release 18.0 F12254-01 |
|

 Previous |
 Next |
The Register Open and Close procedures explain the steps you must perform to open and close a register.
Opening the register is a process that can be quickly completed by managers or associates who have the proper security privileges. The process is highly configurable and your process may be different from the instructions below. Every effort has been made to include notes or examples of additional steps that may be configured for your store.
The register open process depends upon the configuration of your system.
Standard Open - Open a register that is not configured for 24/7 processing.
24/7 Open - Open a register that is configured for 24/7 processing.
Networked Cash Drawer Open - Open a register that uses a networked cash drawer.
To open a register that is not configured for 24/7 trading:
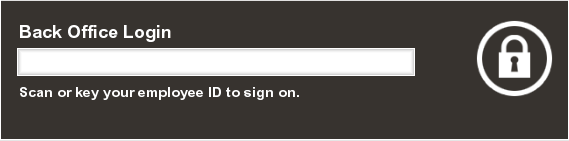
Select Back Office in the Register Login screen.
|
Note: Touchscreen users can tap the red register status to begin the register open process. |
Do one of the following, depending upon the configuration of your system:
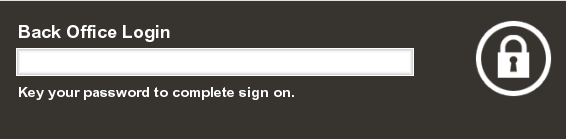
Enter your password and press Enter.
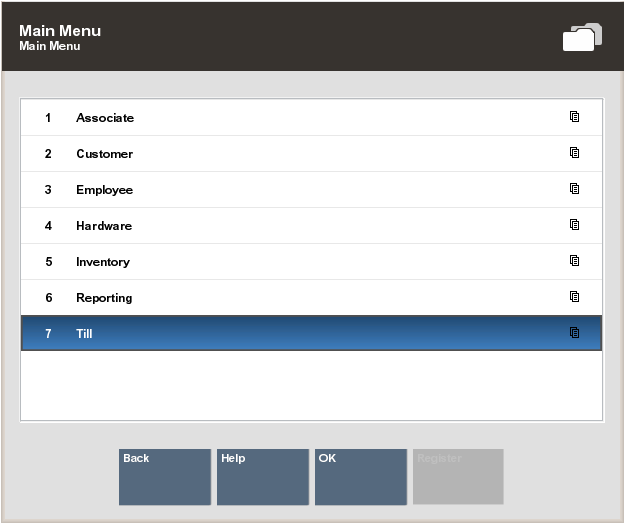
The Back Office Main Menu opens.
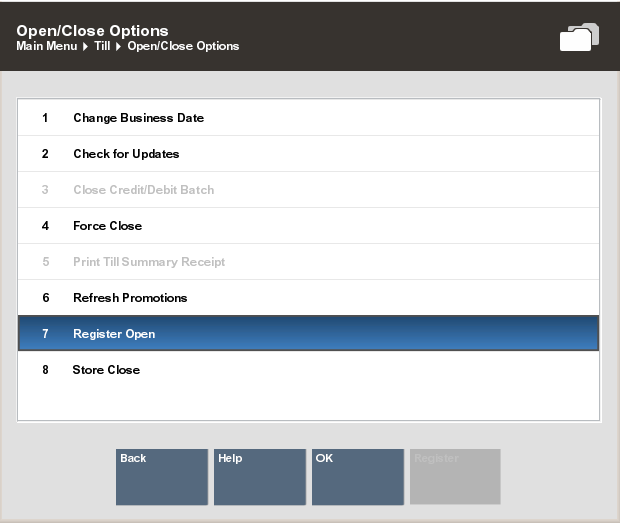
Select Till.
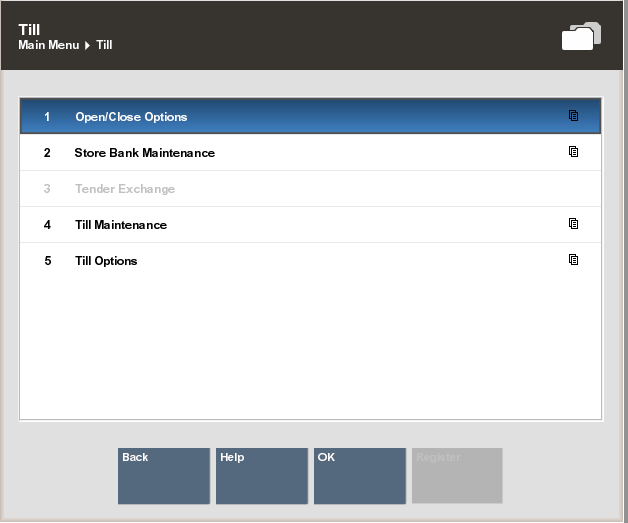
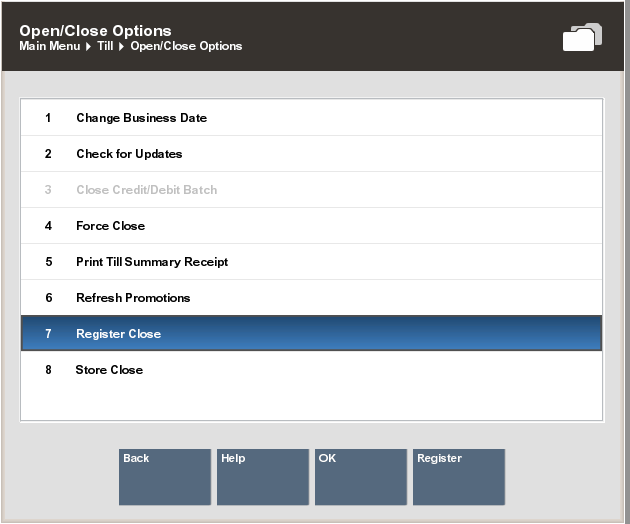
Select Open/Close Options.
Select OK.
The Open/Close Options menu opens.
Select Register Open.
Select OK.
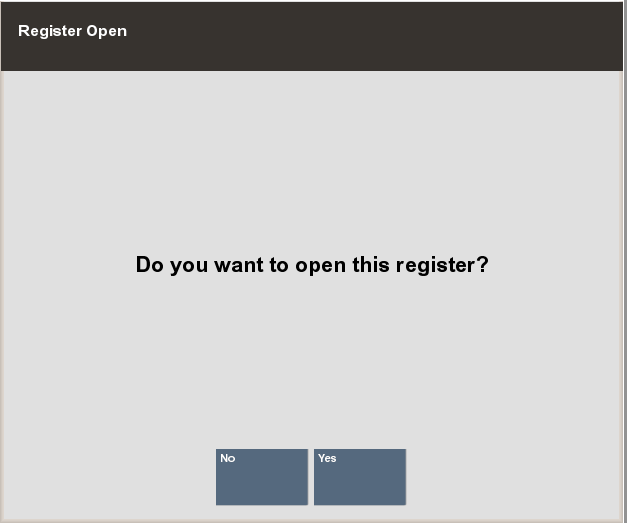
A confirmation prompt opens.
Select Yes.
If your register has more than one cash drawer, you are prompted to select a drawer. Continue with Step 10.
If your register has only one cash drawer, the count summary screen opens. Continue with Step 11.
If necessary, select the drawer from a list of available cash drawers.
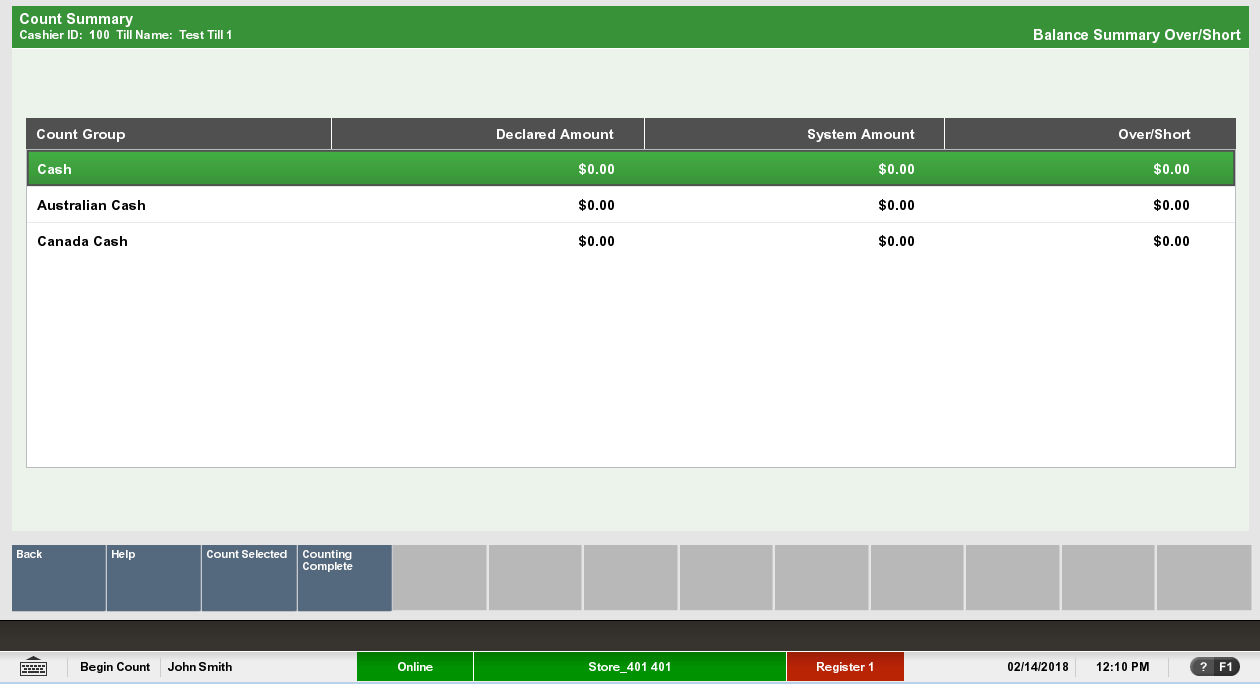
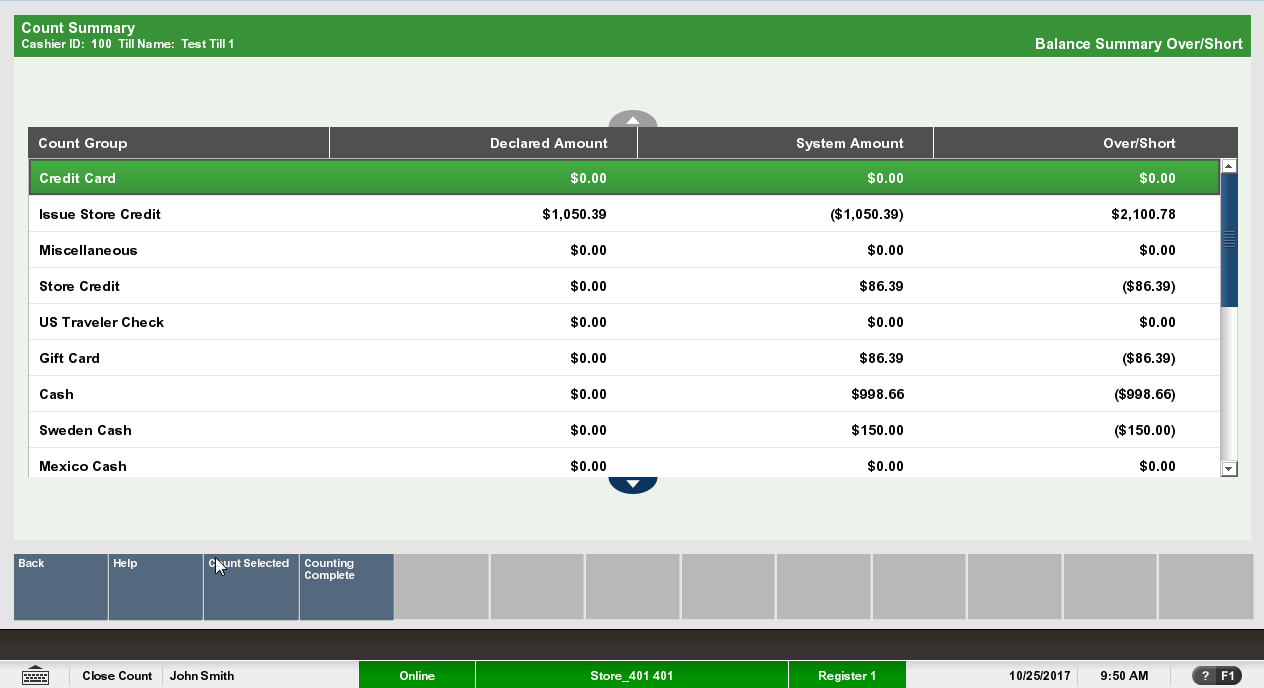
The count summary screen opens.
Count the cash tenders:
Select the tender to count.
Select Count Selected.
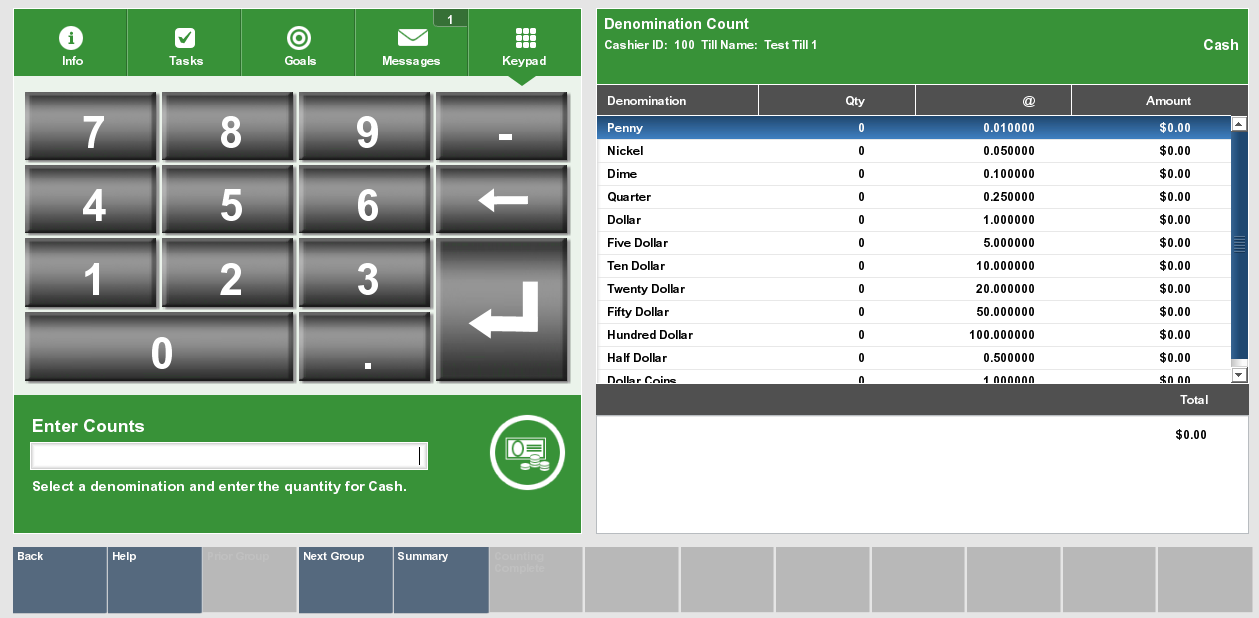
A list of currency denominations opens.
Count a denomination currency.
Select the denomination in the View Port.
Enter the count of the currency denomination in the Focus Bar and press Enter.
Select Summary.
Xstore Point of Service returns to the tender list
Click Counting Complete when all counts are completed.
|
Note: Check the Over/Short column to see if your till is balanced with the system values for each tender type. |
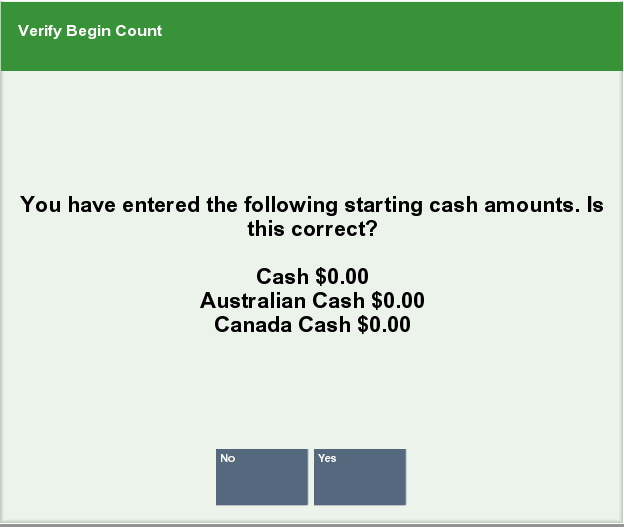
If the starting cash amount matches, the system prompts to confirm the amount for all cash currencies you entered and opens the register after you acknowledge the system amount. Continue with Step 13.
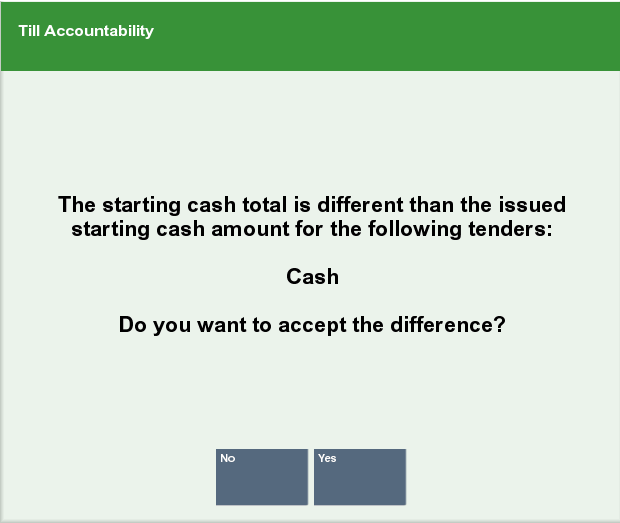
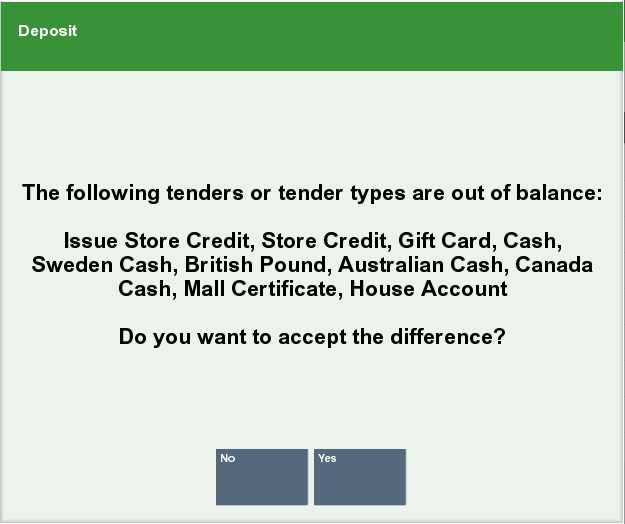
If the currency amounts do not match, the system displays a prompt to either recount the till or to accept the difference. Continue with Step 14.
Click Yes.
The register opens. Receipts for the register open may print.
Do one of the following:
Click Yes to continue opening.
The register opens. Receipts for the register open may print.
Click No to return to the count screen. Return to Step 11.
For systems using 24/7 trading, the register open process must be performed on each register every day. Depending upon the configuration of your system, and the time that the register is opened, the register may open for the previous day or the next day.
To open a register that is configured for 24/7 trading:
Select Back Office in the Register Login screen.
|
Note: Touchscreen users can tap the red register status to begin the register open process. |
Do one of the following, depending upon the configuration of your system:
Enter your password and press Enter.
The Back Office Main Menu opens.
Select Till.
Select Open/Close Options.
Select OK.
The Open/Close Options menu opens.
Select Register Open.
Select OK.
A confirmation prompt opens.
Click Yes.
An insert till notification window opens.
Select OK to open the till.
The cash drawer opens. Continue with Step 18.
Click Change Float to change the float amount. Continue with Step 10.
Xstore Point of Service prompts for the reason for changing the float.
Select the reason for changing the float:
Click the reason.
Use the up and down arrows to highlight the correct reason then press the Spacebar.
Select OK.
Xstore Point of Service prompts for additional comments.
Enter any additional comments.
Select OK.
Xstore Point of Service prompts for the currency to change.
Select the currency to change:
Click the currency.
Use the up and down arrows to highlight the correct currency then press the Spacebar.
Select OK.
Xstore Point of Service prompts for the new float value.
Enter the new float amount and press Enter.
A confirmation prompts opens.
Click Yes to confirm the new amount.
An insert till notification window opens.
Insert the till into the cash drawer.
Close the cash drawer.
The register opens.
In a register configured to use a networked cash drawer, opening the register is done by opening the cash drawer.
To open a networked cash drawer:
Select Back Office in the Register Login screen.
|
Note: Touchscreen users can tap the red register status to begin the register open process. |
Do one of the following, depending upon the configuration of your system:
Enter your password and press Enter.
The Back Office Main Menu opens.
Select Till.
Select Open/Close Options.
Select OK.
The Open/Close Options menu opens.
Click Cash Drawer Open.
Select OK.
A list of cash drawers opens.
Select the cash drawer to open:
Click the cash drawer.
Use the up and down arrow keys to highlight the cash drawer and press the Spacebar.
Select OK.
A confirmation prompt opens.
Click Yes.
A list of tills opens.
Select the till to assign to the cash drawer:
Click the till.
Use the up and down arrow keys to highlight the till and press the Spacebar.
Select OK.
The Count Summary screen opens.
Count the cash tenders:
Click the tender to count.
Click Count Selected.
A list of currency denominations opens.
Count a currency denomination.
Click the denomination in the View Port.
Enter the count of the currency denomination in the Focus Bar and press Enter.
Click Summary.
Xstore Point of Service returns to the tender list.
Click Counting Complete when all counts are completed.
|
Note: Check the Over/Short column to see if your till is balanced with the system values for each tender type. |
If the starting cash amount matches, the system prompts to confirm the amount for all cash currencies you entered and opens the register after you acknowledge the system amount. Continue with Step 10.
If the currency amounts do not match, the system displays a prompt to either recount the till or to accept the difference Continue with Step 11.
Click Yes.
The register opens. Receipts for the register open may print.
Do one of the following:
Open the till to associate with the Cash Drawer. See Open a Till for more information.
If necessary, click Register.
The register opens. Opening receipts may print.
The register close process can be performed by store managers or associates who have the proper security privileges. A register close can be completed any time during the day.
This process is highly configurable and your process may be different than the instructions below. Every effort has been made to include notes or examples of additional steps that may be configured for your store.
The procedures described in this section assume that till accountability is not being used (this is a configurable option). For more information on till accountability and its requirements, refer to the Oracle Retail Xstore Point of Service Manager's Guide.
The register open process depends upon the configuration of your system:
Standard Close - Close a register that is not configured for 24/7 processing.
24/7 Close - Close a register that is configured for 24/7 processing.
Networked Cash Drawer Close - Close a register on a system that uses a networked cash drawer.
To close a register with the standard close process:
Click Back Office in the Register Login screen.
|
Note: Touchscreen users can tap the red register status to begin the register open process. |
Do one of the following, depending upon the configuration of your system:
Enter your password and press Enter.
The Back Office Main Menu opens.
Select Till.
Select Open/Close Options.
Select OK.
The Open/Close Options menu opens.
Select Register Close.
Select OK.
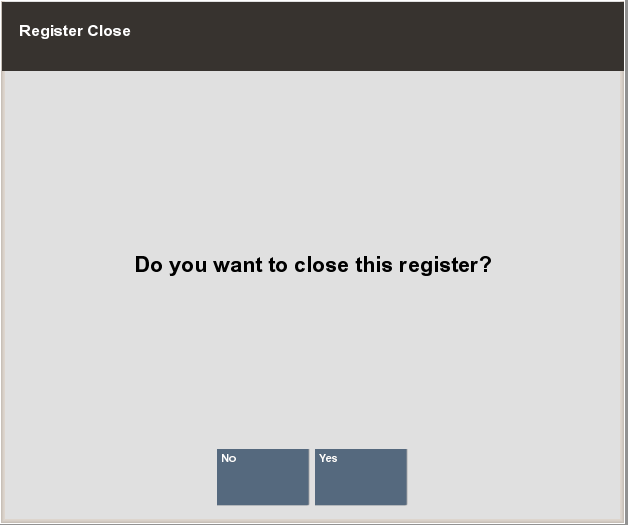
A confirmation prompt opens.
Select Yes.
The cash drawer opens and Xstore Point of Service displays the Close Count Summary screen. Each count group (tender type) is counted individually.
Count the cash tenders:
Click the tender to count.
Click Count Selected.
A list of currency denominations opens.
Count a currency denomination.
Click the denomination in the View Port.
Enter the count of the currency denomination in the Focus Bar and press Enter.
Click Summary.
Xstore Point of Service returns to the tender list.
If necessary, count the credit card tender:
Click to select Credit Card.
Click Count Selected.
Xstore Point of Service prompts for the credit card tender count.
Enter the number of credit card tender counts and press Enter.
Xstore Point of Service prompts for the amount of credit card tenders.
Enter the total amount of all credit card tenders and press Enter.
Click Summary.
Xstore Point of Service returns to the tender list.
If necessary, count the check tender:
Click to select Check.
Click Count Selected.
Xstore Point of Service prompts for a check serial number.
Enter the serial number for the check and press Enter.
Xstore Point of Service prompts for the amount of the check.
Enter the amount of the check and press Enter.
Click Summary.
Xstore Point of Service returns to the tender list.
If necessary, count the other tenders:
Click Counting Complete when all counts are completed.
|
Note: Check the Over/Short column to see if your till is balanced with the system values for each tender type. |
If the cash amount matches, the system prompts to confirm the amount for all cash currencies you entered and closes the register after you acknowledge the system amount. Continue with Step 15.
If the currency amounts do not match, the system displays a prompt to either recount the till or to accept the difference. Continue with Step 16.
Click Yes.
Continue with Step 9.
Do one of the following:
If necessary, select the deposit amount:
Click Accept Deposit to accept the suggested amount.
The register closes. Close receipts may print. Continue with Step 11.
Click Change Deposit to enter a new deposit amount.
Xstore Point of Service prompts for a new deposit amount. Continue with Step 10.
Click Deposit Calculator to calculate a new deposit amount.
Xstore Point of Service displays a denomination count screen that can be used as a calculator (see Step 10). Enter the count for each denomination. A running total at the bottom of the screen is updated as you count the cash amount to be deposited.
Enter the new deposit amount and press Enter.
Close the cash drawer.
The close is complete.
The register close process must be performed on each opened register for it to be rolled over into the next day.
|
Note: Near the end of a day, warning messages will appear on registers that remain open close to and after the required close time. If a register continues to stay open past the required close time, the register will eventually prevent the user from opening any more transactions until the register is closed and reopened for the next day. |
To close a register configured for 24/7 trading:
Click Back Office in the Register Login screen.
|
Note: Touchscreen users can tap the red register status to begin the register open process. |
Do one of the following, depending upon the configuration of your system:
Enter your password and press Enter.
The Back Office Main Menu opens.
Select Till.
Select Open/Close Options.
Select OK.
The Open/Close Options menu opens.
Select Register Close.
Select OK.
A confirmation prompt opens.
Select Yes.
The cash drawer opens.
Perform the instructions on the screen. Depending upon the configuration of your system, you may be prompted to do one of the following:
Remove all non-cash tenders from the till.
Remove the till.
Close the cash drawer.
Register close receipts may print.
You may be prompted whether to open the register.
If necessary, indicate whether to open the register:
Click Yes to open the register. See 24/7 Open for the open procedure.
Click No to keep the register closed.
If your system is configured to use network-enabled cash drawers, closing the register is done by closing the cash drawer.
You must remove the till before closing the cash drawer. See Remove a Till from a Register for more information.
To close a register with a networked cash drawer:
Click Back Office in the Register Login screen.
|
Note: Touchscreen users can tap the red register status to begin the register open process. |
Do one of the following, depending upon the configuration of your system:
Enter your password and press Enter.
The Back Office Main Menu opens.
Select Till.
Select Open/Close Options.
Select OK.
The Open/Close Options menu opens.
Click Cash Drawer Close.
Select OK.
A list of cash drawers opens.
Select the cash drawer to close:
Click the cash drawer.
Use the up and down arrows to highlight the cash drawer, then press the Spacebar.
Select OK.
A confirmation prompt opens.
Click Yes.
The physical cash drawer opens and Xstore Point of Service displays the Close Count Summary screen. Each count group (tender type) is counted individually.
Count the cash tenders:
Click the cash tender to count.
Click Count Selected.
A list of currency denominations opens.
Count a currency denomination.
Click the denomination in the View Port.
Enter the count of the currency denomination in the Focus Bar and press Enter.
Click Summary.
Xstore Point of Service returns to the tender list.
If necessary, count the credit card tender:
Click to select Credit Card.
Click Count Selected.
Xstore Point of Service prompts for the credit card tender count.
Enter the number of credit card tender counts and press Enter.
Xstore Point of Service prompts for the amount of credit card tenders.
Enter the total of all credit card tenders and press Enter.
Click Summary.
Xstore Point of Service returns to the tender list.
If necessary, count the check tender:
Click to select Check.
Click Count Selected.
Xstore Point of Service prompts for a check serial number.
Enter the serial number for the check and press Enter.
Xstore Point of Service prompts for the amount of the check.
Enter the amount of the check and press Enter.
Click Summary.
Xstore Point of Service returns to the tender list.
If necessary, count the other tenders:
Click Counting Complete when all counts are completed.
|
Note: Check the Over/Short column to see if your till is balanced with the system values for each tender type. |
If the starting cash amount matches, the system prompts to confirm the amount for all cash currencies you entered and closes the register after you acknowledge the system amount. Continue with Step 7.
If the currency amounts do not match, the system displays a prompt to either recount the till or to accept the difference Continue with Step 8.
Click Yes.
The register closes. Receipts for the register close may print.
Do one of the following:
Close the physical cash drawer.
The close is complete.