| Oracle® Retail Xstore Point of Service Mobile User Guide Release 19.0 F25674-03 |
|

 Previous |
 Next |
| Oracle® Retail Xstore Point of Service Mobile User Guide Release 19.0 F25674-03 |
|
Previous |
Next |
Oracle Retail Xstore Mobile POS maintains various kinds of information about store associates. Associates who have the proper security privileges may add, view, update, terminate, and void an employee record. The employee maintenance screen is organized into four categories, each one accessible by selecting an on-screen tab. The tabs are named General, Human Resources (HR), Security, and Comment. The Employee Maintenance Menu also provides additional functions including the ability to borrow an employee from another store in the organization, and an employee payroll advance function.
|
Note: Because each Oracle Retail Xstore Mobile POS menu is configurable, the button functions and the menu options on your system may appear in a different order or have different text than the examples shown in this guide. |
This chapter contains the following sections:
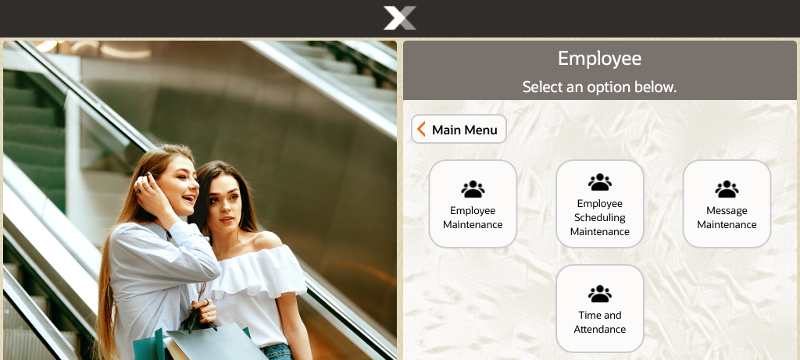
After logging in, select Employee from the Main Menu. See Figure 1-4.
At the Employee menu, select one of the options.
The following options are available:
Employee Maintenance - Select this option to maintain employee records. Refer to Maintaining Employee Information.
Associate Advance - Select this option to provide payment in advance of an employee's scheduled payday. Refer to Associate Advance.
Employee Borrow - Select this option to borrow an associate from another store to work in your store for a specific and limited period of time. Refer to Employee Borrow.
Employee Scheduling Maintenance - Select this option to create and edit employees' work schedules and manage employees' time off. Refer to Employee Scheduling, Maintain Employee Time Off and Shift Maintenance.
Message Maintenance - Select this option to create and maintain employee messages. Refer to Message Maintenance.
Time and Attendance - Select this option to maintain employee timecard and payroll information. Refer to Payroll and Timecard Maintenance.
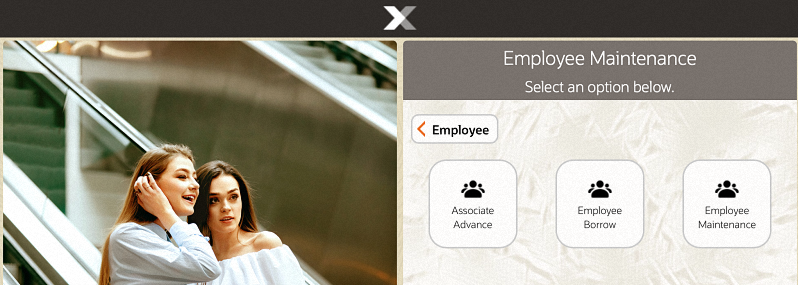
When the Employee Maintenance menu displays, select the Employee Maintenance option.
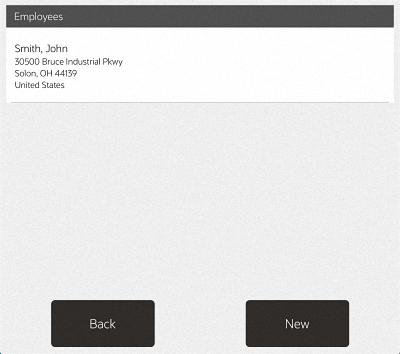
Oracle Retail Xstore Mobile POS displays the Employee Lookup form, prompting for employee information.
Enter the criteria you want to use for finding an employee record and select Process.
|
Note: If you enter an Employee ID, Oracle Retail Xstore Mobile POS may immediately display that employee's record if the ID exists and if it is unique. |
If you enter search criteria that results in more than one record being found or your system is set up to always display a list, you must select the record you want from the list.
Choose one of these options:
Back – Returns to the Employee Lookup form.
Select & View – Opens the selected employee record for viewing, editing, or printing.
New – Displays a form for adding a new employee record to the employee database.
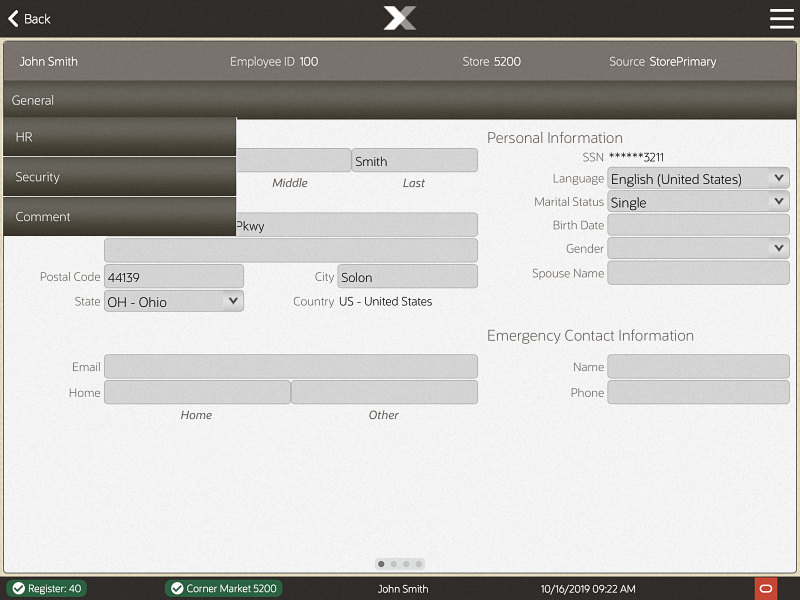
An employee record always opens in a view-only mode and cannot be edited unless you change to the editing mode. After an employee record displays, you can navigate between the tab sections to select any of them. Refer to Employee Maintenance Tabs Overview for screen images and more detail about the information found on each tab.
|
Note: When a screen or field is grayed out, it cannot be edited until you change to the editing mode. The edit functions are controlled by security and may not be available to all users. |
After viewing an employee record you may decide that some of the information must be changed, or you may want to enter additional information in some fields. You must enter the editing mode to make any changes to the record.
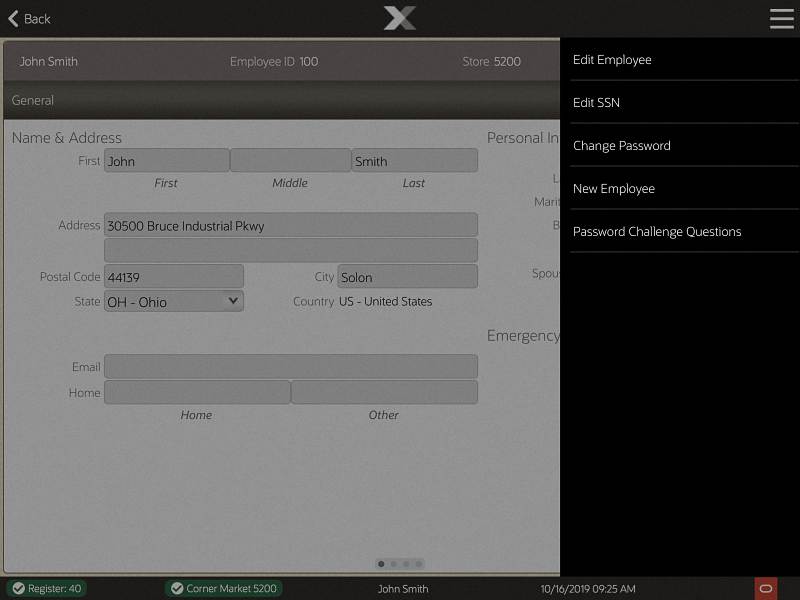
With the employee record displayed, select Edit Employee from the Context Menu to go into an editing mode.
The fields are no longer grayed out.
To make changes to any of the fields, select the field you want to change, and replace the old entry by typing over it with the new information.
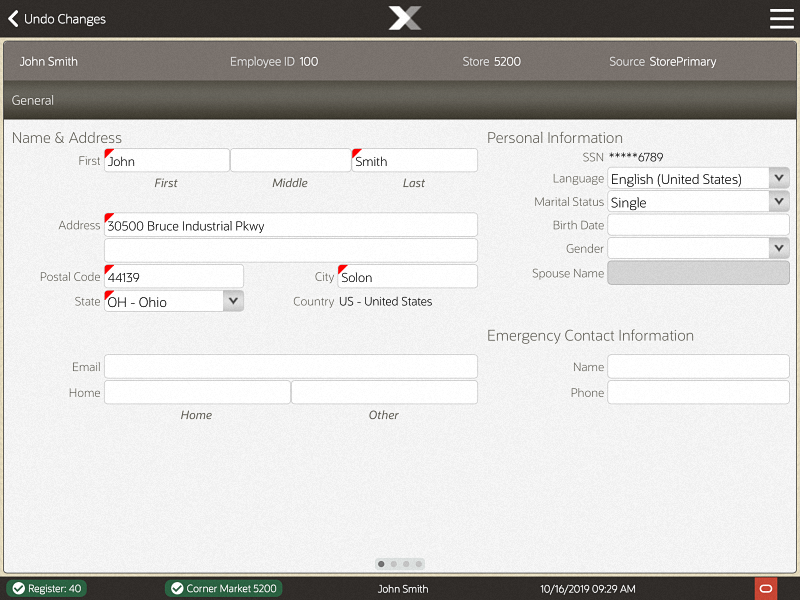
Any fields that require entries are marked with a red triangle in the upper left corner of the field.
Any fields that have lists attached display a down arrow on the right side of the field.
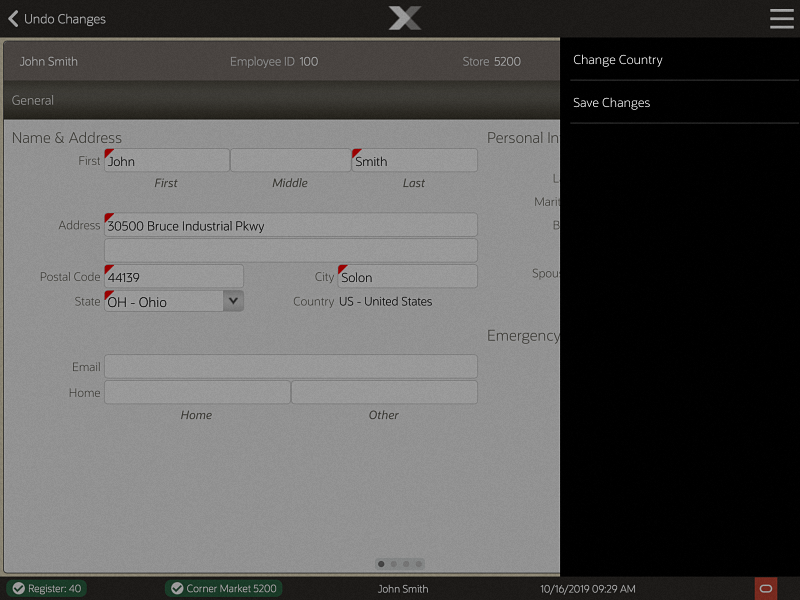
Save any changes you made before exiting from the Employee Maintenance screen.
Select the Save Changes option in the Context Menu to keep your changes. If you decide not to keep the changes you made, select the Undo Changes option.
|
Note: If you select Undo Changes you are prompted to confirm that you want to exit edit mode without saving any changes that you made. When the prompt ”Are you sure you want to lose changes?” displays, and you select Yes, your changes are discarded. |
The following options are available within Employee Maintenance:
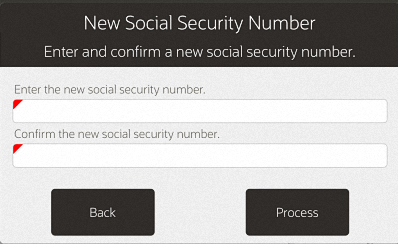
This option allows you to change a Social Security Number (SSN) for an employee.
Open the employee record for the user whose password you want to change.
Select the Edit SSN option in the Context Menu.
Enter a SSN twice. The second time as confirmation.
Select Process.
This option allows you to change a password for an employee. Passwords for new employees are created when a new employee's record is added to the database. You must have security privileges in the system to change a password.
|
Note: This option allows you to change a password for an employee. Passwords for new employees are created when a new employee's record is added to the database. You must have security privileges in the system to change a password. |
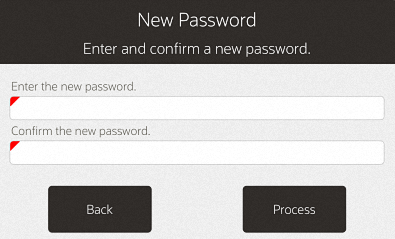
Open the employee record for the user whose password you want to change.
Select the Change Password option in the Context Menu.
Oracle Retail Xstore Mobile POS may prompt to verify your identity. If prompted, enter your own employee ID and password to verify that you have security privileges to change an employee's password. If you enter this information incorrectly, the system displays the message ”The password entered was incorrect.” Select OK to continue and reenter the information.
Oracle Retail Xstore Mobile POS prompts you to enter a new password for the employee. Type the new password for the employee and retype the same new password on the line below to confirm it.
|
Tip: Passwords may be case sensitive, so notice whether the Caps Lock key is on or off when you enter and confirm the new password. |
Select Process to verify the new password. If the system accepts the password, a confirmation message indicates that the password was changed.
|
Note: The system may enforce certain rules regarding passwords such as the minimum number of characters required or whether you can reuse an old password. If the new password does not meet the requirements, the system displays a message. If prompted, follow the instructions to correct any errors. |
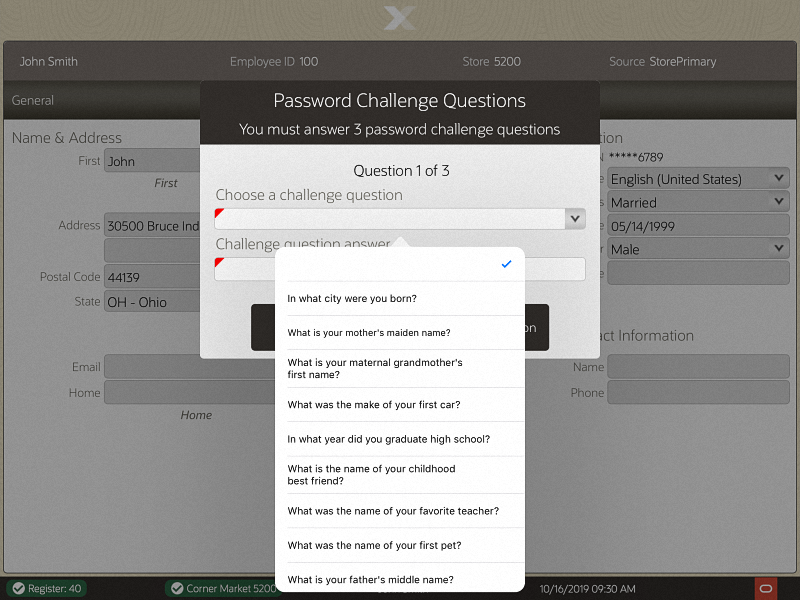
This configurable function allows your associates to reset their own password after answering several questions. Your store may not have this option available.
To establish password challenge questions:
Open the employee record for the user whose challenge questions you want to maintain.
Select the Password Challenge Questions Context Menu option.
Select a Challenge Question from the drop-down menu and type the answer in the Challenge question answer field.
Select Next Question.
Repeat steps 3-4 until the confirmation prompt displays. Save changes.
|
Note: The number of challenge questions is configured by your store, up to ten. |
Oracle Retail Xstore Mobile POS allows you to add a text comment to an employee's record. The comment can be viewed on the Comment tab window and printed.
|
Important: If you are creating a new employee record, select Save Changes first and then open the Comment Tab to create a comment. |
Select the Comment tab.
Select the Add Comment option from the Context Menu.
Oracle Retail Xstore Mobile POS displays a text form where you can enter a comment.
Select OK to save the comment with the employee's record.
Although some employee records may be downloaded from the home office automatically, you may need to create a new employee record at the store level.
You must first log in to the Employee Maintenance Menu.
Check to see if the employee record already exists by entering the new associate's name in the Employee Lookup form.
|
Tip: You may search by partial names if needed. |
Select Process to continue.
If your search for an employee name did not return a valid employee record, the system displays the message shown below. Select the New option to create a new employee record.
|
Note: After you finish adding the new employee and you have saved the new record, you can add an additional new employee record by selecting the New Employee option from the Employee Maintenance screen. |
The system prompts you to create a password for the new associate by entering and confirming it in the New Password form.
|
Note: The system may enforce certain rules regarding passwords such as the minimum number of characters required, or whether you can reuse a previous password.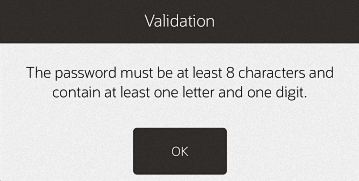 |
Select Process to continue. Oracle Retail Xstore Mobile POS displays a blank form with the four tab sections.
|
Note: Any information you entered in the fields on the Employee Lookup form automatically populates the associated fields on the Employee Maintenance General tab. |
Enter the new employee's information on the appropriate tabs. For more details about the type of information on each tab, refer to Employee Maintenance Tabs Overview.
After completing all of the data entry, select Save Changes in the Context Menu to store the new employee record in the database.
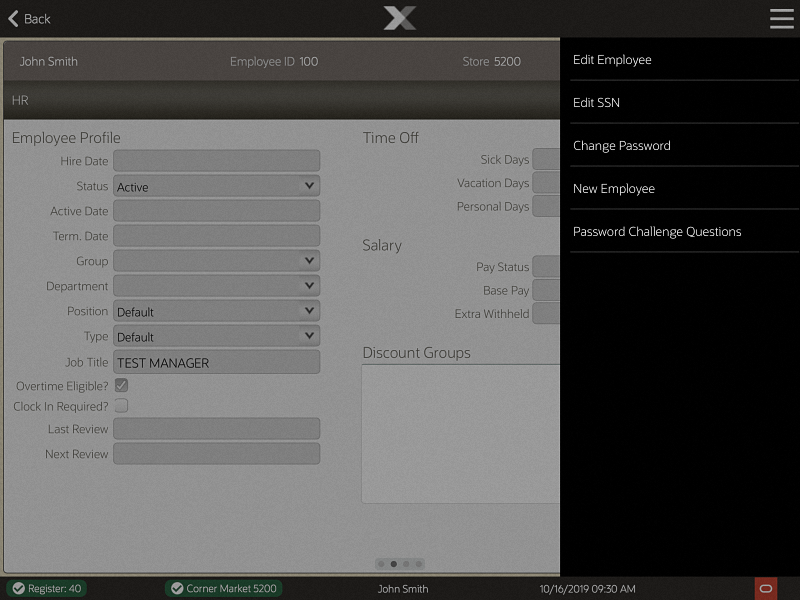
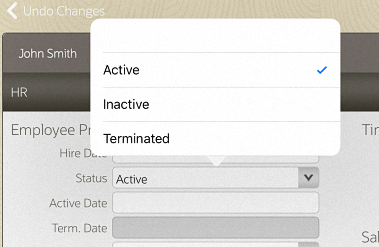
The employee Status field specifies whether an employee is considered to be actively employed or terminated. The Status field is found on the Human Resources (HR) tab of the employee record.
Open the record of the employee that you want to terminate.
Navigate to the Human Resources (HR) tab; the system displays the HR information.
Select Edit Employee from the Context Menu.
Select the drop-down arrow on the Status field to list the available options.
Select the Terminated option from the list.
Enter the employee's termination date.
Select the Save Changes option in the Context Menu to complete the termination process. The employee's record is now marked as voided (terminated). The employee's security privileges are also terminated.
|
Tip: The employee record is still in the system and can be viewed by selecting the Terminated check box on the Employee Lookup form.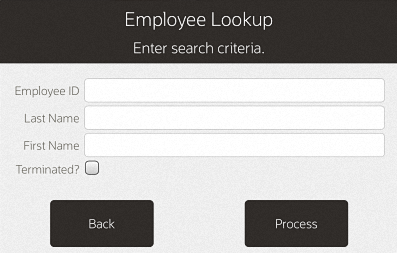 |
There are four tabs on the Employee Maintenance window. This section shows the four tabbed sections, gives a brief description, and shows the menu options available for each tab.
|
Note: Because the fields on the Employee Maintenance screens are configurable, your screens may differ from the screens shown here. |
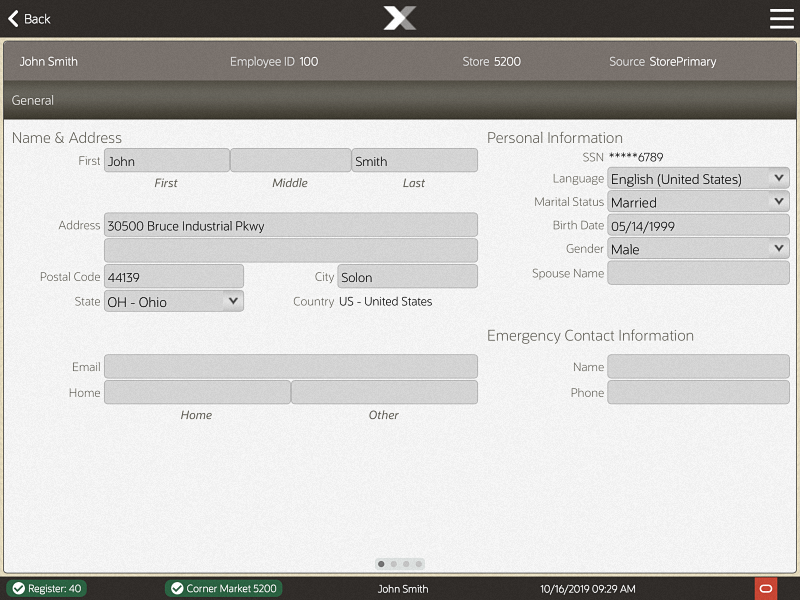
General Tab - Displays employee name, address, contact and personal information.
General employee information can include any combination of the following fields, any of which can be configured to require an entry:
Table 38-1 Employee Maintenance - Fields General Tab
| Section | Fields |
|---|---|
|
Employee Name & Address Information |
Name prefix (Mr., Ms., Dr., and so on) |
|
First name, Middle name/initial, Last name |
|
|
Name suffix (Jr., Sr., III, and so on) |
|
|
Address |
|
|
City |
|
|
State/Province |
|
|
Zip/Postal Code (system will populate the city and State based on the entered zip code) |
|
|
Country (defaults to the country in which the store is located, but can be changed) |
|
|
Email address |
|
|
Phone Number |
|
|
Employee Status & Personal Information |
Social Security Number (SSN) |
|
Language (the employee's language preference, French, United States English, and so on) |
|
|
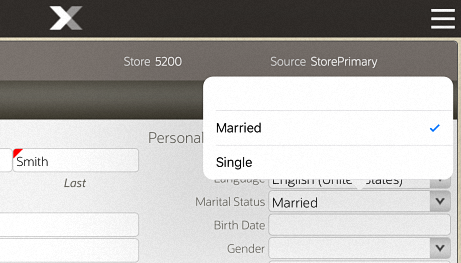
Marital Status (Married, Single) |
|
|
Birth Date |
|
|
Gender |
|
|
Spouse's Name |
|
|
Emergency Contact Information |
Emergency Contact Name |
|
Emergency Contact Phone Number |
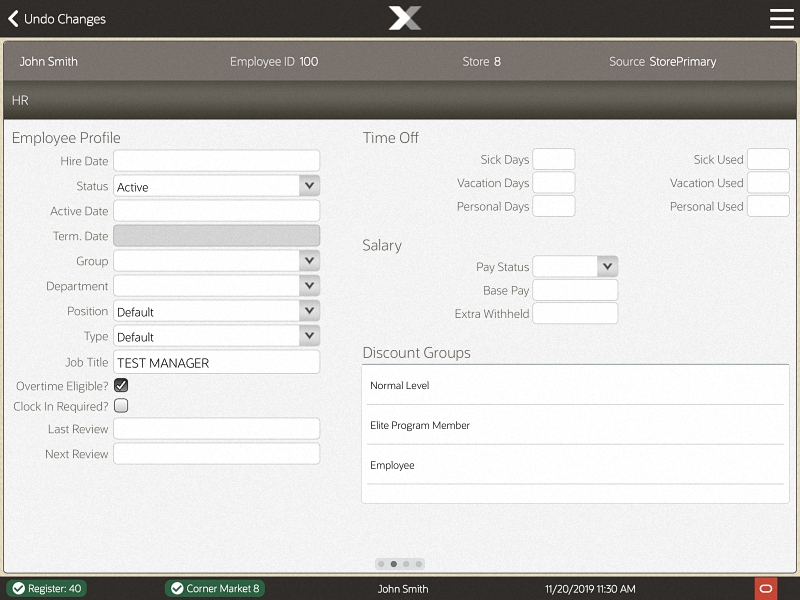
Human Resources (HR) Tab - Displays information about hiring date, employee status, and pay status, title, salary, vacation and personal time, and discount group membership.
Information on the Human Resources Tab is organized into the following sections:
Table 38-2 Employee Maintenance - Fields Human Resources Tab
| Section | Fields |
|---|---|
|
Employee Hire & Status Information |
Hire Date |
|
Status (Active, Inactive, Terminated) |
|
|
Active Date |
|
|
Termination Date |
|
|
Group membership |
|
|
Department assignment |
|
|
Position |
|
|
Type (used to further define the employee's position within the organization) |
|
|
Employee Pay Information |
Pay Status (Salary or Hourly) |
|
Base Pay (Amount) |
|
|
Extra Withheld (extra amount withheld from the employee's pay check) |
|
|
Job Title |
|
|
Overtime Eligible? |
|
|
Clock In Required? |
|
|
Last Review date |
|
|
Next Review date |
|
|
Employee Time Off Information |
Sick Days (Allotment) |
|
Vacation Days (Allotment) |
|
|
Personal Days (Allotment) |
|
|
Sick Used |
|
|
Vacation Used |
|
|
Personal Used |
|
|
Employee Group Information |
Discount Groups |
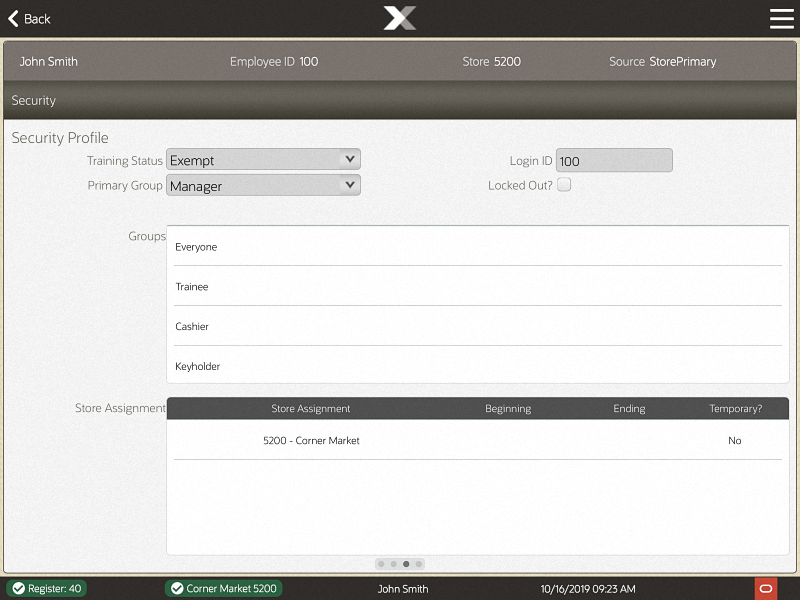
Security Tab - Displays information about the groups with which the employee is associated to determine system privileges.
Table 38-3 Employee Maintenance - Fields Security Tab
| Section | Fields |
|---|---|
|
Employee Security Permission and System Access Information |
Training Status (for example, Exempt, Restricted Trainee, Unrestricted Trainee) |
|
Primary Group (security assignment) |
|
|
Groups (lists the available security groups set up for your store) |
|
|
Login ID (may be different from the employee ID) |
|
|
Locked Out? (if Yes, the employee cannot access any area of the system) |
|
|
Store Assignment (used for borrowed employee functions) |
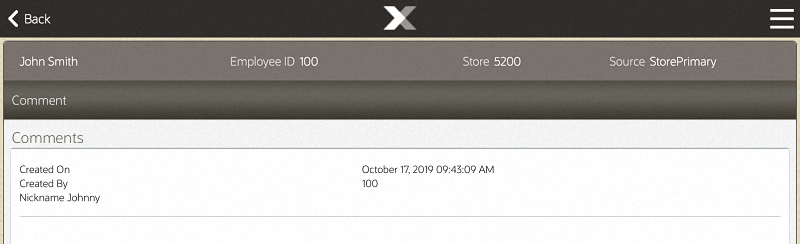
Comment Tab - Displays notes and comments about the associate.
The date and time and the ID for the person who created the comment is associated with the text of the comment. The most-recent comment is listed first. An option to add a new comment for the associate's record is available here.
This function provides the capability to search the corporate database for an employee. Once the employee record is found, the employee can be assigned to work in a new location by setting up an expiration time limit for this temporary position. This functionality can be used when sharing employees between stores.
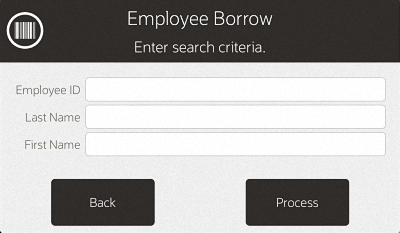
After logging in, select Employee Maintenance and select the Employee Borrow option.
At the Employee Borrow search form, enter your criteria for finding the employee you want to borrow and select Process.
|
Tip: If you know the employee's ID, you can enter it in the Employee ID field so that only that employee is listed. |
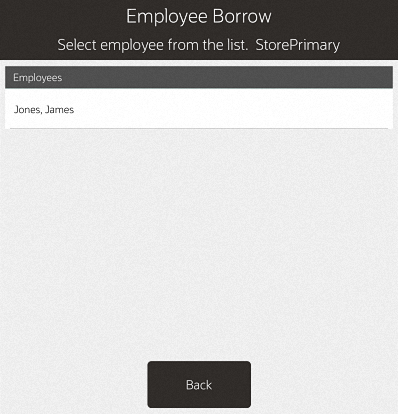
If the results include more than one employee, choose the employee you want.
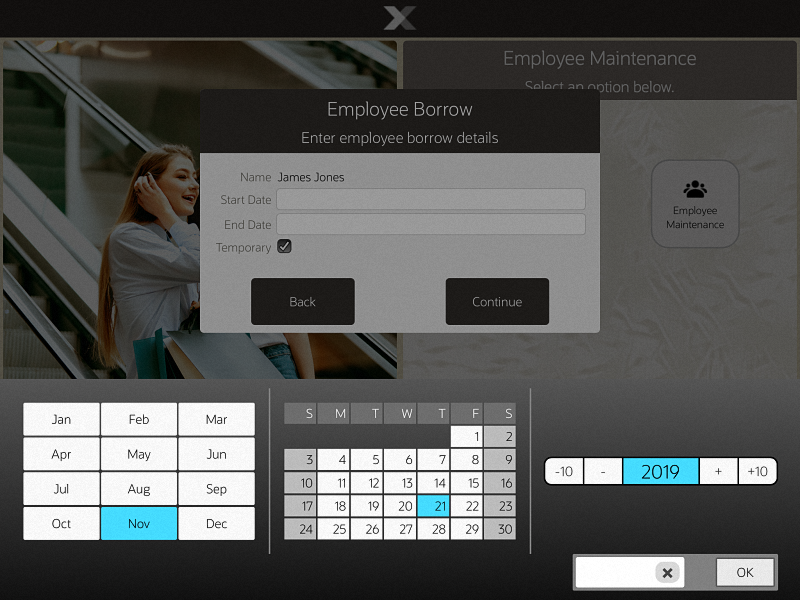
After you select one of the employees listed, or if only one employee is found, the Employee Borrow Details form displays:
Enter the Start Date and End Date.
Indicate whether the employee is being borrowed temporarily by selecting Yes or No from the list in the Temporary field.
Select Continue.
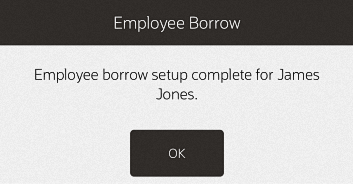
The system displays a confirmation message when the process for borrowing an employee is complete.
Select OK to continue. The system returns to the Main Menu.
This employee is now available for employee functions in the borrowing store.
|
Note: Borrowed employees may change their login password at the store where they are temporarily assigned. The password at their home store does not change. |
The Associate Advance function allows a payment to an associate in advance of the associate's scheduled payday. Examples of associate advances include cases of emergency or to pay a new employee in a timely manner.
After logging in, select Employee from the Main Menu. See Figure 1-4.
Select Employee Maintenance. See Figure 38-1.
Select Associate Advance.
The system prompts you to enter the lookup criteria. Enter the criteria you want to use for finding an employee's record and select Process.
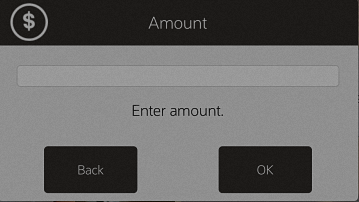
If you enter an Employee ID, Oracle Retail Xstore Mobile POS may immediately display a prompt for the cash advance amount.
If you enter search criteria that results in more than one record being found, or if your system is set up to always show a list, you must select the employee you want from the list.
At the prompt, enter the cash advance amount and select OK to continue.
The system records the transaction and returns to the Main Menu.
Oracle Retail Xstore Mobile POS prints a receipt with the associate's advance information and an employee signature line. Both a store copy and an employee copy are printed.
The cash drawer opens to remove the cash advance.
If the system prompts you to close the cash drawer, select OK to respond to the prompt.