| Oracle® Retail Xstore Point of Service Mobile User Guide Release 19.0 F25674-03 |
|

 Previous |
 Next |
| Oracle® Retail Xstore Point of Service Mobile User Guide Release 19.0 F25674-03 |
|
Previous |
Next |
The Register Open and Close procedures explain the steps you must perform to open and close a register.
|
Note: Xstore Mobile POS supports Register Accountability mode and Till Accountability mode. |
The register status indicator, along with the store name and store number is shown on the Status Bar at the bottom of every screen. When the first circle is red, the register is closed, when green it is open.
Tapping the bottom left red register indicator only works when you are not logged in. Log out and then tap the indicator if desired to open a register or follow the procedure below.
Select a link for more information:
Opening the register is a process that can be quickly completed by managers or associates who have the proper security privileges. The process is highly configurable and your process may be different from the instructions below.
The Xstore Mobile POS register is opened and closed through the Till menu on the Main menu. The following procedures describe the method for opening and closing the register. The system may prompt you to open the register after the store has been opened.
To open a closed Xstore Mobile POS register:
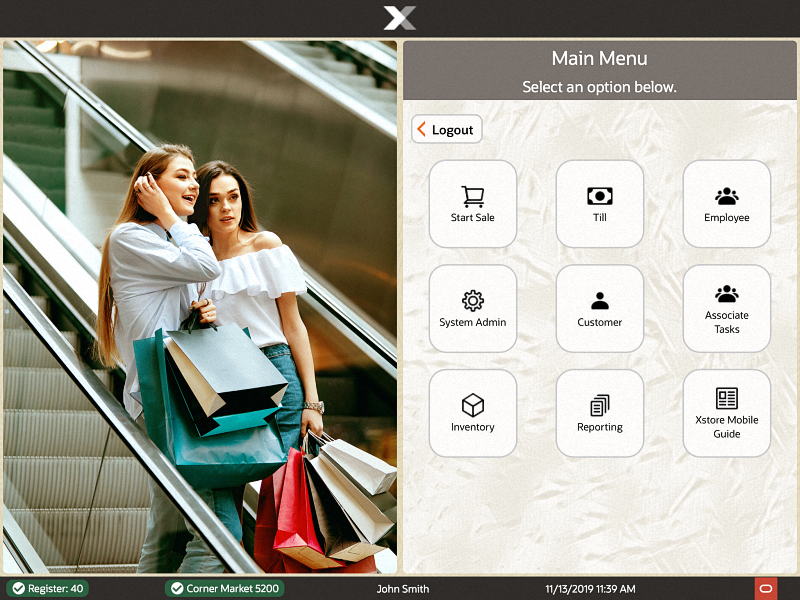
Select the Till from the Main Menu. See Mobile Tablet/Thin Client Main Menu and Mobile Handheld Main Menu.
Select Open/Close Options.
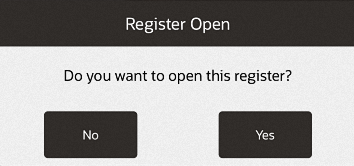
Select Register Open.
Select Yes to confirm that you want to open the register.
Depending upon the configuration of your system, you may be prompted to perform an opening count.
If your register has more than one cash drawer, you are prompted to select the drawer from a list of available cash drawers and attach the till before performing an opening count. Refer to Till Management for more information.
If you are not prompted to count the till, the register is opened at this time.
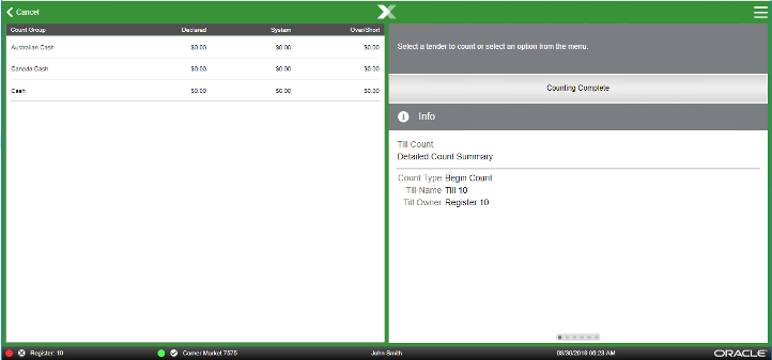
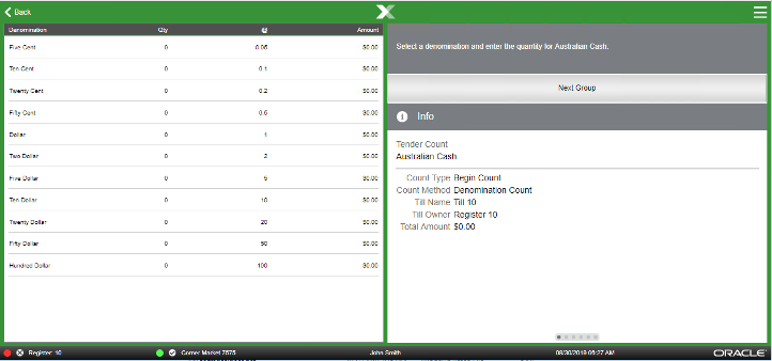
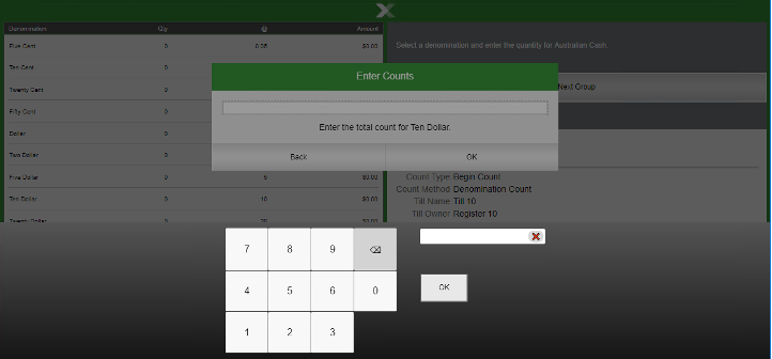
Select a tender to count. A list of currency denominations opens.
Select a denomination and enter the count of the currency denomination.
Repeat for each denomination.
When done, select Next Group from the Context Menu. Repeat step 6 for each tender.
Select Counting Complete when all counts are completed.
|
Note: Check the Over/Short column to see if your till is balanced with the system values for each tender type. |
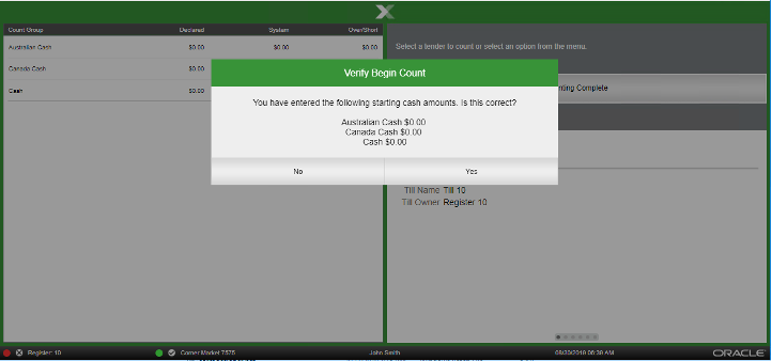
If the starting cash amount matches, the system prompts to confirm the amount for all cash currencies you entered. Select Yes.
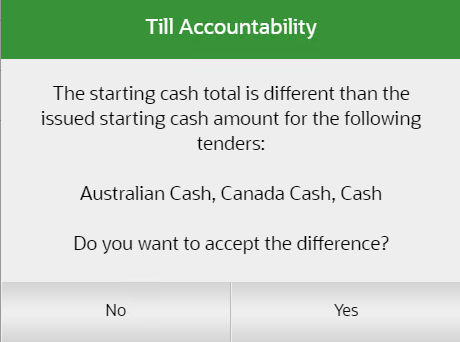
If the currency amounts do not match, the system displays a prompt to either recount the till or to accept the difference.
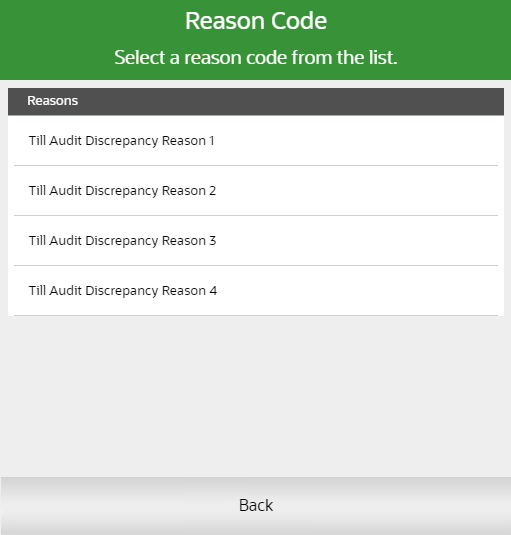
Select No to change the entered amount or select a reason code if you want to accept the difference.
Enter a comment describing any special circumstances if required and select OK.
The register opens and Xstore Mobile POS returns to the Open/Close Options menu. Note the green indicator for the register on the Status Bar.
The register close process can be performed by store managers or associates who have the proper security privileges. A register close can be completed any time during the day. This process is highly configurable and your process may be different than the instructions below. Every effort has been made to include notes or examples of additional steps that may be configured for your store.
To close an open Xstore Mobile register:
Select the Till option from the Main Menu. See Figure 1-4 and Figure 1-7.
Select Open/Close Options.
Select Register Close.
Select Yes to confirm that you want to close the register.
The register closes and Xstore Mobile returns to the Till menu.
If register equipment fails for any reason and a register cannot be closed using the normal procedure, the Force Close option may be used. By forcing a register to close, despite equipment failure, the store closing procedure may then be started. This function applies to the Mobile Tablet and Thin Client but not Mobile Handheld.
To force close an open Xstore Mobile register:
Select the Till option from the Main Menu. See Figure 1-4.
Select Open/Close Options.
Select Force Close. The system displays a list of any open registers (if no registers are still open, Oracle Retail Xstore Mobile POS displays a message).
Select the register that you want to close from the list. The system displays a message indicating that the register has been forced to close.
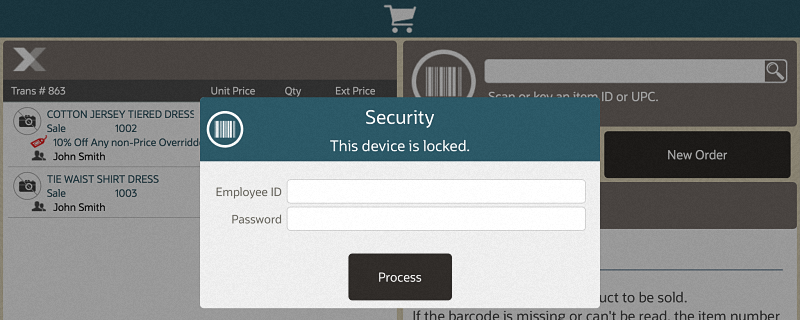
Your system may be configured to automatically log out an associate after a specified period of time if there is no system activity. However, you may need to temporarily leave a register before that occurs. In that case, you can lock the register to prevent another person from using the system while you are away.
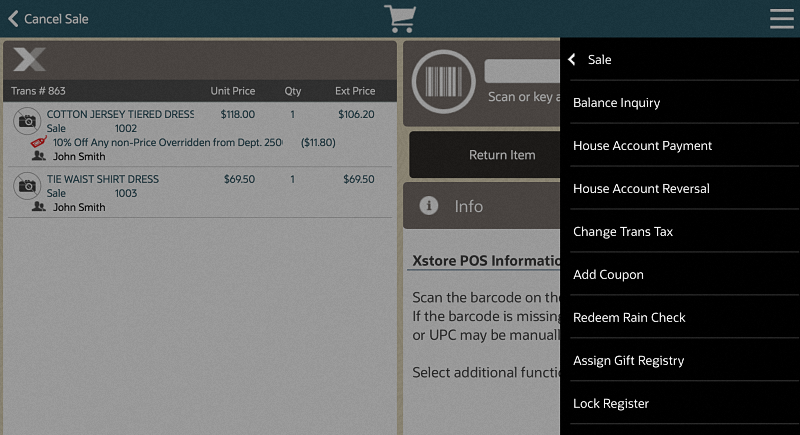
From a sales transaction go to the Context Menu and select Register Options.
From Register Options select Lock Register.
The system displays a prompt stating the device is locked along with the ability to enter employee id and password.
|
Note: Any functions that may still be available are determined by your store policy. |
|
Note: The register may be unlocked only by the associate who locked it or someone who has sufficient privileges to unlock the register, such as a manager. |
Enter your employee ID and password. Select Process to complete the unlock process.
The system is now unlocked and available for point-of-sale functions.
This option allows you to print a summary recorded during the last till count and applies to the Mobile Tablet and Thin Client, but not Mobile Handheld devices.
Select the Till option from the Main Menu. See Figure 1-4.
Select Open/Close Options.
Select Print Till Summary Receipt.
When prompted, select Yes to print the receipt.
The system prints the till summary for the register to a receipt printer. The receipt includes a breakdown of the various tenders (quantity and amount), a configurable list of various transactions that occurred at the register (paid out, returns, refunds, discounts, account setups, and so on, and the quantity and amount for each), and taxes.
This option allows you to print a summary recorded during the last till count on an IP Enabled Cash Drawer and applies to Mobile Tablet, Thin Client and Mobile Handheld devices.
Select the Till option from the Main Menu. See Figure 1-4 and Figure 1-7.
Select Open/Close Options.
Select Print Till Summary Receipt.
If the register has more than one cash drawer, select the till to be used.
In an all networked cash drawer environment when not in till accountability mode, scan the IP Enabled cash drawer, or,
In a mixed network/local cash drawer environment, you are prompted if you want to use a networked cash drawer when not in till accountability mode. Select Yes and then scan the IP Enabled cash drawer.
The system prints the till summary for the register to a receipt printer. The receipt includes a breakdown of the various tenders (quantity and amount), a configurable list of various transactions that occurred at the register (paid out, returns, refunds, discounts, account setups, and so on, and the quantity and amount for each), and taxes.