| Oracle® Retail Xstore Point of Service Mobile User Guide Release 20.0 F35714-03 |
|

 Previous |
 Next |
| Oracle® Retail Xstore Point of Service Mobile User Guide Release 20.0 F35714-03 |
|
Previous |
Next |
Select this option to create and maintain employee messages.
Messages can be viewed from outside of sale by selecting Employee then Message Maintenance.
Messages are for information purposes only, and require no action by the employee. Messages may be downloaded from the corporate office, and messages can also be created and maintained at the store level using the outside of sale mode Message Maintenance menu option.
Messages can be store-based or register-based, and provide the ability for both the corporate office and the store managers to share information with all employees.
Messages can be maintained at the corporate office or using the these functions. Only store-created messages can be edited at the store level. Messages from the corporate office cannot be changed or deleted.
Perform the following steps to create and maintain messages:
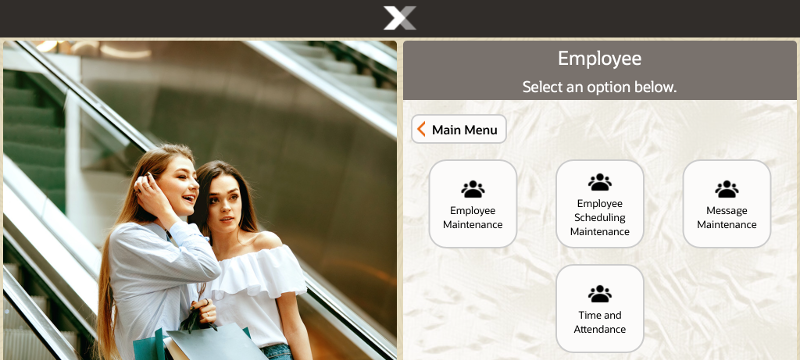
After logging in, select Employee from the Main Menu. See Figure 1-5.
At the Employee menu, select Message Maintenance.
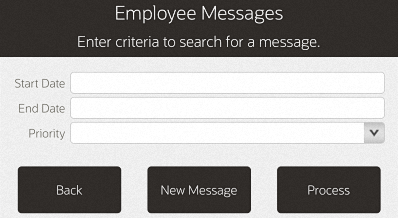
The Employee Messages search form displays. You have the following options on the search form:
To create a new message, select New Message. See Creating a New Message.
To find an existing message:
Enter the search criteria in the search fields provided and select Process.
Search fields include:
Start Date: The date the message is to be displayed.
End Date: The date the message is to be removed from the message list.
Priority: The message importance: High, Medium, Low.
<OR>
Leave all the search fields blank and select Process to return a list of all active, store-level messages.
See Editing a Message and Deleting a Message.
Messages can be displayed on all registers, or only a specific register. However, all employees have the ability to see the messages. Messages cannot be directed to specific employees or employee groups. Any messages created are automatically flagged as Store Created.
At the Employee Messages search form (Figure 26-2), select New Message.
|
Note: You can also create a new message by selecting the New Message option from the Employee Messages list. See Figure 26-4. |
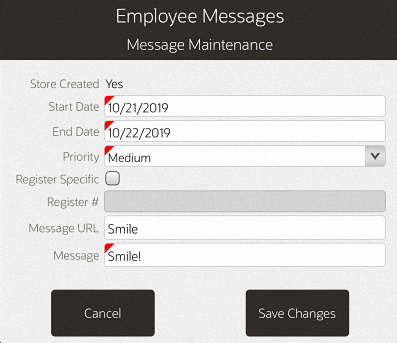
Enter data as required to create a new message:
Start Date: The date the message is to be displayed.
End Date: The date the message is to be removed from the message list.
Priority: The message importance: High, Medium, Low.
Register Specific/Register #:
Register Specific: Yes or No - If No, the message is displayed on all registers. If Yes, the message is only displayed on a specific register.
Register # - If Register Specific is set to Yes, this is the register on which the message are displayed.
Message URL: If applicable, enter a URL address. The URL will appear as an attachment to the message.
Message: The message text.
Select Save Changes to create the new message.
Only messages created at the store level can be edited or deleted. For this reason, any messages downloaded from the corporate office are not displayed in the list of messages returned from a message search.
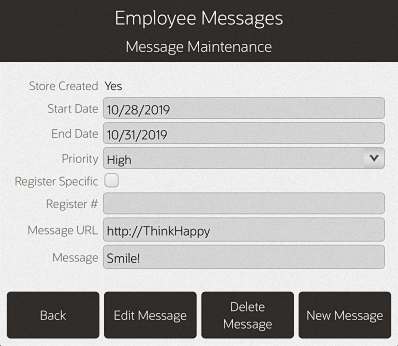
At the Employee Messages list, select and highlight a message, to display the Employee Messages maintenance form.
At the Employee Messages maintenance form, select Edit Message to make the fields active and available for editing.
At the active Employee Messages maintenance form, make your changes as needed:
Start Date: The date the message is to be displayed.
End Date: The date the message is to be removed from the message list.
Priority: The message importance: High, Medium, Low.
Register Specific/Register #:
Register Specific: Yes or No - If No, the message is displayed on all registers. If Yes, the message is only displayed on a specific register.
Register #: The register on which the message is displayed. This only applies if Register Specific is set to Yes.
Message: The message text.
After making your changes, select Save Changes to apply your edits to the message.
Only messages created at the store level can be deleted.
At the Employee Messages list (Figure 26-4) select and highlight a message to display the Employee Messages maintenance form.
At the Employee Messages maintenance form, select Delete Message to delete the message.
At the Delete Message confirmation prompt, select Yes to remove the message. If you do not want to delete the message, select No to return to the Employee Messages search form.