| Oracle® Retail Xstore Point of Service Mobile User Guide Release 20.0 F35714-03 |
|

 Previous |
 Next |
| Oracle® Retail Xstore Point of Service Mobile User Guide Release 20.0 F35714-03 |
|
Previous |
Next |
Work Orders are labor services requested by a customer and performed by the retailer or an outside contractor. They may be further sub-classified as repairs or alterations.
The system provides Work Order tracking functionality that allows a retailer to take in merchandise from the customer and associate it with a POS tracking record. The record identifies the product, its value, condition, customer information, and the work to be done. The kinds of work that are performed on a product are called Work Order tasks.
Repair service is typically found in retail environments that sell and service watches, athletic equipment, and footwear. Repair services usually focus on the repairing, setting up, or fitting of products for the retail customer. An example of a repair is fixing a flat tire at a bicycle shop. A setup example is a Hot-Tub purchase in which installers are required to connect the filter and heating systems.
Repairs may vary depending on the service being performed. For instance, a sporting goods outlet may track the service associated with the sizing and drilling of a bowling ball as a repair service. The similarities of this process and their actual repair activities allow retailers to utilize the same POS function to perform multiple activities.
Alteration services are primarily found in clothing retail locations. Retailers provide an important service by altering the garments that they sell to their customers. This service may be a billable activity to the customer or it may be without cost. Some retailers extend this offer to non-customers or even to customers who have a product for alteration that was not purchased through a particular outlet; this is generally performed as a value-added service to loyal customers.
Tasks are the detail operations that are performed on a Work Order item and can be selected from a list. The system also maintains a fixed rate of cost for the task, a description, and a free-form comment field that may be used to describe the task to be performed. For example, a comment may contain the specific text to engrave or embroider on an item.
The following section covers these topics:
|
Note: Because each Xstore Mobile menu is configurable, the button functions on your system may appear in a different order or have different text than examples shown in this manual. |
A work order must be associated with a regular sale transaction and a customer name.
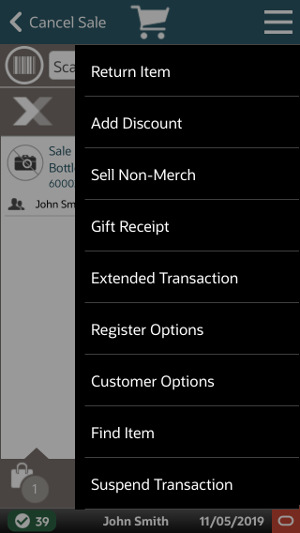
At the Sale screen, select the Context Menu button.
Select Extended Transaction in the Context Menu.
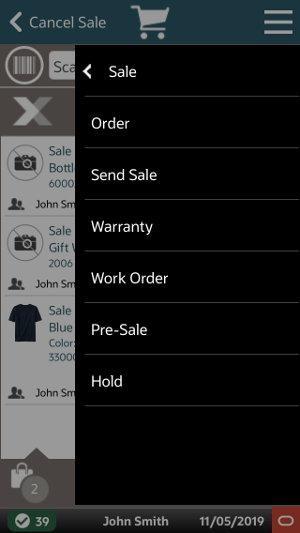
At the Extended Transaction menu, select the Work Order option.
|
Note: The system does not allow you to create a work order unless you have the required security privileges. |
The next steps depend upon whether or not a customer has been associated with the sale transaction:
If no customer is associated with the transaction:
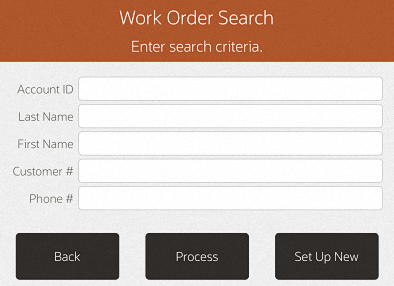
The system displays the Work Order Search form shown here.
Select Set Up New.
|
Note: To search for an existing work order, enter your search criteria and select the Process option. |
The system displays the Customer Search form. Enter search criteria and select Process.
Select a customer to associate with the transaction.
When customer association is complete, go to step 5.
If a customer is associated with the transaction the system automatically searches for work orders for the customer.
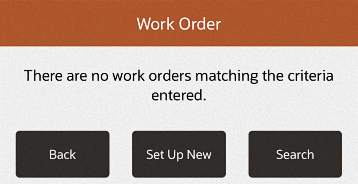
If an established work order is not found, the message stating no matching work orders were found is displayed.
Select Set Up New to create a new work order.
Go to step 6.
If an established work order is found, the work order accounts are shown in a list.
Select Set Up New to create a new work order.
Go to step 5 below.
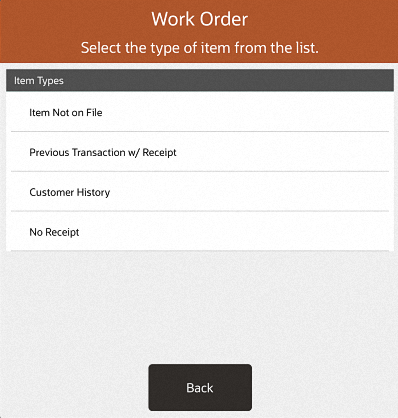
The system prompts for the source of information about the item that is referenced in the work order.
Select one of the following options:
Current Transaction: The item is in the current sale transaction. This option is only available if there is at least one item in the current sale transaction. See Work Order Item - In the Current Sale Transaction.
Item Not on File: The item requiring work is not in the system. See Work Order Item - Item Not on File.
Previous Transaction with Receipt: The item is identified on the receipt from a previous transaction. See Work Order Item - Using Original Transaction Receipt.
Customer History: Find the item by searching the customer's previous purchase transaction history. See Work Order Item - Customer History.
No Receipt: The item has no receipt available or is not referenced on a receipt. See Work Order Item - No Receipt; Manual Item Entry.
...continued from step 6
The system displays a list of items that are eligible for a work order in the current transaction.
Figure 14-6 Items Eligible For Work Order
|
Note: Some merchandise or non-merchandise items (for example, loyalty cards, gift cards, gift certificates and warranties) are not included in the list of items eligible for work order processing. |
Select an item from the current sale that is to be included in the work order. You can select multiple items from the list to select and add each item to the work order. The system adds the selected item(s) to the work order.
The system prompts you to specify if there is another item to be added to the work order:
Figure 14-7 Prompt for Additional Work Order Items
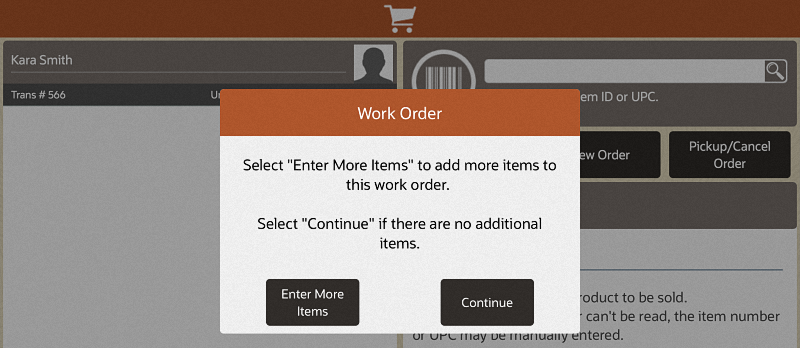
If you need to add additional items to this work order, select the Enter More Items option. The system returns to the prompt for work order item source.
<OR>
If there are no more items for this work order, select the Continue option. The system displays the work order categories.
The next step in the process is to select a work order category. Continue with Work Order Categories.
...continued from step 6
The system prompts you to enter information from the original transaction receipt. You may indicate whether or not the receipt is a gift receipt by selecting Yes or No in the Gift Receipt drop-down list.
Scan the original receipt barcode from the receipt, or enter the receipt information manually and select Process.
The system displays a list of eligible items from the original transaction and prompts you to select the item(s) for the work order.
|
Note: If applicable, you can select multiple items from the list and add each item to the work order. If no items in the original transaction are eligible for a work order, or if the original transaction cannot be found, the system displays a message notifying you that there are no eligible items available for a work order. |
Select the item. The system adds the item to the work order.
The system prompts you to specify if there is another item to be added to the work order:
Figure 14-8 Additional Work Order Items Prompt
If you need to add additional items to this work order, select the Enter More Items option. The system returns to the prompt for work order item source.
<OR>
If there are no more items for this work order, select the Continue option. The system displays the work order categories.
The next step in the process is to select a work order category. Continue with Work Order Categories.
...continued from step 6
At the prompt for an item ID, enter the Item ID, or scan the item.
|
Note: If you do not know the item ID but your system has a Work Order SKU, you can enter that instead of the actual item ID. You can also use the Item Not On File functionality to capture the item information. |
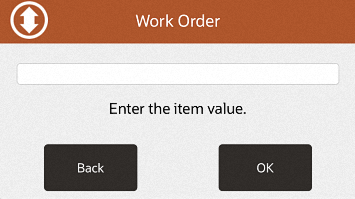
If the item's value has not been determined by the item selection (value is zero), enter the value and press OK.
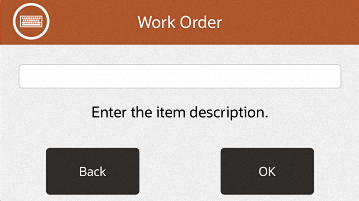
If prompted, enter a text description for the item and press OK.
The system prompts you to specify if there is another item to be added to the work order:
Figure 14-9 Additional Work Order Items Prompt
If you need to add additional items to this work order, select the Enter More Items option. The system returns to the prompt for work order item source.
<OR>
If there are no more items for this work order, select the Continue option. The system displays the work order categories.
The next step in the process is to select a work order category. Continue with Work Order Categories.
...continued from step 6
The system displays a list of items the customer has purchased previously.
Select the item(s) and press OK. The system adds the selected item(s) to the work order.
|
Note: You can select multiple items from the item and add each item to the work order. |
The system prompts you to specify if there is another item to be added to the work order:
Figure 14-10 Additional Work Order Items Prompt
If you need to add additional items to this work order, select the Enter More Items option. The system returns to the prompt for work order item source.
<OR>
If there are no more items for this work order, select the Continue option. The system displays the work order categories.
The next step in the process is to select a work order category. Continue with Work Order Categories.
...continued from step 6
At the prompt for an item description, enter a text description for the item and select OK.
At the prompt for item value, enter the item's value and press OK.
The system prompts you to specify if there is another item to be added to the work order:
Figure 14-13 Additional Work Order Items Prompt
If you need to add additional items to this work order, select the Enter More Items option. The system returns to the prompt for work order item source.
<OR>
If there are no more items for this work order, select the Continue option. The system displays the work order categories.
The next step in the process is to select a work order category. Continue with Work Order Categories.
Once you have identified the item(s) for the work order, you are prompted to select a work order category. Categories may include repairs, alterations, or any other categories that are determined by your store operations.
For example, repairs may include work order categories such as jewelry and watch repairs. Work order alterations may include categories such as men's clothing and children's clothing.
The system displays the list of work order categories. Choose a category.
|
Note: The Home Office defines the Work Order Alteration and Repair categories. |
Depending upon your system's configuration, additional prompts for information may be displayed based on the work order category you selected. For example:
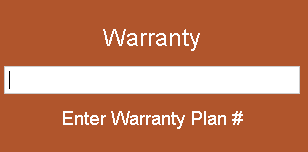
Pricing category - Examples include No Charge, Warranty, and Chargeable.
Warranty Contract Number - The system prompts for the Warranty Plan Number.
Figure 14-16 Warranty Contract Number Prompt
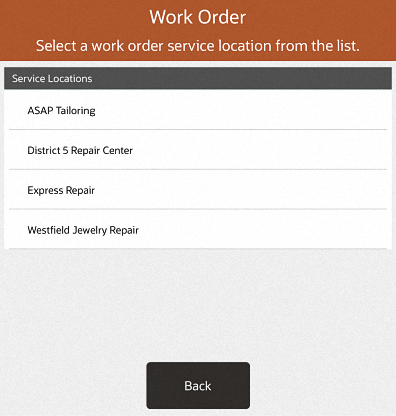
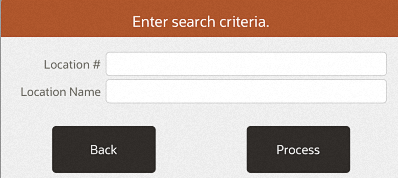
You may be prompted to search for a location where the work will be performed. If you do not know a location, leave the fields blank and select Process to show all available vendors.
Figure 14-17 Work Order Location Search Form
The system displays a list of service locations. Select a location and press Process.
|
Note: To accommodate in-house work order or single location where work orders are performed, the system my be configured to skip the location selection. |
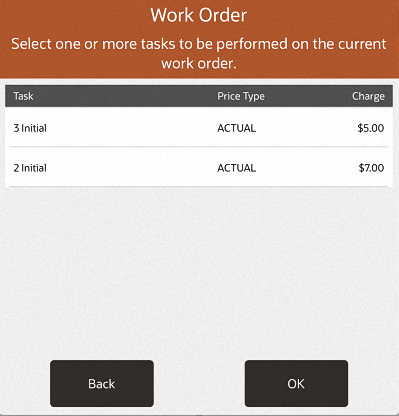
The system displays the tasks that can be performed on the item, based upon the service location that you selected.
|
Note: A task may not have a cost associated with it. If it does not have a cost, it may be an estimate. Estimates must be converted to actual amounts before the customer can pick up the item. Price categories such as No Charge and Warranty have zero amounts in the Charge column on the Task List form. |
Select the task activity and press OK.
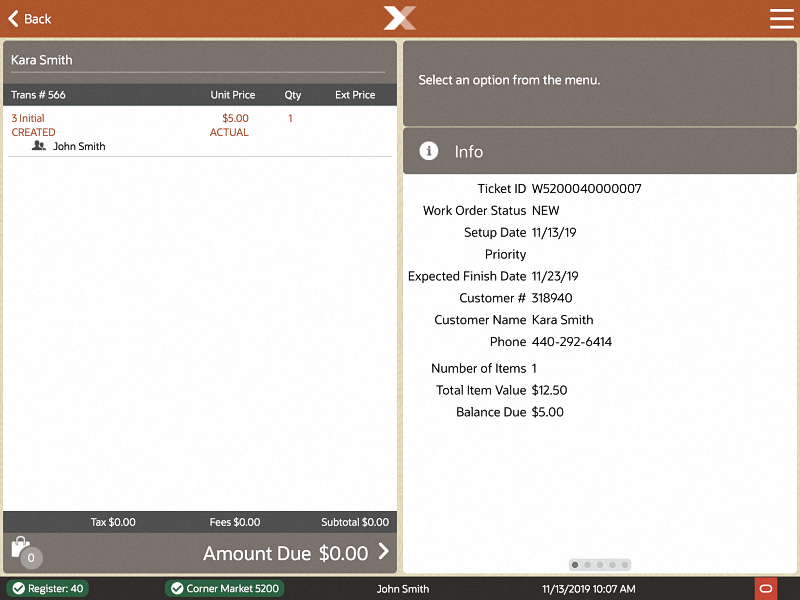
The system displays the summary information for the work order.
Figure 14-20 Work Order Summary Information
You can modify the work order or complete the transaction:
To modify the work order and add additional information, select from the following options as needed:
Refer to Modifying a Work Order for detailed information about each of the options shown here.
To complete this work order setup process, select one the following options:
Select the Tender option to complete and tender the transaction. If prompted for a work order deposit, enter a deposit amount or accept the default amount and tender the transaction.
<OR>
Select the Exit Work Order option to return to the sale if the customer would like to continue purchasing additional items. If prompted for a work order deposit, enter a deposit amount or accept the default amount and continue selling items at the Sale screen.
|
Note: Your store policy determines if the Work Order transaction can be mixed with the sale of other items on the Sale screen. |
The system displays the work order information that you entered during the setup process.
When you tender the transaction, the system creates receipts as required by your store's policy.
|
Note: If the location requires a shipper or a receiver, the system will create a shipping document. Once the item(s) are shipped, the system will create a receiving document. The documents created for work order shipping and receiving are managed outside of a sale through Customer / Work Order Maintenance. |
Figure 14-22 Customer Sale Receipt Sample
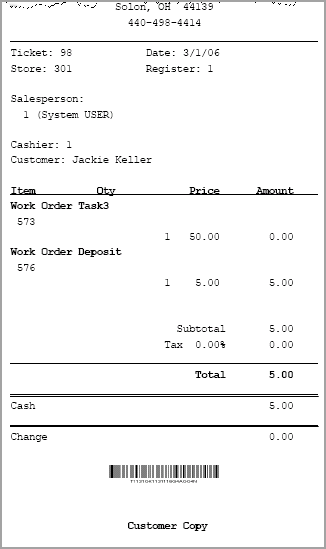
Figure 14-23 Work Order Receipt, Customer Copy Sample
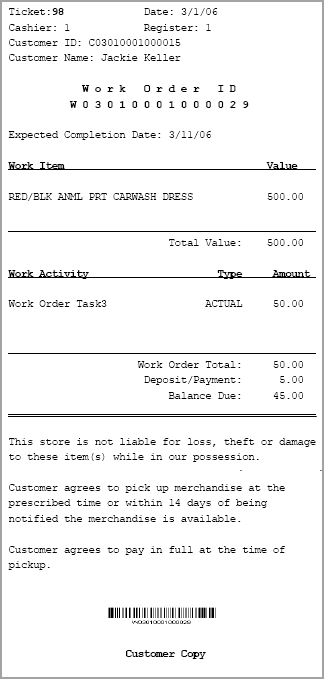
Figure 14-24 Work Order Receipt, Store Copy Sample
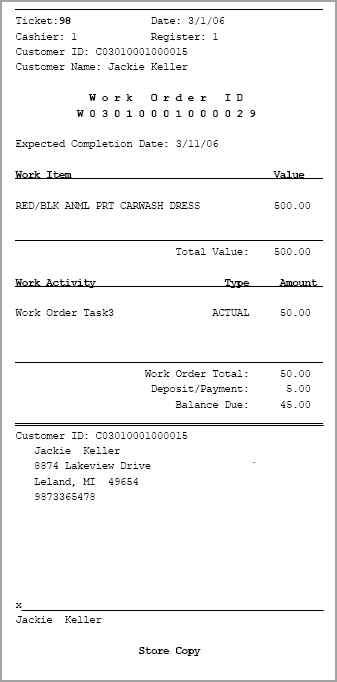
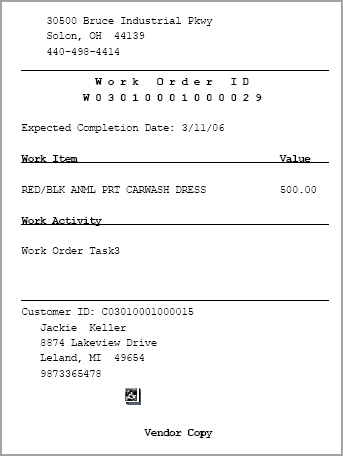
Figure 14-25 Work Order Receipt - Vendor Copy Sample
This section covers the following topics:
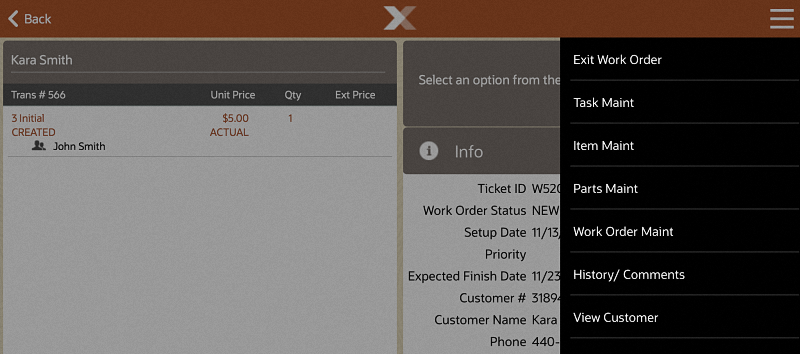
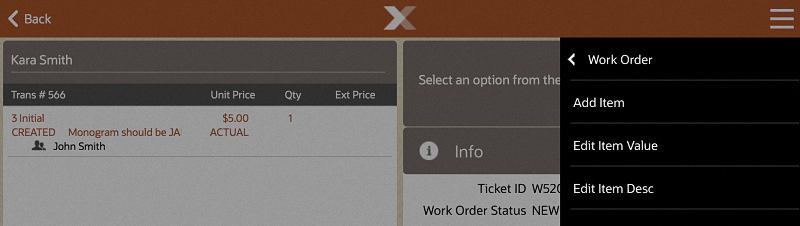
One or more tasks may be associated with a work order, and they can be modified during or after its creation. If the work order is still being created, select the Task Maint option while in the Work Orders mode.
If the transaction in which the work order was created has been completed:
Create a new sale transaction.
At the Sale screen Context Menu, select Extended Transaction.
At the Extended Transaction menu, select Work Order. If a customer is associated with the transaction, Xstore Mobile displays a list of work orders for the customer. If a customer is not associated with the transaction, enter the work order search criteria to locate the work order.
Select the work order that includes the task you want to edit and the work order is displayed.
From the Work Order Context menu, select the Task Maint option.
Task maintenance functions allow you to modify the work order tasks by adding new tasks, deleting work order tasks, and adding additional information pertaining to a specific task.
|
Note: The status of the work order (shipped, received, and so on.) determines the options available here. |
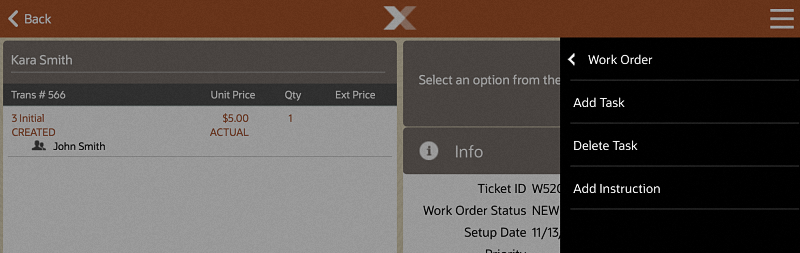
The following Task Maintenance options are available:
Select this option to create an additional task on the work order.
Select Add Task.
The system displays the work order tasks that are available for the work order service location.
Select a task from the list.
The system adds the new task to the work order.
Select this option to remove a task from the work order.
Select Delete Task.
The system displays a list of tasks on the current work order.
Select the task to be deleted from the list.
The system removes the task by voiding the line item and any associated information from the work order.
Select this option to change an estimated cost amount to an actual cost amount. An estimated cost is a best guess for the final cost of performing the task, and it is assigned when the work order is created. After the task is completed, the actual cost is known, and the estimate can be converted so that the final price can be calculated.
|
Note: The Convert Estimate option is only available when an estimated task is on the work order. |
Select Convert Estimate.
The system displays a list of the tasks that have estimated costs on the current work order.
Select the task to be converted to an actual cost amount.
The system displays a list of the tasks with actual costs that are applicable to the work order category (repairs, alterations, and so on).
|
Note: For each task that has an estimated cost, there is a corresponding task with the actual cost. These were set up by the Home Office during the configuration process for your system. |
Select the most appropriate task and its actual cost for the work order.
The system replaces the estimated cost of the task with the converted, actual cost, on the work order.
Select this option to enter informational text instructions for the work order.
Select Add Instruction.
The system displays a list of the tasks on the current work order.
Select the task to be associated with the instructions.
The system displays a text entry form. You can add new information, change existing information, or delete any existing information. Select OK after you enter your comment or instructions.
The system associates the comments or instructions with the task.
The item maintenance functions allow you to change the work order item information by adding new items, deleting items from the work order, or editing an item's value and description. The items may come from several different sources including the current transaction, a previous transaction (with or without a receipt), customer history, or it may be an item not found in the database. For more information about this, see step 6.
One or more items may be associated with a work order, and they can be modified during or after its creation. If the work order is still being created, select the Item Maint option while in the Work Orders mode.
If the transaction in which the work order was created has been completed:
Create a new sale transaction.
At the Sale screen Context Menu, select Extended Transaction.
At the Extended Transaction menu, select Work Order. If a customer is associated with the transaction, Xstore Mobile displays a list of work orders for the customer. If a customer is not associated with the transaction at this point, enter the work order search criteria to locate the work order.
Select the work order that includes the item you want to edit and the work order is displayed.
From the Work Order menu, choose the Item Maint option.
The following Item Maintenance options are available:
Figure 14-28 Item Maintenance Menu - Delete Not Available
Select this option to add additional items to the work order.
Select Add Item.
The system prompts for the source of information about the new item to be referenced in the work order.
Refer to the work order process beginning with step 5 for more information.
Enter all information for this new item when prompted. The system adds the item to the current work order.
Select this option to remove an item from the work order.
|
Note: The Delete Item option is only available when there are two or more items on the work order. |
Select Delete Item.
The system displays a list of the items on the current work order.
Select the item to be deleted from the work order.
The system removes the item from the work order.
Select this option to change the value of an item on the work order.
Select Edit Item Value.
The system displays a list of the items on the current work order.
Select the item you want to change.
The system prompts you to enter a new value for the selected item.
Enter the new value and select OK.
The system updates the value of the item on the work order.
Select this option to change the text description of an item on the work order.
Select Edit Item Desc.
The system displays a list of the items on the current work order.
Select the item you want to change.
The system prompts you to enter a new text description for the selected item.
Enter the new description and select OK.
The system updates the description of the item on the work order.
The Parts Maintenance functions allow you to add or delete supplementary parts from a work order. A part may be anything that is required to complete a task. One or more parts may be associated with a work order, and they can be added or deleted during or after its creation. If the work order is still being created, select the Parts Maint option while in Work Order mode. If the transaction in which the work order was created has been completed:
Create a new sale transaction.
At the Sale screen Context Menu, select Extended Transaction.
At the Extended Transaction menu, select Work Order. If a customer is associated with the transaction, Xstore Mobile displays a list of work orders for the customer. If a customer is not associated with the transaction at this point, enter the work order search criteria to locate the work order.
Select the work order that requires the addition or deletion of a part. The system displays the work order.
From the Work Order menu (Figure 13-27), choose the Parts Maint option.
The following Parts Maintenance options are available:
Select this option to enter an item ID that must be purchased to complete the work order. It is included as part of the work order record.
Select Add Parts.
The system prompts for the part identifier to be added to the work order.
Enter or scan the item ID or UPC.
The system updates the work order with the information for the supplementary parts.
Select this option to remove a supplementary part from a work order.
|
Note: The Delete Parts option is only available when a part has been added to this account. |
Select Add Parts.
The system displays a list of the supplementary parts on the current work order.
Select the supplementary part to be deleted from the work order.
The system removes the supplementary part from the work order and updates the work order account information.
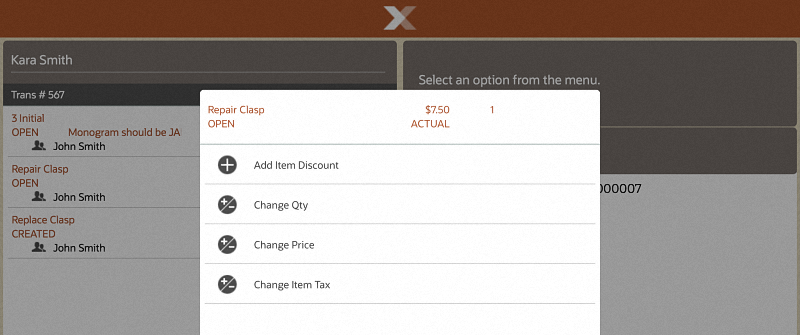
Edit Line Item functions allow you to change the quantity, price, and tax on a line item in the work order.
A work order may contain one or more line items, and they can be edited during or after its creation. If the work order is still being created, select the Edit Line Item option while in the Work Orders mode.
If the transaction in which the work order was created has been completed:
Create a new sale transaction.
At the Sale screen Context Menu, select Extended Transaction.
At the Extended Transaction menu, select Work Order. If a customer is associated with the transaction, Xstore Mobile displays a list of work orders for the customer. If a customer is not associated with the transaction at this point, enter the work order search criteria to locate the work order.
Select the work order that includes the line item(s) to be edited. The system displays the work order.
Select the line item.
The following Edit Line Item options are available:
Select this option to add a discount to the work order task.
Select Add Item Discount.
The system displays a list of discounts that may be applied to the work order task.
Select the type of discount to be applied to the work order task.
Select the task to be discounted.
Select the discount from the list of available discounts.
If prompted, select a reason for the discount, and enter any other information as needed when prompted.
The system applies the discount to the task (if permitted by store policy).
Select this option to change the quantity of an item.
Select Change Qty.
The system displays a list of the line items on the current work order.
Select the line item to be changed.
The system prompts you to enter a new quantity for the selected item.
Enter the new quantity and select OK.
The system updates the line item quantity on the work order.
|
Note: If the quantity you entered is not allowed for the line item, the system displays a message indicating the reason the quantity change is not allowed. You must acknowledge this message to continue. |
Select this option to change the price of an item.
Select Change Price.
The system displays a list of the line items on the current work order.
Select the line item to be changed.
The system prompts you to enter a new price for the selected item.
Enter the new price and select OK.
The system updates the line item price on the work order. If the price you entered is not allowed for the line item, the system displays a message indicating the reason the price change is not allowed. You must acknowledge this message to continue.
Select this option to change the tax amount for an item. You can change the item's tax location, change the item to tax exempt, or change the item's tax amount or percent.
Select Change Item Tax.
The system displays a list of the line items on the current work order.
Select the line item to be changed.
The system prompts you for specific information for the type of tax change based upon the tax change option you chose. Refer to Changing Item Taxes for procedural information.
Enter the information as required; the system updates the line item tax on the work order.
Work Order maintenance functions allow you to add, change, and maintain work orders.
A work order may be edited during or after its creation. If the work order is still being created, select the Work Order Maint option while in the Work Orders mode.
If the transaction in which the work order was created has been completed:
Create a new sale transaction.
At the Sale screen Context Menu, select Extended Transaction.
At the Extended Transaction menu, select Work Order. If a customer is associated with the transaction, Xstore Mobile displays a list of work orders for the customer. If a customer is not associated with the transaction at this point, enter the work order search criteria to locate the work order.
Select the work order that you want to edit. The system displays the work order.
From the Work Order menu, choose the Work Order Maint option.
The following Work Order Maintenance options are available:
Figure 14-31 Work Order Maintenance Menu
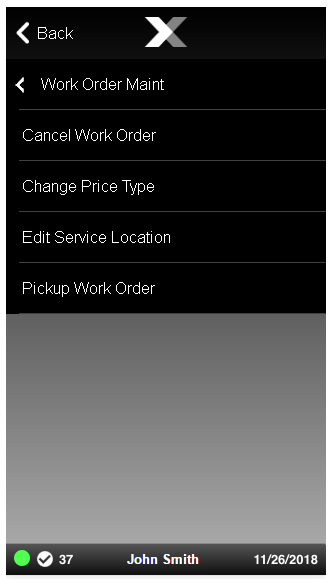
Select this option from the Work Order Maint menu to cancel an existing work order.
With the work order displayed, select Cancel Work Order.
At the prompt to confirm the work order cancellation, select Yes.
The system returns to the Sale screen where you can refund any money due to the customer.
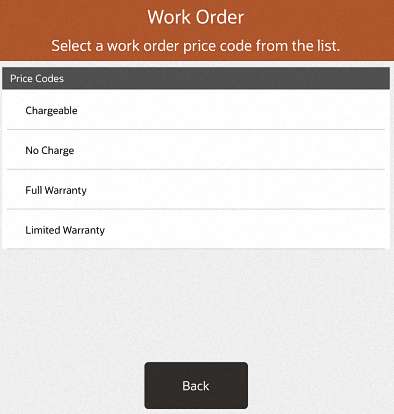
Select this option from the Work Order Maint menu to change the price from actual to estimated or vice versa, or to change from chargeable to warranty. You may also select no charge. For example, a customer may not have the warranty information in-hand when the work order is set up. If the customer returns at a later date with proof of a valid warranty, you can use this option to change the work order price from chargeable to full warranty or limited warranty.
Select Change Price Type.
The system displays the work order price code list.
Select a price code from the list.
The system updates the current work order charge to the new price.
Select this option to choose a different location where work will be performed.
The system prompts for the new service location where the work will be performed. You may enter search criteria and select Process or just select Process to display all locations.
Figure 14-33 Service Location Search Form
When the list of service locations displays, select a location and press Process.
The system updates the current work order with the new service location.
Select this option when a completed work order is ready for customer pickup. This option is only available when the work order item is finished and ready for customer pickup. Refer to Picking Up a Completed Work Order for more information.
Work Order History and Comments functions allow you to view the history of the work order and add comments to it. If the work order is still being created, select the History/Comments option while in the Work Order mode.
If the transaction in which the work order was created has been completed:
Create a new sale transaction.
At the Sale screen Context Menu, select Extended Transaction.
At the Extended Transaction menu, select Work Order. If a customer is associated with the transaction, Xstore Mobile displays a list of work orders for the customer. If a customer is not associated with the transaction at this point, enter the work order search criteria to locate the work order.
Select the work order that you want to edit. The system displays the work order.
From the Work Order menu, choose the History/Comments option.
The following History/Comments functions are available:
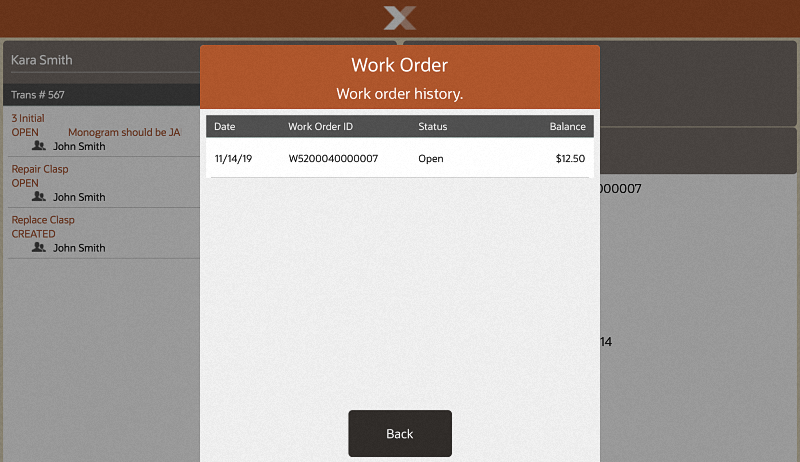
Select this option to see the work order account history. The information shown here includes the account number, setup date, status, and balance due.
Select View History.
The system displays a form showing the work order account information. You may need to scroll through the screen if there are more lines than can be displayed at once.
Select Back to close the form and return to the Work Order Summary screen.
Select this option to see any comments associated with the work order.
Select View Comments.
The system displays any comments associated with this work order account. You may need to scroll through the screen if there are more comments than can be displayed at once.
Select Back to close the comments form and return to the Work Order Summary screen.
Select this option to add a comment to this work order.
Select Add Comment.
The system displays a free-text comment form.
Type a comment to be associated with this work order account.
Select OK to close the comment entry form and return to the Work Order Summary screen.
When a customer is associated with a sale transaction, the system may automatically notify you if the customer has a work order that requires attention. For example, you may be prompted if the customer's work order is ready for pickup. Select OK to acknowledge this prompt.
At the Sale screen, select Extended Transaction and the Work Order option to pick up work order items or to view work order account information.
At the Work Order Search form, if prompted, select the work order account from the list. If the work order is not listed, enter the search criteria for the work order, or scan the customer's work order receipt.
With the work order displayed, select the Work Order Maint option from the Context Menu.
From the Work Order Maintenance menu, select the Pickup Work Order menu button option.
The system adds the completed work order item to the Sale screen. Tender the transaction to complete the work order.