17 Managing Pluggable Databases Using Enterprise Manager
This chapter explains how you can manage pluggable databases (PDBs) using Oracle Enterprise Manager Cloud Control (Cloud Control). In particular, this chapter covers the following:
-
Getting Started With Managing Pluggable Databases Using Enterprise Manager
-
Overview of Managing Pluggable Databases Using Enterprise Manager
-
Viewing Pluggable Database Job Details Using Enterprise Manager
17.1 Getting Started With Managing Pluggable Databases Using Enterprise Manager
This section helps you get started with this chapter by providing an overview of the steps involved in creating a new pluggable database (PDB), cloning a PDB, migrating a non-container database (CDB) as a PDB, unplugging a PDB, and deleting PDBs. Consider this section to be a documentation map to understand the sequence of actions you must perform to successfully perform these tasks using Cloud Control. Click the reference links provided against the steps to reach the relevant sections that provide more information.
Table 17-1 Getting Started with Managing Pluggable Databases
| Step | Description | Reference Links |
|---|---|---|
|
Step 1 |
Obtaining an Overview Obtain a conceptual overview of PDBs. |
To obtain a conceptual overview of PDBs, see Section 17.2. |
|
Step 2 |
Selecting the Use Case Among the following use cases, select the one that best matches your requirement:
|
|
|
Step 3 |
Meeting the Prerequisites Meet the prerequisites for the selected use case. |
|
|
Step 4 |
Following the Procedure Follow the procedure for the selected use case. |
|
17.2 Overview of Managing Pluggable Databases Using Enterprise Manager
An Oracle Database can contain a portable collection of schemas, schema objects, and nonschema objects, that appear to an Oracle Net client as a separate database. This self-contained collection is called a pluggable database (PDB). A multitenant container database (CDB) is a database that includes one or more PDBs. Oracle Database 12c Release 1 (12.1) and later versions allow you to create many PDBs within a single CDB. Applications that connect to databases view PDBs and earlier versions of Oracle Database (earlier than 12.1) in the same manner.
Cloud Control enables administrators to manage the entire PDB lifecycle, including provisioning CDBs, provisioning PDBs (from the seed or from an unplugged PDB), cloning existing PDBs, migrating non-CDBs as PDBs, unplugging PDBs, and deleting PDBs.
Important:
To manage the PDB lifecycle using Cloud Control, you must have the 12.1.0.3 Enterprise Manager for Oracle Database plug-in, or a later version, deployed. To delete PDBs using Cloud Control, you must have the 12.1.0.5 Enterprise Manager for Oracle Database plug-in deployed.For information on how to deploy a plug-in and upgrade an existing plug-in, see Oracle Enterprise Manager Cloud Control Administrator's Guide.
Figure 17-1 provides a graphical overview of how you can manage the PDB lifecycle in Cloud Control.
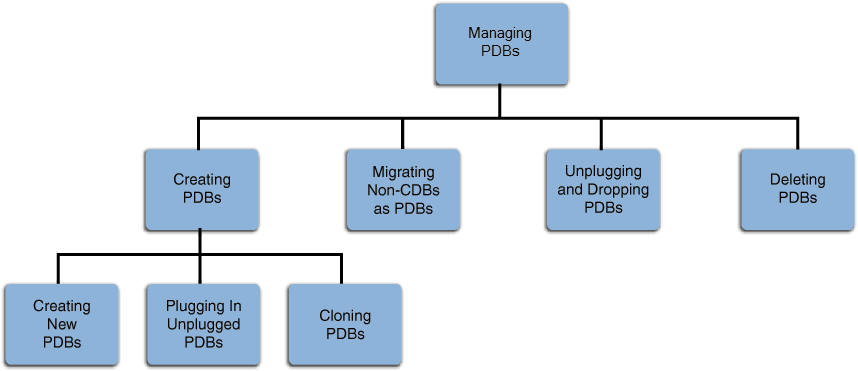
For more information about PDBs and CDBs, see the Managing Pluggable Databases part in Oracle Database Administrator's Guide.
17.3 Provisioning Pluggable Databases Using Enterprise Manager
You can provision PDBs by creating a new PDB within a CDB, by cloning an existing PDB, or by migrating existing non-CDBs to a CDB as PDBs. You can also use unplugged PDBs for provisioning, by plugging them into a CDB.
This section provides information about provisioning a PDB using the Cloud Control console. In particular, it contains the following:
-
Plugging In an Unplugged Pluggable Database Using Enterprise Manager
-
Migrating a Non-CDB as a Pluggable Database Using Enterprise Manager
Note:
You can also provision PDBs using EM CLI. For information on how to do so, see Section A.4.4.17.3.1 Creating a New Pluggable Database Using Enterprise Manager
This section provides information about creating a new PDB using Cloud Control. In particular, it contains the following:
17.3.1.1 Prerequisites for Creating a New Pluggable Database
Before creating a new PDB using Cloud Control, ensure that you meet the following prerequisites:
-
Oracle Software Library (Software Library) must be set up in Cloud Control.
For information on how to set up Software Library in Cloud Control, see Section 2.2.
-
The CDB within which you want to create a PDB must exist, and must be a Cloud Control target.
Note:
For information on how to create a new CDB, see Chapter 16. -
The CDB (within which you want to create a PDB) must not be in read-only, upgrade, or downgrade mode.
-
The target host user must be the owner of the Oracle home that the CDB (within which you want to create the PDB) belongs to.
17.3.1.2 Creating a New Pluggable Database
To create a new PDB in a CDB using Cloud Control, follow these steps:
-
From the Enterprise menu, select Provisioning and Patching, then select Database Provisioning. In the Database Provisioning page, in the Related Links section of the left menu pane, click Provision Pluggable Databases.
Note:
You can also access the Provision Pluggable Database Console from the home page of the CDB. To do so, in the CDB's home page, from the Oracle Database menu, select Provisioning, then select Provision Pluggable Database. -
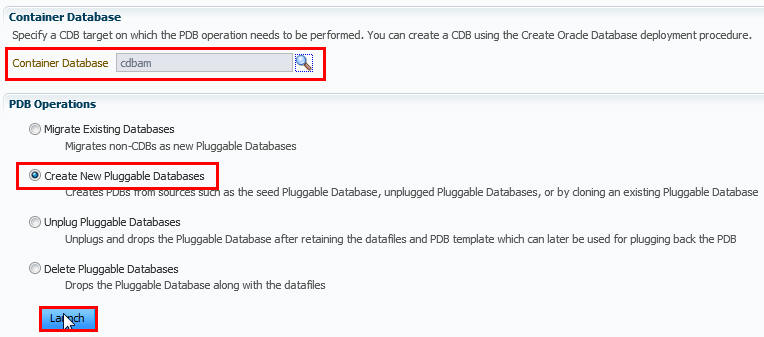
In the Provision Pluggable Database Console, under the Container Database section, select the CDB within which you want to create new PDBs.
Note:
Skip this step if you have accessed the Provision Pluggable Database Console from the CDB's home page. -
In the PDB Operations section, select Create New Pluggable Databases.
-
Click Launch.
Figure 17-2 displays the Provision Pluggable Database Console.
Note:
You will be prompted to log in to the database if you have not already logged in to it through Enterprise Manager. Make sure you log in using sysdba user account credentials. -
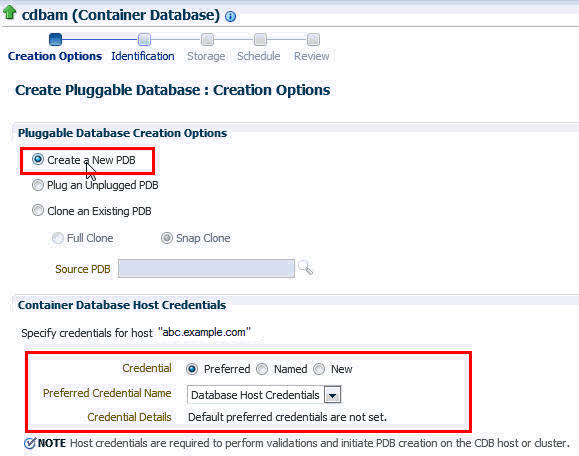
In the Creation Options page of the Create Pluggable Database Wizard, in the Pluggable Database Creation Options section, select Create a New PDB.
-
In the Container Database Host Credentials section, select or specify the target CDB Oracle home owner host credentials. If you have already registered the credentials with Enterprise Manager, you can select Preferred or Named. Otherwise, you can select New and enter the credentials.
Figure 17-3 displays the Creation Options page.
-
Click Next.
-
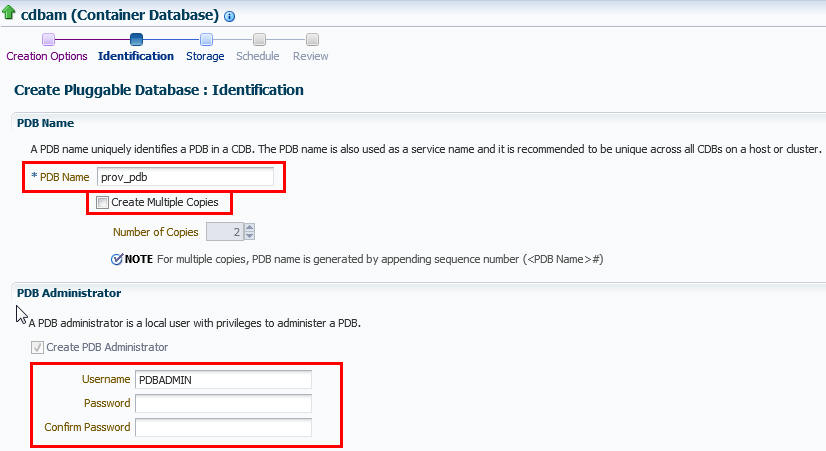
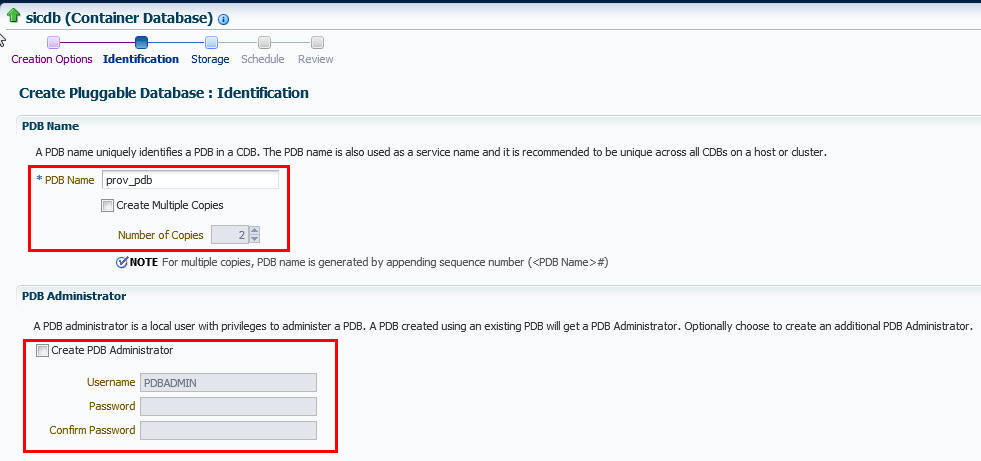
In the Identification page, enter a unique name for the PDB you are creating.
If you prefer to create more than one PDB in this procedure, then select Create Multiple Copies, and set the number of PDBs that you want to create. Note that you can create a maximum of 252 PDBs within a CDB.
Note:
If you choose to create multiple PDBs, then the unique name you enter here is used as a prefix for all PDBs, and the suffix is a numeric value that indicates the count of PDBs.For example, if you create five PDBs with the name
accountsPDB,then the PDBs are created with the namesaccountsPDB1, accountsPDB2, accountsPDB3, accountsPDB4,andaccountsPDB5. -
In the PDB Administrator section, enter the credentials of the admin user account you need to create for administering the PDB.
Figure 17-4 displays the Identification page.
Note:
If you choose to create multiple PDBs, then an admin user account is created for each PDB that you create, with the same set of the specified credentials. -
Click Next.
-
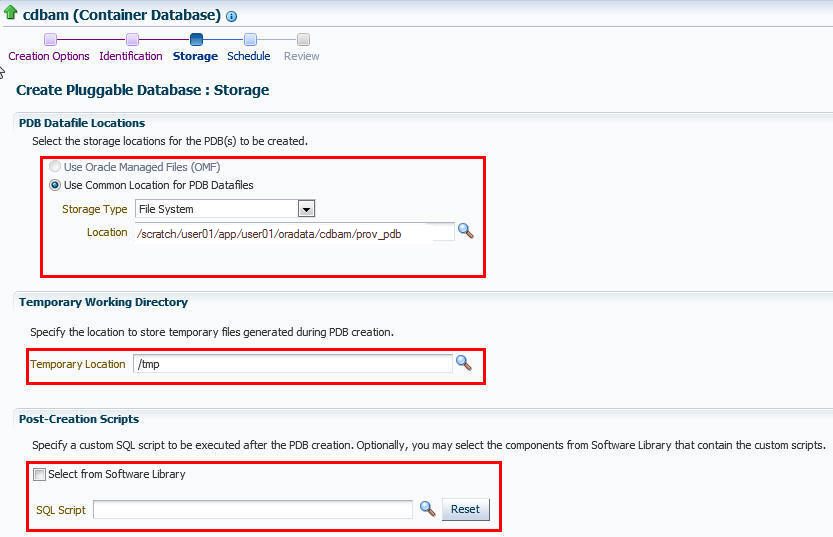
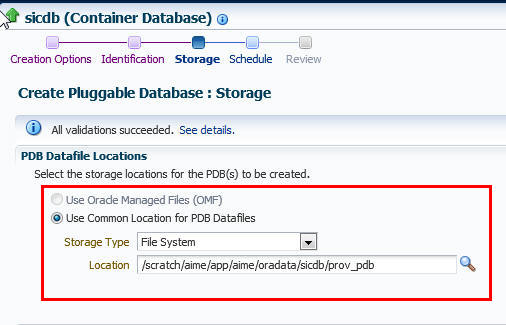
In the Storage page, in the PDB Datafile Locations section, select the type of location where you want to store the datafiles.
-
If the target CDB (CDB in which you are creating the PDB) is enabled with Oracle Managed Files and if you want to use the same, then select Use Oracle Managed Files (OMF).
-
If you want to enter a custom location, then select Use Common Location for PDB Datafiles. Select the storage type and the location where the datafiles can be stored.
-
-
In the Temporary Working Directory section, enter a location where the temporary files generated during the PDB creation process can be stored.
-
In the Post-Creation Scripts section, select a custom SQL script you want to run as part of this procedure, once the PDB is created.
Figure 17-5 displays the Storage page.
-
Click Next.
-
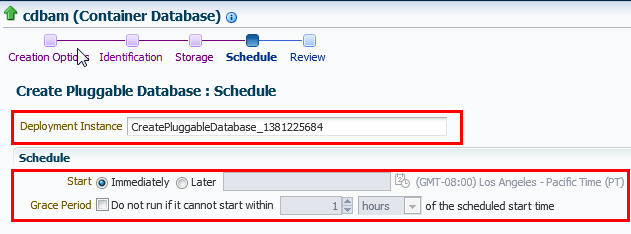
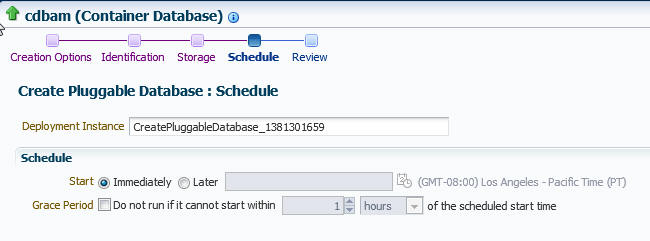
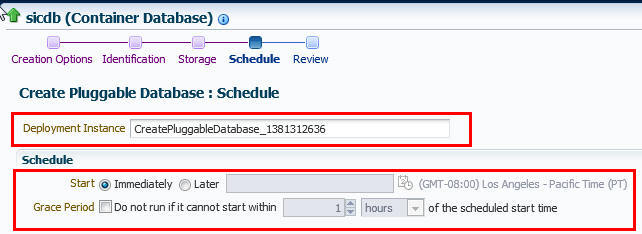
In the Schedule page, enter a unique deployment procedure instance name and a schedule for the deployment. The instance name you enter here helps you identify and track the progress of this procedure on the Procedure Activity page.
If you want to run the procedure immediately, then retain the default selection, that is, Immediately. Otherwise, select Later and provide time zone, start date, and start time details.
You can optionally set a grace period for this schedule. A grace period is a period of time that defines the maximum permissible delay when attempting to run a scheduled procedure. If the procedure does not start within the grace period you have set, then the procedure skips running. To set a grace period, select Grace Period, and set the permissible delay time.
Figure 17-6 displays the Schedule page.
-
Click Next.
-
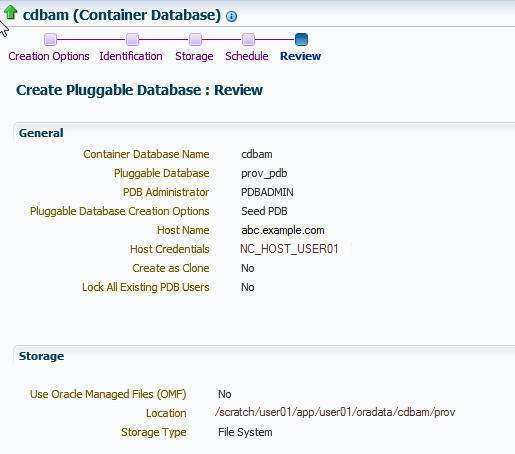
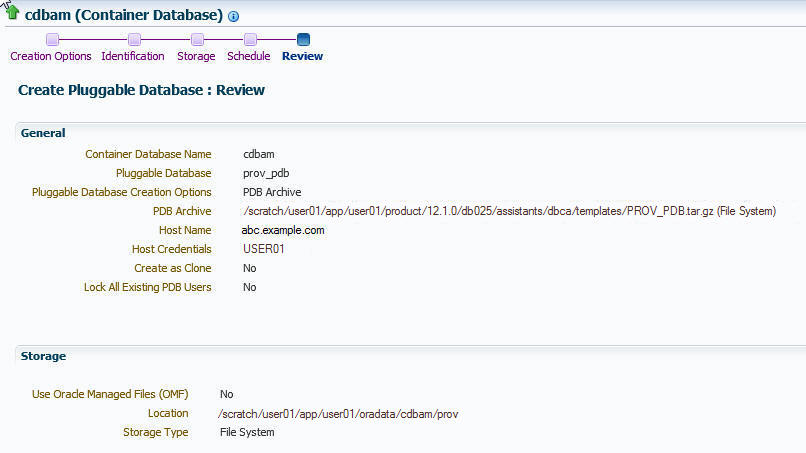
In the Review page, review the details you have provided for the deployment procedure. If you are satisfied with the details, click Submit.
If you want to modify the details, then click Back repeatedly to reach the page where you want to make the changes.
Figure 17-7 displays the Review page.
-
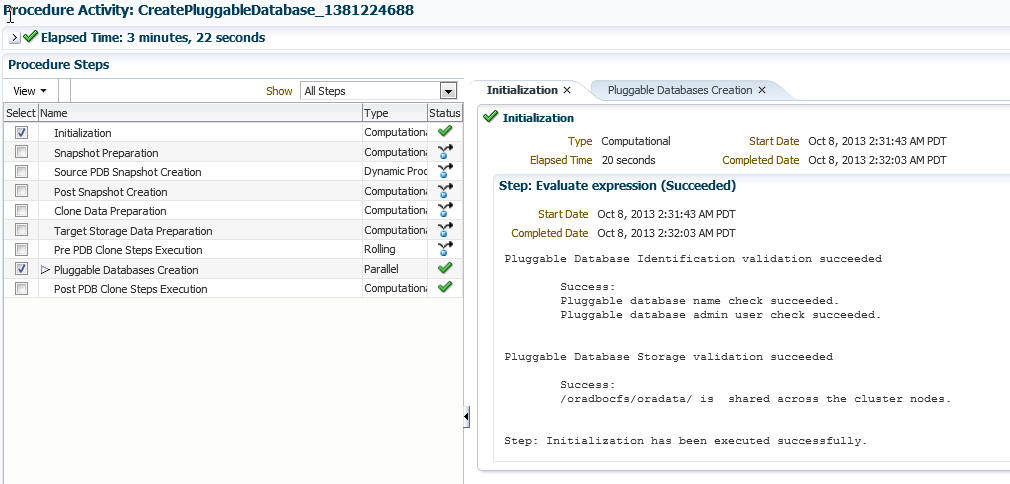
In the Procedure Activity page, view the status of the procedure. From the Procedure Actions menu, you can select Debug to set the logging level to Debug, and select Stop to stop the procedure execution.
Figure 17-8 displays the Procedure Activity page.
When you create a new PDB, the Enterprise Manager job system creates a Create Pluggable Database job. For information about viewing the details of this job, see Section 17.5.1.
17.3.2 Plugging In an Unplugged Pluggable Database Using Enterprise Manager
This section provides information about plugging in an unplugged PDB into a CDB, using Cloud Control. In particular, it contains the following:
17.3.2.1 Prerequisites for Plugging In an Unplugged Pluggable Database
Before plugging in an unplugged PDB using Cloud Control, ensure that you meet the following prerequisites:
-
Oracle Software Library (Software Library) must be set up in Cloud Control.
For information on how to set up Software Library in Cloud Control, see Section 2.2.
-
The target CDB (the CDB within which you want to plug in the unplugged PDB) must exist, and must be a Cloud Control target.
Note:
For information on how to create a new CDB, see Chapter 16. -
The target CDB must not be in read-only, upgrade, or downgrade mode.
-
The XML file that describes the unplugged PDB, and the other files associated with the unplugged PDB, such as the datafiles and the wallet file, must exist and must be readable.
-
The target host user must be the owner of the Oracle home that the CDB (within which you want to plug in the unplugged PDB) belongs to.
-
The platforms of the source CDB host (the host on which the CDB that previously contained the unplugged PDB is installed) and the target CDB host (the host on which the target CDB is installed) must have the same endianness, and must have compatible database options installed.
-
The source CDB (the CDB that previously contained the unplugged PDB) and the target CDB must have compatible character sets and national character sets. Every character in the source CDB character set must be available in the target CDB character set, and the code point value of every character available in the source CDB character set must be the same in the target CDB character set.
17.3.2.2 Plugging In an Unplugged Pluggable Database
To plug in an unplugged PDB to a CDB using Cloud Control, follow these steps:
-
From the Enterprise menu, select Provisioning and Patching, then select Database Provisioning. In the Database Provisioning page, in the Related Links section of the left menu pane, click Provision Pluggable Databases.
Note:
You can also access the Provision Pluggable Database Console from the home page of the CDB. To do so, in the CDB's home page, from the Oracle Database menu, select Provisioning, then select Provision Pluggable Database. -
In the Provision Pluggable Database Console, under the Container Database section, select the CDB to which you want to add the unplugged PDBs.
Note:
Skip this step if you have accessed the Provision Pluggable Database Console from the CDB's home page. -
In the PDB Operations section, select Create New Pluggable Databases.
-
Click Launch.
Figure 17-9 displays the Provision Pluggable Database Console.
Note:
You will be prompted to log in to the database if you have not already logged in to it through Enterprise Manager. Make sure you log in using sysdba user account credentials. -
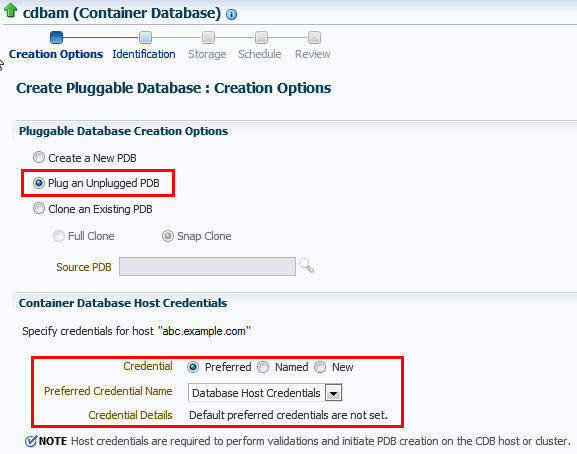
In the Creation Options page of the Create Pluggable Database Wizard, in the Pluggable Database Creation Options section, select Plug an Unplugged PDB.
-
In the Container Database Host Credentials section, select or specify the target CDB Oracle home owner host credentials. If you have already registered the credentials with Enterprise Manager, you can select Preferred or Named. Otherwise, you can select New and enter the credentials.
Figure 17-10 displays the Creation Options page.
-
Click Next.
-
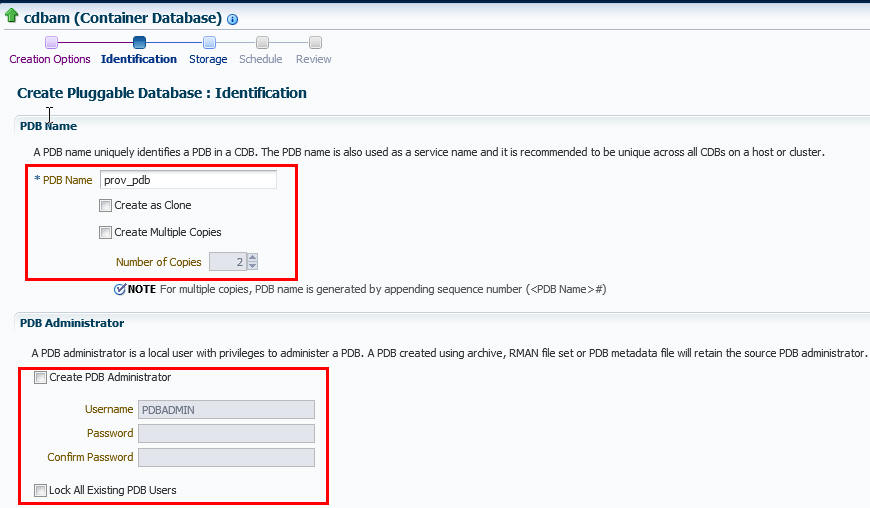
In the Identification page, enter a unique name for the PDB you are plugging in.
Select Create As Clone to ensure that Oracle Database generates a unique PDB DBID, GUID, and other identifiers expected for the new PDB.
If you prefer to create more than one PDB in this procedure, then select Create Multiple Copies, and set the number of PDBs that you want to create. Note that you can create a maximum of 252 PDBs within a CDB.
Note:
If you choose to create multiple PDBs, then the unique name you enter here is used as a prefix for all PDBs, and the suffix is a numeric value that indicates the count of PDBs.For example, if you create five PDBs with the name
accountsPDB,then the PDBs are created with the namesaccountsPDB1, accountsPDB2, accountsPDB3, accountsPDB4,andaccountsPDB5. -
In the PDB Administrator section, do one of the following to administer the PDB:
-
If you prefer to use the admin user account that was created as part of the source PDB that you are plugging in, then deselect Create PDB Administrator.
-
If you want to create a brand new admin user account for the PDB you are plugging in, then select Create PDB Administrator, and enter the desired credentials.
Note:
If you choose to create multiple PDBs, then an admin user account is created for each PDB that you create, with the same set of the specified credentials.To lock and expire all the users in the newly created PDB, (except the newly created Admin), select Lock All Existing PDB Users.
Figure 17-11 displays the Identification page.
-
-
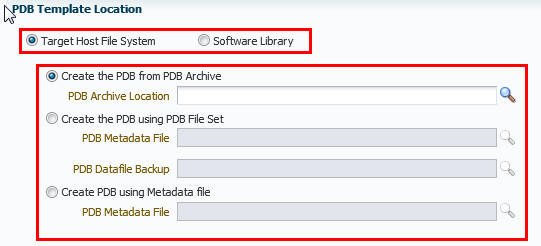
In the PDB Template Location section, select the location where the source PDB's template is available, and then select the type of PDB template.
-
If the PDB template is available on your CDB host (CDB to which you are plugging in the unplugged PDB), then select Target Host File System.
-
If the PDB template is a single archive file—a TAR file with datafiles and metadata XML file included in it, then select Create the PDB from PDB Archive, then select the PDB template.
-
If the PDB template is a PDB file set—a separate DFB file with all the datafiles and a separate metadata XML file, then select Create the PDB using PDB File Set, then select the DBF and XML files.
-
If you want to plug in a PDB using the PDB metadata XML file and the existing datafiles, then select Create PDB using Metadata file.
-
-
If the PDB template is available in Oracle Software Library (Software Library), then select Software Library, then select the component in the Software Library that contains the PDB template.
Figure 17-12 displays the PDB Template Location section of the Identification page.
-
-
Click Next.
-
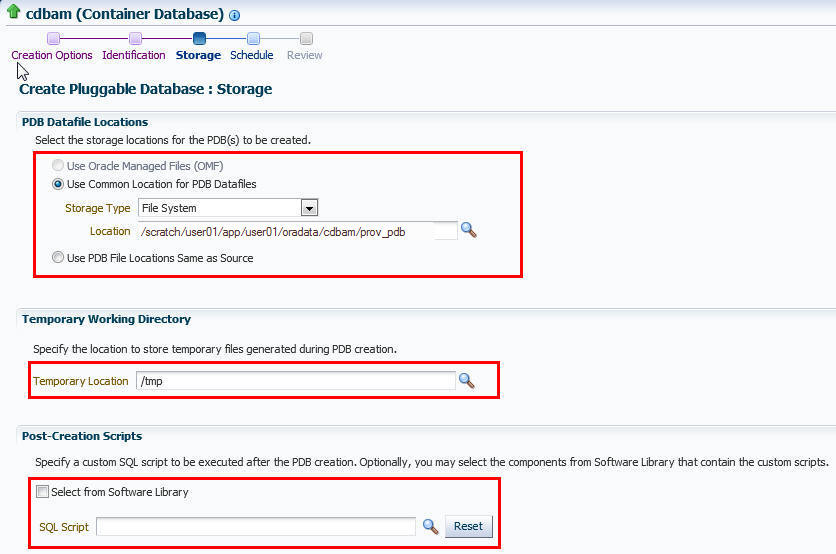
In the Storage page, do one of the following:
-
In the previous page, if you chose to create the PDB from a pluggable database archive (single TAR file) or using a pluggable database file set (DFB file and an XML file), then select the type of location where you want to store the target datafiles for the PDB you are plugging in.
-
If the target CDB (CDB to which you are plugging in the unplugged PDB) is enabled with Oracle Managed Files and if you want to use the same, then select Use Oracle Managed Files (OMF).
-
If you want to enter a common custom location, then select Use Common Location for PDB datafiles. Select the storage type and the location where the datafiles can be stored.
-
-
In the previous page, if you chose to create the PDB using a pluggable database template (XML file only), then do the following:
In the PDB Datafile Locations section, validate the locations mapped for the datafiles. If they are incorrect, correct the paths. Alternatively, if you have a single location where the datafiles are all available, then enter the absolute path in the Set Common Source File Mapping Location field, and click Set.
You can choose to store the target datafiles for the PDB you are plugging in, in the same location as the source datafiles. However, if you want the target datafiles to be stored in a different location, then select Copy Datafiles, and select the type of location:
-
If the target CDB (CDB to which you are plugging in the unplugged PDB) is enabled with Oracle Managed Files and if you want to use the same, then select Use Oracle Managed Files (OMF).
-
If you want to enter a common custom location, then select Use Common Location for Pluggable Database Files. Select the storage type and the location where the datafiles can be stored.
-
If you prefer to use different custom locations for different datafiles, then select Customized Location, and enter the custom location paths.
-
-
-
In the Temporary Working Directory section, enter a location where the temporary files generated during the PDB creation process can be stored.
-
In the Post-Creation Scripts section, select a custom SQL script you want to run as part of this procedure, once the PDB is plugged in.
If the script is available in the Software Library, select Select from Software Library, then select the component that contains the custom script.
Figure 17-13 displays the Storage page.
-
Click Next.
-
In the Schedule page, enter a unique deployment procedure instance name and a schedule for the deployment. The instance name you enter here helps you identify and track the progress of this procedure on the Procedure Activity page.
If you want to run the procedure immediately, then retain the default selection, that is, Immediately. Otherwise, select Later and provide time zone, start date, and start time details.
You can optionally set a grace period for this schedule. A grace period is a period of time that defines the maximum permissible delay when attempting to run a scheduled procedure. If the procedure does not start within the grace period you have set, then the procedure skips running. To set a grace period, select Grace Period, then set the permissible delay time.
Figure 17-14 displays the Schedule page.
-
Click Next.
-
In the Review page, review the details you have provided for the deployment procedure. If you are satisfied with the details, click Submit.
If you want to modify the details, then click Back repeatedly to reach the page where you want to make the changes.
Figure 17-15 displays the Review page.
-
In the Procedure Activity page, view the status of the procedure. From the Procedure Actions menu, you can select Debug to set the logging level to Debug, and select Stop to stop the procedure execution.
Figure 17-16 displays the Procedure Activity page.
When you plug in an unplugged PDB, the Enterprise Manager job system creates a Create Pluggable Database job. For information about viewing the details of this job, see Section 17.5.1.
17.3.3 Cloning a Pluggable Database Using Enterprise Manager
You can clone a PDB using either the Full Clone method, or the Snap Clone method. This section provides information about cloning a PDB using these methods, in Cloud Control. In particular, it contains the following:
17.3.3.1 Prerequisites for Cloning a Pluggable Database
To clone a PDB using Cloud Control, you must meet the following prerequisites:
-
Oracle Software Library (Software Library) must be set up in Cloud Control.
For information on how to set up Software Library in Cloud Control, see Section 2.2.
-
The source PDB (the PDB that you want to clone) must exist, and must be a Cloud Control target.
Note:
For information on how to create a new PDB, see Section 17.3.1. -
The source PDB must be open.
-
The target CDB (the CDB into which you want to plug in the cloned PDB) must exist, and must be a Cloud Control target.
Note:
For information on how to create a new CDB, see Chapter 16. -
The target CDB must not be in read-only, upgrade, or downgrade mode.
-
The target host user must be the owner of the Oracle home that the target CDB belongs to.
To clone a PDB using the Snap Clone method, you must meet the following additional prerequisites:
-
The 12.1.0.5 Enterprise Manager for Oracle Database plug-in must be downloaded and deployed. Also, the 12.1.0.3 SMF plug-in or higher must be downloaded and deployed.
-
The PDB that you want to clone must reside on a registered storage server. This storage server must be synchronized.
For information on how to register a storage server and synchronize storage servers, see Oracle Enterprise Manager Cloud Administration Guide.
-
All the datafiles of the PDB that you want to clone must reside on the storage volumes of the storage server, and not on the local disk.
-
Metric collections must be run on the source CDB (the CDB containing the PDB that you want to clone), the source CDB host, and the PDB that you want to clone.
-
The Snap Clone feature must be enabled for the PDB that you want to clone.
For information on how to enable the Snap Clone feature, see Oracle Enterprise Manager Cloud Administration Guide.
17.3.3.2 Cloning a Pluggable Database
To clone an existing PDB using either the Full Clone or the Snap Clone method, follow these steps:
Important:
If you use the Full Clone method to clone a PDB, you can clone the PDB only to the source CDB (the CDB containing the PDB that you are cloning).-
From the Enterprise menu, select Provisioning and Patching, then select Database Provisioning. In the Database Provisioning page, in the Related Links section of the left menu pane, click Provision Pluggable Databases.
Note:
You can also access the Provision Pluggable Database Console from the home page of the CDB. To do so, in the CDB's home page, from the Oracle Database menu, select Provisioning, then select Provision Pluggable Database. -
In the Provision Pluggable Database Console, in the CDB section, select the CDB to which you want to add the cloned PDB.
Note:
Skip this step if you have accessed the Provision Pluggable Database Console from the CDB's home page. -
In the PDB Operations section, select Create New Pluggable Databases.
-
Click Launch.
Figure 17-17 displays the Provision Pluggable Database Console.
Note:
You will be prompted to log in to the database if you have not already logged in to it through Enterprise Manager. Make sure you log in using sysdba user account credentials. -
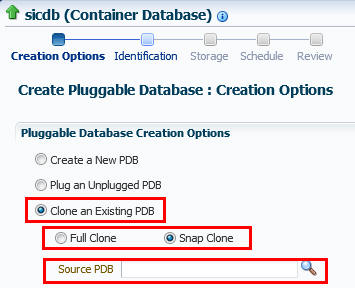
In the Creation Options page of the Create Pluggable Database Wizard, in the PDB Creation Options section, select Clone an Existing PDB.
To clone a PDB using the traditional method of cloning the PDB datafiles, select Full Clone. Use this method if you want to clone a PDB for long term usage. This method is ideal for load testing, when you plan to make significant data updates to the PDB clone. However, this method takes a longer period of time, and a clone that is created using this method occupies a fairly large amount of space, as compared to the Snap Clone method.
To clone a PDB using the Storage Management Framework (SMF) Snap Clone feature, select Snap Clone. Use this method if you want to clone a PDB for short term purposes. This method is ideal for functional testing, as the cloning process is quick, and a PDB clone that is created using this method occupies very little space. However, this method is not suitable if you plan to make significant data updates to the PDB clone.
For Source PDB, select the PDB that you want to clone.
Figure 17-18 displays the PDB Creation Options section of the Creation Options page.
-
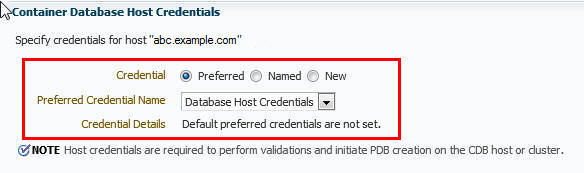
In the CDB Host Credentials section, select or specify the target CDB Oracle Home owner host credentials. If you have already registered the credentials with Enterprise Manager, you can select Preferred or Named. Otherwise, you can select New and enter the credentials.
Figure 17-19 displays the CDB Host Credentials section of the Creation Options page.
-
Click Next.
-
In the Identification page, enter a unique name for the PDB you are cloning.
If you prefer to create more than one PDB in this procedure, then select Create Multiple Copies, and set the number of PDBs you want to create. Note that you can create a maximum of 252 PDBs.
Note:
If you choose to create multiple PDBs, then the unique name you enter here is used as a prefix for all the cloned PDBs, and the suffix is a numeric value that indicates the count of PDBs.For example, if you create five PDBs with the name
accountsPDB,then the PDBs are created with the namesaccountsPDB1, accountsPDB2, accountsPDB3, accountsPDB4,andaccountsPDB5. -
In the PDB Administrator section, do one of the following to administer the PDB:
-
If you prefer to use the admin user account that was created as part of the source PDB that you are cloning, then deselect Create PDB Administrator.
-
If you want to create a brand new admin user account for the PDB you are cloning, then select Create PDB Administrator, and enter the desired credentials.
Figure 17-20 displays the Identification page.
Note:
If you choose to create multiple PDBs, then an admin user account is created for each PDB that you create, with the same set of the specified credentials. -
-
In the Source CDB Login Credentials section, select or specify the login credentials of the source CDB. If you have already registered the credentials with Enterprise Manager, you can select Preferred or Named. Otherwise, you can select New and enter the credentials.
The credentials are used to bring the source PDB to read-only mode before the cloning operation begins, and to restore it to the original state after the cloning operation ends.
If you chose the Snap Clone method (on the Source page of the Create Pluggable Database Wizard) to clone the PDB, specify the host credentials for the source CDB.
Note:
If you are cloning the source PDB to the source CDB itself, then the Source CDB Login Credentials section is not displayed, that is, you do not need to provide the source CDB login credentials or the source CDB host credentials.If you are cloning the source PDB to a CDB different from the source CDB, and this CDB resides on the source CDB host, then you must provide the source CDB login credentials. You do not need to provide the source CDB host credentials.
If you are cloning the source PDB to a CDB different from the source CDB, and this CDB resides on a host different from the source CDB host, then you must provide the source CDB login credentials and the source CDB host credentials.
-
Click Next.
-
In the Storage page, specify the storage information.
If you chose the Full Clone method to clone the PDB, select the type of location where you want to store the PDB datafiles in the following manner:
-
If the source CDB is enabled with Oracle Managed Files and if you want to use the same, then select Use Oracle Managed Files (OMF).
-
If you want to enter a custom location, then select Use Common Location for PDB Datafiles. Select the storage type and the location where the datafiles can be stored.
Figure 17-21 displays the Storage page for the Full Clone method.
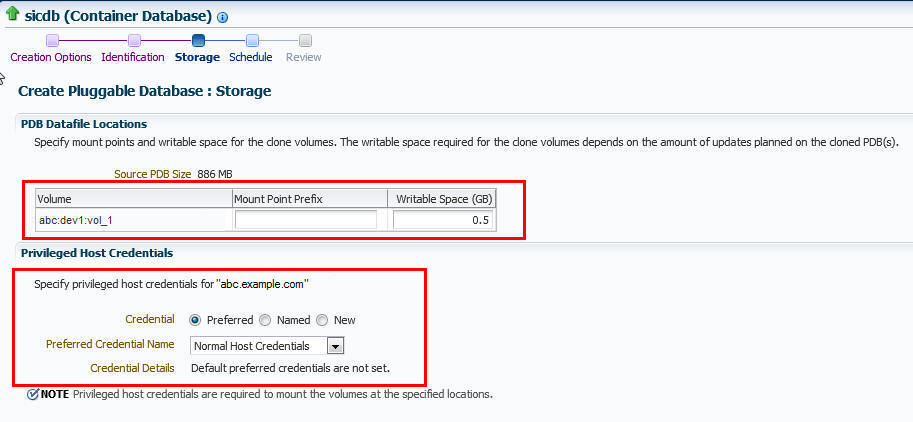
If you chose the Snap Clone method to clone the PDB, do the following:
-
In the PDB Datafile Locations section, specify a value for Mount Point Prefix, that is, the mount location for the storage volumes. You can choose to specify the same prefix for all the volumes, or a different prefix for each volume. Also, specify a value for Writable Space, that is, the space that you want to allocate for writing the changes made to the PDB clone. You can choose to specify the same writable space value for all the volumes, or a different value for each volume.
-
In the Privileged Host Credentials section, select or specify the credentials of the root user. These credentials are used for mounting the cloned volumes on the destination host.
If you have already registered the credentials with Enterprise Manager, you can select Preferred or Named. Otherwise, you can select New and enter the credentials.
Figure 17-22 displays the Storage page for the Snap Clone method.
-
-
In the Temporary Working Directory section, enter a location where the temporary files generated during the PDB creation process can be stored.
-
In the Post-Creation Scripts section, select a custom SQL script you want to run as part of this procedure, once the PDB is cloned.
-
Click Next.
-
In the Schedule page, enter a unique deployment procedure instance name and a schedule for the deployment. The instance name you enter here helps you identify and track the progress of this procedure on the Procedure Activity page.
If you want to run the procedure immediately, then retain the default selection, that is, Immediately. Otherwise, select Later and provide time zone, start date, and start time details.
You can optionally set a grace period for this schedule. A grace period is a period of time that defines the maximum permissible delay when attempting to run a scheduled procedure. If the procedure does not start within the grace period you have set, then the procedure skips running. To set a grace period, select Grace Period, and set the permissible delay time.
Figure 17-23 displays the Schedule page.
-
Click Next.
-
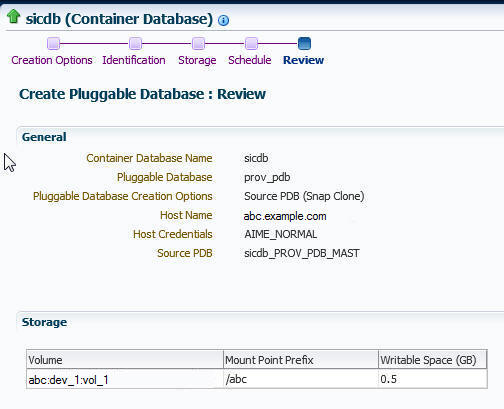
In the Review page, review the details you have provided for the deployment procedure. If you are satisfied with the details, click Submit.
If you want to modify the details, then click Back repeatedly to reach the page where you want to make the changes.
Figure 17-24 displays the Review page.
-
In the Procedure Activity page, view the status of the procedure. From the Procedure Actions menu, you can select Debug to set the logging level to Debug, and select Stop to stop the procedure execution.
Figure 17-25 displays the Procedure Activity page.
When you clone a PDB, the Enterprise Manager job system creates a Create Pluggable Database job. For information about viewing the details of this job, see Section 17.5.1.
17.3.4 Migrating a Non-CDB as a Pluggable Database Using Enterprise Manager
This section provides information about migrating a non-CDB as a PDB using Cloud Control. In particular, it contains the following:
17.3.4.1 Prerequisites for Migrating a Non-CDB as a Pluggable Database
Before migrating a non-CDB as a PDB using Cloud Control, ensure that you meet the following prerequisites:
-
Oracle Software Library (Software Library) must be set up in Cloud Control.
For information on how to set up Software Library in Cloud Control, see Section 2.2.
-
The target CDB (the CDB to which you want to migrate a non-CDB as a PDB) must exist, and must be a Cloud Control target.
Note:
For information on how to create a new CDB, see Chapter 16. -
The target CDB must not be in read-only, upgrade, or downgrade mode.
-
The non-CDB that you want to migrate and the target CDB must be running in
ARCHIVELOGmode.For information on setting the archiving mode of a database, see Oracle Database Administrator's Guide.
-
The database administrators of the database you want to migrate, and the target CDB must have
SYSDBAprivileges. -
The target host user must be the owner of the Oracle home that the target CDB belongs to.
17.3.4.2 Migrating a Non-CDB as a Pluggable Database
To migrate a non-CDB as a PDB using Cloud Control, follow these steps:
-
From the Enterprise menu, select Provisioning and Patching, then select Database Provisioning. In the Database Provisioning page, in the Related Links section of the left menu pane, click Provision Pluggable Databases.
Note:
You can also access the Provision Pluggable Database Console from the home page of the CDB. To do so, in the CDB's home page, from the Oracle Database menu, select Provisioning, then select Provision Pluggable Database. -
In the Provision Pluggable Database Console, in the CDB section, select the CDB to which you want to migrate a non-CDB as a PDB.
Note:
Skip this step if you have accessed the Provision Pluggable Database Console from the CDB's home page. -
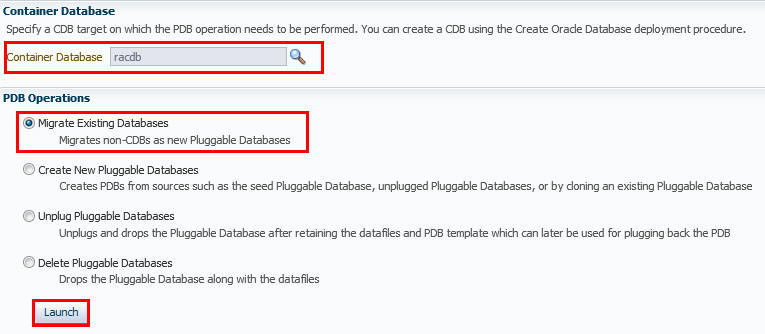
In the PDB Operations section of the Provision Pluggable Database page, select the Migrate Existing Databases option and click Launch.
Figure 17-26 displays the Provision Pluggable Database Console.
-
On the Database Login page, select the Credential Name from the drop-down list. Click Login.
-
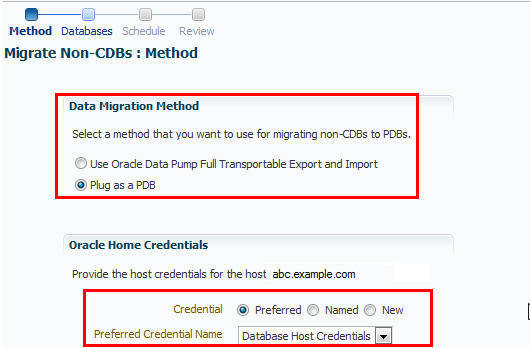
On the Migrate Non-CDBs launch page, select a data migration method, that is, Export/Import or Plug as a PDB. If you select Plug as a PDB, ensure that the non-CDB that you want to migrate is open, and is in read-only mode.
Enter the appropriate credentials for the Oracle Home Credential section.
Click Next.
Figure 17-27 displays the Method page.
-
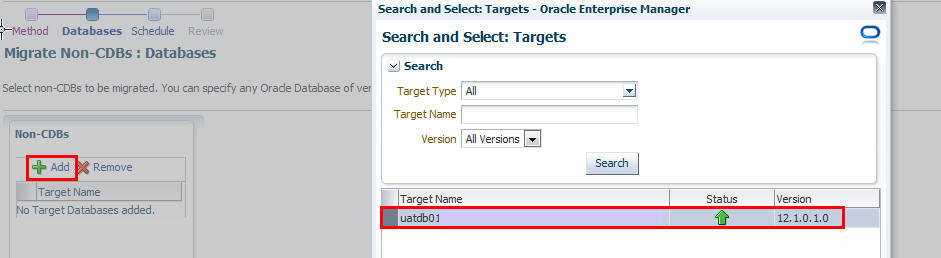
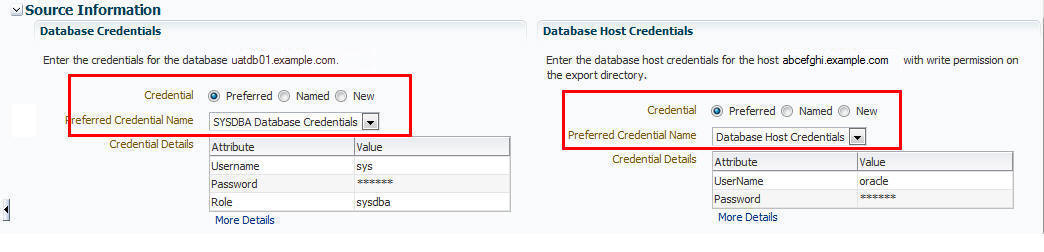
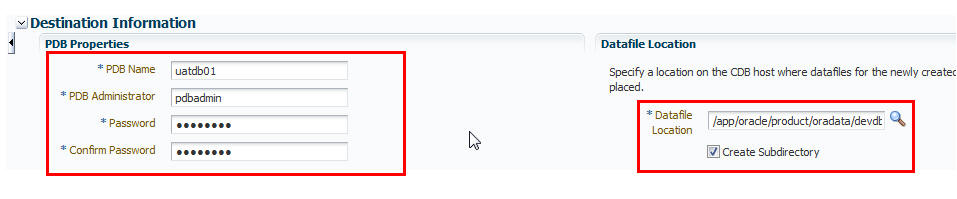
On the Database page, select a Non-CDB to be migrated. You can select more than one. Click Add. In the database pane, provide the appropriate credential, properties, export, import, and datafile location information. Click Next.
Figure 17-28 displays how to select the non-CDB you want to migrate.
Figure 17-29 displays how to specify the database and database host credentials.
Figure 17-30 displays how to specify the stage location for migration.
Figure 17-31 displays how to specify the PDB administrator details and datafile location.
Figure 17-32 displays how to specify the import directory.
-
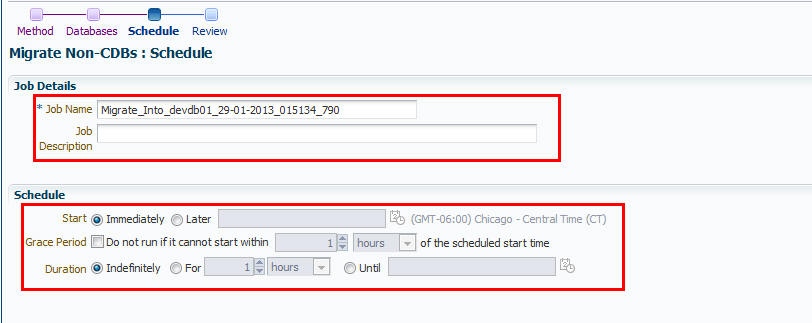
On the Schedule page, enter the appropriate job and scheduling details. Click Next.
Figure 17-33 displays the Schedule page.
-
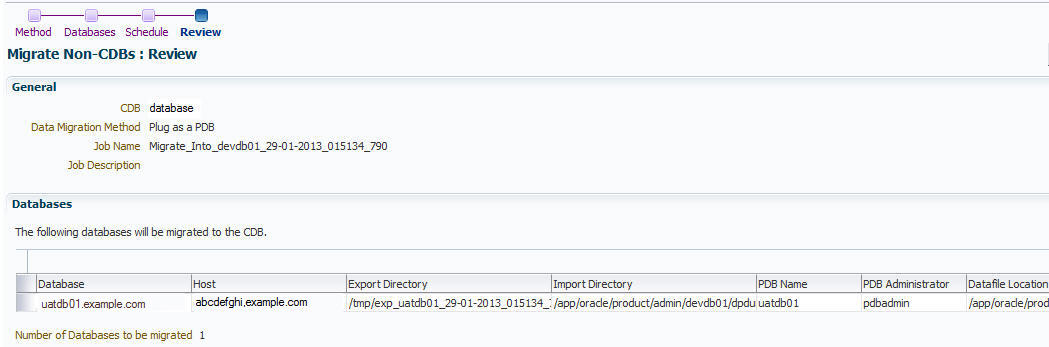
On the Review page, review all details entered. If there are no changes required, click Submit.
Figure 17-34 displays the Review page.


17.4 Removing Pluggable Databases Using Enterprise Manager
This section provides information related to unplugging PDBs and deleting PDBs. In particular, it contains the following:
17.4.1 Unplugging and Dropping a Pluggable Database Using Enterprise Manager
This section provides information about unplugging and dropping a PDB using Cloud Control. In particular, it contains the following:
Note:
As an alternative to using the method described in this section, you can use EM CLI to unplug and drop PDBs. For more information, see Section A.4.4.4.17.4.1.1 Prerequisites for Unplugging and Dropping a Pluggable Database
Before unplugging and dropping a PDB using Cloud Control, ensure that you meet the following prerequisites:
-
Oracle Software Library (Software Library) must be set up in Cloud Control.
For information on how to set up Software Library in Cloud Control, see Section 2.2.
-
The PDB that you want to unplug and drop must have been opened at least once.
-
The target host user must be the owner of the Oracle home that the CDB (containing the PDB that you want to unplug and drop) belongs to.
17.4.1.2 Unplugging and Dropping a Pluggable Database
To unplug a PDB from its CDB using Cloud Control, follow these steps:
-
From the Enterprise menu, select Provisioning and Patching, then select Database Provisioning. In the Database Provisioning page, in the Related Links section of the left menu pane, click Provision Pluggable Databases.
Note:
You can also access the Provision Pluggable Database Console from the home page of the CDB. To do so, in the CDB's home page, from the Oracle Database menu, select Provisioning, then select Provision Pluggable Database. -
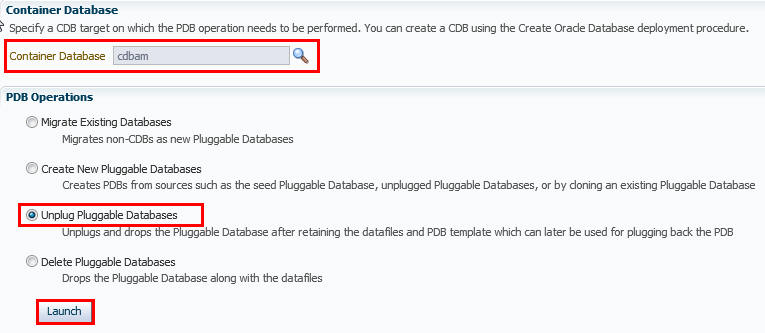
In the Provision Pluggable Database Console, in the CDB section, select the CDB from which you want to unplug the PDBs.
Note:
Skip this step if you have accessed the Provision Pluggable Database Console from the CDB's home page. -
In the PDB Operations section, select Unplug Pluggable Database.
-
Click Launch.
Figure 17-35 displays the Provision Pluggable Database Console.
Note:
You will be prompted to log in to the database if you have not already logged in to it through Enterprise Manager. Make sure you log in using sysdba user account credentials. -
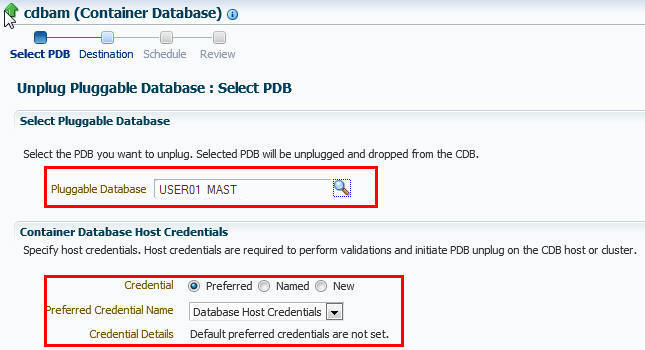
In the Select PDB page of the Unplug Pluggable Database Wizard, in the Select Pluggable Database section, select the PDB you want to unplug. Note that the PDB once unplugged will be stopped and dropped.
-
In the CDB Host Credentials section, select or specify the target CDB Oracle Home owner host credentials. If you have already registered the credentials with Enterprise Manager, you can select Preferred or Named. Otherwise, you can select New and enter the credentials.
Figure 17-36 displays the Select PDB page.
-
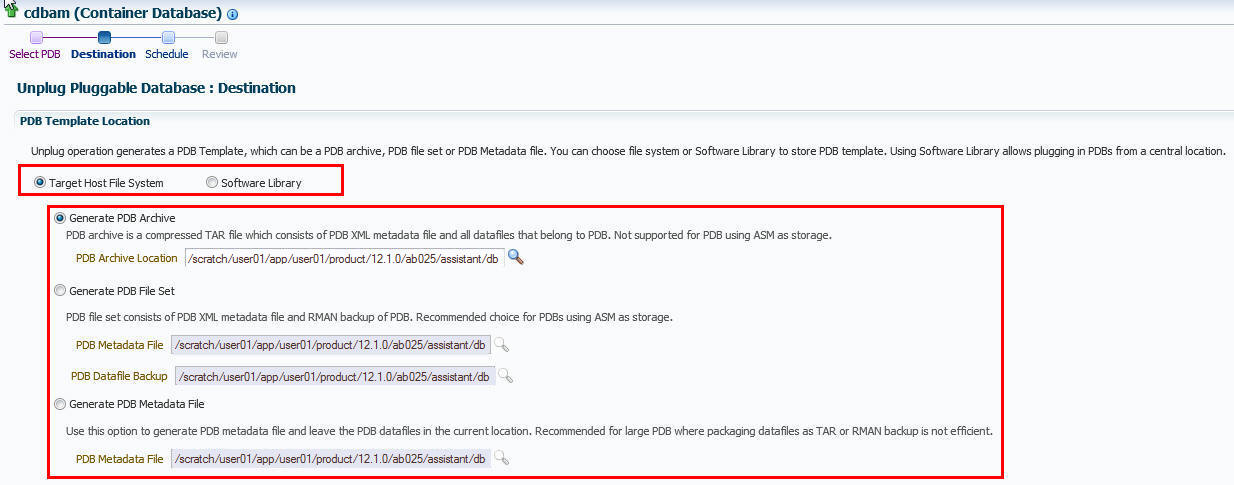
In the Destination page, select the type of PDB template you want to generate for unplugging the PDB, and the location where you want to store it. The PDB template consists of all datafiles as well as the metadata XML file.
-
If you want to store the PDB template on your CDB host (CDB from where you are unplugging the PDB), then select Target Host File System.
-
If you want to generate a single archive file—a TAR file with the datafiles and the metadata XML file included in it, then select Generate PDB Archive. Select a location where the archive file can be created.
Note:
Oracle recommends you to select this option if the source and target CDBs are using file system for storage. This option is not supported for PDBs using ASM as storage. -
If you want to generate an archive file set—a separate DFB file with all the datafiles and a separate metadata XML file, then select Generate PDB File Set. Select the locations where the DBF and XML files can be created.
Note:
Oracle recommends you to select this option if the source and target CDBs are using ASM for storage. -
If you want to generate only a metadata XML file, leaving the datafiles in their current location, then select Generate PDB Metadata File. Select a location where the metadata XML file can be created.
-
-
If you want to store the PDB template in Oracle Software Library (Software Library), then select Software Library.
-
If you want to generate a single archive file—a TAR file with the datafiles and the metadata XML file included in it, then select Generate PDB Archive. If you want to generate an archive file set—a separate DFB file with all the datafiles and a separate metadata XML file, then select Generate PDB File Set. If you want to generate only a metadata XML file, leaving the datafiles in their current location, then select Generate PDB Metadata File.
-
Enter a unique PDB template name.
The template is created in the default location that has the following format:
Database Configuration/<db_release>/<platform>/Database TemplatesFor example,
Database Configuration/12.1.0.0.2/unix/Database Templates -
Enter a temporary location where the archive can be created by Enterprise Manager before it is uploaded to the Software Library.
-
Figure 17-37 displays the Destination page.
-
-
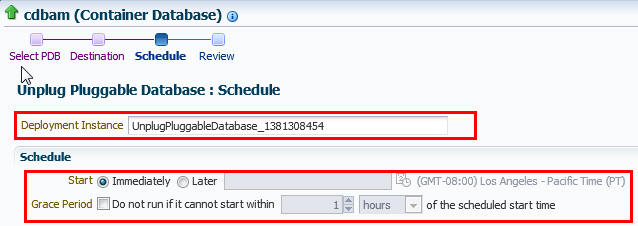
In the Schedule page, enter a unique deployment procedure instance name and a schedule for the deployment. The instance name you enter here helps you identify and track the progress of this procedure on the Procedure Activity page.
If you want to run the procedure immediately, then retain the default selection, that is, Immediately. Otherwise, select Later and provide time zone, start date, and start time details.
You can optionally set a grace period for this schedule. A grace period is a period of time that defines the maximum permissible delay when attempting to run a scheduled procedure. If the procedure does not start within the grace period you have set, then the procedure skips running. To set a grace period, select Grace Period, and set the permissible delay time.
Figure 17-38 displays the Schedule page.
-
Click Next.
-
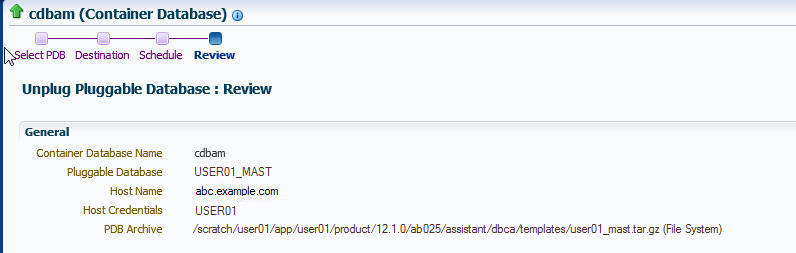
In the Review page, review the details you have provided for the deployment procedure. If you are satisfied with the details, click Submit.
If you want to modify the details, then click Back repeatedly to reach the page where you want to make the changes.
Figure 17-39 displays the Review page.
-
In the Procedure Activity page, view the status of the procedure. From the Procedure Actions menu, you can select Debug to set the logging level to Debug, and select Stop to stop the procedure execution.
When you unplug and drop a PDB, the Enterprise Manager job system creates an Unplug Pluggable Database job. For information about viewing the details of this job, see Section 17.5.2.
17.4.2 Deleting Pluggable Databases Using Enterprise Manager
This section provides information about permanently deleting PDBs from a CDB, using Cloud Control. In particular, it contains the following:
17.4.2.1 Prerequisites for Deleting Pluggable Databases
Before permanently deleting a set of PDBs from a CDB using Cloud Control, ensure that you meet the following prerequisites:
-
The 12.1.0.5 Enterprise Manager for Oracle Database plug-in must be downloaded and deployed.
For information on how to download and deploy a plug-in, see Oracle Enterprise Manager Cloud Control Administrator's Guide.
-
Oracle Software Library (Software Library) must be set up in Cloud Control.
For information on how to set up Software Library in Cloud Control, see Section 2.2.
-
The PDBs that you want to delete must have been opened at least once.
-
The target host user must be the owner of the Oracle home that the CDB (containing the PDBs that you want to delete) belongs to.
17.4.2.2 Deleting Pluggable Databases
To permanently delete a set of PDBs from a CDB using Cloud Control, follow these steps:
-
From the Enterprise menu, select Provisioning and Patching, then select Database Provisioning. In the Database Provisioning page, in the Related Links section of the left menu pane, click Provision Pluggable Databases.
Note:
You can also access the Provision Pluggable Database Console from the home page of the CDB. To do so, in the CDB's home page, from the Oracle Database menu, select Provisioning, then select Provision Pluggable Database. -
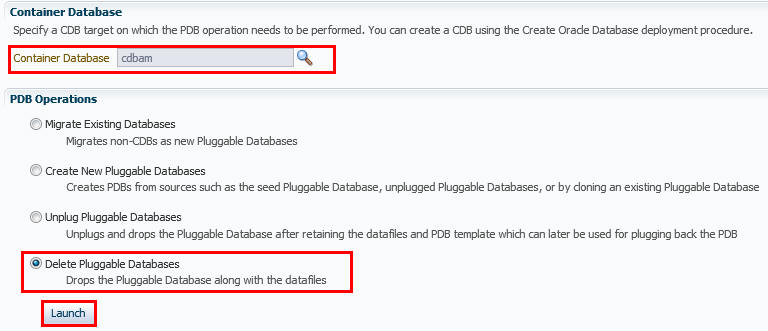
In the Provision Pluggable Database Console, in the CDB section, select the CDB from which you want to delete the PDBs.
Note:
Skip this step if you have accessed the Provision Pluggable Database Console from the CDB's home page. -
In the PDB Operations section, select Delete Pluggable Databases.
-
Click Launch.
Figure 17-40 displays the Provision Pluggable Database Console.
Note:
You will be prompted to log in to the database if you have not already logged in to it through Enterprise Manager. Make sure you log in using sysdba user account credentials. -
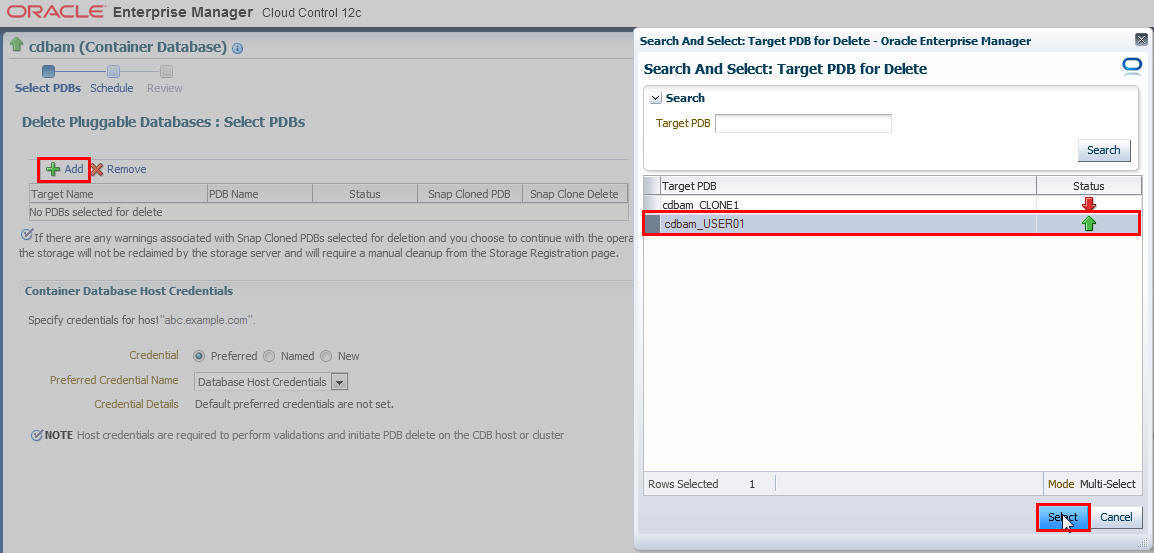
In the Select PDBs page of the Delete Pluggable Databases Wizard, click Add. Select the PDBs that you want to delete, then click Select.
Note:
If you choose to delete a PDB that was created using the Snap Clone method, the PDB mount points on the CDB host are cleaned up. The corresponding storage volumes on the storage server are also deleted. This action is irreversible.Figure 17-41 displays the Select PDBs page.
-
In the CDB Host Credentials section, select or specify the target CDB Oracle Home owner host credentials. If you have already registered the credentials with Enterprise Manager, you can select Preferred or Named. Otherwise, you can select New and enter the credentials.
If one (or more) of the PDBs that you selected for deletion is the Snap Clone of another PDB, you must also provide the privileged host credentials, that is, the credentials of the root user. If you have already registered the credentials with Enterprise Manager, you can select Preferred or Named. Otherwise, you can select New and enter the credentials.
Figure 17-42 displays the CDB Host Credentials section of the Select PDBs page.
-
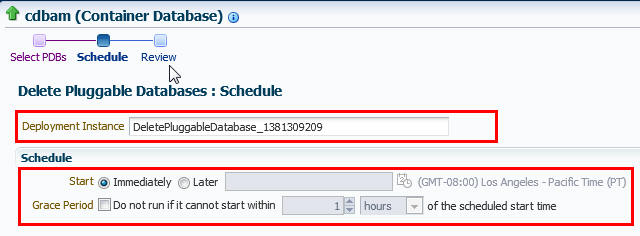
In the Schedule page, enter a unique deployment procedure instance name and a schedule for the deployment. The instance name you enter here helps you identify and track the progress of this procedure on the Procedure Activity page.
If you want to run the procedure immediately, then retain the default selection, that is, Immediately. Otherwise, select Later and provide time zone, start date, and start time details.
You can optionally set a grace period for this schedule. A grace period is a period of time that defines the maximum permissible delay when attempting to run a scheduled procedure. If the procedure does not start within the grace period you have set, then the procedure skips running. To set a grace period, select Grace Period, and set the permissible delay time.
Figure 17-43 displays the Schedule page.
-
Click Next.
-
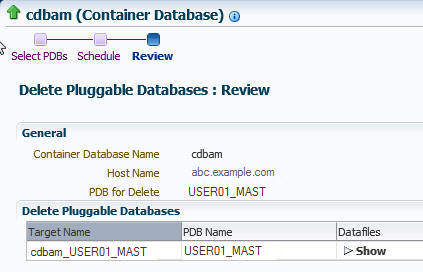
In the Review page, review the details you have provided for the deployment procedure. If you are satisfied with the details, click Submit.
If you want to modify the details, then click Back repeatedly to reach the page where you want to make the changes.
Figure 17-44 displays the Review page.
-
In the Procedure Activity page, view the status of the procedure. From the Procedure Actions menu, you can select Debug to set the logging level to Debug, and select Stop to stop the procedure execution.
Figure 17-45 displays the Procedure Activity page.
When you delete a PDB, the Enterprise Manager job system creates a Delete Pluggable Database job. For information about viewing the details of this job, see Section 17.5.3.

17.5 Viewing Pluggable Database Job Details Using Enterprise Manager
This section provides information about viewing the details of the jobs that are created by the Enterprise Manager job system when you create a PDB, unplug a PDB, or delete a PDB. It contains the following:
17.5.1 Viewing Create Pluggable Database Job Details
To view the details of a create PDB job, follow these steps:
-
From the Enterprise menu, select Provisioning and Patching, then select Procedure Activity.
-
Click the deployment procedure that contains the required create PDB job.

Description of the illustration ''pdb_create_job1_new.jpg''
-
Expand the deployment procedure steps. Select the PDB creation job.
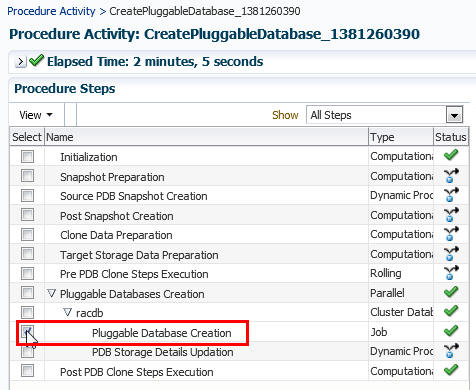
Description of the illustration ''pdb_create_job2_new.jpg''
-
Click Job Summary.
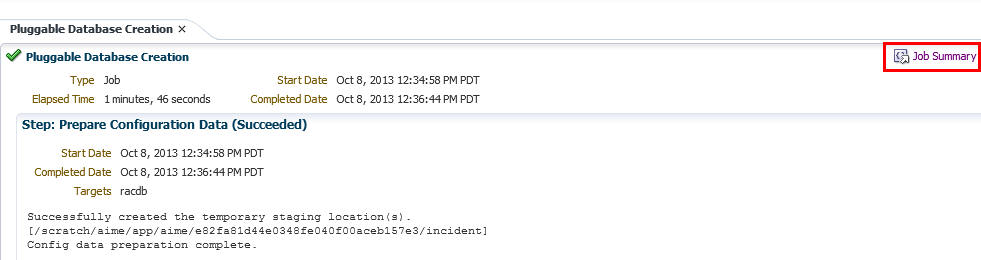
Description of the illustration ''pdb_create_job3_new.jpg''
-
To view a summary of the job details, click Summary.
In the Prepare Configuration Data step, the system prepares for PDB creation.
In the Check Prerequisites step, the system checks the prerequisites for PDB creation.
In the Verify and Prepare step, the system runs tasks prior to PDB creation.
In the Perform Configuration step, the PDB creation is performed. For details of the performed tasks and their status, refer to the remote log files present on the host.
In the Post Configuration step, Enterprise Manager is updated with the newly created PDB details, and the custom scripts are run.
-
To view a visual representation of the create PDB job progress, click Results.
In the Configuration Progress section, you can view the completion percentage of the job, and a list of pending, currently running, and completed job steps. You can also view errors, warnings, and logs. The tail of the log for the currently running job step is displayed.
17.5.2 Viewing Unplug Pluggable Database Job Details
To view the details of an unplug PDB job, follow these steps:
-
From the Enterprise menu, select Provisioning and Patching, then select Procedure Activity.
-
Click the deployment procedure that contains the required unplug PDB job.
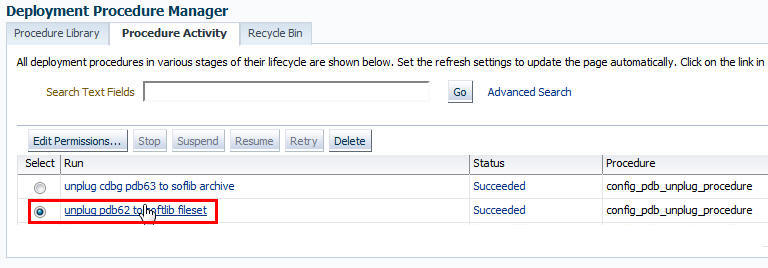
Description of the illustration ''pdb_job_unplug_1_new.jpg''
-
Expand the deployment procedure steps. Select the unplug PDB job.
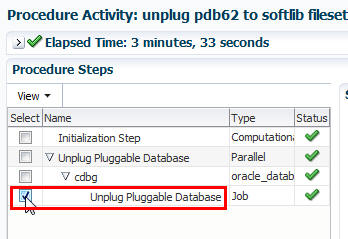
Description of the illustration ''pdb_job_unplug_2.jpg''
-
Click Job Summary.
-
To view a summary of the job details, click Summary.
In the Prepare Configuration Data step, the system prepares for unplugging a PDB.
In the Check Prerequisites step, the system checks the prerequisites for unplugging a PDB.
In the Verify and Prepare step, the system runs tasks prior to unplugging the PDB.
In the Perform Configuration step, the PDB unplugging is performed. For details of the performed tasks and their status, refer to the remote log files present on the host.
In the Post Configuration step, Enterprise Manager is updated with the unplugged PDB details.
-
To view a visual representation of the unplug PDB job progress, click Results.
In the Configuration Progress section, you can view the completion percentage of the job, and a list of pending, currently running, and completed job steps. You can also view errors, warnings, and logs. The tail of the log for the currently running job step is displayed.
17.5.3 Viewing Delete Pluggable Database Job Details
To view the details of a delete PDB job, follow these steps:
-
From the Enterprise menu, select Provisioning and Patching, then select Procedure Activity.
-
Click the deployment procedure that contains the required delete PDB job.

Description of the illustration ''pdb_delete_job1.jpg''
-
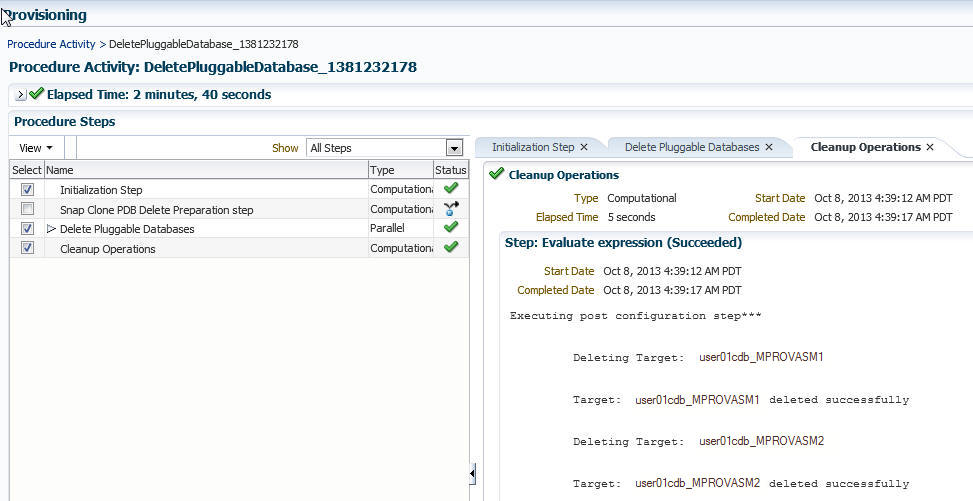
Expand the deployment procedure steps. Select the delete PDB job.
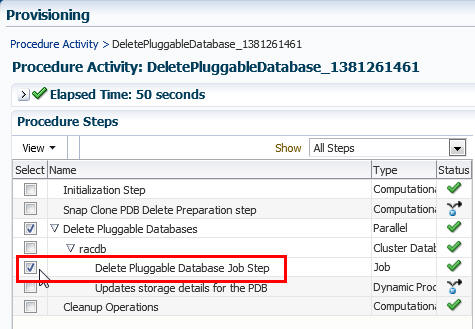
Description of the illustration ''pdb_delete_job2.jpg''
-
Click Job Summary.

Description of the illustration ''pdb_delete_job3.jpg''
-
To view a summary of the job details, click Summary.
In the Prepare Configuration Data step, the system prepares for deleting the PDBs.
In the Verify and Prepare step, the system runs tasks prior to deleting the PDBs.
In the Perform Configuration step, the PDB deletion is performed. For details of the performed tasks and their status, refer to the remote log files present on the host.
In the Post Configuration step, Enterprise Manager is updated with the deleted PDB details.
-
To view a visual representation of the delete PDB job progress, click Results.
In the Configuration Progress section, you can view the completion percentage of the job, and a list of pending, currently running, and completed job steps. You can also view errors, warnings, and logs. The tail of the log for the currently running job step is displayed.
17.6 Administering Pluggable Databases Using Enterprise Manager
This section provides information about performing PDB administration tasks using Cloud Control. It contains the following:
17.6.1 Switching Between Pluggable Databases Using Enterprise Manager
If you are performing a task such as granting user privileges or performance reporting, and you need to perform the same task on another PDB, then you can switch to another PDB using Cloud Control. To switch between PDBs while staying on the same feature page, follow these steps:
-
From the current PDB, select any PDB scope page (such as, Manage Advanced Queues).
In the upper-left corner of the window, the name of the PDB will update to display a context switcher as a drop-down menu.
-
Click the context switcher to display the drop-down menu. This menu shows the PDBs most recently used.
Select a PDB from this list.
-
The page will update to show the System Queues.
-
Click the context switcher to display the drop-down menu. If the menu does not show the PDBs you want, then select All Containers.
-
A Switch Container window will pop up to display all available PDBs for the monitored target.
Select a PDB from this list and click OK.
-
The page will update to show data for the selected PDB.
17.6.2 Altering Pluggable Database State Using Enterprise Manager
To change the state of a single-instance PDB to Open or Close using Cloud Control, follow these steps:
-
From the Oracle Database menu, select Control, then select Open/Close Pluggable Database.
-
From the Open/Close PDB page, select a PDB from the list.
-
Click the Action drop-down menu and select the appropriate actions. Your choices are Open, Open Read Only, and Close.
-
In the Confirmation dialog window, click Yes to complete the change. A Processing dialog window appears to show you the progress of your choice.
-
Once state change completes, the Open/Close PDB page will update to show the new state of the PDB.
To change the state of a PDB in a Cluster/RAC to Open or Close, follow these steps:
-
From the Oracle Database menu, select Control, then Open/Close Pluggable Database.
-
From the Open/Close PDB page, select a PDB from the list. The RAC instances are shown along with the PDB's current state on those instances.
-
Once you select a PDB, a panel appears below the list to show the state of the PDBs on the different RAC instances. The open and close options apply to the PDBs on the RAC instance's panel. You can open or close a PDB on any number of available RAC instances.
-
In the Confirmation dialog window, click Yes to complete the change. A Processing dialog window appears to show you the progress of your choice.
-
Once state change completes, the Open/Close PDB page will update to show the new state of the PDB.