|
Siebel Business Process Framework: Task UI Guide > Examples of Developing a Task UI > Example of Developing a Task UI That Assists with Adding an Opportunity and an Activity >
Revising the Task UI
This task is a step in Example of Developing a Task UI That Assists with Adding an Opportunity and an Activity. In this topic, you revise the task UI so that it allows the user to add an activity. To revise the task UI
- In the Object Explorer, click Task.
- In the Tasks list, query the Task Name property for Create New Opportunity.
If Siebel Tools returns more than one record, then choose the record that includes the highest number in the Version property.
- In the WF/Task Editor Toolbar, click the Revise icon.
Siebel Tools creates a new record in the Tasks list. This new record possesses the highest number in the Version property. For more information, see Using the WF/Task Editor Toolbar.
- In the Tasks list, modify the new revision using values from the following table.
|
|
Transient BC |
TBC for Opportunity |
The Transient BC property identifies the transient business component.
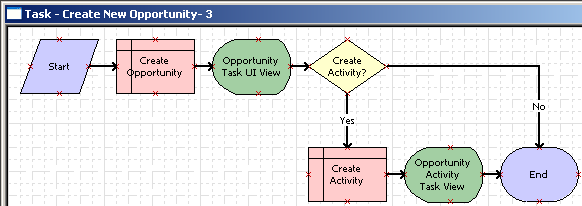
- Open the Task Editor for the new version, and then modify the task UI until it resembles the flow that the following diagram displays:
Siebel Tools displays the label of the Opportunity Activity Task View after you bind the view in a subsequent step in this example. For more information, see Diagramming a Task UI.
- Choose the Opportunity Task UI View step, and then use the properties window to define values described in the following table.
- Choose the Create Activity step, and then use the properties window to define values described in the following table.
|
|
Business Component |
Action |
Defer Write Record |
True |
Operation |
Insert |
- Choose the Opportunity Activity Task View step, and then use the properties window to define values described in the following table.
|
|
Display Name - String Override |
Create Activity |
Forward Button Type |
Submit |
Task View |
Opportunity Activity Task View |
- Click the No connector, and then use the properties window to define values described in the following table.
|