|
Developing and Deploying Siebel Business Applications > Configuring the User Interface > Process of Configuring the User Interface Layer >
Adding Fields to Applets
This task is a step in Process of Configuring the User Interface Layer. To add fields to applets, you do the following:
NREC requires the following applets in the Activities view:
- Activity List Applet
- Activity Detail Applet
You must modify these applets to meet the following NREC business requirements:
- Display fields in a particular order.
- Provide partner agents the ability to track which opportunity is associated with each activity. This functionality is not available in the predefined application. Therefore, you must add the Opportunity field to the Activity List Applet and the Activity Detail Applet applet.
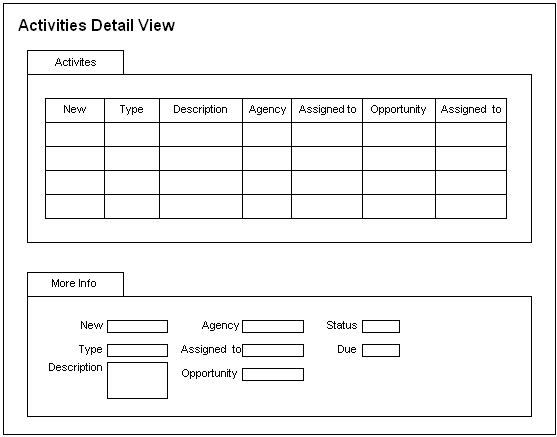
Figure 10 illustrates a view mock-up. You will develop a view that resembles this mock-up.
Figure 10. Mock-up of the Activity Detail View
|
Because the Opportunity field is predefined on the Action business component that these applets reference, you are only required to add the field to each applet. It is not necessary to add a field to the business component. Each object that Siebel CRM displays in the Siebel client includes a display name or caption. Example objects include controls, fields, views, and screens. The following properties determine the text label that Siebel CRM displays in the Siebel client:
- The Display Name property for a list applet
- The Caption property for a form applet
To determine the text that the property displays, you use the drop-down list for the property to identify a predefined symbolic string. You do not define text directly in the property. For more information, see Configuring Siebel Business Applications. Adding a Field to a List Applet
You use the Web Layout Editor to add a field to a list applet. For more information, see Opening the Web Layout Editor. To add a field to a list applet
- In the Object Explorer, click Applet.
- In the Applets list, locate the Activity List Applet (SCW) applet.
- Choose the Tools menu, and then the Lock Project menu item.
- Change the value in the Project property to NREC Configuration.
- Right-click the Activity List Applet (SCW) applet, and then choose the Edit Web Layout menu item.
- In the Controls/Columns window, set the Mode to Edit List.
- To make room for the Opportunity field, rearrange predefined controls in the Web template.
To determine the required layout, see Figure 10. To move a control, drag and drop it.
- Drag a Field control from the Palettes window, and drop it in the space you made in Step 7.
- In the Properties window, set properties for the control you added in Step 8, using values from the following table.
|
|
Name |
Enter Opportunity. |
Display Name |
Do the following:
- Click the arrow in the Display Name property.
- In the Display Name - String Reference dialog box, type Opportunity in the Starting with window, and then click Go.
- In the Current String Value column, click the record that includes only Opportunity. It is approximately the fourth record in the list. Do not choose the record that includes a colon, such as Opportunity:.
- Click Pick.
|
Field |
In the Field property, click the arrow, and then choose Opportunity. Note that the values that Siebel Tools includes in the list of values in the Field property are fields that are defined on the parent business component of the Applet. In this example, this is the Action business component. |
Runtime |
Set to TRUE. If the Runtime property is TRUE, then Siebel CRM performs a run-time check to determine if it must display a picklist, calculator, calendar, or multi-value group (MVG). |
- To approximate how Siebel CRM renders the applet in the Siebel client, right-click anywhere in the Web template, and then choose the Preview menu item.
You can also export the preview to an HTML file. To do this, choose the File menu, and then the Export menu item. Choose a file name and location in the Save As dialog.
- Make adjustments as necessary.
- Choose the File menu, and then the Save menu item.
Adding a Field to a Form Applet
You use the Web Layout Editor to add a field to a form applet. For more information, see Opening the Web Layout Editor. To add a field to a form applet
- In the Object Explorer, click Applet.
- In the Applets list, locate the Activity Detail Applet (SCW) applet.
- Choose the Tools menu, and then the Lock Project menu item.
- Change the value in the Project property to NREC Configuration.
- Right-click the Activity Detail Applet (SCW), and then choose the Edit Web Layout menu item.
- To make room for the Opportunity field, rearrange controls in the Web template that are already mapped to the Web template.
To determine the required layout, see Figure 10. To move a control, drag and drop it.
- Drag a Field control from the Palettes window, and drop it in the space you made in Step 6.
- In the Properties window, set properties for the control you added in Step 7. Use the values described in Step 9, with the following differences:
- Set the Caption property instead of the Display Name property.
- Set the HTML Type property to Field.
- Do not set the Runtime property.
- Drag a Label control from the Palettes window, and drop it immediately to the left of the Opportunity control you added in Step 7.
- In the Properties window, set properties for the control you added in Step 9. Use the same values you used for the Opportunity field you defined in Step 8.
- To approximate how Siebel CRM renders the applet in the Siebel client, right-click anywhere in the Web template, and then choose the Preview menu item.
- Choose the File menu, and then the Save menu item.
|