D 配置安全证书
Oracle 提供自生成安全证书供 HTTPS/SSL 端口使用。在安装过程中,STA 使用 Java keytool 在 STA 服务器上生成证书(使用服务器主机名)。您可以选择将 Oracle 证书替换为您自己批准的来自选定证书颁发机构(例如 VeriSign)的证书。
本章包含以下节:
安全证书配置任务
如果您要使用默认安全证书之外的安全证书,请按照列出的顺序执行这些过程。
注:
这些过程使用在 Windows 平台上运行的 Mozilla Firefox。建立初始 HTTPS/SSL 连接
-
在您的计算机上启动受支持的 Web 浏览器并输入 STA 应用程序的 HTTPS/SSL 版本 URL。
https://STA_host_name:port_number/STA/
其中:
-
host_name 是 STA 服务器的主机名。
-
port_number 是在安装过程中指定的 STA 端口号。默认 HTTP 端口是 7021;默认 HTTPS 端口是 7022。
-
STA 必须大写。
例如:
https://staserver.example.com:7022/STA/
此时将显示 "Connection is Untrusted" 屏幕。
-
-
选择 I Understand the Risks,然后单击 Add Exception。
此时将显示 "Add Security Exception" 屏幕。
-
单击 View。
此时将显示 "Certificate Viewer" 屏幕。证书未显示为已验证状态,因为它不是来自某个证书颁发机构。
-
要检查证书,请单击 Details 选项卡。
-
在 "Certificate Fields" 面板中,选择 issuer。下面是显示样例。CN 指示生成证书的服务器名称。
CN = staserver.example.com
OU = Tape Systems
O = Oracle America Inc
L = Redwood City
ST = California
C = USA
-
单击 Close 返回到 "Add Security Certificate" 屏幕。
-
选择 Confirm Security Exception。
证书将添加到 STA 服务器,现在可以通过该证书使用 HTTPS。
重新配置 WebLogic 以使用不同的安全证书
-
打开浏览器窗口并输入 WebLogic 管理控制台的 URL。默认 HTTP 端口是 7019,默认 HTTPS 端口是 7020。
https://your_hostname:port number/console/
例如:
https://staserver.company.com:7019/console/ -
使用在 STA 安装过程中定义的 WebLogic 管理控制台用户名和密码登录。
-
在 "Domain Structure" 部分,选择 Environment,然后选择 Servers。
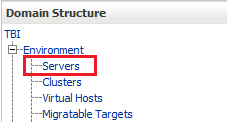
图示说明cert_servers.png
-
在 "Servers" 表中,选择 staUi 活动链接(选择该名称本身,而不是复选框)。
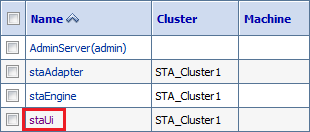
图示说明cert_staui.png
-
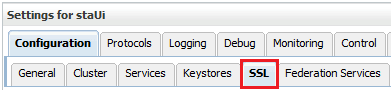
选择 Keystores 选项卡。

图示说明cert_keystores.png
-
在 "Change Center" 部分,单击 Lock & Edit。

图示说明wl_lockedit.png
-
在 "Keystores" 部分,单击 Change。
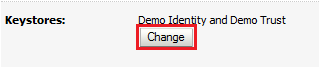
图示说明cert_change.png
-
在 "Keystores" 菜单中,选择 Custom Identity and Java Standard Trust。
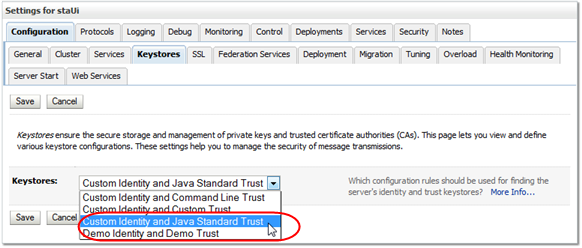
图示说明cert_keystoresmenu.png
-
单击 Save。
-
按以下所示完成 "Keystores" 屏幕:
-
Custom Identity Keystore:私钥文件的路径和文件。
-
Custom Identity Keystore Type:密钥库类型。如果进行 RACF 验证配置,则输入 PKCS12。
-
Custom Identity Keystore Passphrase:MVS 系统管理员提供的密码。
-
Java Standard Trust Keystore Passphrase:Java 标准信任密钥库文件的新密码。
注意:
如果忘记了这些密码,则必须重新安装 STA。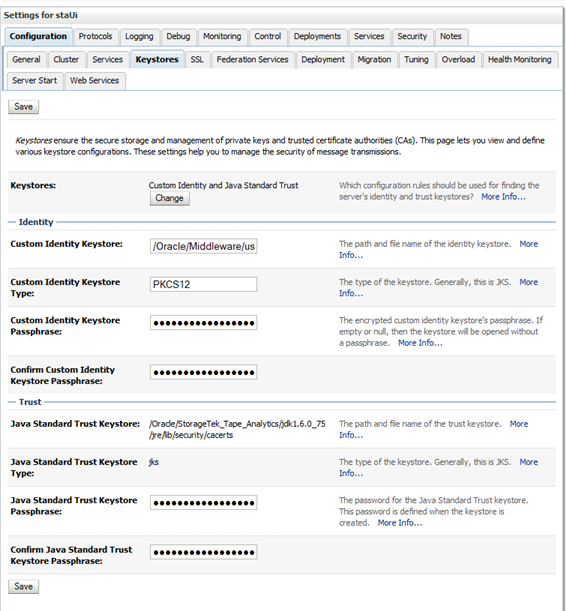
图示说明cert_keystoresentries.png
-
-
单击 Save。
-
选择 SSL 选项卡。
图示说明cert_ssl.png
-
输入由 MVS 系统程序员提供的 "Private Key Alias" 和 "Private Key Passphrase"。
注:
要确定 "Private Key Alias",请在系统命令行中使用 keytool 命令。例如:# keytool -list -keystore CLTBI.PKCS12DR.D080411 -storetype PKCS12 Enter keystore password: (password from the MVS sysadmin) Keystore type: PKCS12 Keystore provider: SunJSSE Your keystore contains 1 entry tbiclient, Aug 17, 2011, PrivateKeyEntry, Certificate fingerprint (MD5): 9A:F7:D1:13:AE:9E:9C:47:55:83:75:3F:11:0C:BB:46
图示说明cert_sslentries.png
-
单击 Save。
-
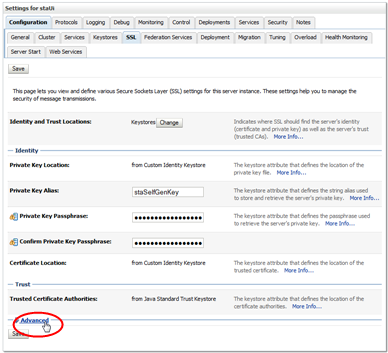
在 "Trusted Certificate Authorities" 部分,单击 Advanced。
图示说明cert_advanced.png
-
按以下所示完成 "SSL" 屏幕的 "Advanced" 部分:
-
选中 Use Server Certs 复选框。
-
从 Two Way Client Cert Behavior 菜单中,选择 "Client Certs Requested But Not Enforced"。
-
在 Inbound Certification Validation 和 Outbound Certificate Validation 菜单中,选择 "Builtin SSL Validation Only"。
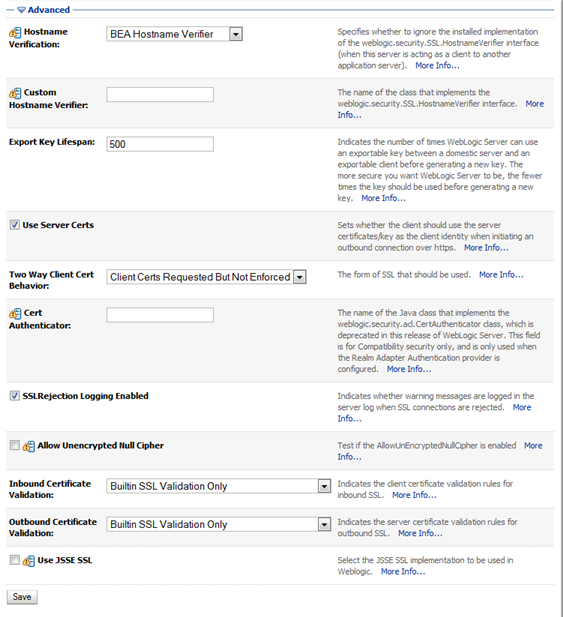
图示说明cert_advancedentries.png
-
-
单击 Save。
-
在 "Change Center" 部分中,单击 Activate Changes。

图示说明wl_activate.png
-
从 WebLogic 注销。
-
使用 STA 命令停止并重新启动 STA。有关命令用法的详细信息,请参见《STA 管理指南》。
# STA stop all
# STA start all
替换 Oracle 证书
-
在您的计算机上启动受支持的 Web 浏览器并输入 STA 应用程序的 HTTPS/SSL 版本 URL。
https://STA_host_name:port_number/STA/
其中:
-
host_name 是 STA 服务器的主机名。
-
port_number 是在安装过程中指定的 STA 端口号。默认 HTTP 端口是 7021;默认 HTTPS 端口是 7022。
-
STA 必须大写。
例如:
https://staserver.example.com:7022/STA/
-
-
在 "This Connection is Untrusted" 屏幕上选择 I Understand the Risks。
-
单击 Add Exception。
-
要为组织指定证书,请在 "Add Security Certificate" 屏幕上单击 Get Certificate,然后选择相应的文件。
-
单击 Confirm Security Exception。